1 Introduction
[hide]
AdaptiveWorkflow runs a sequence of processes the way an operator would. It runs a process, asks which way to go, measures the image and chooses by the result, and carries on. We design that sequence once, as a workflow blueprint, blueprint for short, and run it whenever it is needed.
It's not that PixInsight lacks a way to run several processes in a row: ProcessContainer does it. A container runs the same steps in the same way every time, but a real processing session is not like that. It depends on the data: is there a gradient, how noisy is the image, is it stretched already, is the star halo too large? Of course, ProcessContainer is mostly meant to be used to save some static recipes, or as a way to save a guiven sequence, but not an adaptive workflow. AdaptiveWorkflow is.
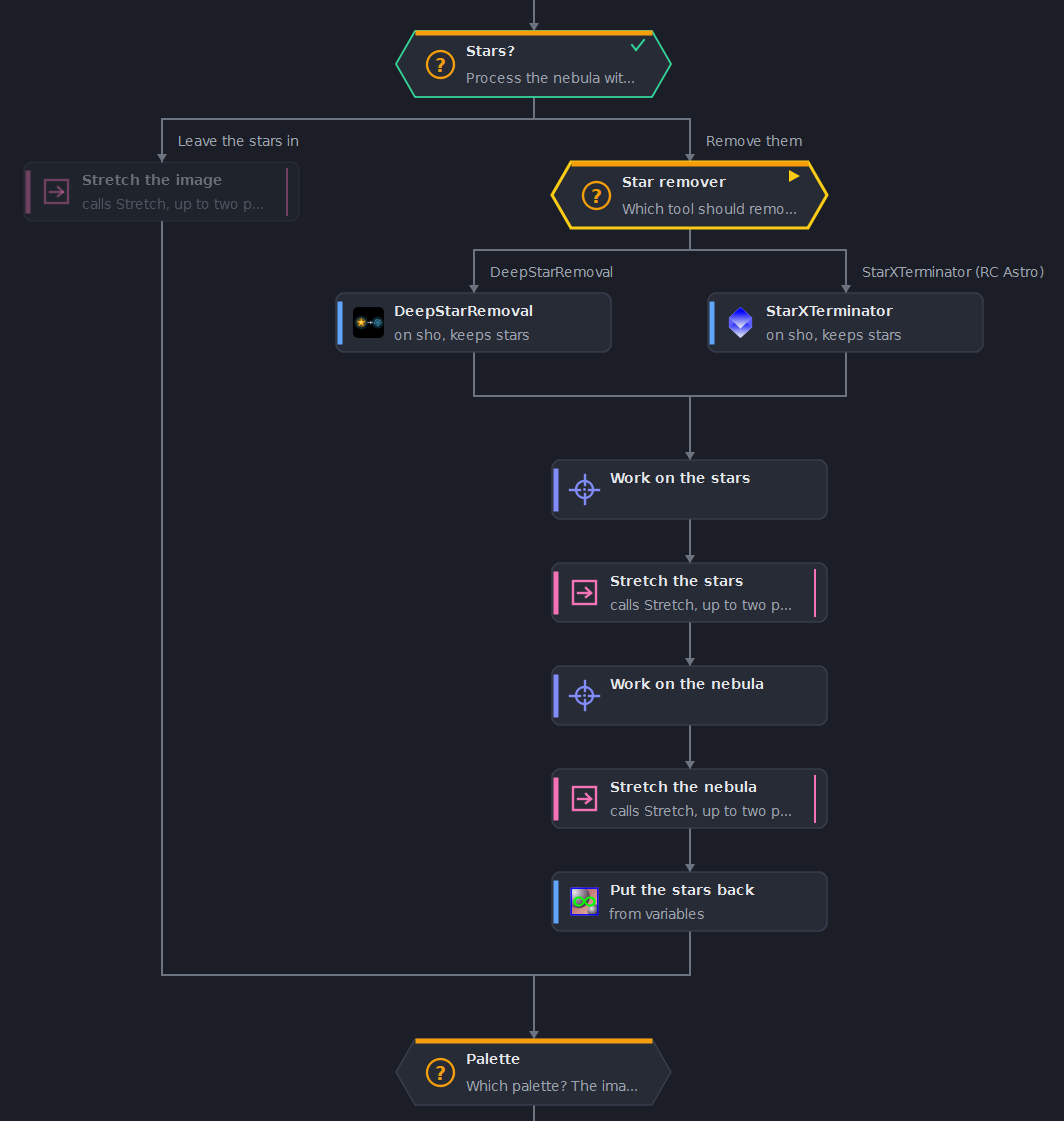
A blueprint is drawn as a flowchart, and the chart arranges itself. Every step has one way in and one way out; a decision (a question, or a test on a measurement) fans out into routes that join again below it, so there are no wires to cross and nothing to align by hand. The steps are:
- Process: a stored process instance to run, with any of its parameters set to be asked, or taken from a variable.
- Ask: a question for the operator. Each answer is a route of its own.
- Branch: a decision made by the workflow, by testing a measurement or an earlier answer against a value.
- Measure: a measurement of the image (noise, median, and others), kept in a variable.
- Message: a note for the operator, shown until Continue is clicked.
- Images and Work on: a request for one of the open images, kept under a name, or a choice among image files by what their headers say (the frames of a session); and a step that makes one of the kept images the one the following steps work on. They are what lets a blueprint handle one image, view, some of them, and a whole session with hundreds of them.
- Route: a call to a named sequence of steps that several places can share.
- Script: a script that is installed in this PixInsight installation, chosen from the SCRIPT menu's list. The blueprint keeps its name, never its code (blueprints are code-free), and flags a script that is not PixInsight's.
Each process step stores the process instance's own definition, so if a step is added via a process icon, once added, the original process icon can be deleted and the step still works. A blueprint is saved to a file, with the extension .awf, to keep it and to share it. It can also be kept as a process icon, and then it is applied to an image like any other process: the whole workflow becomes one step of that image's history, and one Undo takes all of it back.
Chapter 3 builds a small blueprint step by step, and says where blueprints are easy to make and where they are not.
2 Setup and Installation
[hide]
The only official distribution of AdaptiveWorkflow is through DSC Hub, our free PixInsight process for installing and updating everything Deep Sky Colors makes. One address covers every one of our processes:
https://repo.deepskycolors.com/
Adding that repository to PixInsight installs DSC Hub, and PixInsight handles that installation itself, with our Developer and Repository certificates verified before it completes. We then open PROCESS > DeepSkyColors > DSCHub, select AdaptiveWorkflow in the list, and click Download and install.
DSC Hub checks every download against a catalog that is digitally signed, and refuses anything whose checksum does not match. PixInsight then verifies the module's own signature every time it loads it, so a module altered after we published it is refused.
Keep that repository in the list. DSC Hub tells us at startup when an update for AdaptiveWorkflow is waiting, and installs it in a couple of clicks.
2.1 Launching AdaptiveWorkflow
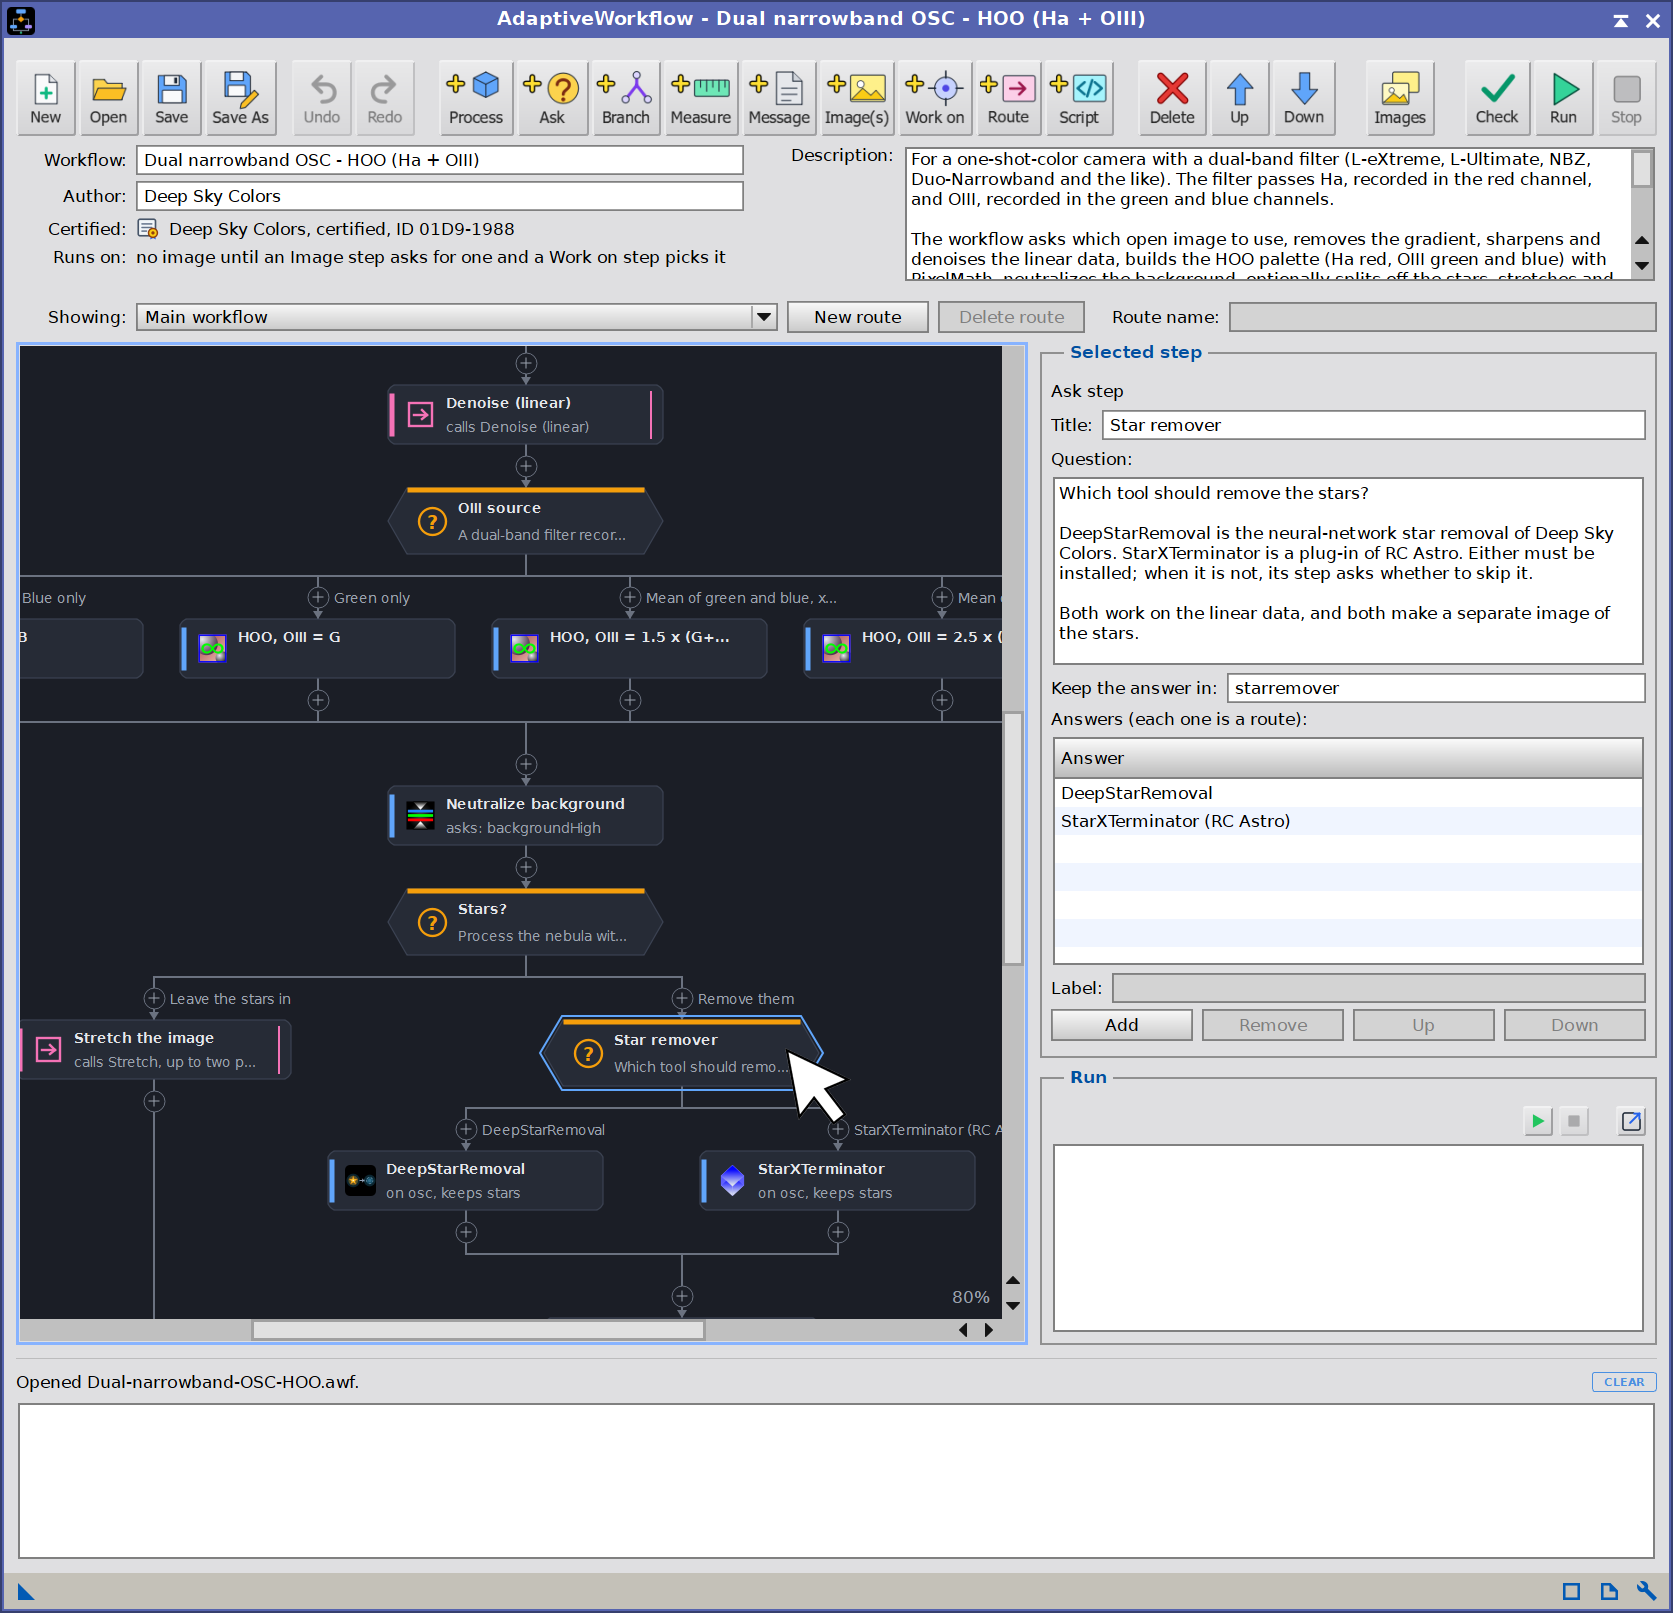
In Process Explorer or via the PROCESS menu, AdaptiveWorkflow is listed under the DeepSkyColors and Global categories as AdaptiveWorkflow. Double-clicking it opens the designer, the one window where blueprints are made, edited, checked and run (see 4).
The control bar of the designer carries three things worth knowing about:
- The drag triangle: dragging it makes a process icon that holds a copy of the blueprint as it is at that moment. That icon is how a blueprint is applied to an image or executed globally (see 9.2). An AdaptiveWorkflow process icon can also be imported back into the designer, to edit the blueprint it holds.
- The documentation button, which opens this page.
- The wrench: it opens the Preferences window, which also leads to the license dialog (see 4.7 and 2.2).
An icon can be made from a blueprint that has errors, but it cannot be executed. PixInsight only grays out Execute in the global context on such an icon, without saying why, so when the icon is made the Process Console lists the first of the errors (up to six), and the log of the designer lists them all.
2.2 Licensing
AdaptiveWorkflow is licensed software with a 30-day trial, which starts the first time the module runs. While the trial lasts, everything works and the Process Console says how many days remain whenever the designer is opened.
When the trial ends, AdaptiveWorkflow stops until a license is registered. The designer does not open: a window says that the trial has ended and offers Get my license, which opens the purchase page, and OK, which opens the registration dialog. A blueprint kept as a process icon does not run either, whether it is executed from the icon, from a Process Container or from a script: the run stops with a message that says how to register. Nothing is deleted: every blueprint and every icon is exactly as it was, and registering brings them all back at once.
To register during the trial, we click the wrench on the designer's control bar, then License and version information..., then Click here to register. After the trial, OK in the window above leads straight to the registration dialog. It asks for the Email address used when purchasing and the Registration key, the code received with the license. Its status line asks for both until enough of the key is present, then says Valid key. Click Register to activate. when the key and the address agree, and Key does not match this email address. when they do not. The license information window shows the version, and either the days remaining in the trial or the address the module is licensed to.
The license is read again every time the designer is opened and every time a workflow starts, so registering takes effect at once, with no restart.
A license is also what lets a blueprint be certified when it is saved (see 11). During the trial, blueprints are saved without a certificate, and they can be certified later, by opening them and saving them once the license is registered.
3 A first blueprint
[hide]
This chapter builds a small blueprint from nothing, one click at a time, so that the rest of the documentation has something to hang on. It takes a quarter of an hour. It uses almost every idea that matters in a post-processing blueprint: a measurement, a decision made by the workflow, a question for us, a parameter that gets its value from a measurement, a parameter we are asked about, and a route. The chapters that follow describe each of them in full.
3.1 What is easy, and what is not
A post-processing blueprint is easy to make. It works on one image, or on a few we choose, and it is a sequence of processes with a few decisions in it. For most of them, the steps we need are the ones in this chapter: a process, now and then a question, and when we want the workflow to decide by itself, a measurement and a branch. The parameters we are not sure of are marked to be asked when the blueprint runs, and the rest is stored. Nothing has to be written, and a mistake is undone with Undo. A blueprint of this kind gets complicated only when we ask a lot of it: many measurements, each leading to its own decisions, routes within routes, multiple masks. That takes more design, but it is the same few ideas used more often.
A preprocessing blueprint is another matter, and even a basic one grows quickly. The reasons are in the data, not in AdaptiveWorkflow:
- It works on files, many of them, not on an image. The workflow has to find the right frames (the lights, and the darks, flats and bias that belong to them), and it can tell them apart only by what their FITS headers or filenames say, which differs from one camera and one capture program to another. Creating a preprocessing blueprint for our own datasets should not be difficult. Creating one to be used by others takes more effort, and it will be more difficult making it fool-proof.
- Each kind of frame becomes a master, and each master has to match the lights: the darks by exposure, the flats by filter, perhaps by binning, gain and temperature. A master can be made by AdaptiveWorkflow, or it can be one we already have.
- The stages hand files to each other through folders: calibration writes files, cosmetic correction and debayering read and write more, registration writes more, and integration reads them all. The processes involved (ImageCalibration, StarAlignment, ImageIntegration) take tables of file paths and have many parameters.
- The data varies: a color camera or a mono one with filters, a camera with bias or without, flats with their own darks, a night that lacks a kind of frame. A blueprint has to say what to do in each case, or stop and say what is missing.
- A mistake is expensive: it may show up hours into a run, on a lot of data.
A blueprint will not be as flexible as WBPP. WBPP is a general-purpose tool: it sorts any session into groups by itself, and it deals with the combinations of cameras, filters, exposures and calibration frames that people bring. A blueprint does not try to. It is made for a data set we know: we decide how its frames are told apart (by their headers, or by which files are added), which processes run, with which settings, and what we are asked when it runs. For a session that is not too complex, such as one camera, a known number of filters and the usual calibration frames, a blueprint tailored to it can do most of the work WBPP would do, and does it the way we want. Two things to know. A blueprint has no loops yet, so a set with several filters is processed by naming each filter in turn (an Images step with a rule on FILTER, then a call to a route that does the work), which repeats a pair of steps for each filter; and the weights of the frames are either one of ImageIntegration's own or a formula of ours over the measurements (see 6.6). The two preprocessing blueprints in the examples (see 10) are starting points, written to cope with as many situations as is reasonable. A blueprint for one's own data is usually shorter than they are.
A good deal of what AdaptiveWorkflow can do is for the cases that need it, and most blueprints leave it alone:
- In post-processing, it is rare to need: running on image files instead of an image, and the work folder (see 8); the Images step that chooses files by their keywords, from a folder, or by asking for one (see 6.6); saving the image a step makes and using its file (see 6.1); keeping the measurements of a process; a Branch with several tests; an enumeration with a list of choices.
- In a preprocessing blueprint for a known data set, much of the machinery of the shipped examples often applies: reading the filter and the exposure from the headers (they can be typed in the rules), the question about master frames, the frame kinds that may be missing, and the optional stages (cosmetic correction, frame selection, local normalization, drizzle) that the data does not need. What is left is the calibration, registration and integration steps with their settings.
The rest of this chapter is post-processing, with nothing more than the basics.
3.2 The recipe
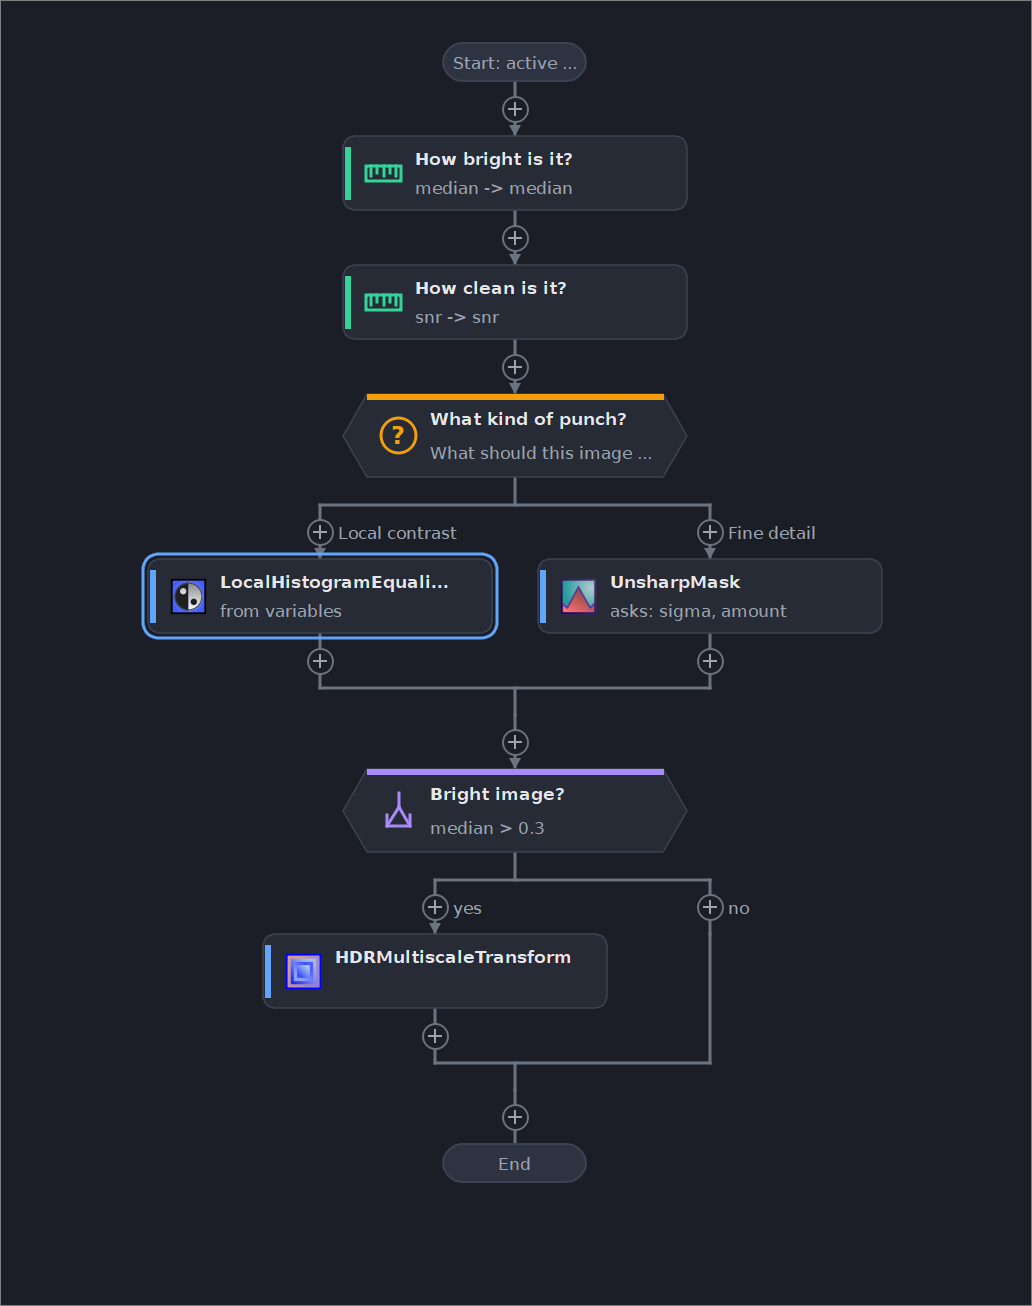
We build Punch for a stretched image. It is applied to the active image, which has to be stretched already (not linear), and it gives it a little punch. The workflow:
- measures how bright the image is (its median) and how clean it is (its signal to noise);
- asks which kind of punch to give: local contrast (LocalHistogramEqualization), whose strength it takes from how clean the image is, or fine detail (UnsharpMask), whose radius and strength it asks us about;
- looks at how bright the image is, and if it is bright, compresses its highlights with HDRMultiscaleTransform, because both kinds of punch push the highlights up;
- and, at the end, asks whether to tidy the color too, which is a route of its own: SCNR to take out the green that local contrast tends to leave, and a note to look at the result.
Nothing in it is a rule to follow: the numbers are reasonable starting points, and the point is how the blueprint is made. We need a stretched image to try it on at the end.
3.3 Starting
- Open AdaptiveWorkflow from the PROCESS menu (see 2.1). If the window already holds a blueprint, click New in the toolbar (or press Ctrl+N).
- In Workflow:, type
Punch for a stretched image. - In Description:, type what it is for: Adds local contrast or fine detail to a stretched image, and looks after bright highlights.
- Leave Runs on: as it is. A new blueprint runs on the active image, which is what we want. The Author: row shows the name set in the Preferences.
The chart shows Start and End with nothing between them. Every step we add goes between them. The toolbar buttons that add steps are the second group, from Process to Route (see 4.1).
3.4 Two measurements
A Measure step looks at the image, and keeps the number in a variable, a name that later steps can use.
- Click Measure. A box appears on the chart, selected, and the Selected step box on the right shows its fields.
- Set Title: to
How bright is it?. The title is what the chart shows. - In Measure:, choose
median. A new Measure begins as noise, so this has to be changed. - Leave Of image: on (the image being worked on), which is the active image.
- In Keep it in:, type
median. The variable begins as noise, like the measurement, so change it too. - Click Measure again. The second step is added after the first. Set Title: to
How clean is it?, Measure: tosnr, and Keep it in: tosnr.
The snr is the background level over the noise, so a higher number means a cleaner image (see 6.4 for all the measurements). We now have two variables, median and snr, set before anything else happens.
3.5 A question that chooses between two processes
An Ask stops the workflow, puts a question to us, and runs the steps of the answer we choose. Each answer is a route of its own.
- With the second Measure still selected, click Ask. It goes after it.
- Set Title: to
What kind of punch?. - In Question:, write what we are asked: What should this image get? Local contrast brings out structure in nebulae and galaxies. Fine detail sharpens small features.
- A new Ask has two answers, Yes and No. In the list of answers, select the first and change its Label: to
Local contrast. Select the second and change its label toFine detail.
The chart now shows the question as a hexagon that fans out into two routes, each labeled with its answer, and joins them again below. Each route has a plus on it, which is where its first step goes.
Local contrast: a parameter that takes its value from a measurement
- On the chart, click the plus at the top of the Local contrast route. It turns blue: the next step goes there.
- Click Process. A window titled Choose a Process opens. In its Filter box, type
LocalHistogramEqualizationand double-click the process in the list of all installed processes. - The step is added to the route, with the process's own default parameters. The Selected step box lists them. Select
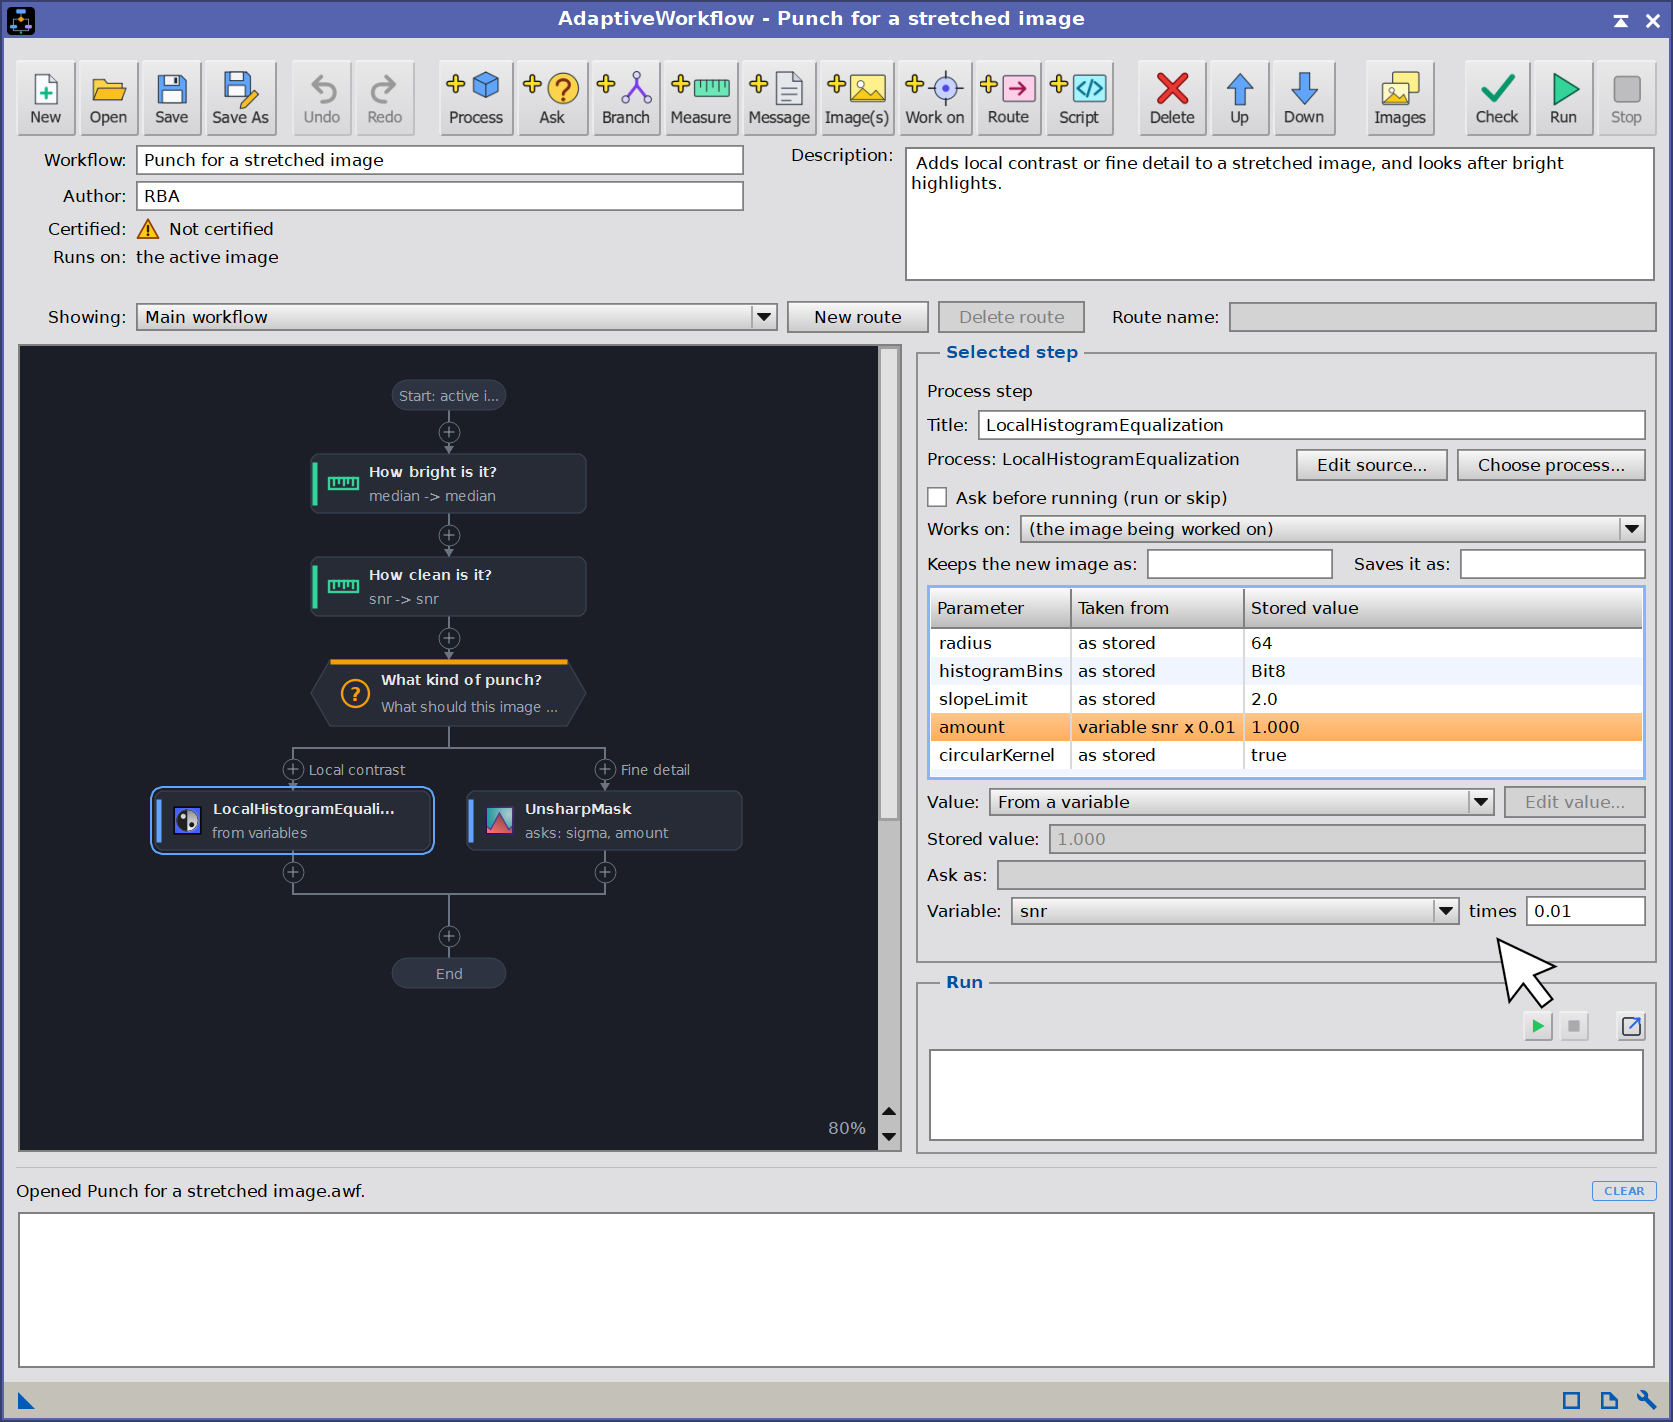
amountin the list. - In Value:, choose From a variable. In Variable:, choose
snr, and in times type0.01.
The list's Taken from column now reads variable snr x 0.01 for amount. When the step runs, its amount is the image's snr times 0.01: a clean image with an snr of 30 gets an amount of 0.3, and a noisier one gets less, which is the right way round, because local contrast amplifies noise. (The amount of this process goes from 0 to 1. The snr of a stretched image is typically between 10 and 50, but yours may be different: the log shows the value that was used, and the factor is there to be changed. A value outside what the process accepts is not corrected: the step fails, and says which parameter and what its range is, so a factor of 0.1 on an snr of 10 would stop here with an amount of 1.0088.) The other parameters keep the values they were stored with.
Fine detail: a process whose parameters we are asked about
- Click the plus at the top of the Fine detail route, then Process, and choose
UnsharpMaskin the same way. - Select
sigmain the list of parameters. In Value:, choose Ask the operator. In Ask as:, write what we should read: Radius of the sharpening in pixels (1 to 2 for fine detail, 3 to 5 for larger structures). The value shown in Stored value: is where the question starts; type2. - Select
amount, and do the same: Ask the operator, Ask as: Strength (0.3 is subtle, 1 is strong), stored value0.5.
When the blueprint reaches this step, a row for each of these two parameters appears in the Run box, starting from the stored value, with the buttons Run this step and Skip. The parameters we did not mark are not asked: they run with the stored value (see 6.1).
3.6 A decision made by the workflow
A Branch tests a variable and takes one of two routes, yes or no, with no question for us. Here it protects the highlights of a bright image.
- On the chart, click the box of the question (What kind of punch?) to select it, so that the next step goes after the whole question and not inside one of its answers. Click Branch.
- Set Title: to
Bright image?. - Under Take the 'yes' route when, choose the variable
median, the comparison>and type0.3as the value. The variable is chosen from those that are set before this step, on every path that reaches it. The median is one of them. - The branch has two routes on the chart. Click the plus on the yes route, then Process, and choose
HDRMultiscaleTransform. Its stored parameters are fine as they are. - Leave the no route empty. An empty route is just a way through.
A median above 0.3 is a bright image. When the workflow reaches the Branch it compares the median measured at the beginning with 0.3, and the highlights are compressed only if it is higher. The log says which way it went.
3.7 Check, save and run
- Click Check (F7). The status line says The blueprint can run., and the log says Check done: no problems found. If something is wrong, the log lists it, and each line names the step (see 4.5).
- Click Save (Ctrl+S) and give the file a name. The blueprint is a
.awffile. - Open a stretched image in PixInsight and make it the active window. Work on a copy: every step changes the image in place, and each can be undone.
- Click Run (F5), or the small play button in the Run box.
The chart follows the run. The two measurements go by, and the log writes them: Measured median = 0.21, Measured snr = 28. The workflow then stops at the question: the Run box shows it, with the answers in a list, and Continue. We choose an answer. With Local contrast, the step runs with an amount worked out from the snr, and the log shows it: Run: LocalHistogramEqualization (amount=0.28). With Fine detail, the Run box shows the two parameters we marked, starting from the values we stored, with Run this step and Skip. At the Branch, nothing is asked: the log says Bright image?: median > 0.3 is true (or false), and the workflow takes that route. The run ends with Finished. in the status line, and only then does the Run box offer Undo this run, which takes the image back to how it was.
Everything the workflow did is a step of the image's history, so PixInsight's own Undo works as well (see 9.1).
3.8 A final, optional step as a route
A route is a named sequence of steps kept apart from the main flow, which the main flow can call from one place or several. We use one for the last, optional part: tidying the color.
Making the route
- In the Showing: row, click New route. A route is made and shown, empty, with only Start and Return.
- In Route name:, type
Tidy the color. - Click Process and choose
SCNR. In its parameter list, selectamountand set Value: to Ask the operator, with Ask as: Amount of green removed (0 = none, 1 = all; 0.8 keeps some of the natural tint). - Click Message. A Message shows a text and waits for Continue. Write: Compare the stars and the background with and without this step. If you do not like it, finish the run and then use Undo this run.
Both steps are in the route, in order. (A route is filled like the main flow: the step goes after the selected step, or where a plus was clicked.)
A route:
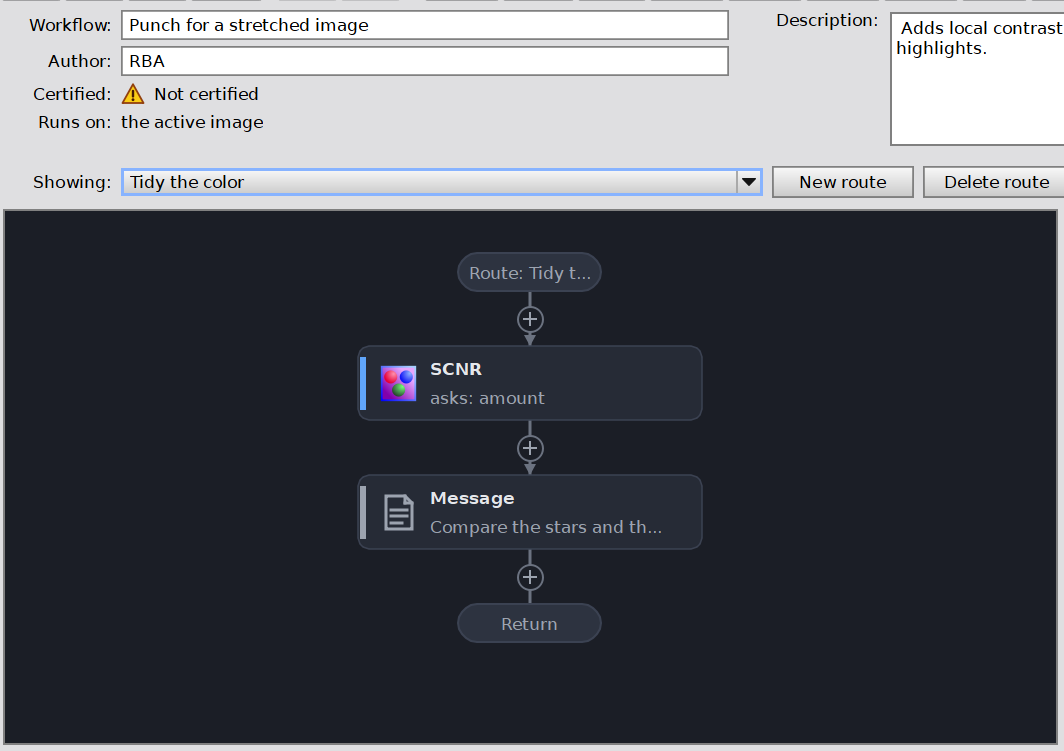
The route Tidy the color, shown on the chart through the Showing row: an SCNR step that asks for its amount, and a message.
Calling it from the main flow, as an option
- In the Showing: list, choose Main workflow.
- Select the last step (the Bright image? branch) and click Ask. Set its Title: to
Tidy the color?, its question to Tidy the color as well?, and leave the answers Yes and No. - Click the plus on the Yes route, then Route in the toolbar. The Selected step box has a Route: list, which offers only the routes this place may call. With a single route made, it holds just Tidy the color, and the step already has it chosen: the chart shows the call as soon as the step is added, and there is nothing to pick. (With several routes, this is where we would choose one.)
- Leave the No route empty.
The step reads Route: Tidy the color on the chart. A route runs where it is called, with the same variables as the rest of the workflow, and the box of the step says from how many places it is called. Check the blueprint again and save it. Run it once more on a copy of the image: after the branch, the question asks whether to tidy the color, and with Yes the route runs, asking for the amount of green to remove before it goes on.
Had the route been a good idea for other blueprints, the same steps could have been called from several places in this one. This is what routes are for (see 6.8).
3.9 Where to go from here
This blueprint has used a Process, an Ask, a Measure, a Branch, a Message and a Route, with a variable and a question for the operator. The steps are described in 6, variables in 7, and running in 9. The example blueprints (see 10) show larger designs of the same kind, and the usage tips (see 12) collect a few habits that make blueprints easier to read and to change. The keyboard shortcuts are in the toolbar section (see 4.1).
4 The designer window
[hide]
From the top, the designer holds the toolbar; a block that says what the blueprint is called, who made it and what it is for, whether it is certified, and what it runs on; a row that says which of its routes is shown; the chart, on the left; the Selected step and Run boxes, on the right; and, at the bottom, a status line and a log. The title of the window is AdaptiveWorkflow, followed by the name of the blueprint (or the name of its file, or untitled), and a star while there are changes that are not saved.
4.1 The toolbar
Each button is an icon with its name under it. Hovering one shows what it does. The buttons are in four groups.
File and history
 | New | starts an empty blueprint. When the one open has changes that are not saved, we are asked first whether to discard them. |
 | Open | opens a blueprint file (.awf). The file windows open where they were last used: one folder for blueprints, another for images, and another for work folders. |
 | Save | saves the blueprint to its file, and asks where when it has none yet. |
 | Save As | saves the blueprint to a new file. |
 | Undo | takes back the last change to the design. See 4.6. |
 | Redo | puts back what was undone. |
Adding steps
Each of these buttons adds one kind of step, so their labels leave the word add out. What says it instead is the yellow plus beside each icon, the same sign PI LaunchPad uses.
 | Process | adds a process to run: one of the process icons on the workspace, or any installed process. See 6.1. |
 | Ask | adds a question for the operator. Each answer is a route of its own, and the routes join again below. See 6.2. |
 | Branch | adds a choice of route by a test: a measurement or an earlier answer against a value. See 6.3. |
 | Measure | adds a measurement of the image (noise, median, and others) into a variable, for a later test or parameter. See 6.4. |
 | Message | adds a message for the operator, shown until Continue. See 6.5. |
 | Image(s) | adds an Images step: a request for one of the open images, kept under a name, or a choice among image files by what their FITS headers say. See 6.6. |
 | Work on | adds a step that makes one of the kept images the one the steps work on, until another Work on step. See 6.7. |
 | Route | adds a call to a named route: steps kept apart, so that several places can run the same ones. The routes themselves are made with New route. See 6.8. |
 | Script | adds a script that is installed in this PixInsight, chosen from a list. See 6.9. |
Design and run
 | Delete | deletes the selected step, and the routes inside it. |
 | Up | moves the selected step up within its route. |
 | Down | moves the selected step down within its route. |
 | Images | chooses what the workflow runs on: the active image, a set of image files, or no image until the workflow asks for one. See 8. |
 | Check | looks for problems in the blueprint without running it. See 4.5. |
 | Run | runs the workflow. See 9.1. |
 | Stop | stops the run after the step that is executing. It is on only while a workflow runs. |
Delete, Up and Down need a step to be selected. Undo and Redo are on only when there is something to undo or redo. While a workflow runs, the design is locked: everything that changes it is off, and only Stop (and the two Save buttons) stay on.
Keyboard shortcuts
| Ctrl+N | New. |
| Ctrl+S | Save. |
| Ctrl+Z, Ctrl+Y (or Ctrl+Shift+Z) | Undo, Redo, of the design. In a text box, Ctrl+Z undoes the typing instead. |
| Delete | Delete the selected step, when the chart has the focus (click it first). In a text box, Delete deletes text. |
| F7 | Check. |
| F5, Shift+F5 | Run, Stop. Also in the detached Run window. |
| Ctrl+wheel, middle button | Zoom the chart in and out, and back to 100%. |
A shortcut does what its button does, and does nothing when the button is off (during a run, for instance). It reaches the window when the control with the focus does not use the key. Open, Save As and moving a step have no shortcut: Ctrl+O and Ctrl+Shift+S belong to PixInsight, which opens and saves images with them.

4.2 Name, author, what it runs on, and routes
- Runs on: says in words what the workflow works on: the active image, the number of image files and where their results are saved, or no image until an Images step asks for one and a Work on step picks it. It turns red when the plan cannot be carried out, and says why. It is changed by clicking the text itself, or the Start block of the chart (which reads Start: active image, or whatever the workflow runs on, and shows a hand when the pointer is over it), or with the Images button of the toolbar: all three open the same window. The Start block of a route does not do this, and nothing does while a run is on (see 8).
- Workflow: the name of the blueprint. It appears in the window title, in the first line of the log, and as the suggested name of the file.
- Description: what the blueprint is for, in a box of four rows beside the name and the author. It is kept in the file and shown to whoever opens it, and it scrolls when it is longer than the box.
- Author: who made the blueprint. A new blueprint starts with the name last written here, and is saved with it. A blueprint that someone else made shows its author and does not let us change it. The first time we change such a blueprint, it becomes ours: we are its author from then on, and it records that it is based on theirs. See 11.
- Certified: the line under those fields. A certified blueprint reads the name of its author, certified and the ID of the license, such as Jane Doe, certified, ID 7F3A-91C2, with a certificate icon before it. One that is not reads Not certified, with a warning sign. One that was changed after it was certified says so, in red. When the blueprint was made from someone else's, the line ends with whose it is based on. See 11.
- The scripts chip: at the end of the Certified line, only when the blueprint runs scripts that are not PixInsight's: ! 2 scripts, orange when they are signed and red when one is not. Its tooltip lists them with the reason, and a click goes to the first. See 6.9.
- Showing: the part of the blueprint the chart shows: Main workflow, or one of its routes. New route makes a route and shows it, ready to be filled with steps. Delete route deletes the route shown, with its steps and every step that calls it, after asking. Route name: renames the route shown. See 6.8.
4.3 The chart
The chart is drawn from the blueprint alone: Start at the top, End at the bottom (a route starts with its name and ends with Return), and between them the steps in the order they run, joined by arrows. It lays itself out again with every change, and scrolls when it is larger than its window: with the mouse wheel, and sideways with Shift and the wheel.
The chart can be zoomed: Ctrl and the wheel zoom in and out about the pointer, from 50% to 250% in steps, and the middle button sets it back to 100%, the scale of the display. The boxes, their text and their icons all scale, and everything works as at 100%: selecting, dragging, the plus signs, the marks of a run. The zoom shows in the bottom right corner of the chart when it is not 100%, and is kept until PixInsight is closed.
Reading it
Every step is a box with its title on the first line and, under it, what it asks, tests or measures. A step with no title of its own shows the name of its process, or its kind. The chart wears the PI ThemeStudio theme that is applied, if any: the ground, the text of the boxes, the lines and the selection take its colors, and the colors that mean something (the accent of each kind of step, the marks of a run) never change.
Without a theme the chart has its own dark ground. The accent on the box tells the kind of step at a glance: Process blue, Ask amber, Branch violet, Measure green, Message gray, Images yellow, Work on indigo, Route pink, and Script cyan. A Script step whose script is not part of PixInsight carries a warning at its bottom right corner: orange when the script is signed by a developer, red when it is not signed at all. The two kinds of decision, Ask and Branch, are drawn as hexagons with the accent across the top, and fan out into their routes. A Branch has a yes route and a no route, and an Ask has one route for each answer, labeled with the answer. A Route step is drawn with an extra bar on its right.
The selected step has a blue ring around it. Each box also carries an icon on its left: the process's own icon for a process step, and a small drawing for the other kinds (a question mark, a note, a picture, and so on).
While a workflow runs
The chart shows where the run is. The step being executed has a yellow outline and a yellow triangle, a finished step a green outline and a check mark, a step that failed a red outline and a red cross, and a step the run did not take (the other routes of a decision) is drawn faded. The chart follows the run into a route when the run goes into one, and the plus signs are not offered meanwhile.
When a run finishes, the End of the flow shines: a green glow that pulses for a few seconds and then stays while the marks of the run are on the chart. With a PI ThemeStudio theme applied it takes the theme's selection color. A run that fails or is stopped does not shine.
Selecting, and choosing where a step goes
A click selects on release, so a click that drifts off the box it started on does nothing. Clicking a box selects the step and shows its properties in the Selected step box. Clicking the background selects nothing.
Between steps, at the start and end of every route, there is a small circle with a plus: an insertion point. Clicking one chooses it (it turns blue), and the next step we add goes there. See 5.1.
Dragging
A step can be dragged to another place. The drag begins after a few pixels of travel. Every plus where the step may go lights up in yellow, the one under the pointer grows, and the step, with everything inside it, follows the pointer as a translucent copy, while the original stays faded where it was (with Ctrl held, to copy, it stays as it is). Releasing it on a plus moves it there; releasing it anywhere else does nothing. Near the edge of the chart, it scrolls, so that a place out of sight can be reached. See 5.2.
4.4 The Selected step and Run boxes
The Selected step box shows what is selected and lets us edit it. Its first line says which kind of step it is, and under it every kind of step has a Title: field. The title is what the chart shows in the box, and it can be left empty, which gives the default. With nothing selected the box says so, and what the plus signs are for. Section 6 describes what each kind of step shows there.
The Run box is empty until the workflow stops to ask something. Then it shows the question, and what is needed to answer it. When a run has ended, it says how, and offers Undo this run and Back to editing. See 9.1.
The button in the top-right corner of the Run box detaches it into a window of its own, titled AdaptiveWorkflow: Run. That window is not a dialog: it stays open, and the rest of PixInsight can be used while it is, which is the point of it: put it on a second screen, or beside the image the workflow asks about, and answer there.
Everything in the box works the same in either place, and a run goes on as it was. Closing the window, or clicking the same button, which then shows an arrow back in, puts the box back in the designer. The window remembers where it was and how big, until PixInsight is closed. When the workflow stops with a question, the window comes in front of the others.
The Run box, detached:
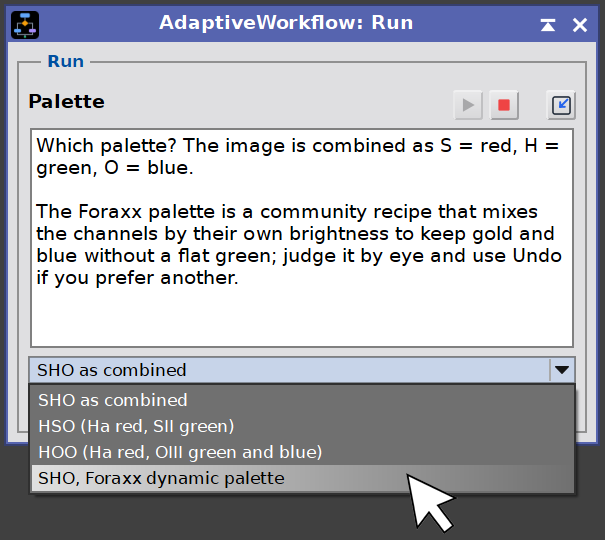
The Run box in a window of its own, independent from the designer, while the workflow waits for an answer.
The top row of the Run box:

The heading of the Run box, the play and stop buttons, and the detach button in the corner.
In the first row of the Run box, to the left of the detach button, two tiny buttons, play and stop, do what Run and Stop of the toolbar do. They are the ones to use when the box is detached.
Editing is by typing and choosing, and every change is made on the blueprint as it is typed: there is no Apply button.
4.5 The status line and the log
Under the chart, the status line says what just happened or what the window is waiting for. It turns red when it is reporting a problem. Under it, the log keeps the results of the checks and the record of the runs of the session.
The log is never cleared by anything the workflow does: a check or a run adds to it, and it is cleared only by CLEAR, the small word at the right end of the status line. The events of the session start with the time, as [14:32:07]: Checking workflow... and how the check ended, the start of a run, how it ended (finished, stopped or failed, and why), and every error. The lines between them are the steps of a run. A thin bar above the status line can be dragged to give the log more or less of the window; the window remembers the height.
The log:
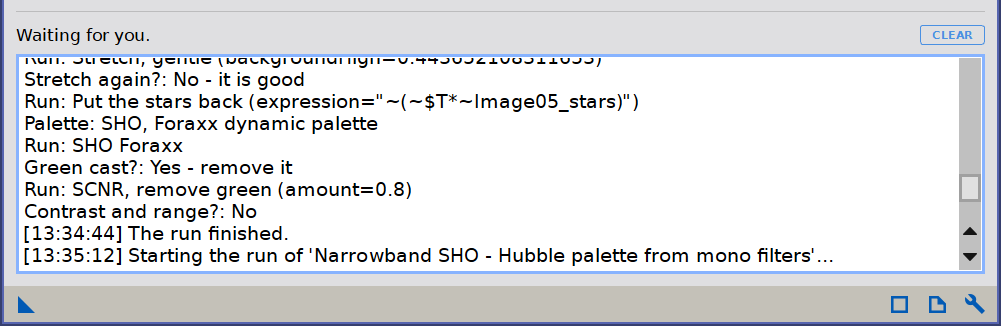
The status line with CLEAR at its right end, and the log under it with the events of a session, each with the time.
Check looks for problems without running anything. Each is a line in the log, starting with ERROR or warning. An error stops a run (and keeps a process icon of the blueprint from being executed); a warning does not. The checks include:
- a process step with no process, or with a stored process that cannot be used;
- a parameter set up twice, or one that is not in the stored process, or one that cannot be asked, computed or turned into text with variables (see 6.1);
- a variable or an image that is read where it is not set on every path that can reach the step that reads it;
- an Ask with fewer than two answers, with an empty answer, or with two answers of the same name;
- a Branch with nothing to test or to compare with, and a Measure with no variable for its result, or one that reads a keyword and names none;
- a variable name or an image name that is not a plain name (letters, digits and the underscore), and a name used for an image and for a variable at once;
- a route that has no name, has the same name as another, or calls itself, and a route that is never called (a warning);
- a blueprint that runs on a set of image files and asks for images or keeps new ones, which it cannot do;
- a blueprint with no steps (a warning, but Run does not start with nothing to run);
- and, as warnings, each process the blueprint uses that is not installed in this PixInsight, at the first step that uses it. A blueprint made by someone else can use any process: a missing one does not stop the run, because the step then asks whether to skip it (see 6.1), but it is worth knowing about before starting. Run lists only the missing processes it is sure to meet: those used by steps at the top of the main flow. A process used only on the routes of a decision, such as the other tool of a pair of NoiseXTerminator and MLDenoise, is left out when a run starts, because the run may never get there, and is listed by Check, with that said. Either way, a step that is reached asks whether to skip it.
The status line then says The blueprint can run., or that it can run but there are warnings, or that it has problems. Run makes the same check first, and does not start when there is an error. During a run, the log records every step: a process that ran, with the values that were asked or computed, a measurement and its value, which way a decision went and why, a step that was skipped, an image that was chosen or kept, and the end. After each process it also gives the image's mean before and after, and says when it did not change, which is worth noticing when a step reports success.
4.6 Undo and redo
Every change to the design can be undone: adding, deleting, moving or copying a step, and editing any property, a name or a route. The tooltip of each button says which change it would take back or put back. Typing counts as one change for a run of typing in the same box of the same step, rather than one for every key. Selecting another step ends the run of typing, so the next edit is a change of its own. The history holds up to 200 changes, and is cleared when a blueprint is opened or a new one started. It is for the design only: it does not touch images.
4.7 Preferences
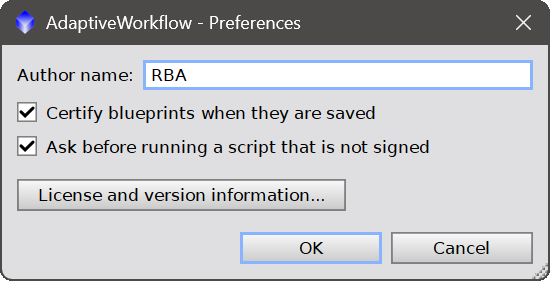
The wrench on the designer's control bar opens the Preferences window:
- Author name: the name a blueprint of ours is made under. A new blueprint starts with it, and so does one we make from someone else's. It is also what the Author field of the designer keeps for the next blueprint, whenever a blueprint is saved.
- Certify blueprints when they are saved: on by default. A blueprint of ours is signed with our license when it is saved (see 11). Turned off, it is saved as a plain file. It needs a license: during the trial the box is off and cannot be changed, and with a license it is on, unless it was turned off.
- Ask before running a script that is not signed: on by default. A Script step that runs a script with no signature at all asks first, and Skip skips it (see 6.9). Turned off, such a script runs without a question. Scripts that are PixInsight's own or signed are never asked about.
- License and version information...: opens the license window described in 2.2.
5 Building a blueprint
[hide]
5.1 Adding steps
One of the nine buttons of the toolbar's second group adds a step, and the step is selected as soon as it is added, with the chart scrolled to show it. Where it goes is decided in this order:
- at the insertion point we chose by clicking a plus on the chart, if there is one;
- otherwise, right after the selected step, inside the same route;
- otherwise, at the end of the route that is shown.
A new blueprint is therefore built by adding steps one after another, each landing after the last. To put a step in the middle, or inside one answer of a question, we click the plus there first.
Each kind of step starts with sensible contents: an Ask begins as the question Run the next step? with the answers Yes and No; a Measure begins as a noise measurement kept in noise (or noise2, and so on, when that name is taken); a Message begins as Continue?. A Branch starts testing the last variable that is set before it, and a Work on step starts on the last image that is kept before it. A Process step first opens the window that chooses the process (see 6.1). A Route step needs a route to call: with none made yet the status line says to make one with New route first.
5.2 Moving, copying and deleting steps
Up and Down move the selected step by one place within its own route. To move it anywhere else, we drag it onto a plus, as described in 4.3. A decision moves whole, with every step inside its routes. Holding Ctrl while dragging copies instead of moving: the copy is shown with a yellow plus at its corner, and the original stays where it was. A copy gets steps of its own, so changing it does not change the original.
Not every plus is a place for every step. A step cannot be dropped into itself or into anything inside it, a move to where the step already is does nothing, and a block that contains a call to a route cannot be put inside that route, because the route would then call itself. Those places stay faint while we drag.
A step moved into another route may read a variable that route does not set. The status line says so as soon as the step lands, saying which problem it now has, rather than at the next check.
Delete removes the selected step. A decision takes its routes with it, and when they hold other steps we are told how many, and asked first.
5.3 Saving and opening
A blueprint is saved as a .awf file. The file is written beside its destination first and swapped in afterwards, so a failed save never leaves a half-written blueprint where a good one was. When a file cannot be opened, the message says why and the blueprint that is open stays exactly as it was. A file larger than 64 MB is refused as not being a blueprint. Opening a file, or starting a new blueprint, while there are unsaved changes asks first.
When image files are in the Images window, the question has a box, Also discard image list, checked by default. Unchecked, the new blueprint keeps the image files and the work folder: a new blueprint takes them with the way they are used, and an opened one takes them too (they show in its Images window, and are used when it runs on files). For an opened blueprint that is somebody else's this is an edit, like choosing its images: it becomes ours, based on theirs.
With a license, saving also certifies a blueprint that is ours: the file carries a signature that covers everything in it, the author included, and the status line says Certified with the ID. A process icon made from the blueprint is certified in the same way. See 11.
6 The steps
[hide]
6.1 Process
A process step runs a stored process instance. The process is chosen in a window titled Choose a Process, with two lists:
- Process icons on the workspace: choosing one keeps the parameters that icon was saved with. The step stores the instance's own definition, so the icon can be renamed or deleted afterwards without affecting the step. The step is titled after the icon.
- All installed processes, with a Filter that matches the name or the category: choosing one takes the process with its default parameters. The step is titled after the process.
A ProcessContainer icon can be chosen too, to bring in a whole sequence at once: each process in the container becomes a step of its own, in the order they are in the container, added one after the other where a new step would go and titled after its process. They are ordinary steps from then on, each with its own parameters, to be asked, computed or changed; the container itself is not kept. It is added in one go, so one Undo takes all of them back. A container cannot replace a step, which is a single process, and one that holds anything besides processes with plain values is refused with a message, as such a process would be.
A double-click chooses. AdaptiveWorkflow itself is not in the list, and neither is the NetworkService process, which is not a tool. Some processes cannot be used in a blueprint: one whose saved definition has anything in it besides plain values (numbers, text, true and false, enumeration elements and tables of those) is refused with a message, because a blueprint only ever stores definitions of that form (see 11).
The Selected step box of a process step holds:
Process: the process this step runs, with Edit source... and Choose process... beside it. Choose process... replaces the process, keeping the settings of every parameter the new one also has. Edit source... opens the stored process as text, which is what PixInsight writes for an instance:
var P = newand the process name, then oneP.parameter = value;line for each parameter.Comments are allowed, and nothing else is. The text is checked when OK is clicked: one that is not accepted is explained, and the window opens again on the text as typed, so it can be corrected or canceled. It must still be the same process. The settings of parameters the new text no longer has are dropped, and the status line says how many.
Ask before running (run or skip): the operator is asked whether to run this step, even when none of its parameters is asked. A step that is skipped is drawn faded, and the workflow goes on.
Works on: the image this step changes. (the image being worked on) is the active image, or the one a Work on step chose; any other entry is one of the images the workflow keeps (see 7).
Mask: an image the workflow keeps that is the mask of the image this step works on, for the length of the step: the process changes the image only where the mask lets it, as with a mask in PixInsight. (no mask) leaves the image with the mask it has. Invert uses the inverse of the mask.
The mask has to be an image of the same size (a gray one, or a color one for a color image), set before the step by an Images step or kept by an earlier step (a star mask a process made, say, with Keeps the new image as:). The mask the image had, or none, is put back when the step ends, whether it worked or not: a mask is never left on an image by a run. Check reports a mask that is not an image the workflow keeps, or that is the image the step works on. A process that makes a new image of its own ignores the mask. The log says Mask: name (and inverted) before the step runs.
Keeps the new image as: for a process that makes a new image (a channel combination, a star image): the name to keep it under. Leave it empty when the step makes none. The step fails, and says so, when it makes no new image, or more than one so that it cannot tell which one is meant.
Keeps what it measured as: for a process that measures what it is given and keeps the measurements in a table, which today is SubframeSelector or SubframeStudio: the name to keep them under. The step reads the table when the process ends, one row for each frame (FWHM, eccentricity, PSF signal weight, noise, the number of stars and the rest), and an Images step can then choose the frames that pass rules about those numbers, or the best one (see 6.6).
SubframeSelector is set up with
routineon MeasureSubframes andnonInteractivetrue, so that it measures and returns without opening its own window, and the frames to measure as a table filled from a list of files. SubframeStudio (Deep Sky Colors) is set up with just itsframestable, rows of [enabled, path] filled from a list of files, and measures when it is run. It measures only: nothing is written, and no frame is copied or deleted. The table is the number of frames when it is tested or written in a message.Saves it as: also saves that new image as a file, so that later steps can name the file: {name.path}, where name is what the image is kept as. It is a file name or a path; a name without a folder goes in the work folder of the Images window (see 8), and .xisf is added when there is no extension. {variables} in it are filled in. It is how a master frame, made by integrating a list of files, is handed to the calibration that uses it. Empty: the image is not saved.
The parameters
Under those, a list shows every parameter of the stored process in three columns: Parameter, Taken from, and Stored value. Selecting one shows how it is set, with a Value: list that offers four ways:
As stored: the process runs with the value it was saved with. That value is edited in the Stored value: field: numbers, yes/no (a true or false choice) and enumerations are typed or chosen right there, and a value that does not fit the parameter is not kept, turns red, and the line under the list says what the parameter takes. Texts and tables are edited with Edit value..., which opens a larger window. The whole definition can always be edited with Edit source.
Ask the operator: just before the step runs, the operator is shown the parameter, starting from the stored value, and types the value to use. Ask as: is what the operator reads next to the value; {name} inserts a variable, and when it is empty the parameter's own name is used. Up to eight parameters can be asked in one step. A value that does not fit the parameter is refused and asked again. A table cannot be asked.
An enumeration is shown by its element (
ToFloat), and either the element or the whole constant (SampleFormatConversion.ToFloat) can be typed. It is asked as the whole constant unless the step lists Choices:, a field that appears for it: the elements the operator may choose, separated by commas (the class in front of an element is dropped, so either form works), such asWinsorizedSigmaClip, SigmaClip, PercentileClip. The operator is then shown a list of them, starting at the one the step has, and the step runs with the one chosen; an answer that is not on the list is refused. PixInsight does not tell a blueprint which elements a parameter has, so the author writes them: they are the names that follow the class in the source of the step (see Edit source...).From a variable: the value is that of a Variable: chosen from those that are set before this step, times a factor (1 by default). A yes/no parameter is true when a number is not zero, and a text is true unless it is empty, false, 0 or no. A text parameter takes the variable's value as text, or the id of an image the workflow keeps. An enumeration and a table cannot come from a variable.
Stored text, with {variables}: for a text, or a table of texts: the stored text is used, with every {name} in it replaced when the step runs, by the id of an image the workflow keeps, or by the value of a variable. It is how a process that takes view ids inside an expression or a table, such as a channel combination, is pointed at the images the operator chose. A name that is neither stays as typed.
A table can be filled from a list of files (see 7): a row that has {name} in a cell, name being the files an Images step kept, is written once for each file. A text parameter whose name has Dir in it, such as outputDirectory, is a folder, and the folder is made when it is missing. A step that is given files this way works on no image, so Check does not ask for a Work on step before it.
The column Taken from shows the choice for each parameter: as stored, asks the operator, variable followed by its name (and the factor, when it is not 1), or text with variables. The box of the step in the chart says asks: followed by the parameters that are asked, or from variables.
A process that is not installed
A blueprint made by someone else can use any process. When one is not installed in this PixInsight, the step asks before it runs, saying so and offering to skip it or to run it anyway to see what happens. The check shows the same thing beforehand, as a warning.
How a step runs
A step runs on the image the workflow is working on. A process that works without an image (a global process) runs globally. One that needs an image when the workflow is not working on one yet fails with a message that says to put a Work on step before it, or to choose the image it works on.
6.2 Ask
An Ask stops the workflow and puts a question to the operator, who picks one of its answers from a list. Each answer is a route of its own, with its own steps, and the routes join again below the question. An answer with no steps is just a way through.
- Question: the text the operator reads. It can be a paragraph. {name} inserts a variable.
- Keep the answer in: optional. The name of a variable that holds the answer, for a later Branch to test.
- Answers (each one is a route): the list of answers, with a Label: field for the selected one, and the buttons Add, Remove, Up and Down. A new answer is named Answer and its number. Removing one that holds steps asks first, and the steps go with it. A question needs at least two answers, and they must have different, non-empty labels. Editing a label updates the chart at once.
6.3 Branch
A Branch makes the workflow decide by itself. It tests a condition and takes one of two routes, yes or no, which join again below it. The test reads Take the 'yes' route when: and then three fields: a variable, a comparison (<, <=, >, >=, == or !=), and a value.
The variable on the left is chosen from those that are set before the Branch, on every path that reaches it: a Measure, or an Ask that keeps its answer. The value on the right is a number, some text, or the name of another variable. Numbers compare as numbers, and an answer or a text that reads as a number is a number. Anything that is not a number can only be tested for equality, and a test that compares text with < stops the workflow with a message that says so.
More than one test
Add a test puts another row of the same three fields under the first, up to four. The words above them then read Take the 'yes' route when [all | any] of these tests are true:. With all, every test has to hold (a test AND another AND another); with any, one is enough (a test OR another OR another). The x at the end of a row takes that test out; with only one left, the Branch is a plain one again. Every test is checked as the first is: each has to read variables that are set on every path that reaches the Branch, and Check says which test, as test 2, when one does not.
A mix of AND and OR is made by putting one Branch inside another: the answer of the first leads to the second, which tests the rest. The box of the step in the chart shows the tests, joined by and or or.
The log records every decision: each test, with whether it came out true or false, and what the whole came to.
6.4 Measure
A Measure takes a measurement of an image, or reads a value from it, and keeps the result in a variable, to be tested by a Branch, put into a message, or used as the value of a parameter. Its fields are Measure: (what to measure), Keyword: (only for the measurement that reads a keyword), Of image: ((the image being worked on), or a kept image), and Keep it in: (the variable). The measurements are:
| noise | the standard deviation of the noise, estimated with a k-sigma clipping on the finest wavelet layer, in image units (0 to 1). Pixels that are exactly zero, such as the black borders registration leaves, are ignored. |
| snr | the background level over the noise: the median divided by the noise, for each channel, averaged. A higher number is a cleaner image, which makes it the natural test for how strongly to denoise. |
| median | the median of all samples, 0 to 1. |
| mad | the median absolute deviation about the median, 0 to 1. |
| mean | the mean of all samples, 0 to 1. |
| clipLow | the fraction of the samples that are at zero or below, 0 to 1: the black that is clipped away. |
| clipHigh | the fraction of the samples that are at the top of the range (1.0), 0 to 1: the white that is clipped away, the cores of saturated stars among it. |
| blackFraction | the fraction of the pixels that are empty in every channel, 0 to 1: no data at all, as at the borders registration leaves. A pixel that is black in one channel only is not empty. It says how much of the frame is border, and so whether to crop. |
| colorBalance | the largest channel median over the smallest. It is 1 when the channels agree, and grows with a color cast, which makes it the test for whether a color calibration is needed. A gray image has one channel, which agrees with itself, so it measures 1. |
| width | the image width in pixels. |
| height | the image height in pixels. |
| megapixels | the size of the image in megapixels: its width times its height, over a million. A Branch cannot multiply, so this is the measurement for a test on the size of the image. |
| channels | the number of channels: 1 for a gray image, 3 for a color one. |
| astrometric | 1 when the image has an astrometric solution, and 0 when it has none: the test for whether a plate solve is needed first, before a process that depends on one. |
| fluxCalibrated | 1 when SpectrophotometricFluxCalibration has been applied to the image, and 0 when it has not: the test for whether MultiscaleGradientCorrection can be run. SPFC leaves its signature in the image (the property PCL:Signature:FluxCalibration, with PCL:SPFC:* beside it), and nothing in the FITS keywords. |
| keyword | the value of a FITS keyword of the image, such as FILTER or EXPTIME. See below. |
The statistics are measured on a floating-point copy of the image in the range 0 to 1, whatever the sample type of the image, so a number means the same thing for every image. For a color image, a statistic is the average of its values over the channels, except blackFraction and colorBalance, which look across them. The measurement fails, and says so, when the image is too small or too empty to measure: for snr, when no channel has noise to measure, and for colorBalance, when a channel is empty.
Reading a keyword
With keyword chosen, the Keyword: field names the FITS keyword to read, and the variable receives its value. The name is not case sensitive. A string value comes without its quotes and its padding, so a filter written 'Ha ' in the header is Ha. A value that reads as a number is a number, as for the answer to a question, so a Branch can test an exposure time with >= and a filter name with ==, and a message can quote either with {name}. When a keyword occurs more than once, as COMMENT and HISTORY do, the first one that has a value is read.
A keyword can also be read from a list of files an Images step kept (see 6.6), by choosing the list in Of image:: the keyword of the first of the files, read from its header, so a workflow can take the filter or the exposure of the frames it was given. The name may list alternatives, separated by |, such as EXPTIME|EXPOSURE: the first the file has is read. When the image has no such keyword the workflow stops, and says which one is missing. In the chart the step is titled Read keyword, and its second line gives the keyword and the variable.
6.5 Message
A Message shows a text to the operator and waits until Continue is clicked. {name} inside the text is replaced by the value of that variable, and numbers are written with up to six significant digits, so a message can report a measurement. Messages are how a blueprint handles what cannot be automated: a step that has to be done by hand, or outside PixInsight, can be a Message that says what to do and goes on when Continue is clicked.
6.6 Images
An Images step brings images into the workflow. Its first list, Asks for:, chooses between two kinds: one of the images that are open, or several image files, chosen by what their headers say. Both keep what they get under a name, made of letters, digits and the underscore.
One of the open images
The step asks the operator for one of the images that are open. Its fields are the text the operator is asked ({name} inserts a variable), and Keep the image as:.
When the workflow reaches it, PixInsight's own view selector opens, listing the open images as we know them. The question is the title of the selector (its first line, shortened when it is long), and the whole text is written to the Process Console as well. The image is never copied: what is kept is the open window itself. If the selector is closed without choosing, the workflow stops: that is a stop, not a failure.
What is kept can then be used by the steps that follow (see 7). A blueprint that runs on a set of image files, one after the other, cannot use this kind of step.
Several image files, chosen by their headers
The step chooses files without asking: the frames of a session, for instance, are told apart by what their FITS headers say. It does not open them as images; it reads their headers only, and keeps the ones that pass every rule. Its fields are:
Takes them from: The Images window, the files added there, which needs These image files, together (see 8); or A folder, the image files directly in it (xisf, fit, fits and fts), such as what an earlier step wrote in the work folder.
The Folder: may hold {variables}, and {workdir} is the work folder, so
{workdir}/calibratedis a folder inside it. Files or measurements kept earlier: the name of a list of files that an Images step kept, to choose among again by new rules, or of the measurements a process kept, to choose the frames that pass rules about them; the Kept as: field names it.A file you choose: when the step is reached, a file window opens, titled with the text of the step, and the operator chooses one file, such as a master frame; the window opens in the folder used for masters last time.
Cancel means no file: the list is empty, the step does not fail, and the steps that follow can go without (see 7). The least number does not apply to it. The rules do, if any are written: the file has to pass them, or the step fails and says which file and which rule.
@ext == xisftakes only XISF files, which is what the master frames of a preprocessing blueprint have to be. The file window offers only the kind of file such a rule names (@ext == xmarsshows only .xmars files, with no image formats among them); with no such rule it offers the image files.Keeps the files that pass these rules, one per line: each line is a keyword, an operator and a value. With no rules, every file is kept. The rules are described below.
Stops when fewer than: the run fails here, saying what it found and what was missing, when fewer files pass. It is how a blueprint says there are no flats before it has done anything. 0 never fails; a Branch can test the size of the list instead.
Keeps the files as: the name of the list.
Weights, as a formula: only for files taken from measurements: the weight each file that is kept is given when ImageIntegration stacks the frames, worked out from its measurements (see below). Empty: no weights are written.
Weights file kept as: the name under which the path of the weights file is kept. The file is written in the weights folder of the work folder, as path, weight for each frame, one per line, which is the form ImageIntegration reads when its weight mode is CSV weights file. A step that integrates then takes the path as {name} for its
csvWeightsFilePath. The log gives the lowest, highest and mean weight, and the first few. A weight that is not above zero, or that cannot be worked out, stops the run, naming the frame.Ask for the formula when the step runs: the operator is shown the formula, starting from the one above, and may change it. A formula that is not an expression is refused and asked again; Skip stops the run, because the frames would have no weights. A stopless run uses the formula above.
Color frames: ImageIntegration wants one weight for each channel of the frames it stacks. For gray frames one weight is written on each line; for color frames (a one-shot-color camera, once debayered) this box writes the same weight three times, path, w, w, w. The OSC blueprint has it on.
The files that pass are in the order their names read: case does not matter, and a number counts as a number, so frame_2 comes before frame_10. The log says how many of how many passed, and why the others did not.
An Images step that chooses files:
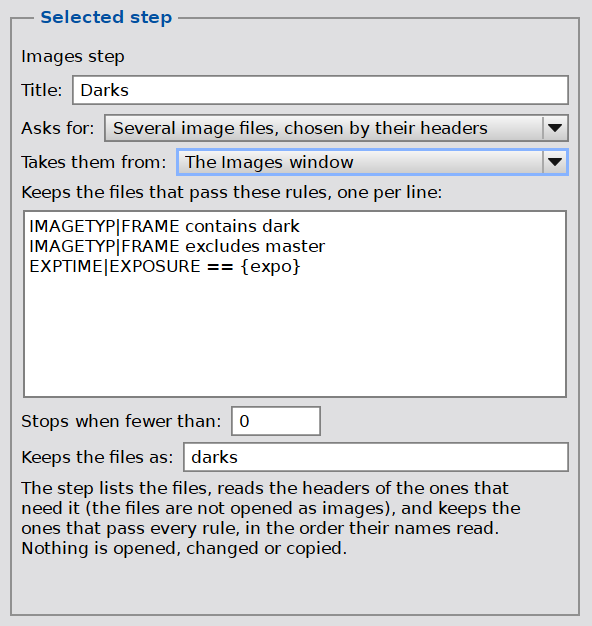
The Selected step box of an Images step that takes the frames of a session from the Images window: where they come from, the rules, the least number, and the name.
Checking that ImageIntegration used the weights
The quickest check is in the Process Console, at the top of ImageIntegration's output: the line Weighting mode ..... CSV weights file: <the path of the weights file> says that ImageIntegration took the file, and in that mode. Three places show it in more detail.
- The log of the run: the line Weights of N frames written to ... lists the weights, and the line of the integration step, Run: Integrate (... csvWeightsFilePath=...), shows the file it was given.
- The Process Console of PixInsight, when ImageIntegration runs: it prints Normalized image weights: and Relative weights:, one value for each frame, which are the weights of the file scaled, so their proportions are the ones in the file; with no weights they would all be equal.
- And ImageIntegration itself stops with a message when the file is wrong: Invalid CSV weights file (line #...): Wrong number of tokens means three weights were needed for a color frame, or one for a gray one. To see it by hand, open ImageIntegration, choose CSV weights file as the weights and the file in the work folder.
The rules
A rule is a keyword, an operator and a value:
IMAGETYP contains light
EXPTIME == 300
FILTER == {filter}
The operators are
==,!=,<,<=,>,>=,containsandexcludes. Two numbers are compared as numbers, so 300 matches 300.0; anything else is compared as text, ignoring case, so Light Frame contains light. Text has no order:<and the like fail on it.Cameras and capture programs do not agree on the names. Write several keywords with
|and the first one a file has is used:EXPTIME|EXPOSURE,IMAGETYP|FRAME.@namestands for the file's name, without its folder:@name contains _c.@extis its extension, without the dot, in any case:@ext == xisf.@indexis the place of the file in the list, from 1, in the order the names read:@index == 1is the first.For measurements, the keyword is the name of a column, in any case:
ECCENTRICITY <= 0.7,FWHM,STARS,NOISE,PSFSIGNALWEIGHT,PSFSNR,SNRWEIGHT,MEDIAN; SubframeStudio has the same, andNSTAR,BACKGROUND,FILTER,EXPOSUREand others, andOK, which is false for a frame it could not read, soOK == trueis the first rule to write for it.The value can be relative to the whole set: a number,
*orx, andmedian,mean,maxorminof that column over all the frames measured (those a process could not read are left out of it).FWHM <= 1.5 * medianleaves out the frames whose FWHM is more than one and a half times the median, andPSFSIGNALWEIGHT >= 1 * maxkeeps the best frame.The log gives the limit that was worked out, and the names of the frames that were left out. FWHM is in the unit the SubframeSelector instance has, pixels with its default scale.
@derived == lightstakes the files made from the files of the list lights: a file whose name starts with the name of one of them, followed by nothing or by_(L_1.fitgivesL_1_c.xisfandL_1_c_cc_r.xisf, but notL_10_c.xisf). It is how a step reading a folder takes only the files of the frames of this run: the files an earlier run left in the work folder, for frames that are no longer in the Images window, are ignored.!=takes the others. The preprocessing blueprints use it at every stage.An expression rule starts with
=and compares two expressions over the measurements of a frame:= FWHM * ECCENTRICITY <= 1.1,= PSFSIGNALWEIGHT >= 0.5 * median(PSFSIGNALWEIGHT). An expression has numbers, the names of the columns,+ - * / ^and parentheses, the functionssqrt abs log exp,min(a, b)andmax(a, b), andmedian,mean,minandmaxof an expression over all the frames measured:min(FWHM) / FWHM. A yes/no column is 1 or 0; the frames the process could not read are left out of the functions over the set. A frame for which a rule cannot be worked out (a division by zero, say) is left out, and the log says why. The same expressions are the weights below.The value may hold {variables}, filled in when the step runs, such as the filter that a Measure read from the first light. A rule whose value comes out empty is left out, and the log says so.
A file that does not have the keyword does not pass, and the log counts the files that lack each keyword. A file that cannot be read does not pass either, and is counted.
A line that starts with
#is a comment. Check refuses a rule that cannot be read, naming its line.
What the list can be used for
The name stands for a list of files. See 7: a table in a process (calibration, integration, registration) is filled from it, one row for each file; a Branch can test how many there are; a Measure can read a keyword from the first of them; and a message can say how many.
6.7 Work on
A Work on step makes one of the kept images the one the steps work on: The steps after this one work on this image, until another Work on step. Its only field is Work on:, the choice among the images the workflow keeps at that point. When the workflow keeps none yet, the box says to add an Image step first. It is how a blueprint changes from one image to another: for example, from the red channel to the green one, so that the same steps are run on each.
6.8 Route
A route is a named sequence of steps kept apart from the main flow, so that several places can run the same steps without repeating them: the steps that stretch an image, or that finish one, for instance. Routes are made, named and deleted with the Showing row (see 4.2), and filled with steps like the main flow, which is shown again by choosing Main workflow. Deleting a route deletes every step that calls it.
A Route step calls one. Its fields are Route:, the route to run, and Open route, which shows it on the chart. A route runs inline where it is called, with the same variables as the rest of the workflow: it reads the ones set before the call and leaves behind the ones it sets. The box says from how many places the route is called. In the chart, the step reads Route: followed by the name, and calls and the name below it.
A route cannot call itself, nor a route that calls it, directly or through others, because it would then run for ever. The designer offers only the routes a place may call. A route that is never called is reported by Check as a warning.
6.9 Script
A Script step runs a script that is installed in this PixInsight: any of the ones the SCRIPT menu lists. Adding the step opens a window with the installed scripts (name, who made it, category, description), one of which is chosen. The step runs it as the menu would, with its own windows and questions, and the workflow goes on when the script ends. The blueprint keeps the script's name, as the SCRIPT menu knows it, and where it was; never its code. Opened on another computer, the step finds the script by its name, and if it is not installed there it offers to skip it.
- Script: the name of the script, with Choose script... to pick another.
- Keeps the new images as: for a script that makes images. Scripts name their results as they like, so AdaptiveWorkflow compares the open windows before and after: every new window is kept, in the order it was made, as a list under this name. A Work on step then picks one: its Image number says which, 1 being the first. The step fails, and says so, when it names an image and the script makes none.
- Ask before running (run or skip): asks even for a script that is PixInsight's own.
How far a script is trusted
A script can do anything on this computer, so each is told apart by what is known about it:
- PixInsight's own (part of the distribution: it is in PixInsight's scripts folder and signed by PixInsight's team, or is one of the few that ship without a signature): no flag, and no question.
- Signed by another developer: orange. It runs without a question.
- Unsigned, and not PixInsight's: red. When the workflow gets to it, it asks first, saying why, and Skip skips the step. The Preferences can turn that question off.
The flag is a warning triangle at the bottom right of the step's box on the chart, a colored line at the top of its panel with the reason, and a chip at the end of the Certified line that counts the scripts and lists them in its tooltip. Opening a blueprint says in the status line how many scripts it runs that are not PixInsight's, and Check lists each of them as a warning. AdaptiveWorkflow reads who signed a script from its signature file, and does not verify the signature itself: PixInsight does that when the script runs, under the security settings of the operator, and a script it refuses makes the step fail with its message.
A script that is not PixInsight's:
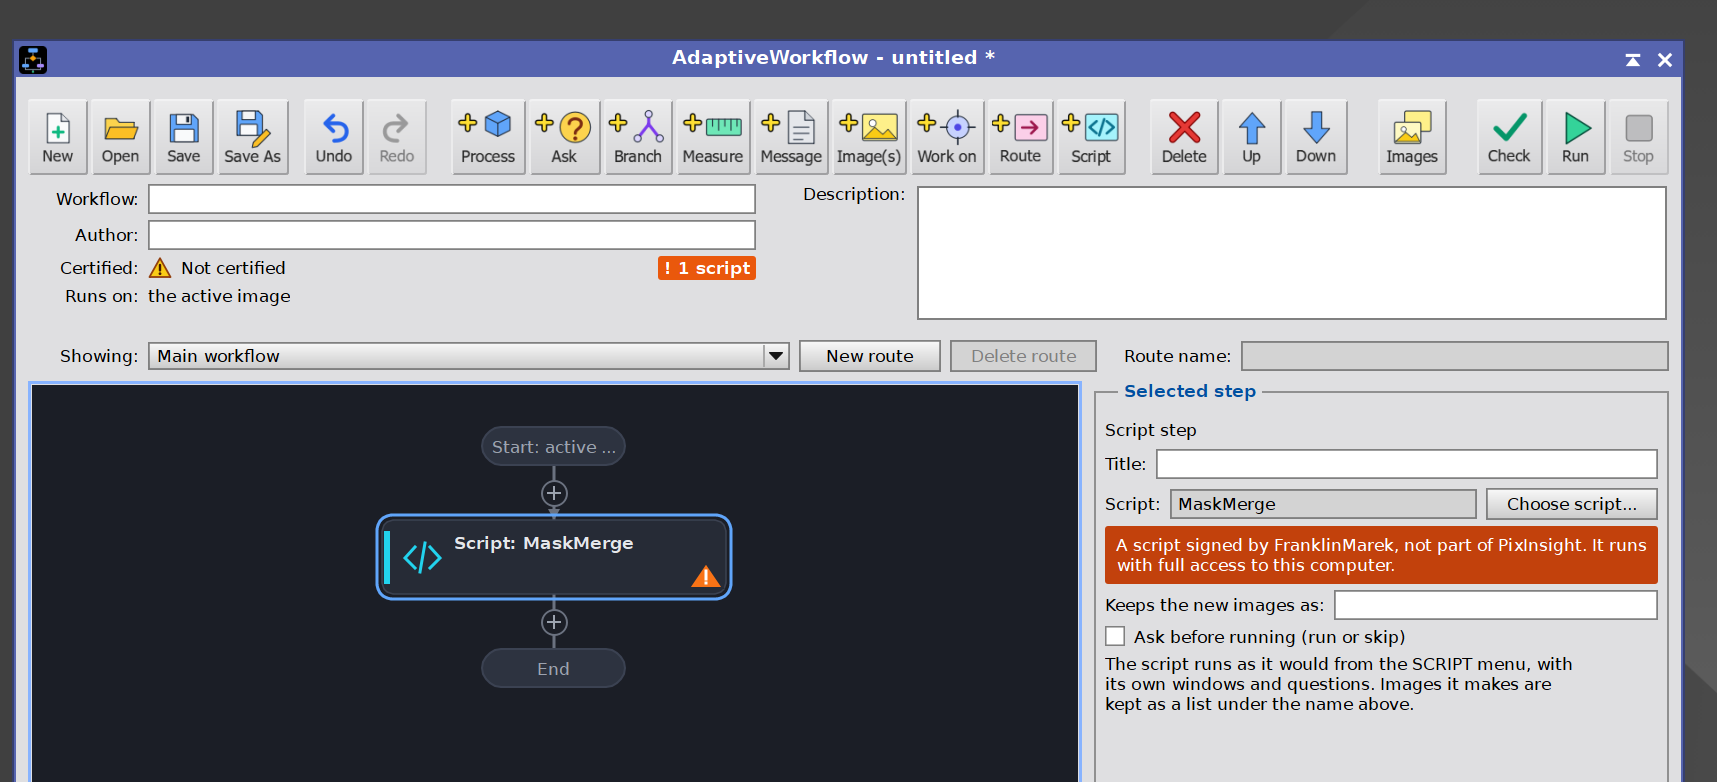
The step's box with its warning, the line under its title in the Selected step box, and the chip at the end of the Certified line.
What a script step cannot do
A script gets no parameters from the workflow, and says nothing about whether it worked: the step is done when the script ends. Scripts that show a window of their own are the natural ones to use, since that window is where the operator decides. What a script does to an image may not be a step of its history, so Undo this run cannot promise to take it back; PixInsight's own Undo is the way, when the script supports it.
7 Variables and images
[hide]
A workflow carries two kinds of things from one step to the next. Both are named with plain names: letters, digits and the underscore.
Variables
A variable holds a number or a text. A Measure sets one to a number, and an Ask can set one to the answer it received. Where a variable can be read:
- on the left side of a Branch, and on its right side, by name;
- as the value of a parameter of a process step (From a variable), with a factor;
- inside a text, written {name}: a question, a message, the text of an Images step, the Ask as text of a parameter, and a parameter set to Stored text, with {variables}. A name that is not a variable stays as typed.
A variable can only be read where it has been set on every path that can reach the reader. One set in only one answer of a question, or only later in the flow, cannot be read, and the lists of the designer offer only the variables a step can read. Check reports a step that reads one it cannot.
Images
The images a workflow keeps are open images, kept under a name. There are two ways to keep one: an Images step, which asks the operator for it, and the Keeps the new image as: field of a process step, for an image that step makes. A kept image can then be:
- the image a step works on, through the Works on: field of a process step, or Of image: of a Measure;
- the mask of a process step, through its Mask: field;
- the image all the following steps work on, through a Work on step;
- the value of a text parameter (From a variable), which then holds the image's id;
- written {name} inside a text or a table, where it stands for the image's id.
Lists of files
An Images step that chooses files keeps a list. It behaves as a variable that holds how many files there are, and as a list of paths:
- on its own in a cell of a table in a process (a parameter set to Stored text, with {variables}), written {name} inside the string, it makes the row repeat for each file. A table whose stored row is
[true, "{lights}"]becomes one row for each light frame. A list with no files writes no row. - in the same row, {name:dir} is the file's folder, {name:name} its name, {name:base} its name without the extension and {name:ext} the extension with its dot, for the files that go with a file:
"{reg:dir}/{reg:base}.xdrz". - {name.path} is the first file, as a text: the one master frame that a calibration is given. It stops the step, saying so, when the list is empty. {name.path?} is the same, and nothing at all when there is no file, which is what a master that may be missing needs. A yes/no parameter set to From a variable and given the list is true when the list has files, so the same step can use a master or go without it.
- in a Branch, it is the number of files:
darks > 0. In a message, {name} is that number. - in a Measure of a keyword, Of image: can be the list: the keyword is read from the header of its first file.
{name.path} also works for an image a process step saved (Saves it as:): it is the file it was saved as. It fails the step, saying so, when the image was not saved or the list is empty.
The work folder
When the Images window is set to These image files, together and names a work folder, {workdir} stands for it in every text, and a name given to Saves it as: without a folder is saved in it. A step that writes files names a folder inside it, such as {workdir}/calibrated, and the next Images step takes its files from there.
Nothing is copied when an image is kept: the name stands for the open image. A kept image whose step was skipped is reported when a later step tries to use it (the image was never made: the step that makes it was skipped), and one that was never chosen is reported as such.
8 What a blueprint runs on
[hide]
The Images button of the toolbar, the Runs on text, or the Start block of the chart, opens a window titled AdaptiveWorkflow: Images, which chooses what the workflow runs on, in its Run on: list:
- The active image: the workflow works on the image that is active when it starts. Without one, it does not start, and says to open an image and make it the active window.
- These image files, one after the other: a set of files, opened, processed, saved and closed one after the other. See below.
- These image files, together: the workflow runs once, with no image, and its Images steps choose among the files by what their headers say. It is the choice for a blueprint that works on a whole session of frames. See below.
- No image until the workflow asks for one: the workflow starts with no image, and its Images steps ask for them. It is the choice for a blueprint that combines several images, such as the channels of a color image.
A set of image files, one after the other
Each file is opened in a window that is not shown, processed, saved and closed, so no image that is open is touched, and no copy of one is made. The list shows each file and its folder, in the order they are processed, with Add files..., Remove selected and Clear. Under it:
- Save in: the folder the results are saved in, with Browse.... Empty means beside each original.
- Name suffix: added to the name of each result: with the suffix _aw, M31.xisf is saved as M31_aw.xisf.
- Format: Same as the original, XISF, FITS or TIFF.
- Ask on the first image, and use the same answers for the rest: the questions of the workflow are put on the first image and their answers reused for the others. Measurements and tests still run on every image, so each can take its own route. A question that is first reached on a later image is asked then.
- Go on with the next image when one fails: otherwise the run ends at the first failure.
- Replace the original files with the results (no suffix, no folder): the originals are overwritten, which cannot be undone. When a run is started with it on, a window says how many files will be replaced, and asks whether to run it.
The window says in words what will happen, and gives the first result's file name. It refuses a plan that would replace an original by accident, or one input with the result of another. Two inputs with the same name from different folders get different results: the second is numbered. A suffix cannot hold a character that is not allowed in a file name.
For a set of files, the status line says which image the run is on (Image 2 of 5), the log records each one saved, and the run ends with a summary: how many images were processed, and how many failed.
Image files, together
The list holds the files the Images steps choose among, with the same Add files..., Remove selected and Clear. Nothing is opened, processed or saved for them: it is the steps that use them. There is one more field, the Work folder:, where the workflow keeps what it makes (see 7). Use an empty folder for each run: the steps find their files by what a folder holds, so the files of an earlier run are found too.
When a blueprint needs the files or the work folder and the Images window has none, Run does not stop with a message: it opens the Images window first, asking for them, and goes on when they are set. The window shows what the blueprint runs on without letting it change, and says what to supply. If the window is closed with Cancel, or left without them, the run does not start, and the status line says what it was missing. This happens only when that is all that is wrong with the blueprint; any other error is reported as usual.
Check, before the Images window is set up:
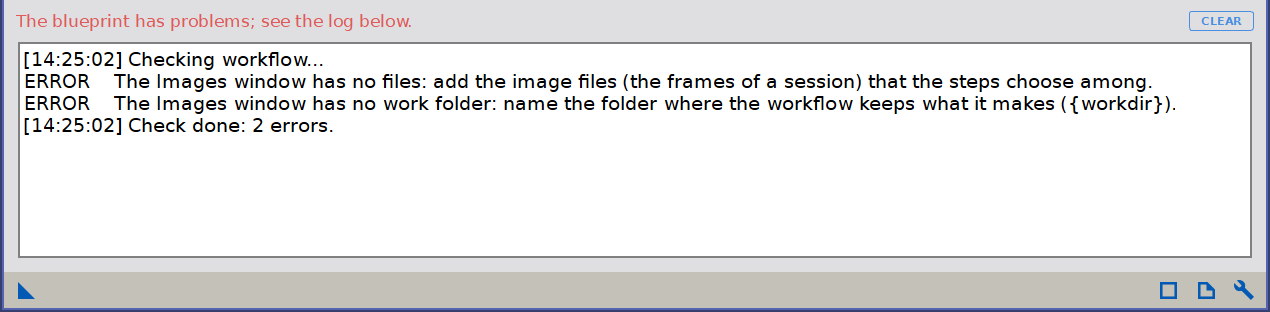
Check on a preprocessing blueprint whose Images window has no files and no work folder: the two lines say what is missing.
The answers of the operator are asked as usual, and the run is one run: the status line does not count images. A blueprint made for this has to be run from the designer or globally, never applied to a single image.
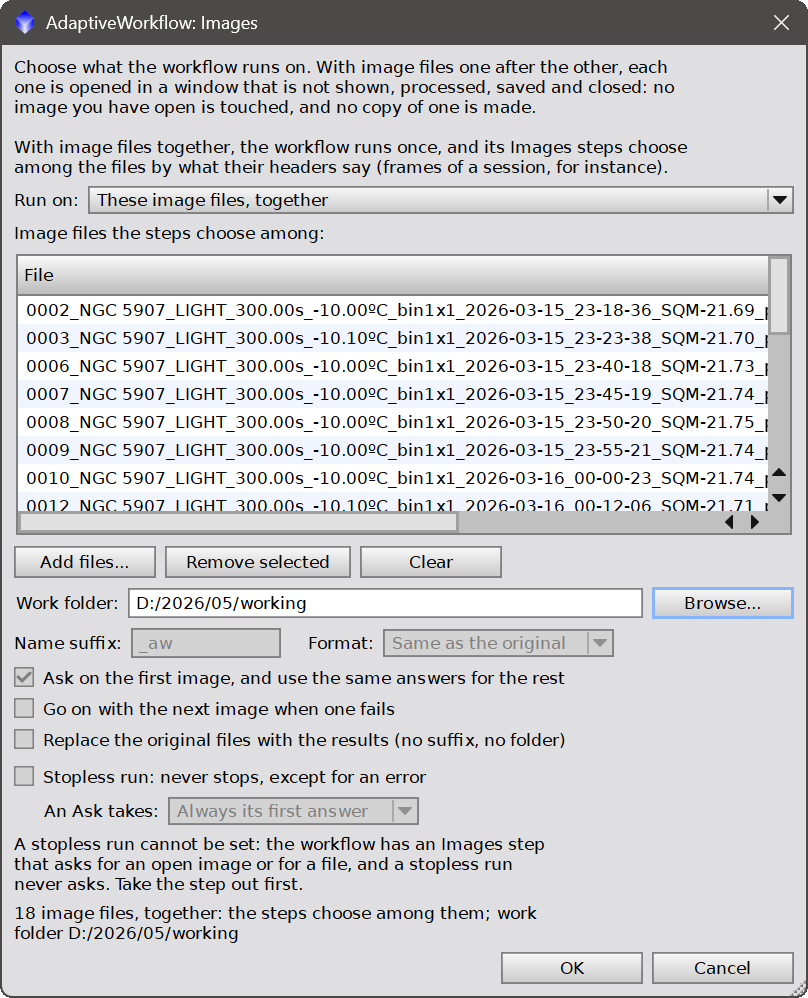
A stopless run
At the bottom of the Images window, Stopless run: never stops, except for an error makes the workflow run from start to end without asking anything, which is what a run from a process icon, or from a Process Container, needs. It is kept in the blueprint. What happens at each step:
- a parameter set to Ask the operator keeps its stored value, and a step that asks run or skip runs;
- an Ask takes always its first answer or always its last (the last is the second of two, the third of three, and so on), as chosen next to the box, and the log says which;
- a Message is written in the log and the run goes on;
- a process that is not installed is skipped, and so is a script that is not installed, or that has no signature, because it cannot be asked about (see 6.9); the Preferences can allow the unsigned ones.
An Images step that chooses files by its rules (from the Images window, a folder, or a list kept earlier) asks nothing, and runs. Only an error stops the run.
A stopless run needs a way through the workflow that asks for no image and no file. The way it takes is fixed by the choice An Ask takes:, the first answer of every Ask or the last, so it can be set when either of the two reaches no Images step that asks for one of the open images or for a file you choose.
A route is followed where it is called, and both sides of a Branch count, since the data decides which one is taken.
The Images window offers only the answers that way allows: when the first answers lead to such a step and the last do not, the choice is the last answers only, and the other way round; when neither way is free, the box says why it is off, and Check reports a stopless blueprint that has such a step on the way it takes.
A workflow that runs on No image until the workflow asks for one can be stopless too, when nothing on its way asks. The Runs on line reads (stopless, first) or (stopless, last) when it is on.
9 Running a workflow
[hide]
A blueprint can be run in two ways: from the designer, which is how we build and test it, and as a process icon, which is how we use it. Both run the same workflow.
9.1 From the designer
Run (or the tiny play button of the Run box) checks the blueprint first, as Check does, and starts only when there is no error. The selection is cleared, the design is locked (so the Selected step box has nothing to show: while the run is on, the Run box takes its place and the whole column, unless the Run box is detached, which brings the Selected step box back, and attaching it again takes it away), and the chart follows the run (see 4.3), scrolling to the step being executed, into a route when the run goes into one. When the workflow runs on an open image, each process is run on it and gets a step of its own in that image's history, so PixInsight's own Undo can take the steps back one by one.
When the workflow reaches something that needs the operator, it stops and the Run box fills. The image the question is about is brought to the front first, so it is not left behind another window. What the box shows depends on the step:
- for a process step that asks, a row for each parameter asked, its name on a line of its own and its value under it, with the buttons Run this step and Skip. A value that does not fit is refused, with the reason in the status line, and the box stays open for it to be corrected;
- for an Ask, the question and a list of its answers, with Continue;
- for a Message, the text, with Continue;
- for a Script that has to be asked about (it is not installed, it has no signature, or the step says to ask), the reason and the buttons Run this step and Skip.
An Images step that asks for an open image opens PixInsight's view selector instead (see 6.6); one that chooses image files asks nothing. While the workflow waits, nothing is running, and the rest of PixInsight stays available: the images can be looked at, and a step that has to be done by hand can be done, before Continue is clicked.
When the run ends, the status line says how: Finished., Stopped., or the step that failed and why. The log keeps the record: it is not cleared by a run or a check, only by CLEAR (see 4.5), and the start and the end of the run are lines with the time.
The chart keeps the marks of a run that has ended, whether it finished, was stopped or failed, so that we can see how far it got and where it failed. The Run box then says how the run ended, and has a Back to editing button that clears the marks. Changing the blueprint clears them too, and so does starting another run. A run that has ended cannot be continued: Run starts a new one, from the beginning.
What a run did to the images can be undone. Each step that ran on an open image is a step of that image's history, as any process applied to it is, so PixInsight's own Edit > Undo and Redo take the steps back one at a time, and the History Explorer shows them. Undo this run, in the Run box, takes every image the run changed back to how it was before the run, in one click; Redo brings the work back. A new image that a step made is left open. A workflow that runs on a set of files has nothing to undo: each file is saved and closed, and the original is only replaced when the Images window says so. A blueprint applied to an image from a process icon is one step of that image's history (see 9.2).
9.2 From a process icon
Dragging the triangle of the control bar makes a process icon that holds the blueprint. From then on the blueprint is used like any other process, without the designer: the icon can be applied to an image, executed globally, put in a Process Container, or run from a script. Two ways to run it, depending on what the blueprint works on:
- Applied to an image (for example by dropping the icon on it): the workflow runs on that image, whatever the blueprint says it runs on. The whole workflow is one step of the image's history, and undoing it takes everything it did back in one go. This is only for a blueprint that works on one image. One that lists image files of its own, or that works with more than one image (it has Image or Work on steps, steps that work on a kept image or keep a new one, or runs on No image until the workflow asks for one), cannot be applied to a single image, and the console says to run it globally.
- Executed globally (Execute in the global context from the icon's menu, or dropping the icon on the workspace): the workflow runs on what it says it runs on: the active image, its set of files, or the images it asks for.
A blueprint can only be executed when it has no errors and has steps. When Execute in the global context is grayed out on one of our icons, that is the reason, and Check in the designer says which errors. A failure before the run itself (a blueprint that cannot be read, or an image that is gone) is said on the Process Console.
The license is checked every time, as described in 2.2.
9.3 The questions window
Without the designer, a workflow asks its questions in a window of its own, titled AdaptiveWorkflow, with the same content as the Run box: a bold title, the text, and what is needed to answer. For a set of files, a line at the top says which image the run is on. Its buttons are Stop workflow, which ends the workflow here so that nothing more is run, Skip this step, for a process step, and Run this step or Continue. A value that does not fit is explained in red and the window stays open.
The window is modal: the rest of PixInsight cannot be used until it is answered. That is why it has a way of looking at the images before we answer, in its Look at: row:
- a list of the open images, starting at the one the question is about;
- Show brings that image's window to the front;
- STF stretches the screen rendition of that image automatically, to look at it, and pressing it again puts it back. Only the display changes, never the pixels, and every image is put back as it was when the window closes.
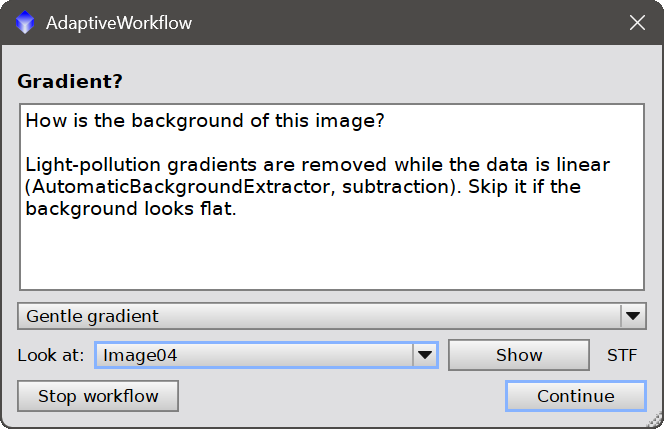
9.4 Stopping and failing
In the designer, Stop ends the run at once when the workflow is only waiting for an answer, and otherwise after the step that is executing: a process that has started is not interrupted, and the status line says Stopping after the step that is running... until it ends. In the questions window, Stop workflow does it at once. When a workflow runs globally, Esc on the Process Console aborts it, and the console says so.
What a stop leaves behind: applied to an image, a stopped or aborted workflow leaves the image as it was before it started. On a set of files, the image in hand is dropped and not saved, and the ones already saved stay. The images of the workspace changed by steps that already ran, in the designer or globally, stay as those steps left them, and can be undone with PixInsight's Undo.
A step that fails ends the workflow, with a red cross on the step in the chart and a message that starts with its title and says what was wrong: a parameter that reads a variable with no value, a test that compares text with a number, a process that did not complete, an image that is gone. On a set of files, the failure is for that image, and the run ends or goes on with the next one, as chosen in the Images window.
Errors, and whose they are
Most of the errors a run ends with are not errors of AdaptiveWorkflow. They come from the design of the blueprint, and from what the processes it runs make of it: a value outside what a process accepts (an amount above 1 where the process takes 0 to 1), a process given an image of a kind it cannot work on (SpectrophotometricFluxCalibration on a stretched image, a process that needs a plate solution on one that has none), a variable that is read where nothing has set it, a file that is not where the blueprint expects it, a rule that leaves no file. In those cases the message says what was wrong, and the Process Console, where PixInsight reports what a process objected to, says the rest.
Debug your error first. Read the message and the log; look at the step that failed, with the values it was given (the log writes them); run that process by hand, on that image, with those values, and see whether PixInsight accepts it; and look online, in the PixInsight forum and in the documentation of the process, before concluding that something is wrong with the workflow.
That said, AdaptiveWorkflow can have bugs, and one cannot be ruled out: something it did not handle as it should is possible, and a report of one is welcome. A useful report has the blueprint (the .awf file), the log of the run from Starting the run to the error, the text of the Process Console around it, the version of AdaptiveWorkflow and of PixInsight, and the steps that lead to the problem; and says what was expected and what happened instead.
What to expect when an error is reported. When the error is one of design that this documentation covers (a run that fails because of a value out of range, a step that reads a variable that is not set, a stretched image given to a process that wants a linear one), we will, most of the time, not work out a solution: we will point to the part of the documentation that explains it. Support goes, mostly and not only, to what is a genuine bug of AdaptiveWorkflow, so that those get fixed.
10 Example blueprints
[hide]
Eleven example blueprints, .awf files that Open loads, show how typical situations can be put into a workflow. They are starting points to be customized: some questions may be removed, others added; same with measurements, the order of certain processes may be altered, new processes added, different values for certain parameters, and anything to suit the gear and the data.
Also, because they are examples, the questions and messages in these blueprints are often long and detailed. For a blueprint that only we are going to use, brief prompts and names are often enough.
| Broadband-OSC-RGB | A stacked linear color image, from a one-shot-color camera or RGB already combined. Runs on the active image. Decides whether there is a gradient to remove, SPCC or the automatic calibration, how hard to sharpen, denoise and stretch, and whether to stretch again. |
| Noisy-data | Short, few or light-polluted exposures. Runs on the active image. Measures the noise: the noisier it is, the gentler the sharpening and the stronger the denoising. It also measures the signal to noise, and calls the image very noisy when the noise is high or the signal to noise is low (a Branch with two tests joined by any). It measures again after the stretch and denoises a second time only if needed. |
| Dual-narrowband-OSC-HOO | A one-shot-color camera with a dual-band filter. Asks for the image. Decides where the OIII comes from and how much to boost it, and whether to split off the stars, stretch them apart and put them back. |
| Narrowband-SHO-mono | SII, Ha and OIII from a mono camera. Asks for the three images. Fits S and O to H and combines them; chooses the palette, the green cast and the stars. |
| Tricolor-RGB-LRGB | Red, green and blue filters from a mono camera, with or without luminance. Asks for R, G and B (and L). Fits G and B to R, combines them, chooses the calibration and the stretch; processes the luminance the same way and combines it. |
| Preprocessing-mono Preprocessing-OSC | From the frames of a night to a stack, with the processes themselves instead of WBPP. Preprocessing-mono is for a mono camera with a filter wheel (one filter per run), Preprocessing-OSC for a one-shot-color camera. Both run on These image files, together: add every light, dark, flat and bias frame to the Images window and name a work folder.
Finding the frames. The blueprint tells the frames apart by their FITS keywords: IMAGETYP or FRAME, EXPTIME or EXPOSURE, and FILTER for the mono one. It takes the filter and exposure of the lights, then finds the darks of that exposure and the flats of that filter. Any kind of frame that is missing is left out, after a warning that asks whether to go on. Masters. It first asks whether to make the masters from raw frames or to use master frames you already have. From raw frames it integrates the master bias and the master dark, calibrates the flats (with the bias, or with darks of the flats' exposure when there is no bias, or with neither) and integrates them. With master frames you choose the master dark and the master flat in a file window, and Cancel means none. Master frames have to be XISF files: since PixInsight 1.9.0, ImageCalibration does not accept a FITS master (The file format (FITS) lacks required capabilities for master calibration frames), so a FITS master is opened and saved as XISF first. Calibration and selection. It calibrates the lights with the masters there are; with no master dark and no master flat, a message says so and the lights are used as they are. It then asks whether to remove hot pixels with CosmeticCorrection, whether to debayer (the color camera only; Yes unless the frames are already color), and whether to measure the frames, with SubframeSelector or SubframeStudio, and leave out the poor ones (eccentricity above 0.7, or a FWHM above one and a half times the median). The best frame by PSF signal weight then becomes the registration reference; otherwise the first frame is. Registration and integration. It registers the frames with StarAlignment, asks whether to use local normalization, and integrates. It asks which pixel rejection algorithm to use (as a list: the Choices of an enumeration) and how to weight the frames: ImageIntegration's own PSF signal weight, or a formula of ours over the measurements of the registered frames, written as a weights file. Last, it asks whether to drizzle. Each stage writes its files in a folder of its own inside the work folder, and the masters go in masters. Limits. It is a baseline: it needs darks, flats and bias, it registers on the first light, and it keeps the settings of each process simple. The color camera one does not do CFA drizzle (drizzle of the frames before they are debayered): the drizzle it offers uses the debayered, registered frames, and CFA drizzle is left to the user to add. |
| Space-telescope-HST-JWST | Calibrated MAST (HST, JWST) data, or an archive color composite. Asks for three filters, or the composite. Combines in chromatic order, measures the image and skips the linear stage when it is already stretched, and denoises only if the noise is high and the signal to noise is low (a Branch with two tests joined by all). |
| Gradient-correction-MGC | A front end for MultiscaleGradientCorrection. Runs on the active image, which has to be linear. It measures the image and says when it looks stretched, plate solves it with the ImageSolver script when it has no solution, flux calibrates it with SpectrophotometricFluxCalibration when that has not been done (it reads the signature SPFC leaves in the image), then asks for your MARS database and runs MultiscaleGradientCorrection. The path of the database is chosen when the workflow runs and is not kept in the blueprint. The flux calibration step holds PixInsight's default sensor and filter curves; SPFC compares your stars with Gaia spectra using exactly the sensor and filter curves it is given, so with other equipment its scale factors are wrong, without any message: choose your own icon for that step. |
| Denoise-per-file | Linear, stacked images, one file after the other. Runs on image files and saves each as XISF with _dn added to its name. It measures each file (the noise and the signal to noise) and gives it the sharpening and the denoising its own noise calls for: the noisier the file, the stronger the denoising and the gentler the sharpening. A batch script applies one setting to all of them; this chooses file by file, and the log shows what it measured and decided for each. It asks which denoiser to use on the first file and reuses the answer; a file that fails is reported and the run goes on; a file that is already stretched is saved unchanged. |
| Saturate-stars-only | A stretched color image. Runs on the active image. Asks which star tool is installed: DeepStarMask (the default, which makes a star mask directly) or DeepStarRemoval (which makes an image of the stars, run on a copy of the image, that works as a mask too); with neither it says sorry and ends. Then it runs ColorSaturation with a curve that raises the saturation of every hue by 35 percent, with the star mask as the step's Mask: only the stars change, and the mask is taken off the image when the step ends. It is the example of the Mask field of a process step. |
A preprocessing blueprint:
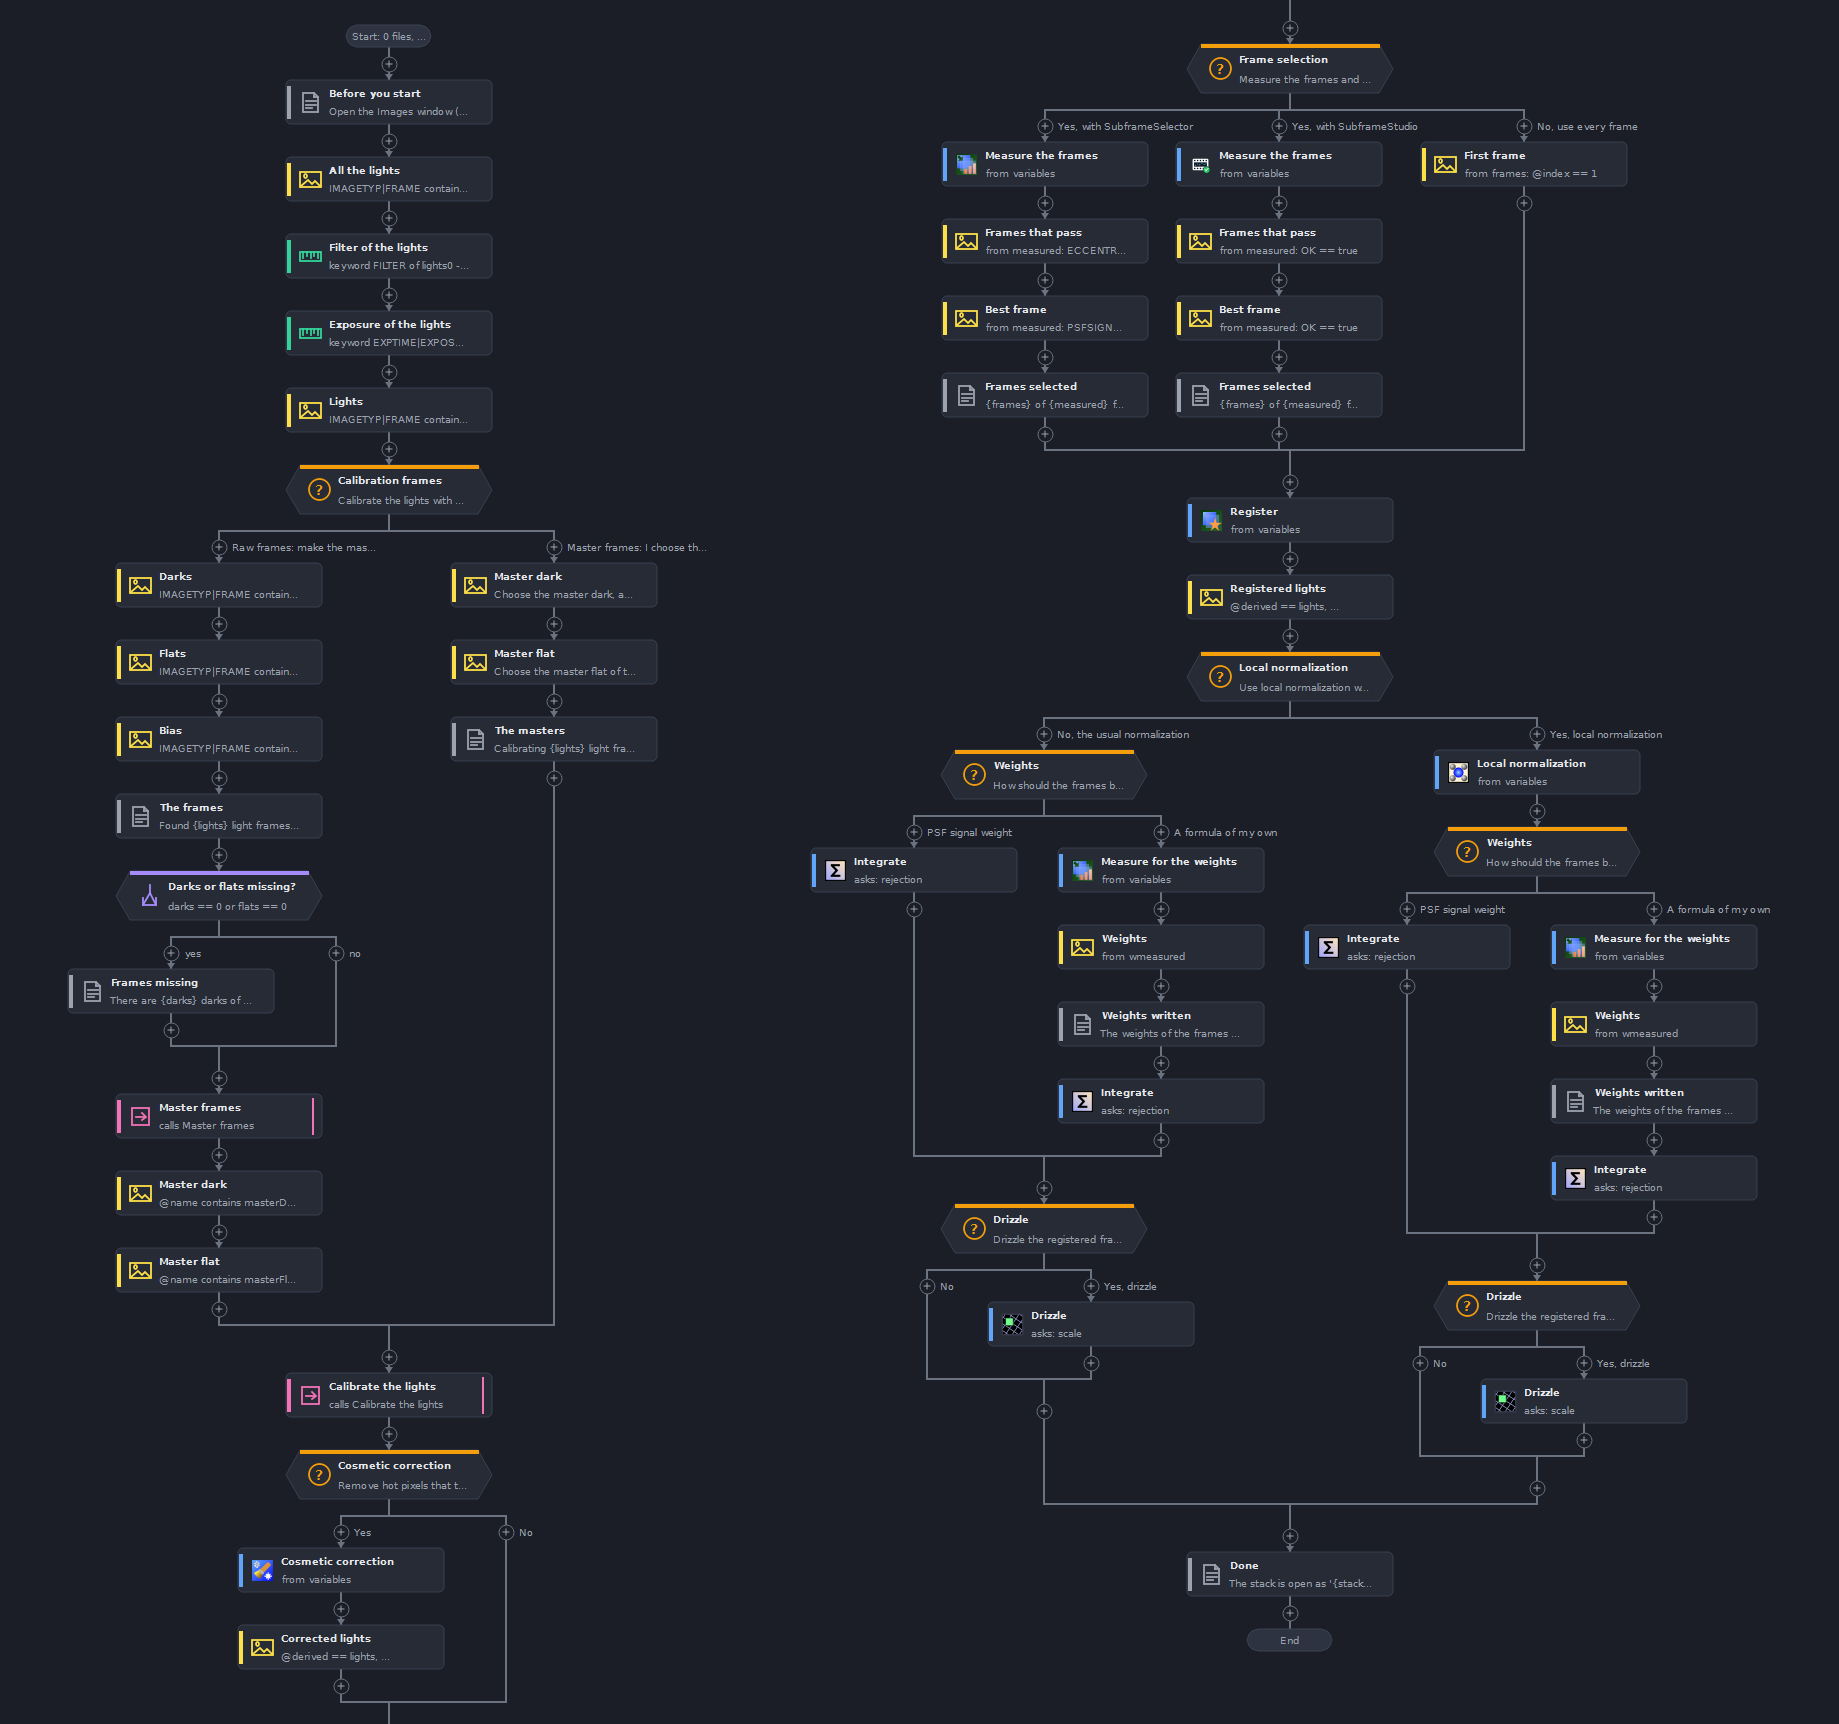
Preprocessing-mono: the main flow, from the frames found by their keywords to the integration.
A few things apply to all of them:
- Except for the two preprocessing blueprints, which work on files, what cannot be done to an open image by a process (calibrating, integrating, aligning, and SPCC, which needs a plate solve) is not automated. At that point the workflow shows a Message that says what to do, and goes on when Continue is clicked. These blueprints are run from the designer, where the rest of PixInsight stays available while the workflow waits: the questions window of a process icon is modal.
- Sharpening uses BlurXTerminator (RC Astro). Wherever a blueprint reduces the noise, it first asks which tool to use: NoiseXTerminator (RC Astro) or MLDenoise. Wherever it removes the stars, it asks between StarXTerminator (RC Astro) and DeepStarRemoval. When a process is not installed, its step asks whether to skip it.
- MLDenoise denoises with a model file of its own, so its step asks for the path of it. Setting the path as the stored value of the step, in the designer, stops the question.
- The stretch uses MaskedStretch, which ships with PixInsight, with its background reference taken from the measured median, in passes that can be repeated.
- The blueprints that ask for images run on No image until the workflow asks for one, and so run from the designer or globally, never applied to a single image.
11 Where everything is stored, who made a blueprint, and why sharing is safe
[hide]
*.awf | A blueprint, as plain text: its name, author and description, its steps and routes, and what it runs on. This is the format to share. The file is where we saved it: AdaptiveWorkflow keeps no copy of its own. |
| A process icon | The blueprint as it was when the icon was made, kept inside the icon, so that an icon is complete in itself: it can be moved to another computer, saved in a project, or sent to someone else. |
| PixInsight's settings | The author name, the choice of certifying when saving, whether to ask before running a script that is not signed, the license information, the last folder each kind of file window was used in (blueprints, images, work folders) and the height given to the log. |
Nothing is stored about the images a blueprint ran on, and nothing is kept between runs: variables, kept images and answers belong to the run, and are gone when it ends.
Who made a blueprint
A blueprint is a plain text file, and anyone with a text editor can change the author in it. A certificate makes that change visible. When a licensed copy of AdaptiveWorkflow saves a blueprint, it signs everything in the file, the author's name included, with a key that comes from the license. Changing anything in the file afterwards, even one letter, makes the signature fail, and AdaptiveWorkflow says so when the file is opened. The Certified line of the designer shows what a blueprint is:
- Jane Doe, certified, ID 7F3A-91C2: the file is as the holder of that license saved it. The ID identifies the license without saying whose it is. It is not the e-mail address, and neither the e-mail address nor the license key can be worked out from it. The name beside it is whatever the author wrote, and the ID is what stays with it: certifying under an ID takes the license behind it, and only we, who issued the license, can say whose it is.
- Not certified, with a warning sign: the file has no certificate, because it was saved during the trial, by a copy that has no license, or with certifying turned off in the Preferences. Nobody vouches for the author's name.
- Changed after it was certified, in red: the certificate is there and the file is not as it was signed. Neither the author nor the blueprint can be trusted.
A certificate does not say who a person is, and it does not stop anyone from copying the steps of a blueprint into one of their own, which is then theirs. Taking the certificate out of a file leaves a blueprint that is simply not certified. And whoever has a license key can certify as that license, as they can use the module with it, so a license key is worth keeping to ourselves.
Changing someone else's blueprint
The author of a blueprint that someone else made cannot be changed. The first change we make to it, whatever it is, makes a blueprint of our own: we are its author from then on (the name last written in an Author box, which can be written at once), and the blueprint records the author it came from, with the ID of the license that had certified it, under Based on. When that blueprint was itself made from another, the whole line is kept, the original author first. Undo takes the change back, and the blueprint is theirs again. A blueprint that we save without changing anything keeps its certificate: it is still theirs.
Why a blueprint is safe to share
A blueprint from someone else is a file we did not write, so nothing in it is ever run as code. Each process step stores a process instance as PixInsight writes it, and AdaptiveWorkflow accepts that form and no other: var P = new and a process name, then lines that set one parameter each, P.parameter = value;, where a value is a number, a text, true or false, an enumeration element, or a table of those. Comments are allowed. No calls, no operators and no other statements are accepted, and a definition that does not follow that is refused whole, never run in part. The values the operator types, and the ones a workflow computes, are written back as literals AdaptiveWorkflow generates itself, so a value cannot break out of the line it is in.
A file is also read with bounds: its size, and how deeply its steps nest, are limited, and what does not fit makes it be refused, with a message, without touching the blueprint that is open.
A blueprint can also name folders: the files it chooses among, the work folder, and where a step saves an image. Their headers are read, never their pixels, and a step saves only what it was told to, but a path in a blueprint from someone else is worth a look, and AdaptiveWorkflow makes sure you look.
Check lists, as notes, every step that writes outside the work folder: a file a step saves an image in, a folder a process is given to write in, and a process set to replace existing files. Before a blueprint runs that is someone else's, or that no license vouches for, a window lists every place it will write (the work folder, the files and folders of its steps, the results folder), marks the ones outside the work folder, and asks whether to go on.It asks once for each version of the blueprint in a session.
A file a step saves an image in is replaced without a word when the run made it itself, or when it is in the work folder (where a rerun of the preprocessing blueprints rewrites its stages); a file anywhere else that was already there before the run is asked about first, with the choices Replace it and Stop the run, before the step does anything.
A stopless run cannot ask, so it stops at such a step and says which file it would have replaced.The paths and flags written in the source of a process are listed and reported, but not changed: the process does what it is told.
A Script step is the one place where code runs, and it is not the blueprint's: the step names a script that is installed in this PixInsight, and carries no code at all. A script that is part of PixInsight runs without a word. One that a developer signed is flagged orange, and one with no signature red, on the chart, in its panel and in a chip at the end of the Certified line, and the workflow asks before it runs the second kind (the Preferences can turn that question off). A script that is not installed is not run: the step offers to skip it. What a blueprint can do is therefore what its processes and the scripts it names do, which is why it is worth looking at what a blueprint from someone else contains, in the designer, before running it.
12 Usage tips
[hide]
- Start by measuring. A Measure followed by a Branch is the smallest decision a workflow can make by itself. The log of the first runs shows the values that were measured on our own data, which is how thresholds are set sensibly: we run, read the number, and then put the threshold where our data says it belongs.
- Ask only what we do not know. A question we always answer the same way is a step that should have its parameters stored. A question is worth its place when the answer depends on how the image looks, and then the Look at row of the questions window, with Show and STF, is the way to look before answering.
- Ask for a parameter, not for a whole step. Setting a parameter to Ask the operator keeps the step in the flow and puts the one value that changes in front of us, starting from the stored value, with the whole process kept as it was saved.
- Read the source when in doubt. Edit source shows exactly what will run. When a parameter has no place in the list, or a value does not behave, the source is the place to look.
- Reuse with routes. When two answers need the same steps, make them a route and call it from both. Changing the route changes both.
- Test on one image, then run on many. Design with the active image, running from the designer, and when the blueprint behaves, move it to a set of files, with Ask on the first image on, so that it asks once and runs the rest unattended. Keep the originals safe: leave Replace the original files off.
- Combine images with names. A blueprint that works with several images asks for each one with an Images step, and then every process says which one it works on. A channel combination is a process that makes a new image: keeping that image under a name lets the following steps work on it.
- Let the headers sort the frames. A blueprint for a night of frames needs no folders sorted by hand: add every frame in the Images window, set to These image files, together, and let Images steps choose them by their FITS keywords (see 6.6). Read the filter and the exposure from the first light with a Measure, and use them in the rules that find the darks and the flats. Give a step that must have frames a Stops when fewer than number, so that a missing set stops the run at once, saying what was missing.
- Keep the Run box in reach. A long workflow that asks questions is easier to follow with the Run box detached, on a second screen or next to the image the question is about (see 4.4). Its play and stop buttons start and stop the run from there.
- Use a Message for what cannot be automated. A step that has to be done by hand can be a note that says what to do, and the workflow waits until Continue is clicked.
- Check before sharing. Run Check, and put the name and a clear title on the steps. A blueprint is read by the person who opens it long before it is run.