Main window

The five settings tabs on the left, the live preview on the right, and the status bar along the bottom.
DeepParallax Studio turns a single deep sky or nightscape image into a stereo 3D result: parallax motion, side-by-side stereo, anaglyph, and flyby video, driven by a depth map assembled from several cues (luminance, structure, narrowband, color, external maps, and an internal sculpting editor).
File > Open Image..., or simply drag the file onto the
window. The common picture formats all work; XISF is read directly and keeps its astrometric
solution.View > Play parallax
motion). The image starts to move: nearer material sweeps, farther material holds
back, and the stars ride at their own depths.File > Export... saves any still view.Everything else in this manual refines what just happened: better depth (the Depth and Shaping tabs), better stars (the Stars tab), designed camera moves instead of a fixed sweep (the Flyby Editor and 3D flight), and finished output (the Post tab and the export sections).
File > Open Image...: load a source image. XISF is read directly, keeping its
astrometric solution; the common picture formats (PNG, JPEG, TIFF and the rest) are read as
pixels.File > Open Project...: load a .dpproj project file.View
menu (Original image, Depth map, Anaglyph, Side-by-side stereo, Starless image, Stars
only, Starless + synthetic stars).View menu (Play parallax motion, Play
flyby). While it plays, a slim timeline appears under the canvas; drag its handle to scrub to
any frame..dpproj project, a
.dpsc flyby script, or a .dpcol color depth profile.Main window
The five settings tabs on the left, the live preview on the right, and the status bar along the bottom.
The views that show no depth (Original image, Starless image, Stars only, Starless plus synthetic stars, and the star overlay) do not rebuild the depth map when you move a depth-related control. Nothing is lost: the rebuild happens the moment you select a view that does show it, and it happens straight away if the Star Distance Distribution chart, the Depth Modelling editor or a flyby depth view is open, since those read the depth too.
Right side of the window, updated on every render (blank fields until an image is loaded):
View: Anaglyph (1920 x 1080).Stars: Detected / Scattered; when the model is Real
Star depth, the model name is left off since the Real depth indicator already covers it.Real depth (33.5M stars).Status bar

View, Stars, and the AI / Real depth indicators, read left to right.
Stars tab
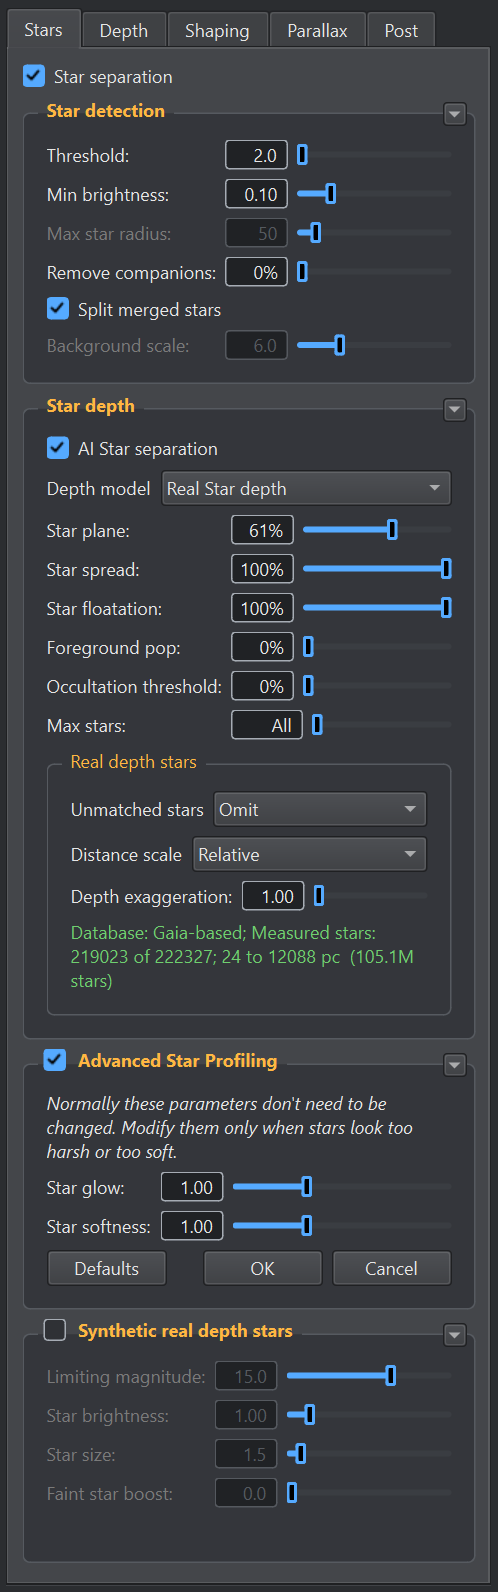
The master switch for the whole tab. Detects or generates stars and treats them as a separate depth layer, so they float in 3D over the structure rather than being flattened into the image. Turns every section below on or off. On by default.
Load stars + starless (Tools group toolbar button) is the third way to get a
star layer, besides detection and AI separation: pick a starless image and a matching stars-only
image and load them directly as the two separated layers, the same way a PixInsight-exported
starless+stars project does. Use it when you would rather separate the stars with a dedicated
tool first and bring both results here; the star layer then comes from what you loaded, not from
Studio's own detection. The two files are remembered together under File > Open Recent
> Recent stars + starless, as a single entry that reopens both.
Classical detection parameters, used when Synthetic real depth stars is off.
How the star layer is placed in depth.
Edit > Preferences > AI Star Separation model); with none loaded, classical
detection is used. When this is on, every separated blob is taken as a star at whatever size
it is, so the Star detection section's Max star radius and Background scale do not apply and
are greyed out.Shapes the soft edge of every separated star (detected, AI, or a loaded starless + stars project; not synthetic stars). Collapsed by default. The section's own title checkbox is the on/off switch: turn it off for hard-edged, tightly clipped stars. Most images never need these; reach for them only when stars look too harsh or too soft.
The Defaults button restores the standard soft look (on, both sliders centered); OK keeps the current values and collapses the section, while Cancel reverts to the values it had when you last opened it.
Replaces the detected stars with a starfield generated from the real depth star catalog: real colors (BP-RP) and real distances, each star floating at its true depth. Needs the image located in the sky and the star catalog; the stars are drawn over the de-starred base.
Marks the detected stars on the source image, so you can see which ones the detector found and,
in Real Star depth mode, which ones carry a real catalog distance. Turn it
on from View > Star overlay or the toolbar button. Colors: green is a Gaia match,
cyan a Hipparcos match, amber a star with no catalog match (given a synthetic depth). Outside Real
Star depth mode there is no cross-match, so every detected star is amber.
The drop-down arrow beside the toolbar's Star overlay button chooses which stars are marked: All, Known stars (matched, green and cyan alike), or Unknown stars (no match). It appears in Real Star depth mode only - the other star-depth models do not cross-match, so nothing there tells one star from another.
A rich field can carry tens of thousands of detected stars, far more marks than a screen has room for. Three things keep it readable, and none of them hides a star from you.
View > Ring only near the pointer marks just the stars around the mouse, and
nothing elsewhere. Useful when you want to examine a dense area at low zoom: sweep the pointer
and every star is reachable, with no filtering and nothing left out. The setting is
remembered.Lowering Max stars also reduces the marks, but it does so by not detecting those stars at all, so they are missing from the depth result as well as from the overlay. The three above change only what is drawn.
File > Export star overlay writes the markers into the saved image, so a file
matches what is on screen. See Exporting the current view.
Depth tab
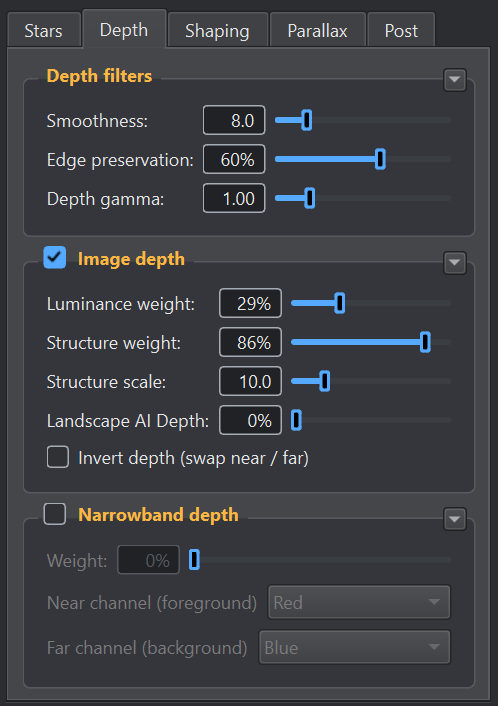
A checkable section: the title checkbox both gates the engine cue and enables the controls below. On by default. The main depth cues that read 3D from the image itself.
dp_dmap.onnx next to the app.A depth cue for narrowband (SHO/HOO) images: the balance between two emission channels drives depth. Needs a color (RGB) source. Off by default.
Shaping tab
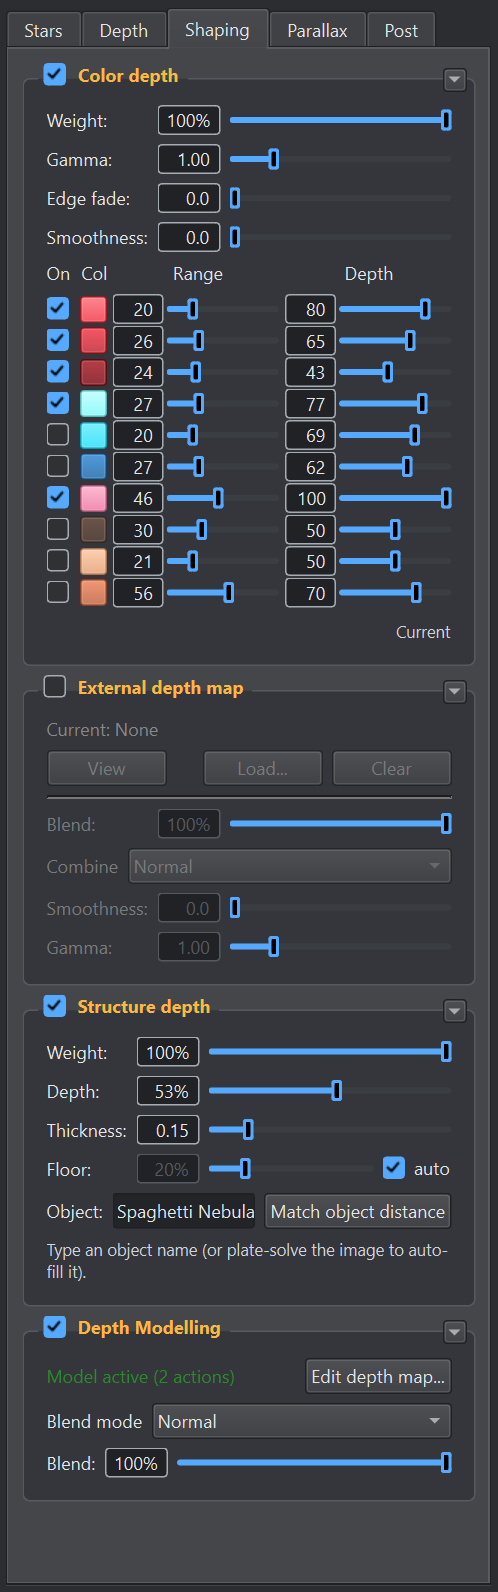
Assigns depth by color: pick colors and push matching pixels toward a chosen depth. Useful for SHO/HOO palettes where specific hues should sit nearer or farther. Off by default.
.dpcol file via File > Load/Save color depth profile....Loads a hand-edited or externally produced grayscale depth map and blends it over the computed depth (white is nearest). Off by default.
File > Open Recent > Recent depth maps, and reopening one from there loads
it as a depth map rather than as the working image.Anchors the structure (the whole depth map) at a chosen distance among the stars. Applies in starless + stars or synthetic-stars mode. Off (unchecked) by default.
M42, NGC 7000, Orion)
and press Enter, or click "Match object distance". Once the image is located in the sky, it
auto-fills with the object at the field center. The field (and its resolved distance) resets
whenever a new image or project loads, or when the app closes.Composites an internal, editor-produced depth model over the computed depth - the true last step in the pipeline. On by default. Uncheck to drop it without losing the sculpted model.
Parallax tab
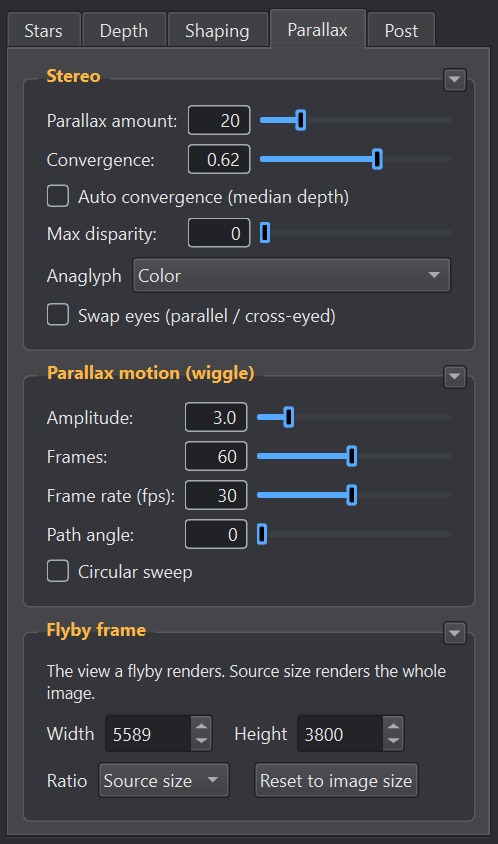
By default a flyby renders the whole image: load a 3000 x 1000 picture and the video is 3000 x 1000. Flyby frame sets a smaller view for it to render - 1000 x 1000, or 1000 x 800, or anything up to the source size - so the flyby becomes a reduced view travelling over the picture rather than the whole picture moving.
The frame is the field of view at zoom 1, which is what gives a flyby somewhere to go: with the whole image as the frame there is no room to pan until you zoom in, while a smaller frame can travel the length of the picture at zoom 1. Every waypoint's own zoom then works from the frame, so zoom 2 shows half the frame's width and height.
Nothing about authoring changes. The whole image stays visible in the Flyby Editor and waypoints go anywhere in it; the per-waypoint rectangles simply take the frame's shape, so they keep showing exactly what each point will render. A waypoint near an edge behaves as it always has - the view slides back inside the picture rather than running off it.
Export is unaffected in the way that matters: the frame is simply the video's native size, and the export dialog fits it into whatever output size you choose, exactly as it does a full-size flyby. This applies to a 2.5D flyby only - a 3D flight frames with its camera rather than by cropping the image, and parallax motion has no camera to move.
Post tab
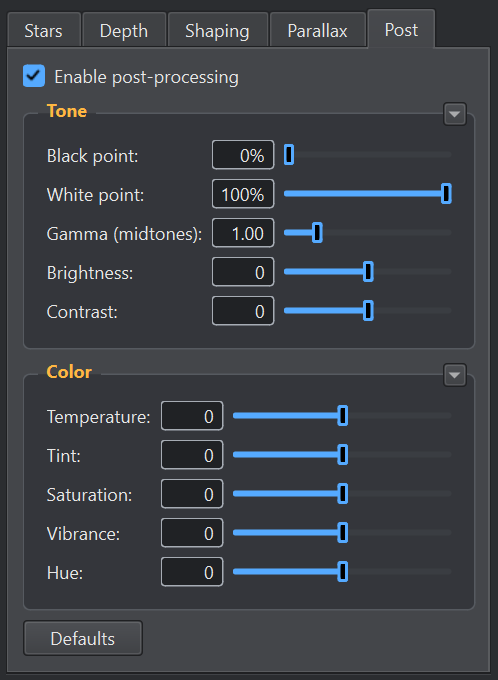
A final tone and color grade applied to the finished image: levels, brightness, contrast, white balance, and color. Everything here is applied to the final rendered image, after the stereo/depth work is done, so it affects every output equally: the anaglyph, the side-by-side pair, and each parallax-motion, flyby and 3D flight frame, including video and image exports.
Where you can see it. Because the grade acts on the final image, it only shows in the "final" preview views: Anaglyph, Side-by-side, and during Parallax motion, Flyby or 3D flight playback. The views that exist to show a source layer instead of the final result, Original, Starless, and Stars only, deliberately ignore the grade, so you can keep using them to judge the inputs. Switch to Anaglyph or Side-by-side (or play the motion) to preview your Post settings. The color adjustments are applied before the anaglyph's red/cyan encoding, so they never distort the anaglyph channels. On a mono image the color controls have no effect.
Levels and light. These apply to mono and color images alike.
White balance and saturation, from -100 to +100 (Hue in degrees). Skipped automatically on mono images.
The Defaults button resets all Post controls to no change.
File > Export... writes whatever the preview is showing. It is not a copy of what
is on screen: the view is rendered again at the image's full resolution, so the file never inherits
the preview's size, the window's size, or the reduced resolution a flyby preview may be running at.
The menu item and the toolbar button both name the view, so you know what you will get before the
dialog opens.
| View | What is written |
|---|---|
| Depth map | The depth map itself, 0 to 1. |
| Anaglyph | The anaglyph, rendered at full size. |
| Side-by-side | The stereo pair, rendered at full size. |
| Starless | The starless layer at full size. |
| Stars only | The stars layer at full size. |
| Starless + synthetic stars | The composite at full size. |
| Original | The source image. |
| Star overlay | The source with the star markers drawn in. |
The formats offered follow what the view is. The depth map and the image layers are real floating-point data, so they offer XISF (32-bit) first, then TIFF, PNG and JPEG. An 8-bit depth map bands, and that banding shows up as stepping if the map is ever brought back in, so XISF is the one worth reaching for. An anaglyph or a stereo pair is a viewing image, and gets the ordinary formats. When the image has been located in the sky, an XISF export of a layer carries the astrometric solution with it; a depth map does not, having none of its own.
The suggested filename is taken from the loaded project, so a project called M42.dpproj
suggests M42_depth_map.xisf. With no project open the name falls back to
deepparallax_.
The dialog opens in the folder your last export went to, remembered between sessions and shared by every export - stills, videos, VR180 and Apple Spatial alike - so a set of exports from one session lands together. Before anything has been exported it starts in the loaded project's own folder.
None of these is ever size-limited, whatever the license state: only video is. See Licensing.
Reachable from Window > Flyby Editor.... A visual editor for authoring a camera
flyby path by clicking over the image, instead of typing a script directly. Click to drop a
keyframe, drag to reposition one, Ctrl-click a point to delete it (the start point cannot be
deleted). Every edit auto-syncs live to the shared flyby script - there is no manual "apply" step,
and the Script Editor always reflects the same underlying script.
Flyby Editor canvas

Numbered keyframe markers and the connecting path drawn over the image, with the selected point's frame-of-view box and its resize/rotate handles.
| Group | Buttons | What they do |
|---|---|---|
| File | New, Load, Save | The first group on the toolbar. New opens a menu, from the button itself or from the
drop-down beside it, with two choices: New flyby (2.5D) clears the canvas to a
single start point, and New 3D flight starts a
3D flight path instead. A path is one kind or the other, so
switching replaces what you have and asks first. Load/Save read and write a
.dpsc path file, either kind. |
| Script | Switch to the script editor | Leaves this editor for the Script Editor, on the same path. |
| Edit | Undo, Redo | Step back and forward through the changes made to the path (Ctrl+Z, Ctrl+Shift+Z). See Undo and redo. |
| Transport | Play, Play point preview, Pause, Stop, Continuous loop | Play starts playback from the top - including from a paused clip, which it restarts rather than resumes; Play point preview renders just the neighbourhood of the selected point (see the point properties panel below). The status line under the canvas reports the path's frame count and playing time as you edit, so there is nothing to ask for separately. Continuous loop (on by default): on, the flyby repeats; off, it plays once and stops on the last frame. |
| View | Zoom out, Zoom in, Fit | Controls the canvas's own view of the backdrop image. The mouse wheel also zooms; right-drag pans. |
| Tools | SCC, Convert to script, Ongoing wiggle, Export | SCC (Script Coordinates Converter) rescales every literal image coordinate in the path from one image size to another. Convert to script flattens the waypoints into individual commands and removes the path block entirely (a one-way, confirmed action). Ongoing wiggle (on by default): on, the flyby gets the Parallax tab's wiggle wherever a point does not override it; off, the Parallax tab's wiggle is ignored during the flyby and only explicit per-point overrides apply. Export opens the flyby video export dialog. SCC and Convert to script are disabled for a 3D flight: its coordinates are world units rather than image pixels, so there is nothing to rescale, and its commands are not the 2.5D ones that Convert flattens to. |
| Right side | FPS, Res | FPS is the clip's frame rate: one value for the whole path, used for playback, for
validation and to fill in the video export dialog. It is stored in the script as
fps= on path_start. Res sets the
flyby preview render resolution. Optimized (the default)
picks the size from how large the preview is actually being displayed, rendering at twice
that so stars stay clean. On a large image in a normal window this is far less work than
100 %, which renders every frame at the full source size only for the view to shrink it
again - at the same quality or better. It follows the window: resize, and the preview
re-renders once the resize settles.
The fixed percentages (100 / 75 / 50 / 25 / 10 %) are shares of the SOURCE size, for when you want to pin the render size yourself. Lower renders faster and lets longer or larger flybys play back smoothly, since more frames fit in memory. Export is always full resolution. Zooming in during the flyby does not cost detail. A frame at 2x zoom needs twice the source detail of a wide one, so the preview renders that frame from a finer copy of the image while the wide frames stay on the coarse one - per frame, automatically, with nothing to set. A path that never zooms in renders exactly at the Res value and pays nothing for this. The frame is rendered at that size and then magnified to fill the canvas, so small features - stars especially - are drawn larger on screen than they will be in the output. The render itself is not affected: the same frame exported at 10 % and at 100 %, compared at the same size, is identical. |
The four navigation buttons (first / previous / next / last) sit right-aligned on the panel's title line, beside the name of the point they act on, with the X button that deletes the selected point at their right - the controls that act on one point are kept together, on the panel that edits it. Deleting is disabled on the start point, and does the same as Ctrl-clicking a point on the canvas or pressing Del. The 2.5D Point panel and the 3D Waypoint panel each carry the whole row, whichever is showing.
Edits the currently selected keyframe (click a point on the canvas, or use the navigation buttons).
Each waypoint's rectangle is the view that point renders. If you have set a Flyby frame, the rectangles take its shape - that is the whole of the framing feedback, and it is the honest place for it, since the view travels with the waypoints rather than sitting still anywhere on the image.
On a 2.5D path each point also carries two small arrows through its marker, on one line,
showing the direction the parallax motion sweeps at that point: horizontal at a path angle of 0,
vertical at 90, and so on. Their length follows that point's amplitude - a longer line is a wider
sweep - while the arrowheads stay one size, so length alone carries the reading. They reflect what
that point will actually do, which is the path-level angle and amplitude unless the point sets its
own sway or amp override, in which case the arrows show the override. No
ongoing parallax motion, no arrows; a 3D flight has none either, having no
sweep angle to point at.
A 3D flight path uses the same canvas and the same two click gestures. Clicking empty space adds a waypoint after the selected one, taking its depth and aim from that one. Clicking a path line inserts a waypoint into that leg: its position across the frame is where you clicked, and everything the canvas cannot show - depth, aim point, field of view and roll - is interpolated between the leg's two ends at that same place along it. The leg's frames are split between the two halves, so the flight stays exactly as long as it was and the speed along that leg does not change.
On a straight fly-in the waypoints differ almost only in depth, so they land on nearly the same pixel here and there is no line to click - that is what the depth view is for. The frame-of-view box carries the waypoint's own Field of view: its side handles change the field of view, its corner handles change the roll.
Each 3D waypoint also shows where it is aimed: a cyan crosshair joined to its camera by a dashed line. Every waypoint's aim is drawn faintly so a developing turn can be read across the path; the selected one is drawn bright and is the only one that can be grabbed. Drag that crosshair to re-aim the camera without moving it, or Alt-click anywhere to aim the selected waypoint at that point. Both change the aim's position across the frame only - its depth belongs to the depth view, the same split the camera marker follows. Look X and Look Y are the same values as numbers.
Dragging the camera's frame box carries the aim along with it, so the framing follows the box. To move the camera while holding an aim - a strafe - use the Cam X/Y sliders or the depth view, which leave the aim where it is.
Undo and Redo (Ctrl+Z and Ctrl+Shift+Z, or Ctrl+Y) step through the changes made to the path. They cover everything the path itself holds: point positions and timing, every property in the point panel, adding and deleting points, the frame rate, and for a 3D flight the waypoints and the whole 3D scene panel. Hand-written code kept alongside the path (see free-form commands) and the comments in it travel with each step, so stepping back never costs you either.
A continuous gesture is one step, not hundreds: dragging a point across the canvas, or a slider from end to end, records a single change once it settles. Fifty steps are kept.
The history belongs to the path currently open, so it starts empty whenever a different one arrives: opening the editor, loading a path file, starting a new path, or rescaling coordinates. The canvas zoom and which point is selected are not part of it - stepping back changes the path, not your view of it. Neither are Ongoing wiggle and Continuous loop: those two are playback settings that live outside the path, so they are unaffected by Undo.
The Depth Modelling Editor keeps its own separate history, and Ctrl+Z in one window never reaches the other.
A 3D flight moves a true perspective camera through the image, rendered as a cloud of particles with the stars placed at their own depths. An ordinary flyby pans and zooms a warped view of a flat image; a 3D flight has a camera position and an aim point in space, so it can dolly into the scene, slide sideways for real parallax between near and far material, and turn to look off-axis.
Start one from the Flyby Editor: New > New 3D flight. It arrives seeded with an
opening view that matches your image and a dolly straight in, so it plays immediately. A path is
either an ordinary flyby or a 3D flight; the two cannot be mixed.
The flight uses the depth map and the star set you already have, so everything in the Depth, Shaping and Stars tabs feeds it, including anything painted in the Depth Modelling Editor and any structure placement dragged in the Star Distance Distribution window. The Parallax tab's Convergence sets the flight's neutral plane: the depth that the structure's surface pivots about, so changing Structure 3D does not shift where the structure sits.
The depth map is followed literally. Every cue you enable feeds it, and a flight renders what it says: black is the far end of the scene, brighter is nearer, and an area raised in the Depth Modelling Editor comes forward by exactly that much. No 3D setting reinterprets it - if a structure should sit behind the stars, give it a depth map that says so, or set Structure depth at or beyond Star depth.
3D flight in the Flyby Editor
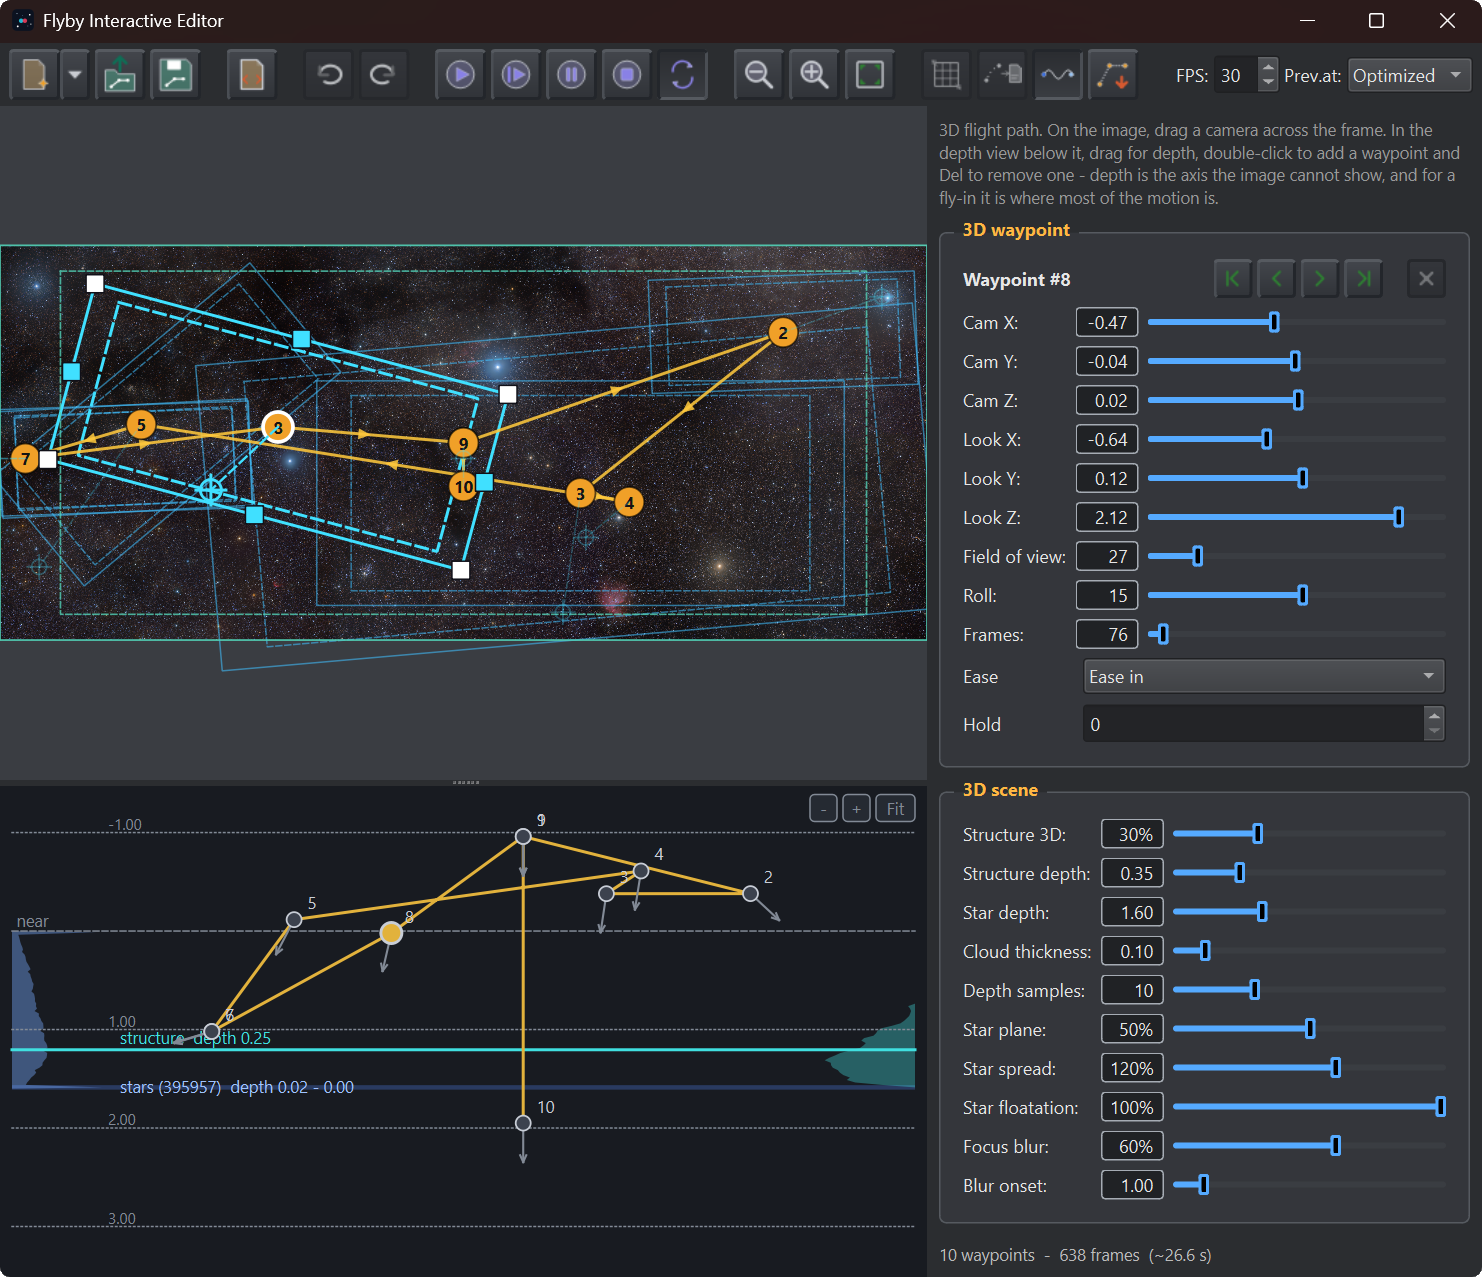
The camera track over the image, the depth view beneath it, and the 3D waypoint and scene panels on the right.
The two populations in an astro image carry very different amounts of real information, and the flight treats them accordingly.
Star depth can be genuine. Each star is placed by the Star depth model, which in Real depth (Catalog) mode comes from actual catalog distances, and each star keeps its real sprite, so bright stars stay bright and keep their halo and spikes as you fly past them.
Structure depth is inferred, not measured. A single image records one view of the nebulosity, so there is no information about what sits behind any part of it. The depth map is a plausible arrangement rather than a measurement, which is why the flight lets you decide how much of it to use. Past a point, less reads better: a heavily three-dimensional structure distorts as you dolly into it and skews as you turn.
Edits the selected waypoint. Select one by clicking it on the image canvas or in the depth view.
These apply to the whole flight rather than to one waypoint, because the scene cannot change shape mid-flight.
Focus blur is worth understanding rather than treating as a filter. Closing in magnifies the source past its own resolution, and what the renderer draws beyond that point is not detail but the structure of its own sampling. Softening it is the truer rendering of having run out of information, as well as a convincing loss of focus, and it covers much of the distortion a high Structure 3D picks up at close range. The stars are composited after the blur, so the field stays crisp against the softened nebulosity.
Flying through the structure is allowed: the camera can pass it and carry on among the stars. As it does, the structure fades out over the last stretch in front of the camera rather than being clipped away in a single frame - a connected surface crosses the camera plane all at once, and cutting it produces a blink rather than a departure. Stars are not faded; a point of light disappearing reads as a star passing, which is what it is.
The strip below the image canvas shows the scene from above: across is the image, down is depth. It appears for 3D flights only.
It is laid out to be read against the Star Distance Distribution window, using the same shared depth axis that chart uses:
The camera track runs through it all as a line with numbered waypoints, and a short arrow from each waypoint points the way that camera is aimed. Drag that arrow to turn the camera left or right: it pivots about the camera's own position and keeps the aim point the same distance away, so aiming never changes how far ahead the camera looks. The Look X/Y/Z sliders follow along.
The view fits itself to whatever you have authored, so its scale changes as you drag a point beyond the current extent.
A camera parked far out in depth squeezes everything else into a sliver, so the view can also be
framed by hand: the mouse wheel zooms about the pointer, the + and -
buttons in its top right corner zoom about the centre, and dragging empty space pans. Fit
(or the F key) returns to fitting everything, and lights up whenever the view is framed by hand, so
it is clear when what you see is not the whole path. Loading a different path fits again from
scratch.
Clicking the image canvas also adds a waypoint, setting its position across the frame while inheriting depth and everything else. Between the two views, each supplies what the other cannot express.
Waypoints can be deleted from either view: the X button on the Waypoint panel's title line, Del, and Ctrl-clicking a point on the image canvas all remove the selected waypoint. The start camera cannot be deleted.
The image canvas and this view are separated by a draggable splitter, so you can give whichever one you are working in more room. A fly-in is mostly motion in depth, where this view is the one worth enlarging; framing and roll want the image instead. Neither can be dragged away entirely, and the position is remembered between sessions.
Depth view
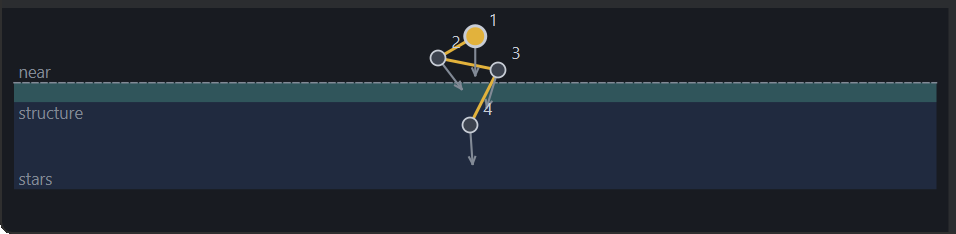
The scene from above: the structure and star depth bands, the camera track, and each waypoint's aim direction.
On a machine with OpenGL 3.3 - which is nearly every machine with a working graphics driver - the graphics card joins the "Building preview" pass: it renders frames side by side with every processor core, so the build finishes faster on any scene, most dramatically on structure-heavy ones. Playback itself shows pre-rendered frames, which is what stays perfectly smooth at any resolution; the status bar notes "GPU-accelerated" while such a clip is playing. On a very long or very large clip the frames that did not fit the memory budget render on demand, also on the graphics card.
The GPU renderer is for previewing only, and it is held to the standard renderer: an automatic test verifies, stage by stage - structure, stars, focus blur, Post grade - that the two produce the same image. Exports always use the standard renderer, so a file rendered on any machine is identical.
Without usable OpenGL (some virtual machines and remote desktops), or with the option turned off in Preferences, the cache builds on the processor exactly as it always did. The Res control and the video export dialog behave identically either way.
Note that stars are drawn from their real sprites only when those project to more than a couple of pixels; at low preview resolutions most stars fall below that and render as points, so star appearance is best judged at full resolution or from an export.
The video export dialog (Export Parallax Motion / Export Flyby) offers a 3D format choice. Every 3D form renders a true left/right eye pair for every frame - for a 2.5D flyby and for parallax motion the eyes are the same warp the stereo stills use, riding on top of the motion; for a 3D flight the camera itself is displaced for each eye and converged where it looks, which is genuine binocular parallax through the particle scene. Depth strength and convergence come from the Stereo section's own parameters (including Swap eyes), so a 3D video agrees with your anaglyph stills about how deep everything is.
The suggested filename gains a suffix naming the packing (_anaglyph,
_SBS, _HSBS, _TB), so a folder of exports stays legible.
Exporting two eyes per frame costs twice the render time of a flat export.
VR180 and Apple Spatial carry motion too. Both export doors ask what the
export should contain: the still stereo pair (or its 3-second loop), the parallax motion sweep,
or - when a path exists - the flyby or 3D flight. The motion forms render the same full side-by-side eye
pairs described above, at the path's own frame rate, and receive the same VR180 or Apple
spatial metadata as the stills, so they play as immersive 3D video on headsets and Apple
devices. Filenames gain _parallax or _flyby accordingly.
A cup of coffee appearing in a progress dialog means the job still has more than about two minutes to run. Nothing is wrong, and nothing needs doing: it is there so you can decide whether to wait or to go and make one.
It is measured rather than predicted. The app cannot know how long a render will take until it has rendered a few frames, so the cup waits for a real rate and then works out the time remaining. It never appears on a job that finishes quickly, and once shown it stays for the rest of the run rather than flickering as the estimate settles. It can appear in any of the long operations - a video export, a stereo video export, or building a flyby preview.
The flyby path compiles to (and the Script Editor edits directly as)
a small line-based language. An empty script uses the built-in push-in loop. Lines starting with
# are comments.
zoom v: set absolute zoom.zoomd v: zoom by a relative delta.pan dx dy: shift the center by (dx, dy).panl v / panr v / pant v / panb v: pan
left/right/top/bottom.reset / home: recenter, zoom 1, no dolly or roll.roll v: set absolute viewport roll, in degrees.update: commit pending instant changes as one frame (a cut).moveto: x y steps [rollTo]: ease the look-at center to (x, y).zoomto: value steps [rollTo]: geometric zoom to a value.rotate deg steps: roll the field of view by a relative amount.flyto: x y steps away [rollTo]: pan to (x, y) while diving into the scene (away is
the depth-dolly percent).flyin: x y steps zoom away [rollTo]: combined pan, magnify, and dolly in one move.sway v: parallax sweep direction, in degrees.amp v: wiggle amplitude (0 to 20).period v: wiggle cycle length, in frames (2 to 600).motion: amp [period] [sway]: a one-liner for all three; omitted arguments are
unchanged.hold n: emit n static frames.setfps n: the frame rate the wiggle is written for, from here on, 1 to 240.
It scales the wiggle's cycle length; it does not change the clip's rate, which comes from
fps= on path_start.ease m: linear, in, out, or inout.repeat N ... end: a single-level loop (no nesting).$name = expression: arithmetic variables. Reserved read-only variables:
$w/$width, $h/$height (source dimensions),
$centerx/$centery (image center), $curx/$cury
(live viewport center), $zoom, $vw/$vh.The Flyby Editor's own waypoint blocks (path_start / path_begin /
waypoint ... / path_end) are the graphic-path form of the same language,
expanded to the base commands above before the script compiles.
A 3D flight is written in the same script, declared by
mode=3d on the path_start line. That declaration is what selects the 3D
compiler; a script without it is an ordinary flyby. One script, one editor, one Load.
path_start version=1 mode=3d fps=24 pos=0,0,-0.96 look=0,0,0 fov=55
scene  depth_scale=0.35 star_depth_scale=1.6 ref_dist=0.96 particles=6000000
render structure_3d=0.2 thickness=0.10 samples=10 cloud_size=1.1 star_max_scale=3.0
stars  plane=0.50 range=0.90 floatation=1.0
path_begin hold=10
  waypoint pos=0,0,-0.55 look=0,0,0.05 frames=40 ease=inout hold=6
  waypoint pos=0.22,0.03,-0.45 look=-0.10,0,0.10 frames=40 ease=inout
path_end
Coordinates are world units in which the image is 1.0 tall, so x spans plus and minus half the
aspect ratio. Depth runs from 0 at the nearest structure to depth_scale at the
farthest, and the camera starts on the negative side looking toward positive depth, so flying in
means increasing z. At fov=55 the image exactly fills the frame from a distance of
0.96, which is why a path opens at pos=0,0,-0.96.
mode=3d: required. Without it the script compiles as an ordinary flyby.pos=x,y,z: the opening camera position.look=x,y,z: the opening aim point.fov=deg: vertical field of view.roll=deg: optional opening roll.fps=n: the clip's frame rate, one value for the whole flight. Used for
playback and for export.The opening camera is itself the first rendered frame.
Scene geometry, before path_begin.
depth_scale=v: world depth the structure occupies.star_depth_scale=v: world depth the stars occupy.ref_dist=v: the distance the image is treated as having been taken from, which
sets how the scene spreads with depth. Match it to the opening camera distance.particles=n: how many particles the structure is built from. Higher resolves
finer detail and takes longer to build.floor=v: skip pixels dimmer than this, which drops empty sky.Appearance, before path_begin.
structure_3d=v: how much three-dimensionality the structure gets, 0 to 1.thickness=v: depth spread per particle.samples=n: depth samples per particle.cloud_size=v: particle splat radius as a multiple of particle spacing.exposure=v / star_exposure=v: brightness of the structure and of the
stars, separately.star_size=v: point size for stars too small to draw from their sprite.star_max_scale=v: how large a star sprite may be drawn relative to its size in
the source image.focus_blur=v: softening of the structure at full strength, as a share of frame
height (0.03 by default, 0 turns it off). This is the raw fraction the renderer uses; the
panel presents the same setting as 0 to 100% of a sensible maximum, where 0.03 reads as 60%.
Stars are never blurred.focus_onset=v: magnification at which that softening begins, where 1 (the
default) is the opening framing.width=n / height=n: optional output size. The app renders at the
image's own size, so these matter only outside it.Star placement, before path_begin.
plane=v: center of the star depth distribution, 0 to 1.range=v: how widely stars scatter around it.floatation=v: 1 uses the model's depth outright, lower blends toward the scene
depth.path_begin [hold=n]: opens the path. The optional hold pauses on the opening
camera before the first move.waypoint pos=x,y,z look=x,y,z frames=n [ease=..] [fov=..] [roll=..] [hold=n]: a
move to a new camera position and aim. frames is required; everything else a
waypoint omits is inherited from the previous one. ease is linear, in, out or
inout. hold adds exactly that many still frames on arrival and is never rounded
up.path_end: closes the path.Every look should sit ahead of its own pos in depth. A path that places
one behind still compiles and plays, but the camera turns to face backward there and the frame goes
black for a stretch (see the note in 3D flight). The path status line
reports any waypoint that does this, naming it and what to change.
path_begin. Placing them inside the path block is an error, since the scene cannot
change shape while the camera is moving through it.Waypoints spell a path out one point at a time, which is tedious for anything a formula could
describe: a circle needs a waypoint every few degrees, each with its position worked out by hand.
Free-form commands let a path be computed instead. They can appear before path_begin or
after path_end, in place of or alongside a waypoint block, and share the same running
camera as the block, so a computed approach can lead into a clicked path and a computed exit can
follow it.
A path written with any free-form commands cannot be drawn on the Flyby Editor canvas, so the editor leaves those parts untouched and edits only the waypoint block between them. This is the same trade the 2.5D Convert to script makes.
campos x y z / lookat x y z: set the camera position or aim point.fov deg / roll deg: set field of view or roll.setfps n: set what the $fps variable reads from here on. A 3D
flight runs at the single rate given by fps= on path_start, so this
does not change playback or export.ease linear|in|out|inout: set the speed curve used by the moves below.hold n: emit n still frames.update: emit the current camera as one frame (a cut).Each eases from the current camera over a number of frames, using the current ease.
camto: x y z frames: move the camera to a new position.lookto: x y z frames: swing the aim point to a new place.flyto: camx camy camz lookx looky lookz frames: move camera and aim together.fovto: deg frames / rollto: deg frames: ease field of view or roll.dolly: distance frames: travel along the direction the camera faces, carrying the
aim point with it, so a dolly never runs past its own target.orbit: degrees frames: swing the camera around its aim point at constant distance,
staying pointed at it. This is the move waypoints are worst at.repeat N ... end: repeat the enclosed commands N times (one level, no
nesting).$name = expression: define a variable. Expressions use + - * / and
parentheses.Read-only variables are available in any expression: $camx, $camy,
$camz, $lookx, $looky, $lookz, $fov,
$roll (the live camera), $fps, $aspect, $depth,
$stardepth, $refdist (the scene), and $pi. Reading
$camz after a waypoint block, for instance, gives wherever the block actually left the
camera, so a following move can be relative to it rather than a number kept in sync by hand.
# A full orbit in one command, with a beat before and after.
path_start version=1 mode=3d fps=24 pos=0,0,-1.10 look=0,0,0.12 fov=55
scene depth_scale=0.30 star_depth_scale=2.0 ref_dist=0.96 particles=6000000
render structure_3d=0.15 thickness=0.1 samples=10 cloud_size=1.1
stars plane=0.5 range=1.0 floatation=1

ease inout
hold 12
orbit: 360 320
hold 16sway, amp, period) does not apply to a 3D flight, which gets
its depth from the camera moving through the scene rather than from a wiggle.Reachable from Window > Script Editor.... The same flyby path as plain text, with
line numbers and syntax highlighting (commands, parameter names, numbers, and comments each colored
differently). The Flyby Editor and Script Editor read and write the same script.
.dpsc file.Reachable from Window > Depth Modelling Editor..., or the Shaping tab's
"Edit depth map..." button. Reshapes regions of the computed depth by hand: select a region, then
apply an effect to it. On Apply, the result becomes the internal Depth Modelling map (see
Shaping tab). Apart from Undo and Redo, everything is toolbar and mouse
driven.
Depth Modelling Editor
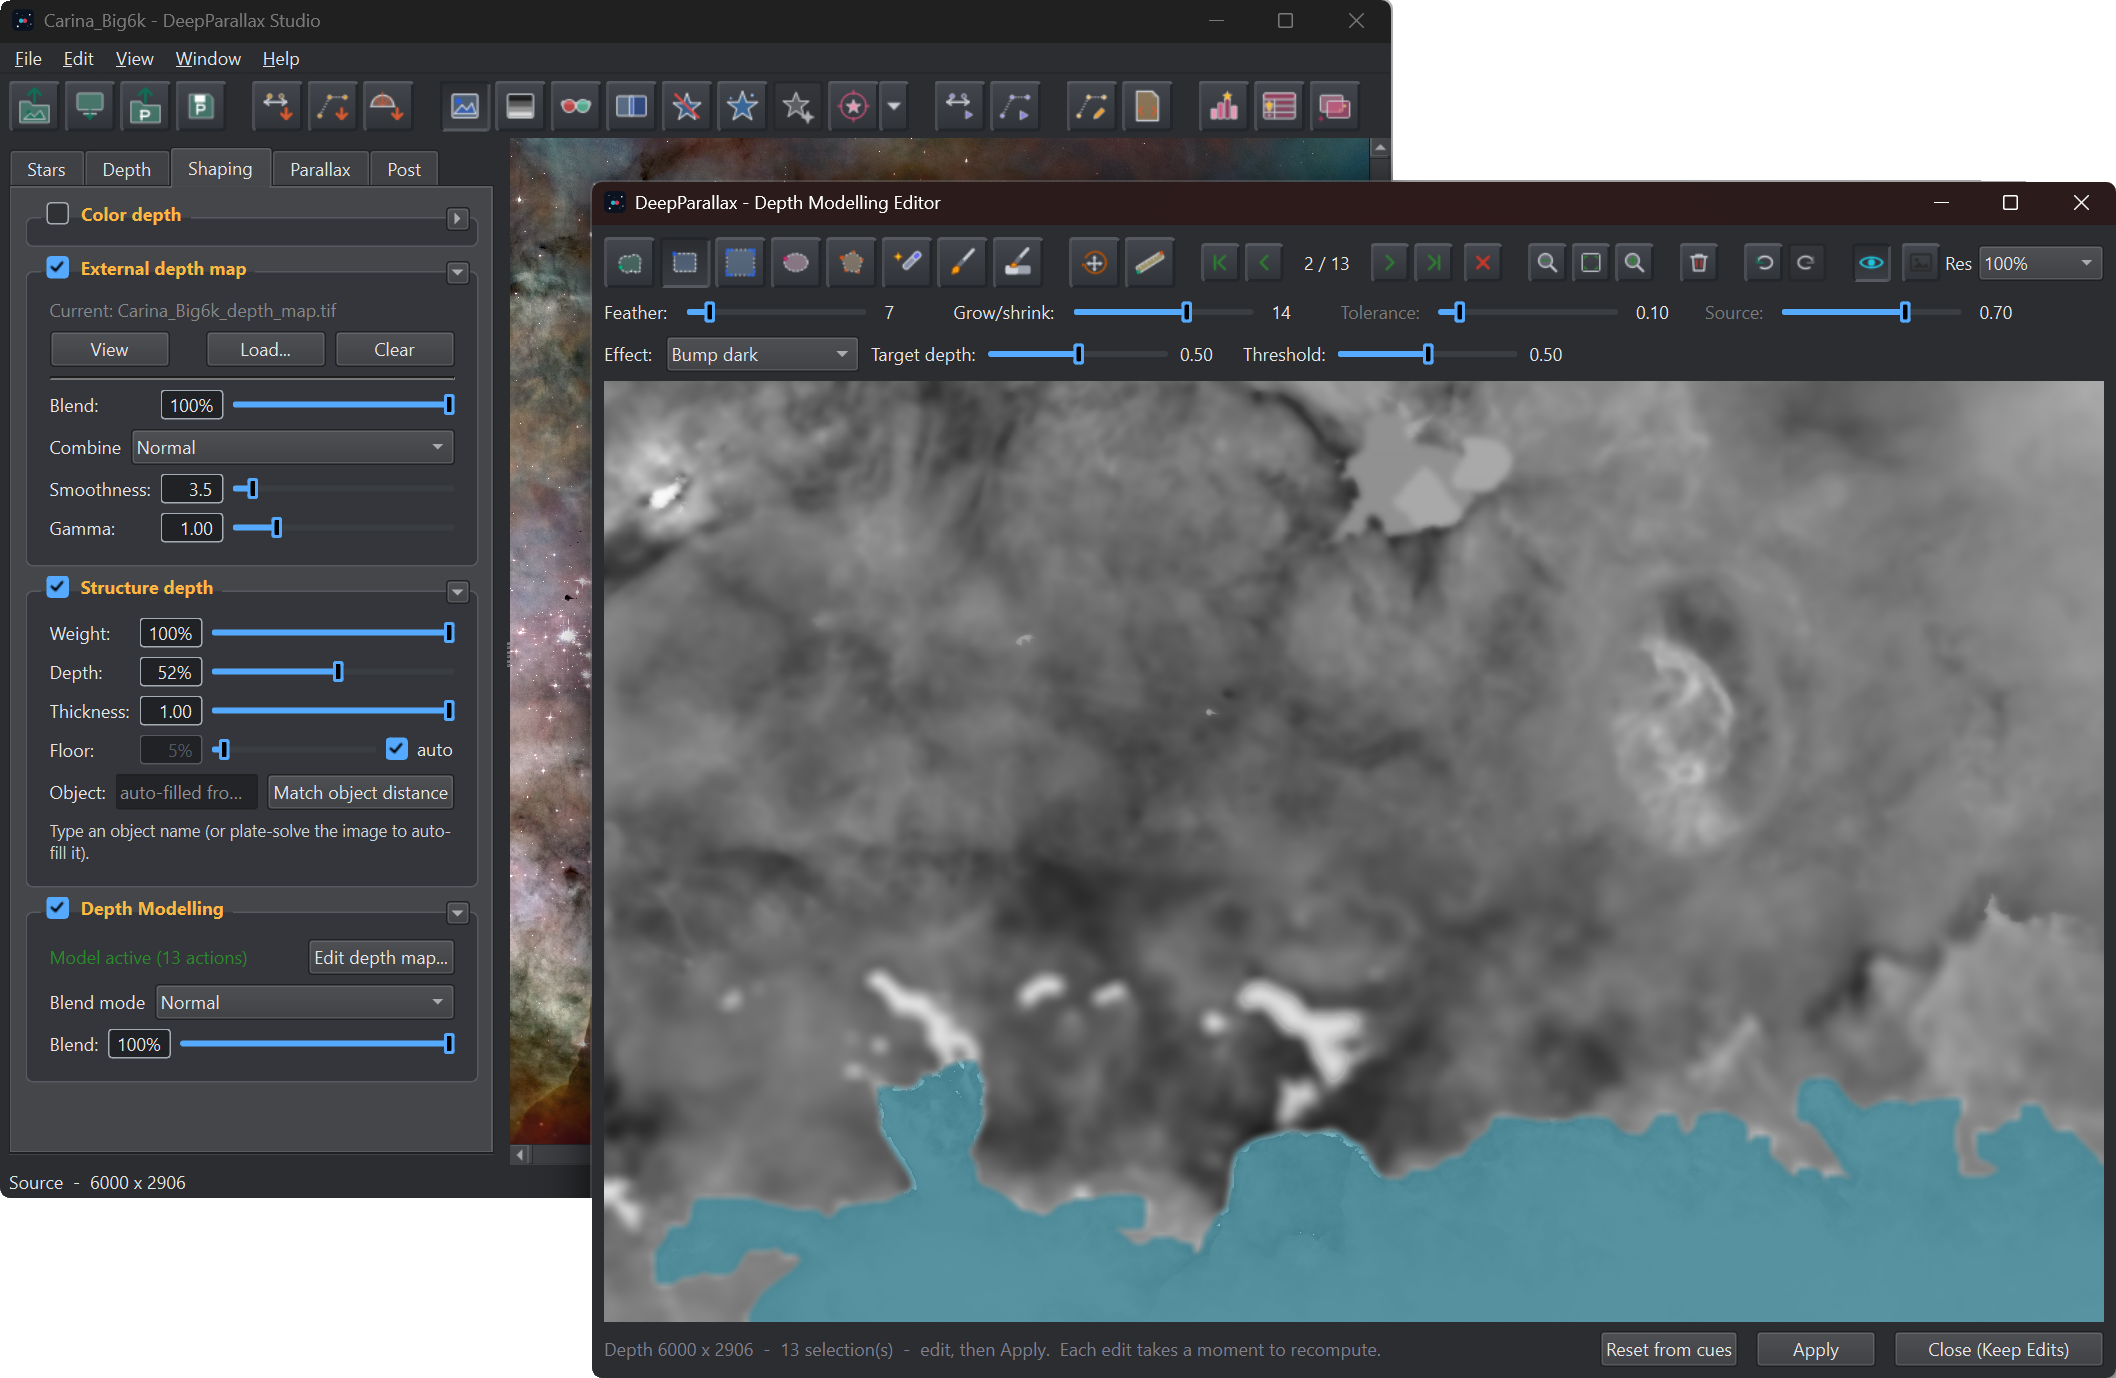
A selection made with the magic wand tool, with the cyan overlay showing its extent before an effect is applied.
The two brushes are easy to conflate, so the differences are worth stating plainly: the Selection brush answers "WHERE should the current effect act" and paints a dashed-world thing, a selection; the Depth brush answers "WHAT depth goes here" and paints the map itself. Amber cursor ring versus gray, dashed icon versus a solid gray swatch, and only the Depth brush enables the Level slider.
The Brush row appears only while one of the two brushes is the active tool; with any other tool selected it is hidden, since its sliders have nothing to act on. Its sliders serve both brushes: Brush size is the diameter in image pixels, up to 512; Softness runs from a hard-edged disc at 0 to a fade from the centre at 1; Opacity is the stroke strength; Level is the Depth brush's gray. The cursor shows the true painted circle, with a dotted inner ring marking the solid core when Softness leaves one.
The toolbar groups the tools by job: the region-creating tools (Freehand through the two brushes, with Select all among them) sit together, and Move and Ruler - which act on or measure what already exists - sit as their own pair after a gap. The two display toggles, the cyan selection overlay and the source-image underlay, sit together at the toolbar's end.
While you drag a region with the move, rotate or resize handles, its effect is lifted: you see the depth without it, and the selection outline moving over it. The effect is applied when you release the button. That keeps a drag responsive on a large image, and there is no ghost of the effect sitting at the place the region came from.
First / Previous / Next / Last move between existing selections; the count label between them reads "current / total". Delete removes the current selection.
Chosen from the Effect combo; each relabels the Amount slider and may add an Extra slider, a direction combo (Spherize, Flatten), or Gradient's own direction dial.
Undo and Redo (Ctrl+Z and Ctrl+Shift+Z, or Ctrl+Y) step through the edits made here: creating a region, deleting one, Clear all, moving or reshaping a region with the Move tool, and changes to its feather, grow/shrink, effect and effect settings. A slider drag is one step, recorded when you release it.
The history is bounded by memory rather than by a fixed number of steps, because a region carries a full-size coverage image: on a large image a single reshaped region is tens of megabytes, while a change of effect settings costs almost nothing. So the number of steps you can go back depends on what those steps were. The Undo button's tooltip reports how many are held and how much they are using; the oldest are dropped as new ones arrive.
This history covers the edits, not the applying of them: Apply commits the current state to the depth map, and undoing afterwards takes the editor back a step without un-applying. Apply again to commit what you have stepped back to. The history starts empty each time the editor opens on the committed model, and is dropped by Reset from cues and by loading a project.
Which region is selected is not part of it, and the Flyby Editor keeps its own separate history.
The toolbar button beside the cyan-overlay toggle, at the toolbar's end, shows the source image underneath the depth map, so you can tell what a region actually covers. Its strength is the Source slider on the adjustment row, 70% by default; the slider is active only while the button is on.
This is a viewing aid and nothing more, in exactly the way the cyan selection overlay is. It changes nothing about the depth map, the regions or the effects, and it never reaches a render: the same edit produces the same result whether the source is showing or not, and the region you are working on stays fully editable either way.
The setting is saved with the project, so reopening one puts the editor back the way you left it.
Every edit replays all of your regions over the depth map, and that cost grows with the image size and with the number of regions. On a large image each change can take a visible moment. Res sets the resolution the map is edited at, which is the one thing that removes that cost rather than hiding it.
Apply always commits at full resolution. The regions and their pixel-measured settings (feather, grow, Blur radius, Contour peak steps) are scaled up to match, so the depth map is built at full size whatever resolution you drew at. Saving a project stores the model at full resolution too, so a project opens the same way whatever setting was in use when it was saved. At a reduced setting the region edges carry the coarseness they were drawn with, which shows as slightly softer boundaries.
Changing Res rescales the regions already drawn. That cannot be stepped back through coherently, so it clears the undo history. Pick the resolution before doing detailed work rather than partway through.
On Optimized, resizing the editor window updates the resolution to match the new canvas size, since that is what Optimized tracks. This happens only while no regions have been drawn: once there are regions, following the window would mean rescaling them and losing the undo history, which is too much to spend on a window drag. With regions present the resolution stays put and the Res combo remains the deliberate way to change it.
The pointer shows a busy cursor while an edit is being recomputed, and the status line says "Each edit takes a moment to recompute" when the image size and region count together make that likely. Lowering Res is the way to shorten it.
Reachable from Window > Star Distance Distribution..., the toolbar, or
View > Star Distance Distribution.... A chart of the star sprites' depths, with the
convergence and structure planes (and, optionally, a looked-up object) marked on it.
Over the star bars runs a cyan line: the depth map's own distribution, on the same depth axis, so you can see where the structure's material sits against where the stars sit. It is the same curve the 3D flight's depth view draws, from the same measurement, so the two windows always agree. Its height is relative to its own peak - the y axis counts stars, not depth-map pixels - and it is drawn on a square-root scale, since background outnumbers structure by orders of magnitude and a linear plot would be one spike and a flat line. The depth chart only: the depth map has no distances, so there is nothing to place it on in real distance mode.
The default view: a histogram of every painted star's depth, 0 (far) to 1 (near); near is on the left, far on the right.
The "Real distance (pc)" checkbox switches the chart to a histogram of the matched stars' real catalog distances, available once at least two stars have a real distance (Real Star depth model, or Synthetic mode).
Star Distance Distribution, Real distance mode
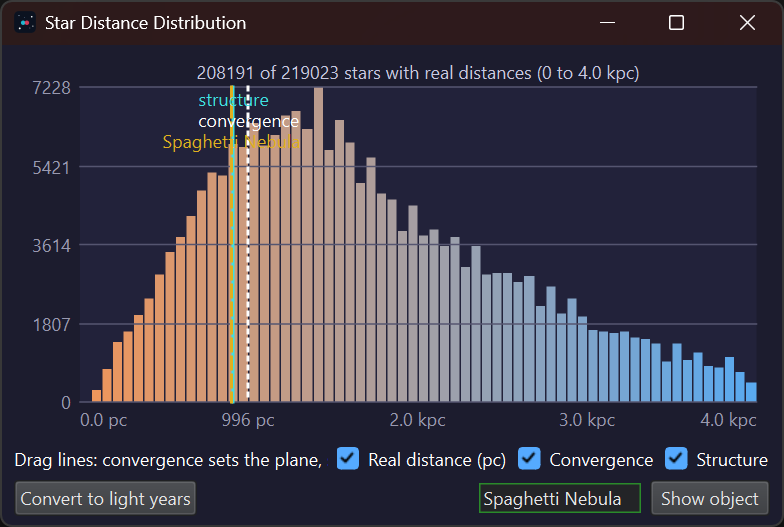
The distance histogram starting at 0, with the Structure and Convergence lines, a looked-up object's gold line, and an off-chart ">" tag for a marker beyond the current range.
A name field and "Show object" button. Typing a name or catalog id (for
example M31) and pressing Enter, or clicking the button, looks it up and draws it as the
gold reference line described above. This is independent of the Shaping tab's "Match object distance":
looking up an object here only charts it, it does not move the Structure depth anchor. The field is
prepopulated from the Shaping tab's Object field the first time this window is opened, but can be
changed to look up a different object at any time - useful for images with several catalogued objects
in them.
Reachable from Window > Detected stars table... or the toolbar. Every star
the detector found, one row each, with everything the program knows about it: where its data
came from, where it sits in the sky, and where it was placed in depth. This is the window to
open when you want to verify a star's distance, find out why something looks wrong, or edit a
sprite by hand.
The columns, briefly. Source says where the star's identity came from: Gaia, Hipparcos (the bright-star fallback), Synthetic, or "-" for a detection with no catalog match. Mag is the G magnitude for Gaia matches and V for Hipparcos ones - different bands, which is why the column is not labelled Gmag. RA/Dec come from the matched catalog row, or, for unmatched stars on a solved image, from the plate solution (marked "(wcs)"). Parallax, Distance and Depth are the star's measured parallax, its distance in parsecs, and the 0 to 1 depth it received in the scene. Size is the sprite's own pixel footprint. Unknown values show as a dash, never as zero: zero is a real coordinate and a real magnitude.
The pane on the right shows the selected star's sprite at its own scale - 1:1 when it fits,
magnified in whole steps when small, reduced only when it cannot fit - with the true size always
stated underneath. Normalise brightness scales each sprite to its own peak, so
its shape is visible whatever its brightness; unticked, all sprites share one scale, so two
stars can honestly be compared (a faint one then looks faint). The mouse wheel zooms around the
cursor, Ctrl+= / Ctrl+- zoom from the
keyboard, Ctrl+0 returns to the automatic fit, and a right-button drag
pans. The view survives re-renders on purpose, so you can stay on the spot you are editing.
Detected Stars table
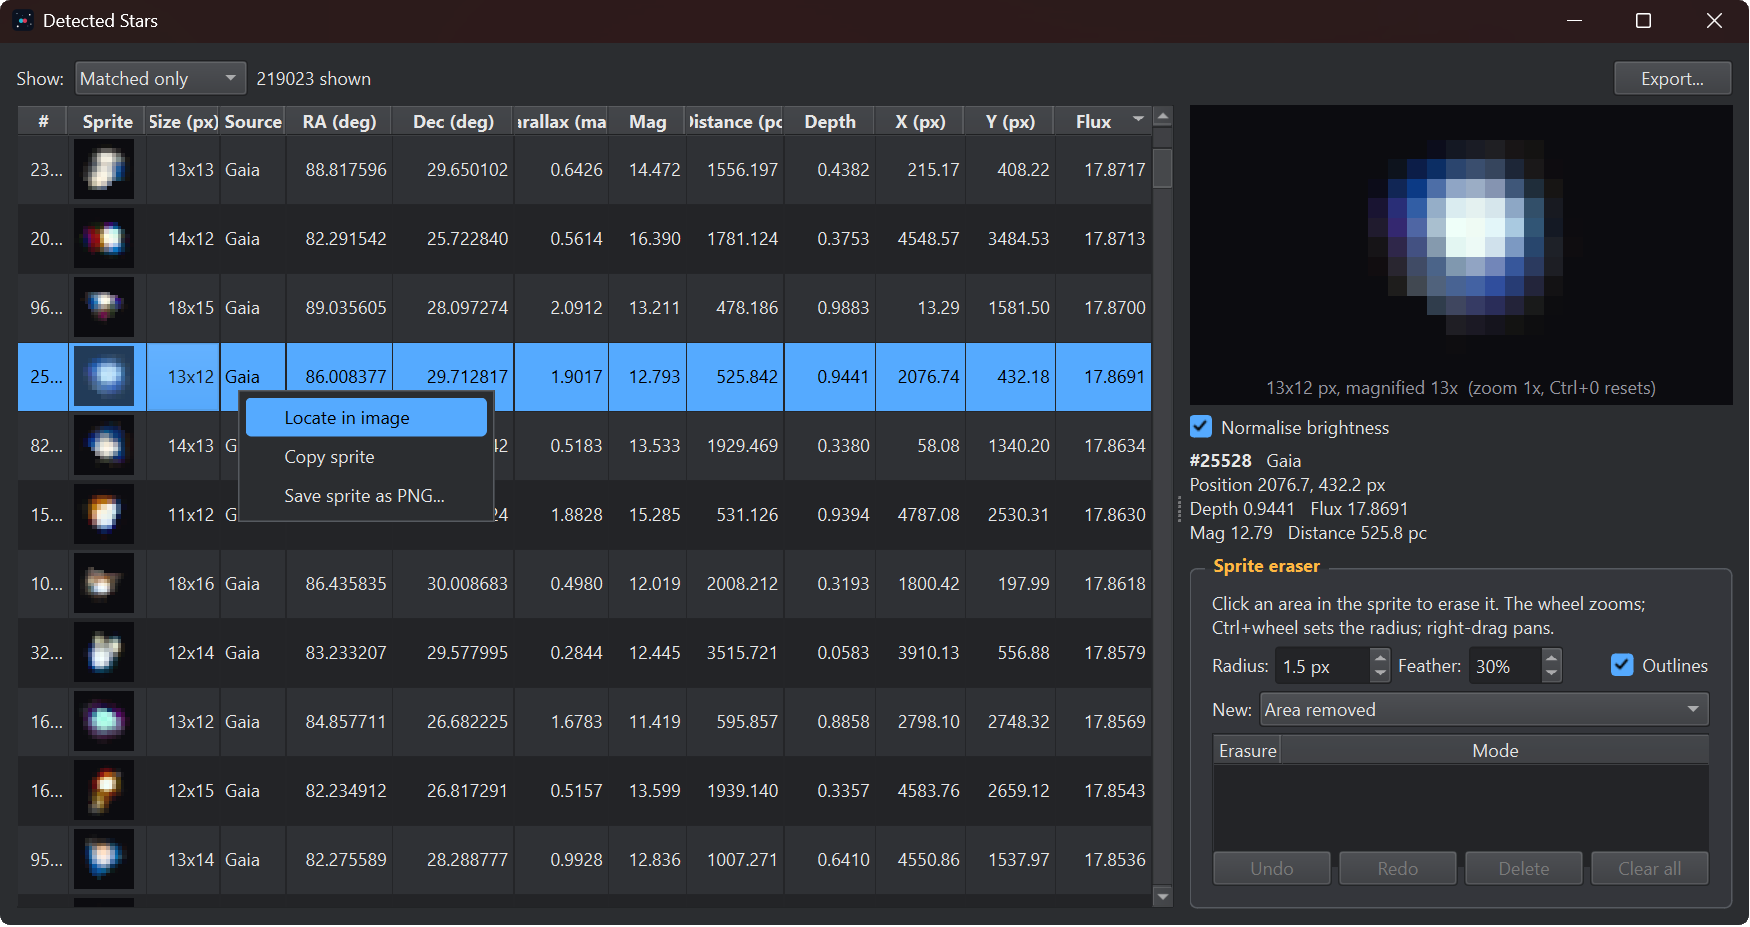
The star table with its filter and export controls, and the detail pane showing one sprite with the Sprite eraser below it.
Detection is not always able to separate what your eye can: a companion inside a bright star's glow, or a pair too close for Split merged stars to cut apart, ends up inside one detected star. The Sprite eraser reshapes such a sprite by hand: click an area of the sprite in the detail pane, and the star light inside that circle stops being rendered as part of it.
Eraser points live in image coordinates, not in the sprite: they survive re-detection, changes to the Star detection sliders, and project save/load, without being tied to any particular detection run. They are saved with the project, and every change re-runs detection, so the render updates as you work.
Ctrl+wheel over the
sprite adjusts the radius (the spin box follows), and the prospective circle is drawn
under the cursor before you click, feather included, so there is no guessing. Feather is
set as a percentage of the radius; the soft edge is what keeps an erasure from stamping a
visible circle into a stellar profile.Ctrl+Z / Ctrl+Y, scoped to this
window: every placement, deletion and mode change steps back and forward
individually.Sprite eraser
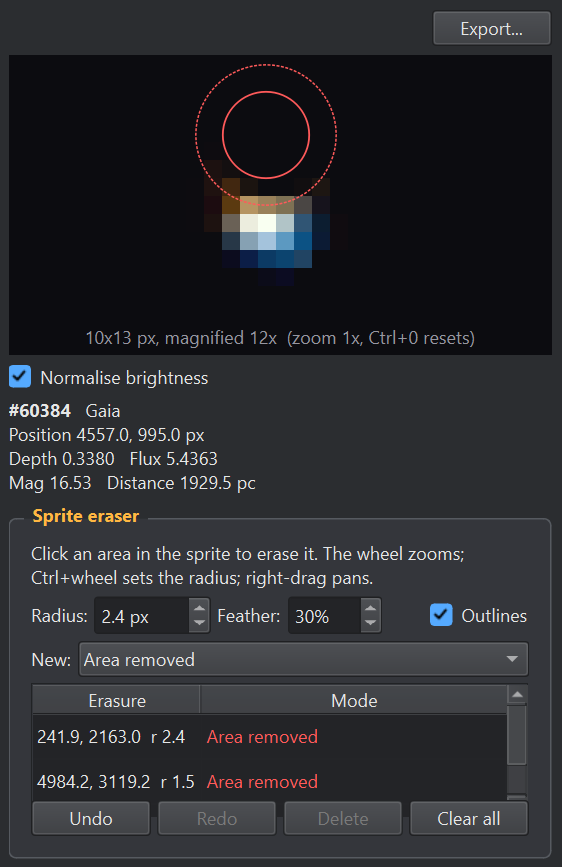
A companion erased from a detected star: the eraser panel with its mode and feather controls, the point list, and the rings over the sprite.
Reachable from Edit > Manual solve.... Locates the image in the sky by having you
point at objects you can name, instead of matching stars against a catalog. It needs no catalog, no
approximate center and no image scale: three identified points are enough to fit a solution.
This is the way in when Locate in the Sky cannot do the field. Automatic solving works by matching star patterns, so it struggles on frames that are very wide, very narrow, sparse, heavily processed, or not really stellar at all. Everything gated behind having an astrometric solution - Real depth stars, Synthetic stars, the Star Distance Distribution's real distance mode - works exactly the same afterwards, whichever way the solution was found.
If the image already has a sky location, you are asked before the window opens whether to discard it. Declining opens nothing, so there is no way to lose an existing solution by looking. When an automatic solve fails, its dialog offers a Manual solve... button that hands straight over.
Manual solve
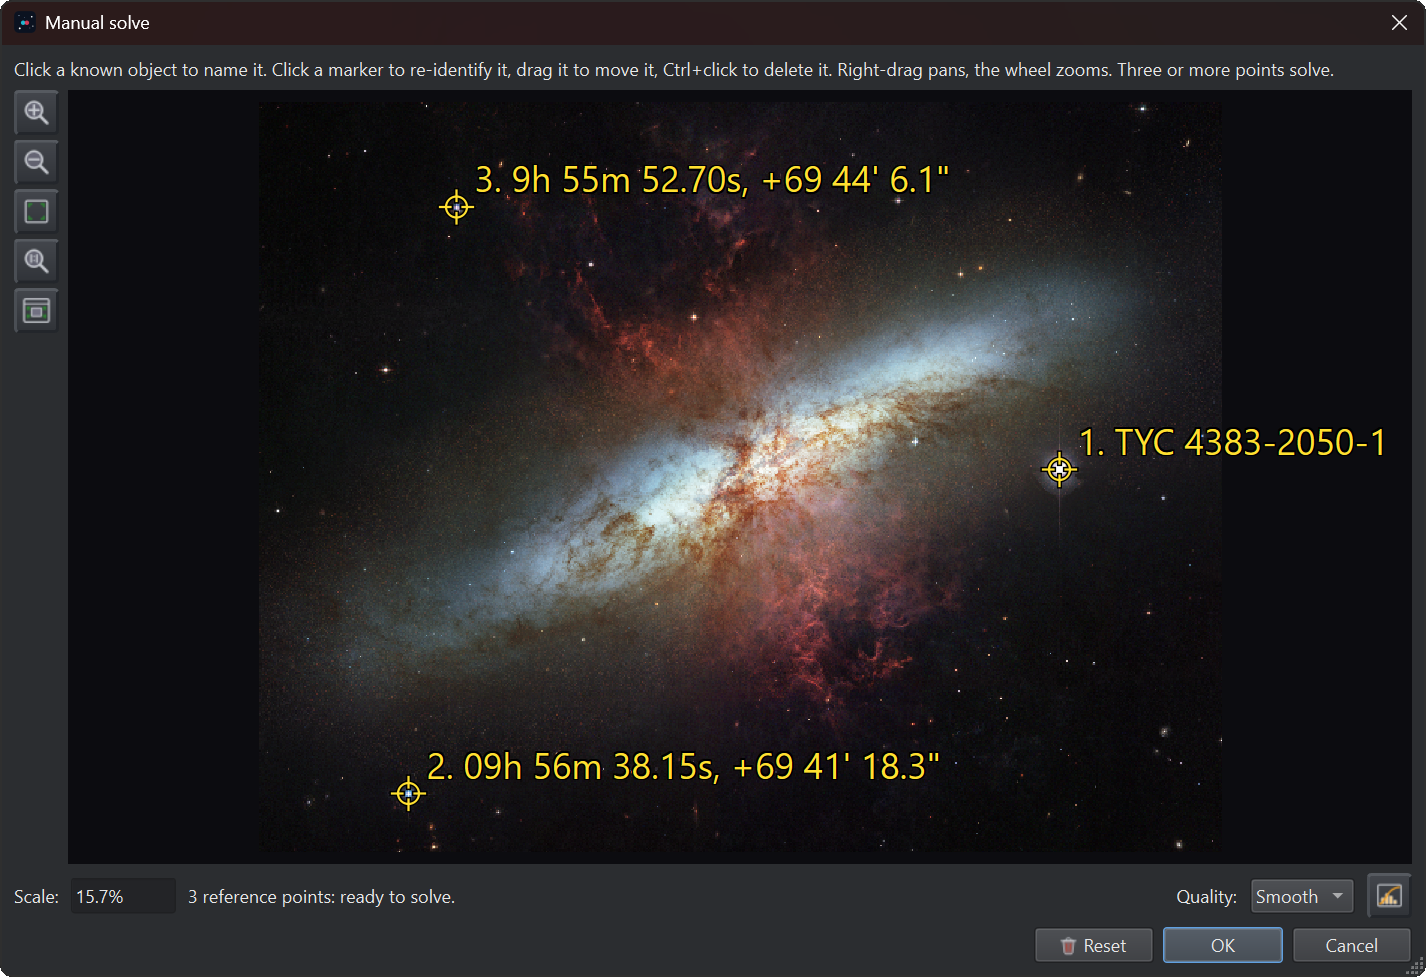
If DeepParallax Studio cannot figure out what part of the sky the image is showing, we can manually solve it by setting at least 3 identifiable points, by name, designation, or coordinates.
Click anywhere on the image to place a marker and name what is there. The name is resolved against the built-in object catalog first, and against SIMBAD online if it is not bundled. You can also type a position instead of a name, which is how you use a star that has no designation anything will resolve:
M42, Rigel, NGC 1976,
HD 4628.83.822 -5.391 (decimal degrees), or
05 35 17 -05 23 28 (RA in hours, minutes, seconds).Each marker is labelled with its number and the name it resolved to.
Three points is the minimum, not the target. Spread them as widely across the frame as you can: points bunched together, or lying on a straight line, describe the geometry poorly and are rejected as degenerate. More points spread wider give a better fit and a smaller residual.
The fit refuses a solution whose points disagree with each other on image scale, which is the signature of one object having been misidentified. If you are told the points disagree on scale, one of the names is wrong rather than the whole attempt being hopeless: check the identifications before removing points.
Your points survive closing the window, whether you accepted or cancelled, so you can come back and add to them. They belong to the image in front of you and are cleared when that changes: opening a project, loading a different image, or loading a stars + starless pair of a different field. On a proxy swap to a proportionally larger or smaller version of the same image they are carried over and rescaled with everything else.
The points themselves are not written to the project file. What a project stores is the resulting astrometric solution, which is the part that matters once the fit is done.
DeepParallax Studio periodically records the open project so that work is not lost if the app or
the machine stops unexpectedly. It is on by default, every 10 minutes; the interval and the on/off
switch are in Edit > Preferences > System.
The first record for a document does not wait for that interval: it is made about 90 seconds after you start working on it, whatever the interval is set to. The opening minutes are when a new document exists nowhere but in memory, so waiting a full interval would leave exactly that stretch unprotected.
It never writes to your project file. The autosave is a separate small file kept with the application's own data, not in the folder your project lives in. Saving a project has to be something you asked for.
Your work, not your pixels: every parameter, the flyby or 3D flight path, the depth model with all its regions, the star settings, the Post grade, and a note of which image files the work was based on. That is typically a few kilobytes - never the images - which is what makes it affordable to write on a timer.
A saved .dpproj is the opposite by design: it embeds every image so it is
self-contained and can be moved or sent to someone else. A project built on a large mosaic can run
to several gigabytes, so a full copy every few minutes would take minutes each time and stall the
app. The images are already on disk, and the autosave points at them.
The one consequence: recovery needs those files to still be where they were. If one has been moved or deleted, everything else is restored and the missing file is named, so you can open it again and carry on.
The countdown starts over, and the recorded file is cleared, whenever the work is safe or
deliberately abandoned: saving the project, opening a project, opening an image,
File > New, and closing the app normally. A file left behind therefore means the
app did not close normally, which is exactly when it is worth offering.
An autosave is skipped when there is nothing to protect or when writing would interrupt you: nothing has changed since the last save, no image is open, a render or an export is running, a dialog is open, the mouse button is down, or a preview is playing. A skipped attempt is retried within seconds rather than deferred to the next interval, so a record that happens to come due during a render is not silently postponed for another full period. When one is written the status bar says Autosaved briefly. Nothing else interrupts you.
If work from a previous session is found at startup, you are asked whether to recover it, and told which project it belongs to and when it was recorded. Discarding deletes it.
Recovering reopens the images the work was based on and restores the settings over them. The
result is treated as unsaved work: it has no project file of its own, so
Save asks where to put it rather than overwriting the project it came from with state
you have not looked at yet. The name it offers is dpRecovered-<project>.dpproj
in the folder the original project lives in, or dpRecovered.dpproj for work that had
never been saved, numbered -01, -02 and so on if such a file already
exists.
Running two copies of the app at once is fine. Each knows which recovery file is its own, so one window never offers to recover, or deletes, the work of another that is still open.
Workflow advice that pays off once the basics are familiar, and the handful of behaviours that surprise people the first time they meet them.
Add a second point to a fresh flyby, try to drag it, and it springs back to the centre. Nothing is stuck. A new point starts at Zoom 1, which frames the entire image - and the only place a view that large can sit is dead centre. There is nowhere to move it to.
Give it something to travel in first: raise Zoom in the point's properties, or drag one of the side handles of its rectangle on the canvas (the handles at the middle of each edge zoom; the corner ones rotate). The rectangle is drawn green while the view fills the image and turns cyan as soon as it is smaller than the image - cyan means "this view can travel". Then the point drags freely.
The colour follows the view's real size, not the zoom number: with a Flyby frame set, a view can be smaller than the image at Zoom 1 and is cyan and movable straight away.
Rebuilding an entire flyby to judge one waypoint is the slowest way to work, and on a long path or a large image it is slow enough to break concentration. Play point preview in the Flyby Editor toolbar renders a window around the selected point instead: it enters at the arrival of the previous point, so you see the move into the point as well as the point itself, then carries on for a set number of further points. One or two is usually all you need. Right-click the button to set that number where you are using it, or set it in Preferences under Rendering - both write the same value. Play until the end, in either place, ignores the count and runs through to the last point. A short preview rebuilds quickly enough to try several values of a parameter in the time one full rebuild would take.
Flyby parameters interact, and the interesting question is always what it looks like, not what the number reads. Change one thing, preview that point, watch. A few pairings that are much easier to see than to reason about:
This is what makes the short preview above worth setting up: it turns "try it" into a few seconds rather than a coffee break.
Inside a point's During move and On arrival groups, Frames is the length of one complete parallax cycle - out to one side, across to the other, and back. Fewer frames is a faster sweep. Every row in these two groups is opt-in: tick it to change it at this point, leave it unticked and whatever is already in effect carries on.
Tick FPS as well and the pair stops counting frames and starts stating a duration: Frames 20 at FPS 10 is a two-second cycle, and Studio stretches that cycle over however many real frames two seconds take at the clip's own rate. That is what makes a sweep look the same speed whether you finally render at 24 or 60 fps. Leave FPS unticked and Frames counts real frames of the clip, so the same setting sweeps faster in a slower clip.
Note that the point's own Frames, up in the point properties, is a different control with the same name: it is how many frames the move into the point takes - its duration, not the sweep's. Worth knowing before adjusting one and wondering why nothing changed.
A parallax sweep that runs back and forth on the spot reads as a wiggle. The same machinery reads as continuous movement through the field if you point it where the camera is going:
The two small arrows drawn through each point's marker show the sweep direction and, by their length, the amplitude - so you can see the angles agreeing along the path without opening every point in turn.
Every preview, every depth rebuild and every frame of a flight costs more on a large image. The way to keep the design work responsive is to do it on a reduced-size copy and swap in the full-resolution frames only for the final render.
Studio recognizes that swap. When you open an image, or load a stars + starless pair, whose dimensions are proportional to the one already loaded - the same shape at a different scale - it asks what to do with the work you have already done:
Save writes the same
.dpproj now built against the new images.The dialog lists what is actually at stake before you choose, and appears only when there is something to carry.
A 3D flight is kept either way. Its waypoints are world units rather than image pixels, so they do not depend on the image size at all and there is nothing to rescale. This is why swapping in a larger image never asks about a 3D flight, only about a 2.5D flyby path, whose waypoints really are pixel coordinates.
Proportional means both dimensions scale by the same factor, allowing 1% for the rounding a resized proxy picks up. A crop changes one ratio and not the other, so it is not a proxy of the same field and is handled as an ordinary size change.
A carried-over session counts as unsaved work, since it no longer matches the project stored on disk.
If a large star seems to carry an arbitrary, lumpy mask instead of a clean round one - and leaves a hole behind it as the parallax moves - turn Split merged stars off, in the Stars tab's Star detection section. Splitting is aimed at dense fields of similar stars; on a big star with a wide glow it can divide what should stay one sprite.
When a flyby needs splitting and has large stars in it, you do not have to choose. Render the flyby twice, identical but for that checkbox, and blend the better passages of each in your video editor. The two renders line up frame for frame, so the cut can fall anywhere.
Depth mistakes hide in a static frame and jump out the moment the scene moves. A mask that looks acceptable, a star sitting at the wrong distance, a structure edge that is really a step - all of them read as ordinary until parallax slides the layers past each other.
Press Play parallax motion (toolbar, or View > Play parallax
motion) and leave it running while you work: the controls stay live during playback, so
you can drag Parallax amount on the Parallax tab and
watch the error grow or vanish. Turn it up higher than you intend to ship for the diagnosis - an
exaggerated move makes a small mistake obvious - then bring it back down. It is the cheapest test
in the program.
Everything the Real Star depth model does rests on stars being found, and found separately. Two stars merged into one detection share a single distance no matter how good the catalog is.
Before tuning depth, open Window > Detected stars table... and click the
Size (px) header to sort by sprite size, largest first. Click the top few rows
and look at the sprite in the pane on the right: each should be one star, not a cluster of them.
If they are clusters, that is what Split merged stars (Stars tab,
Star detection) is for. If one sprite holds a bright star plus a
companion the splitter deliberately leaves alone, the Sprite eraser
below the pane can take the companion out by hand. The Show filter set to
Matched only tells you how many stars actually carry a real distance - the number the
whole model rests on.
Catalogs know how far away an object is; nothing anywhere knows how its gas is arranged along the line of sight, for any nebula. So the method is: anchor what IS known, then sculpt the rest deliberately.
Window > Star Distance
      Distribution...
to see it: the gold line is the object's catalogued distance, the
cyan line is where your structure currently sits. Drag the cyan line onto the gold one, or
set Depth in the same section until they meet.That is the honest method, not a workaround for a measurement you failed to find.
A .dpproj holds every setting, the flyby path, the depth sculpt and the images
themselves - the source, and the starless and stars layers when you have them, stored as
complete XISF inside the file. It is self-contained: copy it to another machine and it opens with
everything in place, nothing to relink.
File > Save Project As... the first time, then Ctrl+S
as you go. That completeness is why a project file is large - it holds your images - and why it is
the thing worth keeping: it is what lets you come back a year later and change the camera move
without redoing any of the depth work. Autosave (Preferences, System) is a crash net, not a
substitute: it is cleared the moment you save, and it records the settings, not the images.
Several sections apply only to a particular way of working, so they grey out or disappear rather than mislead:
If a control is missing or grey, the mode you are in has no use for it - look at the mode first, not at the control.
Two separate trial restrictions, and they apply to different things:
So the depth engine, the catalogs and the editors are the finished product, and
File > Export... writes any view at full native resolution. To judge output
quality without a mark, export the depth map or the starless layer; to judge the 3D itself, use
the preview, which is never marked. Entering a license (Help > License...) lifts
both restrictions immediately - nothing to reinstall, no work lost.
Everything in the Edit menu except License and Preferences acts on a loaded image, so those entries stay disabled until one is open. Loading a path or a profile into an empty session would only leave it waiting for an image that may never arrive, or be replaced by the next project opened.
| Menu | Item | What it does |
|---|---|---|
| File | New | Closes the current document and returns to the empty window, offering to save unsaved work first. |
| File | Open Image... | Load the working image. |
| File | Export <current view>... | Writes whatever the preview is showing, rendered fresh at full resolution. The item names the view it would write, so it reads "Export depth map...", "Export anaglyph...", "Export starless..." and so on. See Exporting the current view. |
| File | Open Recent | Files grouped by what they are: projects, images, stars + starless pairs, depth maps, scripts and color depth profiles. Each group keeps its own 20 most recent entries, so a run of image opening cannot push the project you want off the end, and a group appears only once it has something in it. A stars + starless pair is one entry holding both files, and reopens both. A depth map reopens as a depth map rather than as the working image. Each group can be cleared on its own. |
| File | Open Project..., Save Project, Save Project As... | Load or save a
.dpproj project. Save Project needs only an image, not an existing project file:
with no file yet it asks where to save, and its menu entry shows an ellipsis to say so.
Afterwards it saves straight over that file. |
| File | Exit | Closes the program, offering to save unsaved work first. |
| File | Export Parallax Motion..., Export Flyby..., Export VR180..., Export Apple Spatial (stereo pair)... | Video and stereo-image export. Apple Spatial writes a frame-packed side-by-side MP4 (royalty-free H.264) with the spatial-video metadata Apple devices read; it needs ffmpeg configured (see Preferences). The video export dialog's 3D format choice renders parallax motion, flybys and 3D flights as stereo video, and the VR180 / Apple Spatial doors can carry that motion in their own containers - see Exporting video in 3D. |
| Edit | Rescale flyby coordinates... | The Script Coordinates Converter, outside the Flyby Editor. Available only while an ordinary flyby path is loaded: it rewrites literal x,y pixel coordinates, which a 3D flight does not have, its camera being in world units. |
| Edit | Blend starless and stars | Merges a loaded starless layer and its stars layer back into one ordinary image, which re-enables the features that need a single image. The two layers stop being separate, so this cannot be undone from within the app; reload the project to get them back. Available only when a starless + stars project is loaded. |
| Edit | Load flyby script... | Load a flyby path from a file
(.dpsc, .txt, .flyby). It takes either kind: a
hand-written script, a path saved from the Flyby Editor, or a 3D flight. |
| Edit | Load 3D flight path..., Clear 3D flight path | Load a
3D flight from a .dpsc script file, which becomes the
current path, or drop
back to an ordinary flyby. This is the stricter door than Load flyby script above: it refuses
anything that is not a flight, so picking the wrong file says so rather than quietly loading a
2.5D path. Clear is available only while a flight is loaded. A 3D flight can also be started
from scratch in the Flyby Editor's New menu. |
| Edit | Load/Save color depth profile... | A reusable .dpcol file of
the Color depth tab's 10 rows. Save appears only while that section is switched on. |
| Edit | Manual solve... | Locate the image in the sky by clicking and naming known objects, when automatic solving cannot (see Manual solve). |
| Edit | Preferences... | See Preferences. |
| View | Original image / Depth map / Anaglyph (red/cyan) / Side-by-side stereo / Starless image / Stars only / Starless + synthetic stars | The live preview mode (also on the toolbar). |
| View | Star overlay | Marks the detected stars, in any star mode. In Real Star depth mode the color reads the catalog match: green for matched, cyan for bright matched, amber for unmatched; in the other modes every detected star is amber. Which stars are marked (All / Known / Unknown) is chosen on the drop-down beside the toolbar button, in Real Star depth mode only. See Star overlay for reading a crowded field. |
| View | Ring only near the pointer | Marks only the stars around the mouse pointer instead of all of them at once, for a field too crowded to mark in full. Nothing is filtered out: sweeping the pointer reaches every star. Remembered between sessions. See Star overlay. |
| View | Play parallax motion, Play flyby | Starts playback. |
| View | Locate in the Sky... | Plate-solve the current image. |
| Window | Flyby Editor..., Script Editor..., Depth Modelling Editor..., Star Distance Distribution..., Detected stars table... | One launcher per tool window; each shows a checkmark when its window is currently open, and clicking always opens or raises it (never closes it). |
| Help | DeepParallax Studio Help | Opens this page in your system browser (shortcut F1). |
| Help | Check for Updates... | Asks the Deep Sky Colors repository whether a newer version exists, and reports either way. The same check runs at launch unless it is turned off in Preferences. |
| Help | License... | Shows the current license state and is where a purchased key is entered. On a subscription it can also collect a renewal that has already been issued, and offers the upgrade to a permanent license. See Licensing. |
| Help | Extended Star Catalog... | For owners of that add-on, downloads and installs the extended Gaia catalog and reports what is already installed; without it, explains what the add-on is. |
| Help | About DeepParallax Studio... | Version and credits. |
Complete Preferences window
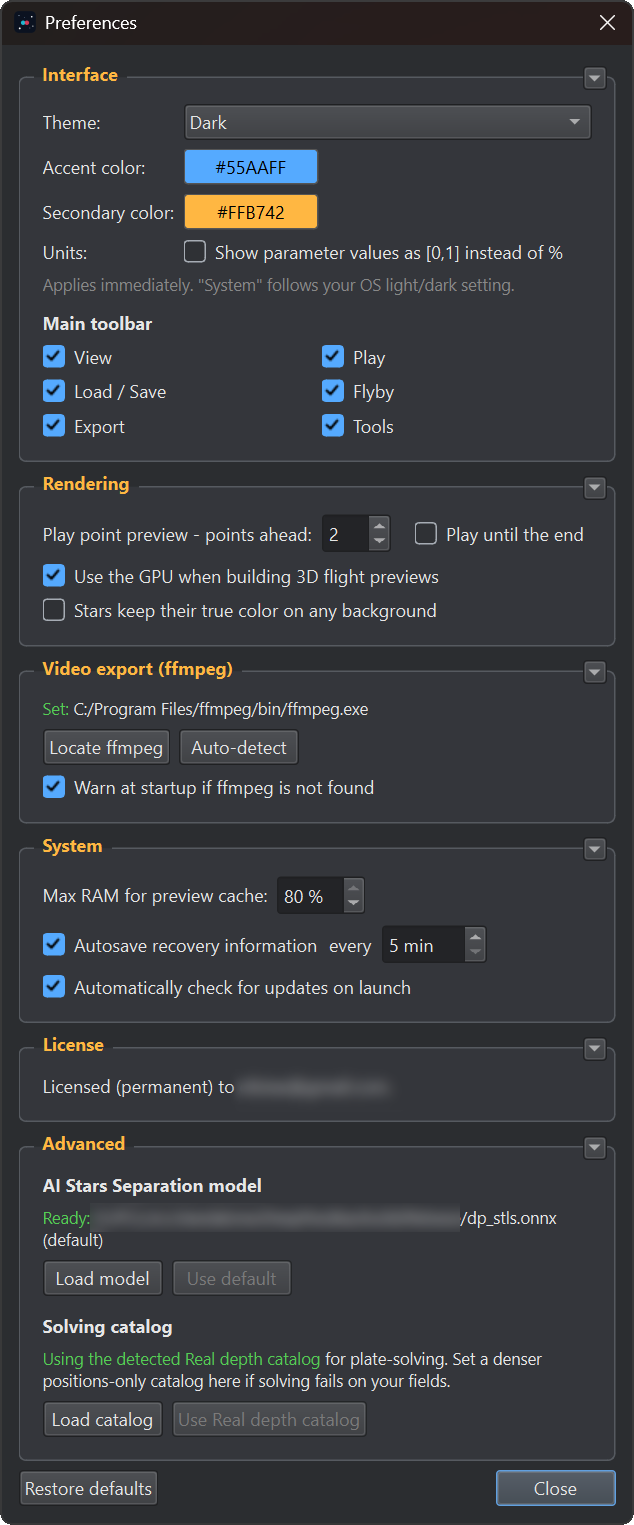
Edit > Preferences.... Every change applies immediately - there is no OK or
Apply. The dialog mirrors the sections below; System and Advanced start collapsed, and the
window shrinks back when a section is folded.
.dpproj: it writes a small separate file, cleared whenever
you save. Turning the checkbox off stops it entirely and disables the interval box. See
Autosave and recovery.Help > Check for Updates.The current license state - who the license belongs to, its kind, and for a subscription its renewal date. Two buttons appear for subscribers only: Refresh license now collects a renewal that has already been issued, so a new key never has to be dug out of an e-mail; Upgrade to permanent... opens the discounted trade from the recurring subscription to a one-time permanent license. See Licensing for the full picture.
Studio is its own product. A license for the PixInsight DeepParallax module does not unlock it,
and a Studio license does not unlock the module; the two are sold separately. Licensing is verified
fully offline: the app embeds only a public key, so it can check a license but never mint one. Enter
your email and key in Help > License... to activate; that dialog also reports the
current state at any time.
DeepParallax Studio runs on a 14-day trial from first launch, tracked independently of any other app. A trial copy is fully functional. Two limits apply when a file is written, and they cover different things:
A license of either kind lifts both. After the trial the app does not start until a key is entered: there is no permanently-free mode.
Studio is sold under two kinds of license. Both unlock every feature and both lift the trial limits in full; what differs is how long the license lasts and which versions it covers. A key carries its own kind, so there is nothing to pick in the app: enter the key you were issued and it behaves accordingly.
The License dialog shows which one is on file. A subscription adds a line reading "Subscription active until" with its date and the days remaining; a Classic license simply shows the address it is registered to, since there is no date to report. A Refresh license button appears only when a subscription is on file, whether it is still running or has lapsed: it fetches a renewal that has already been issued, so a renewed key does not have to be typed in by hand. It is the one part of licensing that uses the network, and it is optional; everything else works offline.
A subscription that has run out is reported as exactly that, with a prompt to renew and enter the new key. It is never described as an invalid key or an expired trial, so a lapsed subscriber is never told their key was never good.
Everything below is summarized in licenses\THIRD-PARTY-NOTICES.txt inside the
installation folder, with the full text of each license beside it.
Qt6*.dll files in the installation folder, not built into the program, so they can
be replaced with another build of the same Qt version. The complete corresponding source for
Qt 6.8.3 is published by The Qt Company at
https://download.qt.io/archive/qt/6.8/6.8.3/single/. The LGPLv3 applies to Qt, not
to DeepParallax Studio, which uses Qt as a library rather than deriving from it.