
1 Introduction
[hide]
Welcome to LayerBlender — a PixInsight process module that brings image layer compositing to our astrophotography workflow. If we have ever wished we could stack images in a layer-based editor without leaving PixInsight, this is exactly what LayerBlender is here for.
LayerBlender lets us build a stack of images, each on its own layer, and blend them together using a rich set of blend modes, per-layer opacity, and masks. We can work non-destructively, tweak blend parameters, and blend the result at any time.
LayerBlender also goes well beyond simple blending. We are not limited to predefined blending modes like Lighten, Color or Hard Light. We can write our own PixelMath expressions as blend formulas for any layer, and we can also apply any installed PixInsight process to the layers below as a process layer – similar to what other programs call adjustment layers – where any layer can be a PixInsight process (from HistogramTransformation, to MultiscaleGradientCorrection, MorphologicalTransformation and dozens of other processes) that adjusts the images below, turning LayerBlender into a flexible, non-destructive processing pipeline right inside the compositor.
Another great feature is that at any time we can save our entire stack of images with their masks, blending modes or formulas, and even independent process layers, as a single XISF file that when we later open within LayerBlender, it will bring our stack back right where it was, including images, masks, blending modes, formulas, and process layers.
An Undo/Redo system that survives resets, the ability to import up to 32 bit TIFF and Photoshop PSD layered files, over 12 different languages to choose from (or create our own), are some of the many additional features to complete what LayerBlender can do for us.
1.1 Key Concepts
Before we dive in, a few concepts worth understanding, the most important being how LayerBlender differs from other applications in order to apply the concept of layers to PixInsight, an application that doesn’t support grouping images into a single layered stack.
In PixInsight, every image is a single object that attaches itself to a window in order to be displayed in the workspace. These windows do not support having several images (say, layers?) attached to it. PixInsight windows were designed to only accept:
- One main view, the image itself.
- Previews, which are sub-areas of the main image, not separate views with pixel data coming from elsewhere.
- Additional metadata used for very specific purposes: color space profile, astrometric solutions, FITS header keywords, and other properties of the main image. We could have used that, but storing metadata wasn't the problem.
- Annotations to the image.
- Associating the image to a different image that would act as a mask. Such mask, however, is a separate image. It does not live inside not attached to the main image, but needs to be open in the workspace for that association to exist (we’re getting closer to how LayerBlender works).
And we cannot add anything else to them. In the end, not being able to natively group several images into one single UI element was a core PixInsight design that could not be circumvented. The PixInsight approach was clear.
Therefore, unlike other applications that support layers and give us the experience of dealing with just one image that has many layers, in PixInsight, LayerBlender uses individual images opened in the workspace to build the layer stack, much like we have been doing so far when adding a single mask to a single image in PixInsight. Each image in the stack lives in the workspace as an independent image, and whenever we want to modify the image assigned to a particular layer, we would go to that image and do it directly on it.
This means that our stack is build with independent, live images from the workspace. Whenever we run a blend, LayerBlender will use the current version of all images referenced in the stack.
So, when we add an image to a layer, we are not moving the image into the layer. We are assigning the image to that layer, but the image stays independent and happy on its own in the workspace. If we then close the image from the workspace, LayerBlender will see that the image is gone, and clear the space in that layer for us to add a different image, if we want.
Now, can we save our stack? Or is it lost after we leave PixInsight? No worries. Not only we can save our stack configuration, but everything in it (images, masks, blending modes, etc), all together as a single XISF file. See Section 10.2 for the details. But we’re getting ahead.
Let’s review some basic terminology before we continue.
-
Layer Stack A collection of image layers stacked on top of each other. The bottom layer is the base; each layer above is composited onto it according to its blend mode and opacity. Blend Mode The mathematical operation that determines how a layer combines with the layers below it. LayerBlender supports 28 blend modes plus custom PixelMath expressions. Opacity A value from 0 to 100% that controls how strongly a layer contributes to the final result. At 0%, the layer is invisible; at 100%, it blends at full strength. Mask An image that controls where and how strongly a layer is applied. Brighter areas of the mask let the layer show through; darker areas hide it. Color masks are converted internally to their luminance component automatically.
The mask system in LayerBlender is independent from PixInsight’s own internal masking, although when we add an image that has an associated “PixInsight” mask to a layer, we can choose whether to automatically add both to that layer: the image and its mask.
Clipping Mask A special mask mode where a layer uses the layer directly below it as its mask, rather than a separately assigned image. Process layer A layer that, instead of holding a pixel image, holds a serialized PixInsight process. When the blend runs, that process is applied to the accumulated blend result at that point in the stack. PixelMath Layer A layer that uses a custom PixelMath expression as its blend formula, giving us full mathematical control over how that layer combines with the rest of the stack. Solo View A view mode that hides all images in the layer stack except the one belonging to the currently selected layer. Useful for inspecting individual layers in isolation.
1.2 What LayerBlender is not
LayerBlender is an astrophotography compositing tool aimed at bringing the popular layer-editing methodology to PixInsight. It Is not a general-purpose photo editor.
If we have been working with layers in other applications before, it’s easy to “miss” a few (or a lot of) editing features not offered by PixInsight. However, adding some of those features to LayerBlender – for example, being able to move the placement of images or masks on the main canvas – would drive our efforts towards a separate and very limited image editor (limited due to the constraints imposed by the PixInsight Class Library, LayerBlender’s gateway for talking to PixInsight) that significantly diverges from what PixInsight does really well, which is astronomical image processing and analysis. For that other kind of editing, other applications are probably a better option.
A few things to keep in mind:
As we add layers to the stack, they all must have the same dimensions as the layer canvas. The first image added to a stack sets the canvas size for all subsequent layers. Mixed-size stacks are supported only when loading layered XISF, PSD or TIFF files that already have layers of different sizes.
For example, Photoshop’s layered PSD and TIFF files often have layers of different sizes and placement offsets, and LayerBlender will try to import them and place them correctly, but in those cases, although existing layer sizes and canvas size may be different, again, new layers will need to match the canvas size. That said, working with different sized layers is uncommon during astrophoto editing workflows. Only something to keep in mind when importing certain TIFF or PSD files.
- LayerBlender currently does not use the alpha channel of images. Transparency is handled through the dedicated mask system instead. A base color can be defined to act as background color that will only be part of the blend if there are transparent areas from the base layer upward.
- Saving layered PSD or TIFF files is not supported. LayerBlender can import layered PSD and TIFFs up to 32-bit float, but for saving or sharing layer stacks, LayerBlender recommends (and only offers) using LayerBlender’s custom layered-XISF format, which saves (and then loads) the entire stack, including images, masks, every layer adjustment, formula or process layer, all in a single XISF file, much like a layered TIFF or PSD file would work when using Gimp or Photoshop.
2 Setup and Installation
[hide]
If you’re reading this, it means you successfully installed LayerBlender and are now reading the inline documentation. Excellent!
As you know, the official distribution of LayerBlender is only available via PixInsight itself, which will fetch it directly and safely from our PixInsight repository at https://repo.deepskycolors.com/LayerBlender/ Make sure the trailing / is part of the URL. Be sure to keep our repository URL in your list of PixInsight repositories to receive timely updates.
Our PixInsight repository is the only official LayerBlender source, and it comes with the guarantee of our Developer and Repository certificates, verified by PixInsight itself from the moment it connects to our repository until it completes installation of the LayerBlender module.
If we ever want to be sure that we have the latest version available to us, we go to PixInsigh’s RESOURCES menu, select Updates,
then Manage Repositories to make sure our repository is still there, then RESOURCES > Updates > Check for Updates.
2.1 Registration and the 30-Day Trial
LayerBlender includes a 30-day free trial. During the trial period, the tool is fully functional with no feature restrictions. When the trial expires, LayerBlender will display a notice at startup and will not open until a valid registration key is entered.
Registering LayerBlender
To register during the trial period, we open the LayerBlender Preferences dialog (the "wrench" icon on the bottom-right of the LayerBlender window). In the Registration section, we enter the registration key we received after purchase and click Register. If the key is valid, LayerBlender confirms registration immediately. The key is stored persistently — we only need to enter it once.
If we open LayerBlender after the trial has expired, a dialog appears letting us know the trial has ended, giving us the option to either enter our registration key or exit LayerBlender. If we have a key, we click Register. The registration dialog appears, where we can enter our key there directly, and when validated, LayerBlender will become fully operational again.
A note on upgrades and perpetual licensing: Registration keys are tied to the LayerBlender module version. A key purchased for v1.0 will continue to work for all v1.x releases. Should a v2.0 version become available in the future, we would have the choice to upgrade at a discounted price, or continue using the latest v1.x version we installed. Yes, we can enjoy using our current LayerBlender v1.0 or any future v.1x version that becomes available, forever. No mandatory paid upgrade to continue using the software, no subscriptions.
3 The LayerBlender Interface
[hide]
When we open LayerBlender, we see a dark, pretty banner and a toolbar below with most buttons disabled.
Startup / Reset window —
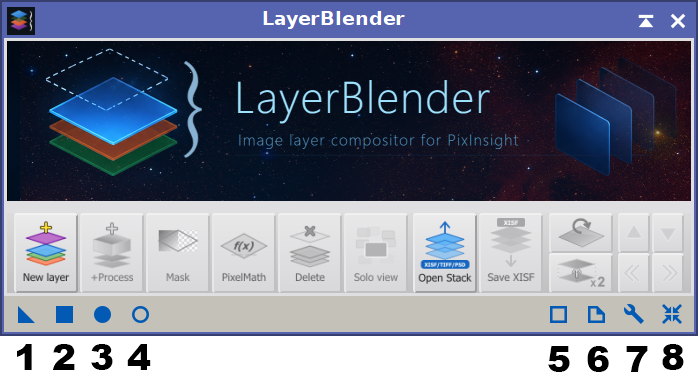
LayerBlender's process interface bar is as busy as it gets. This is what each icon means when using LayerBlender:
- Drag the triangle over an image to apply the results of the blend to that image (dimensions must match), or drag it to the workspace to create a process icon with the current instance of LayerBlender.
- Apply the blend to the currently active image in the workspace.
- Create a new image and apply the blend results to it. This is the most common way to blend our stack.
- Explore the source code signature of the current LayerBlender instance.
- Open the extensive inline documentation.
- Open the LayerBlender Preferences window.
- Reset the stack to zero. This action can be undone via the Undo/Redo buttons.
Our current options are New Layer and Open Stack.
We will talk about those later in depth, but we can figure out that the first button adds a new layer to the stack, the first layer in fact, and Open Stack allows us to load a layered file (TIFF, PSD or XISF). Let’s click once on New Layer to see what changes:

Now the banner is gone, and we see a panel divided into three main areas: the Current Layer Settings area at the top, the Layer Stack in the middle (the largest area eventually, with just one, empty layer now), and the Toolbar at the bottom.
3.1 Current Layer Settings
The Current Layer Settings area at the top of the panel controls the properties of whichever layer is currently selected in the layer stack. When we click on a layer in the stack, this area updates to reflect that layer's settings.
Current Layer Controls —
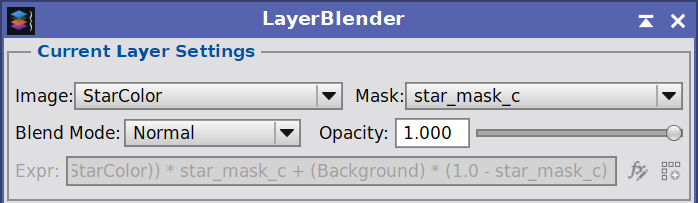
Selecting a layer updates the top controls with the settings of that layer.
Image and Mask Selectors
Two drop-down menus let us assign images to the current layer:
- The left drop-down selects the image for this layer. It lists all open views in the PixInsight workspace. We choose the image we want this layer to use.
- The right drop-down selects the mask for this layer. Again, any open view can be used as a mask, as long as dimensions match. If we select a color image as a mask, LayerBlender will automatically use its luminance component during blending.
In addition to the drop-downs, we have other ways to add an image or mask to a layer, but not from Current Layer Settings. We'll cover those in a moment.
Blend Mode
The Blend Mode drop-down lets us choose how this layer combines with the layers below it. LayerBlender supports 28 blend modes, described in detail in Section 5.Opacity
Next to the Blend Mode selector is the Opacity slider to control how strongly this layer contributes to the blend, from 0 (invisible) to 100% (full strength). We can drag the slider or type a value directly from 0.00 to 1.00.PixelMath Expression
The last field in the Current Later Settings is the PixelMath expression field. When the blend mode is set to PixelMath, we can type our own PixelMath formula here. This field is described in detail in Section 6.
- The pencil button opens LayerBlender's Expression Editor dialog for more comfortable formula writing and syntax highlighting. It is only available if we are in PixelMath mode, or if we double-click on the formula’s edit box – which will bring us to PixelMath mode and make the edit field available for editing as well
- The import button lets us import a PixelMath expression from an existing PixelMath process icon in the workspace.
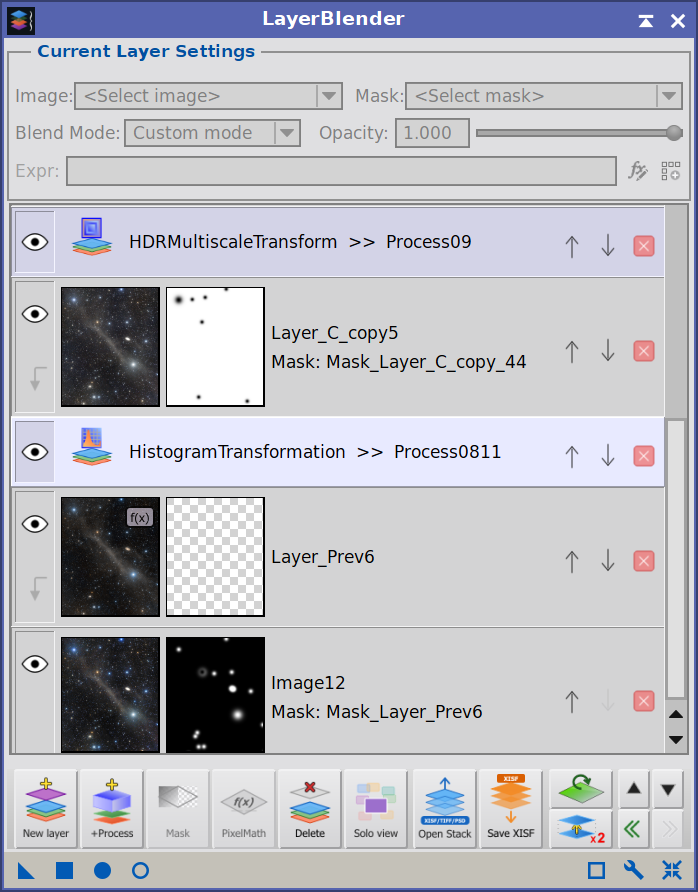
3.2 The Layer Stack
The layer stack is the central area of the LayerBlender panel. Each layer is represented by a row. The bottom layer in the stack is the base image; layers above it are composited on top in order from bottom to top.
Layer Rows
Each layer row shows us at a glance what is on that layer:
Process layer, PixelMath layer and a... layer —
The three different types of layers currently supported by LayerBlender. From top to bottom: a process layer applying MorphologicalTransformation, a PixelMath layer (selected, see formula on top) with a mask, and a classic layer. Each is visually different from the others, so they're quick to spot.
- The thumbnail on the left shows a preview of the layer’s image. If the image's blending mode is PixelMath, we'll also see a small "f(x)" overlay on the thumbnail's top-right corner, as shown above.
- The smaller thumbnail to the right of it shows the mask, if any is assigned.
- The layer name and mask name are shown as text labels.
- The eye icon on the far left toggles the layer's visibility. Invisible layers are excluded from the blend entirely, and many of the layer’s settings will be disabled until we click on the layer’s eye again to re-enable its visibility and contribution to the blend.
- The arrow icon below the eye icon toggles the Clipping Mask for this layer (see Section 5.7). On process layers, this button is hidden — clipping does not apply to processes.
- The Move Up and Move Down buttons let us reorder layers in the stack.
- We can also drag a layer up and down to change its position in the stack, by clicking on the info area of a layer, then drag it up or down.
- The Delete icon effectively removes that layer from the stack. This can be undone.
Both the image and mask thumbnails accept drag-and-drop. We can drop any open view from PixInsight directly onto the image or mask thumbnail to assign it, without going through the dropdown menus. Clicking on the image’s thumb will allow us to assign an available view to that layer, and double-clicking on the thumbnail allows us to directly load an image file from disk onto that layer. This is applicable for the mask’s thumbnail as well.
Clicking on a layer makes that the selected layer, while double-clicking on it will bring the image (and mask if there’s one) to front view in our workspace.
PixelMath layers are shown with a pale blue background to distinguish them visually. Process layers are shown with a pale violet gradient background, a small, distinct icon, and a label showing the process name.
Empty Layers
In LayerBlender, a layer stack can contain layers with no image or mask assigned. This is intentional — we might want to set up a blend structure ahead of time and assign images later. In any case, empty layers are completely ignored during any blending run, so it’s safe to have them.
Dialog Sizing and the Layer List
The LayerBlender dialog grows automatically as we add layers, up to five layers. Once the layer stack exceeds that number (or after we delete our first layer, whichever comes first), we the user own the height of the dialog, which becomes manually resizable — we can make it taller or shorter, scrollbar will appear if neccesary, and the dialog will not resize automatically anymore, regardless of what we do. Again, at that point, we control the size of the dialog. This is by design, and mimics how other layer tools work in other popular programs.
3.3 The Toolbar
The toolbar at the bottom of the LayerBlender panel contains buttons for common actions.

Here is a brief explanation of each button:
| New Layer | Adds a new empty layer above the currently selected layer. |
| +Process | Opens a dialog to select a PixInsight process icon from the workspace and add it as a process layer. See Section 7. |
| Mask | Enables or disables the mask on the currently selected layer without removing it. |
| PixelMath | Opens the PixelMath expression editor for the current layer. See Section 6. |
| Delete | Deletes the currently selected layer. |
| Solo View | Toggles Solo View on or off. The button changes appearance to indicate its current state. See Section 9. |
| Open Stack | Imports a layered XISF, TIFF or PSD file. See Sections 10.1/10.2. |
| Save XISF | Saves the current layer stack as a LayerBlender XISF file. See Section 10.2. |
| Reset active layer | The button with the green layer and a circled arrow resets the active layer to default settings. The assigned image is kept. All other settings (blend mode, opacity, mask, offsets, formula) are reset. |
| Duplicate layer |
The x2 button has two working modes: regular click, and Ctrl+click. Clicking on the button creates an identical copy of the active layer directly above it, including its image, mask, and all settings. The new layer is then auto-selected. Note that the new layer will share the image with the copied layer – a copy of the image is not created – so any modification to that image prior to executing a blend would affect both layers. Ctrl+Click (clicking while keeping the Control key pressed) will do exactly the same, but instead of assigning the same image to the duplicate layer, a brand new copy of the image is created, so that each layer wiḷl have its own separate image. This is useful if we plan on doing modifications to the image on the layer we just duplicated, but without affecting the original layer at all, image included. |
| Up / Down | These buttons allow us to move the selected layer up or down in the stack. This is equivalent to using the individual arrows on each layer row. If a button appears disabled, it’s because that move is not allowed. |
| Undo / Redo | These buttons allow us to navigate through our actions in LayerBlender See Section 4. |
| Nuclear Preview | The button showing the red eye with yellow rays around it over a PixInsight blue cube triggers a one-shot, full-quality preview that includes every layer in the stack, PixelMath and Process layers included. The Dynamic Preview window is opened if it wasn't already. See Section 12. |
| Preview | The bottom eye of the stacked pair. Opens (or closes) the Dynamic Preview window in live mode, where the blend refreshes on every change to the stack. PixelMath and Process layers are skipped during the live refresh; use Nuclear Preview for a full-quality one-shot. See Section 12. |
4 Undo and Redo
[hide]
LayerBlender maintains its own undo and redo history, independent of PixInsight's built-in undo system, out of necessity. PixInsight's Undo system only tracks image data changes and wouldn't know a thing about whether we moved a layer, assigned a given image to a layer, etc.
Through LayerBlender's internal Undo engine, we can step backward and forward through our layer-editing actions without leaving LayerBlender from the moment we launch it until we close PixInsight – with one limitation. Current LayerBlender’s internal Undo/Redo engine will only remember our last 99 actions. I felt that was plenty. Need more?4.1 What is Tracked
LayerBlender's undo system is snapshot-based: before every significant action, LayerBlender saves a complete copy of the current layer stack state. This includes all layer settings — images, masks, blend modes, opacity, visibility, clipping mask state, PixelMath expressions, and process layer data — for every layer in the stack.
Actions that are tracked by undo include:
- Adding or deleting a layer
- Duplicating a layer
- Resetting the stack to empty
- Moving a layer up or down
- Assigning or removing an image or mask to/from a layer
- Changing blend mode, opacity, or visibility
- Enabling, disabling, or inverting a mask
- Reconstructing the stack as it was before loading a new layered file (the loading itself is not undo/redoable).
- Adding/deleting process layers
- Every edit of our custom PixelMath expressions
- Every edit of process layer’s source
- Flattening or merging layers
- Any other operation performed via the layer context menu
- Etc.
4.2 What is not Tracked – Important!
Any actions not performed by LayerBlender (say, applying CurvesTransformation to an image directly), depend on PixInsight’s own Image Undo system. This is normal and expected, as LayerBlender has no part in those actions.
However, there are a few actions that LayerBlender does which modify an image, and those actions cannot be undone.
Luckily, all those actions are only accessible via the contextual menus (see Section 11), they are clearly marked as “Destructive” with a red lightning icon next to them (![]() ), so they're easily identifiable, and they all have non-destructive counterparts that do the same thing without "destroying" anything. These are operations that modify the source images assigned to layers or masks, and that once the image has been modified, although we can Undo to restore the layer to the previous state, the change done to the image is permanent.
), so they're easily identifiable, and they all have non-destructive counterparts that do the same thing without "destroying" anything. These are operations that modify the source images assigned to layers or masks, and that once the image has been modified, although we can Undo to restore the layer to the previous state, the change done to the image is permanent.
For example, there are two ways to execute the action "blend this layer with the layer below it" : Merge Down and Blend Below (See Section 11). The difference? Merge Down is destructive and Blend Below is not. Let's develop this idea a bit more.
If we apply Merge Down (destructive, remember) on two layers, the image associated to the bottom layer is updated with the blend of the top layer and itself – that’s how Merge Down works. Blend Below does the same, but it blends the results in a brand new image, and places that image instead of the other two, so the source images leave the stack, but remain intact: no destruction.
And this is important because in the case of Merge Down, after the merging-down is done and the lower image has been modified, if we click Undo, we would revert the stack as it was before the Merge Down operation, so both layers would show up again, but the bottom layer would now have the modified image.
Another common situation is when we have an image assigned to a layer, and then, for example, we delete the layer and then close the image. If we now Undo to the moment when the layer had that image assigned, obviously the Undo engine would not reload the image back in PixInsight (not many Undo engines do that) so, when LayerBlender notices that the image is gone, it will clear the image’s name id, but leave intact every other setting. Same for masks.
4.3 Using Undo and Redo
The Undo and Redo buttons are located in the toolbar, next to ech other in a single slot at the right end. Undo steps backward; Redo steps forward. Both buttons are grayed out when there is nothing to undo or redo.
4.4 The History panel
LayerBlender maintains a full undo/redo history of every editing operation performed during the current session. The History panel gives us a visual overview of that history and lets us travel to any past or future state with a single double-click.
LayerBlender's History Panel —
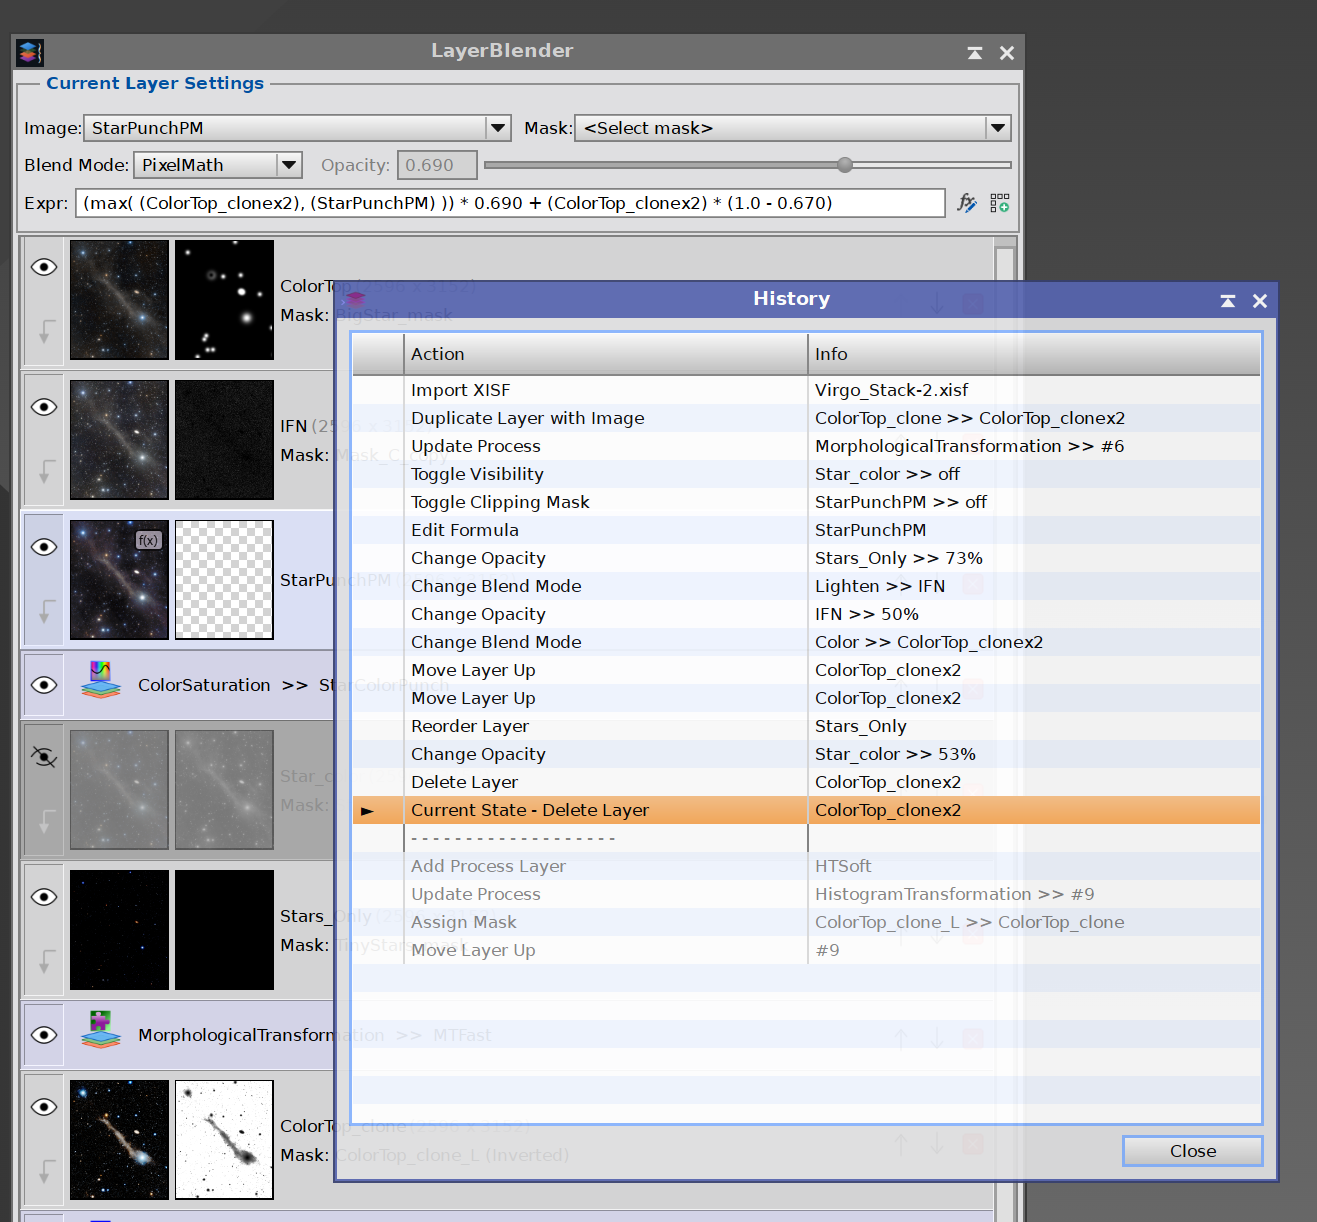
We can keep the History panel open, which will update in real time, and allow us to navigate to any point during our entire LayerBlender session.
Opening the History Panel
The History panel can be opened in two ways:
Right-click either the Undo or Redo toolbar button, when enabled.
Open the context menu on any layer and choose History.
The panel is non-modal and floating — it stays open alongside the main LayerBlender interface while we continue working normally.
Reading the History List
The list displays all recorded states in chronological order, oldest at the top and most recent at the bottom:
| Row | Meaning |
| Normal rows (above current) | Past states available for undo |
| ▶ Current State | Where we are right now |
| Greyed rows (below separator) | Future states available for redo |
Each row is labeled with the action that was recorded at that point — for example Import XISF, Change Blend Mode, or Move Layer Down. The ▶ marker always shows our current position in the timeline.
The panel updates automatically after every action, undo, or redo, so it always reflects the live state of the history stack.
Navigating the History
Double-click any row to jump directly to that state:
Double-clicking a row above Current State travels backward in time, equivalent to clicking the Undo button the corresponding number of times.
Double-clicking a greyed row below the separator travels forward in time, equivalent to clicking Redo the corresponding number of times.
No history is ever discarded by navigating within the panel. Traveling to a past state leaves all future (redo) states intact; traveling to a future state leaves all past (undo) states intact.
Tip: The History panel remembers whether it was open when you close and reopen LayerBlender's main interface, and restores its visibility automatically.
4.5 Limits and Notes
LayerBlender keeps up to 99 undo steps. Once the history is full, the oldest step is silently discarded as new ones are added.
The history is not saved to disk, nor inside PixInsight projects, but it’s preserved during the entire PixInsight session. Restarting PixInsight clears the history, which starts fresh each time LayerBlender is launched for the first time during a new PixInsight session.
Loading a project in the middle of a LayerBlender session may reset some elements in the Undo history, so we should not rely on undoing anything if we're about to load a new PixInsight project.
5 Blend Modes
[hide]
The blend mode determines how a layer's pixels are mathematically combined with the pixels below it in the stack. LayerBlender supports 28 blend modes covering all the classic categories found in professional compositing tools.
In all formulas below, A refers to the layer above (the current layer) and B refers to the accumulated result of all layers below it. All pixel values are in the range 0.0 to 1.0, consistent with PixInsight's 32-bit float representation.
5.1 Normal Blending
| Normal | The default mode. The layer simply replaces what is below it, modulated by opacity and mask. This is the standard compositing operation. |
| Dissolve | At less than 100% opacity, pixels are randomly made fully transparent or fully opaque, creating a grainy, stippled blend. The dithering pattern is random but consistent per pixel across all channels, so no color fringing occurs. This is the only blending mode that does not interpret opacity as “how much should each pixel contribute to the blend”, but “how many pixels should contribute to the blend”. |
5.2 Darkening Mode
These modes can only make the result equal to or darker than either of the two input layers.
| Darken | For each pixel, keeps whichever value is darker between the layer and what is below. Comparison is per channel. |
| Multiply | Multiplies the layer with what is below. Always darkens, similar to overlaying two photographic slides. |
| Color Burn | Darkens the result by increasing contrast between the two layers. Creates rich, saturated shadow tones. |
| Linear Burn | Adds the two layers and subtracts 1. Produces strong darkening, similar to Color Burn but more linear. |
| Darker Color | Compares the overall luminosity of the layer and what is below, and keeps whichever pixel is darker overall (not per channel). |
5.3 Lightening Modes
These modes can only make the result equal to or brighter than either of the two input layers.
| Lighten | For each pixel, keeps whichever value is brighter between the layer and what is below. Comparison is per channel. Often used when adding stars to a starless image. |
| Screen | The opposite of Multiply. Inverts both layers, multiplies them, then inverts the result. Always lightens, like projecting two slides onto the same screen. |
| Color Dodge | Brightens the result by decreasing contrast. Produces vivid, intense highlights. |
| Linear Dodge | Adds the two layers together. Literally a straight addition operation. Useful for combining nebula layers or adding emission data. Simpler and more predictable than Color Dodge. |
| Lighter Color | Compares the overall luminosity of the layer and what is below, and keeps whichever pixel is brighter overall (not per channel). |
5.4 Contrast and Sharpening Modes
These modes increase contrast by darkening areas below 50% gray and lightening areas above 50% gray. Combined with a high-pass filter they create very dramatic sharpening effects, but they can also be used on their own to enhance contrast, and their formulas adjusted in creative ways.
| Overlay | Multiplies dark areas and screens bright areas. A classic contrast-enhancing blend. |
| Soft Light | Similar to Overlay but gentler. Simulates the effect of shining a diffused light on the image. |
| Hard Light | Similar to Overlay but with the two layers' roles reversed. More intense than Soft Light. |
| Vivid Light | Burns or dodges by increasing or decreasing contrast depending on brightness. |
| Linear Light | Burns or dodges by adding or subtracting brightness values. More extreme than Vivid Light. |
| Pin Light | Replaces colors depending on brightness of the blend layer. Produces a surreal, high-contrast result. |
| Hard Mix | Produces a posterized result — each channel is reduced to either 0 or 1. Very dramatic. |
5.5 Difference and Inversion Modes
| Difference | Subtracts the darker of the two layers from the lighter. White inverts, black has no effect. Useful for checking alignment between two images, and for finding differences (what could we expect from that name?) between images. |
| Exclusion | Similar to Difference but lower contrast and softer. Blending with white inverts; blending with black has no effect. |
| Subtract | Subtracts the layer from what is below. Values below 0 are clipped to black. |
| Divide | Divides what is below by the layer. Useful for simple calibration-style operations. |
5.6 Color Component Modes
These modes blend specific perceptual components of color rather than raw pixel values.
| Hue | Takes the hue of the layer and combines it with the saturation and luminosity of what is below. |
| Saturation | Takes the saturation of the layer and combines it with the hue and luminosity of what is below. |
| Color | Takes both the hue and saturation of the layer and combines them with the luminosity of what is below. Useful for colorizing grayscale images. |
| Luminosity | Takes the luminosity of the layer and combines it with the hue and saturation of what is below. The complement of Color mode. |
5.7 Clipping Masks
Clipping Mask is not a blend mode but a masking modifier. When we enable Clipping Mask for a layer, that layer uses the layer directly below it as its mask — its opacity is limited to wherever the layer below has non-black pixels.
We enable or disable the Clipping Mask by clicking the small arrow icon below the eye icon in the layer row. There is also an option in the contextual menus (See Section 11). The bottom layer of a stack cannot have a clipping mask. Process layers do not support clipping masks, so the button is disabled in that case.
Clipping masks can be a strategic tool when building a layer stack, especially when used against a duplicate of the image being clipped and we also have a different mask assigned. When reaching to more artistic endeavors, clipping masks can be useful when we want a texture or color overlay to apply only to a specific region defined by another layer, without affecting the rest of the composite.
6 PixelMath Expression Layers
[hide]
One of LayerBlender's most powerful features is the ability to write custom PixelMath expressions as the blend formula for any layer. Instead of choosing from a preset blend mode, we can write our own mathematical description of exactly how that layer should combine with everything below it.
These custom PixelMath expressions share the same language we already use in the PixelMath process itself. If we are already comfortable writing PixelMath expressions, we can use exactly the same syntax here, same functions, meta-symbols, etc. Currently, LayerBlender’s PixelMath implementation only supports expressions for the K/RGB channel, that is, to all RGB components of each pixel at once. More on this later.
6.1 Setting a PixelMath Expression
To use a PixelMath expression on a layer, we set its blend mode to PixelMath using the Blend Mode drop-down, or even faster, we can just double-click on the PixelMath expression field (labeled as “Expr”). Then, the field becomes active, and we can type our formula directly into it.
From that moment, unless we change the blending mode of this layer from PixelMath to any other mode, when it’s time to execute the blend, LayerBlender will not use it’s own blending engine for this layer, and instead, take the formula in this field and execute it via PixelMath. A small “f(x)” badge appears on the top-right corner of the image’s thumbnail, and the background color of the layer is now a subtle light blue color.
6.2 Formulas for available blending modes
Whenever we select a blending mode, the PixelMath expression field shows a for-reference-only formula of that blending mode, in PixelMath language. If we cannot see the whole expression because it's too long, we can rest our mouse over the field and the field’s tool-tip will show us the formula, or we can also stretch the LayerBlender dialog horizontally.
The field, however, appears disabled. That’s because LayerBlender will not use that formula with PixelMath when we execute a blend – again, it’s there for reference only. LayerBlender will still do the blend internally, not via PixelMath. The disabled field really means “we have a PixelMath equivalent to this blend mode, should you want to modify it and use that instead”. See Section 6.7 for a list of all the predefined PixelMath expression equivalents to the available blending modes.
The PixelMath expression field becomes active and editable only when we either double-click on it, or select PixelMath mode from the Blend Mode selector.
We should keep in mind that if we want to use the unaltered, fast, predefined blending modes, we should select them in the Blend Mode combo box. The blend will execute much faster by magnitudes, and it will be just as accurate or more than using the PixelMath version. However, if we’d like to take one of the blending modes, and experiment by modifying their formulas, then we double-click on the formula edit box while the blend mode we want to experiment with is set, and edit the formula as we please.
If the layer has a mask, the formula includes applying the mask in the calculations. Likewise for opacity adjustments. With all this data being computed at once, formulas can look a bit intimidating even for the Normal blending mode – not because the formulas are complex, but because they may not be easy to read with all those parenthesis and usually long image names.
When we execute a blend and we hit a layer with a custom formula, the expression is evaluated for each pixel, and the result replaces that pixel in the blend output. The final result is composited with the layer's opacity and mask applied.

6.3 Available Variables
Inside our expression, we can refer to specific images by their PixInsight view ID — just as we would in the PixelMath process. In addition, LayerBlender provides a set of special substitution variables (meta-symbols) that are resolved automatically at blend time:
$T or $base
|
The target image — the accumulated blend result of all layers below this one. This is what we are blending onto. Although PixelMath does not recognize $base, LayerBlender will always
translate it to the actual view id (same as with |
$A or $blend
|
The active (source) image — the image assigned to this layer. This
is what we are blending from. Same consideration about using
$blend as we did for $base.
|
$M or $mask
|
Expands to the mask view ID if a mask is assigned and active, otherwise it
Is replaced by 1.0. Useful when the user wants the mask channel
separately from opacity. Same considerations as we did for $base
and $blend.
|
$W
|
Unified weight. This can be useful for writing custom blend formulas because it gives the full weighting in one token without having to know whether there’s a mask or the opacity is anything but 1. Same consideration about using |
$opacity
|
The current layer's opacity value, as a floating number from 0.0 to 1.0. As with other meta-symbols, the final formula always translates to the correct amount before serving it to PixelMath. The PixelMath process itself never receives the word $opacity in the expression, only its value. |
We can also reference any open view by its PixInsight view ID directly — for example, Image01, Luminance, HAlpha, etc. — just as we would in a standard PixelMath expression.
$base, $blend, $mask, $M, $W, and $opacity are LayerBlender's own convenience aliases. Inside the expression, they are automatically translated to the actual values (for example, view IDs of the target and source images in the case of $base, $blend and $mask) before PixelMath processes the formula.
6.4 The Expression Editor
For writing more complex expressions, once the expression field is editable, we can click the ƒx + pencil button next to the expression field to open the full LayerBlender’s Expression Editor. This is a comfortable multi-line editor with syntax analysis and expression parsing — very similar to the editor used in the PixelMath process module itself, but lacking individual RGB expressions, symbols support, and all the syntax documentation.
The Expression Editor can parse our formula and report any errors before we try to blend, showing us exactly where a problem is and what it is. It also lists all images referenced in our formula and tells us which ones it can find in the current workspace.
LayerBlender's PixelMath Expression Editor —
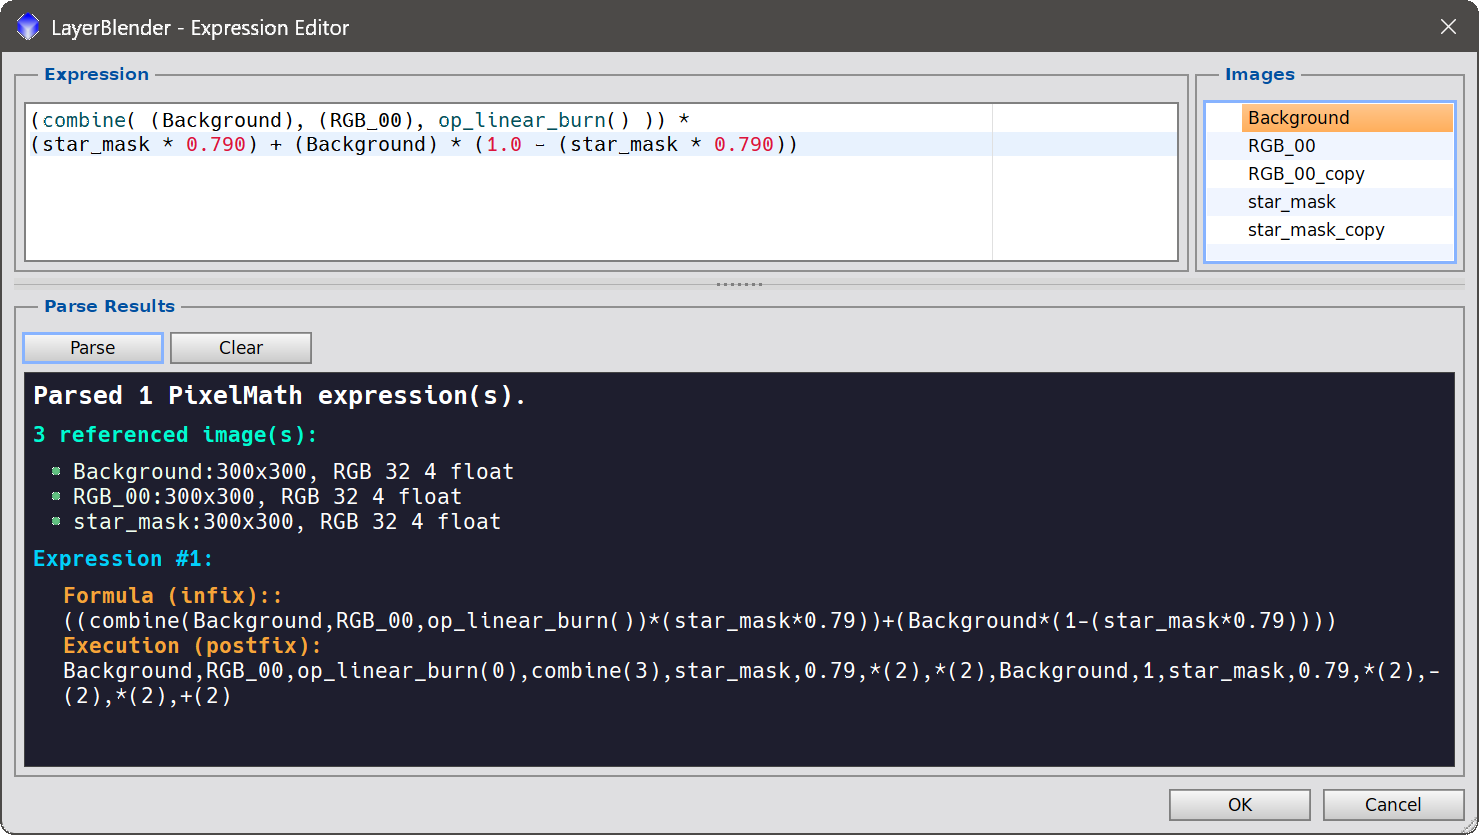
Very similar to PixelMath's own expression editor (it uses the same engine). The current version supports RGB/K expressions only.
If we enter and save a formula that won’t work in PixelMath, LayerBlender will not warn us after saving it. It will accept whatever we type. However, when we execute a blend, LayerBlender will validate all our PixelMath expressions before the blend starts. If any of our PixelMath expressions is going to cause PixelMath to fail, it will let us know, showing us all the failed expressions, and where in the expressions the errors are.
6.5 Importing from a PixelMath Icon
If we have already created one or more PixelMath process icons in our workspace, we can import them directly into LayerBlender’s PixelMath expression field by using the import button, sitting right to the ƒx expression editor button. A dialog appears listing all PixelMath process icons currently in the workspace, and we can choose which one to import. If there are no PixelMath process icons in the workspace, a message appears letting us know.
After we've selected one PixelMath process icon, the expression from that process icon is placed into the current layer's formula RGB/K field. Again, symbols and individual R, G, B expressions are not yet supported by LayerBlender’s internal PixelMath expression integration, so only PixelMath expressions in PixelMath's RGB/K field are imported. If we wish to use a PixelMath formula that includes symbols or individual R, G and/or B expressions, we should instead add that PixelMath instance as a project layer - then we have absolute control over all parameters and components available in PixelMath itself.
6.6 Formula Validation
We mentioned this earlier but it’s worth highlighting it. When we run a blend, before starting it, LayerBlender automatically validates every PixelMath expression we may have entered in our layer stack. If any expression contains a syntax error, the blend is not started and a clear error message tells us, for every expression that failed validation, what went wrong and where.
LayerBlender's PixelMath Formula Validation —
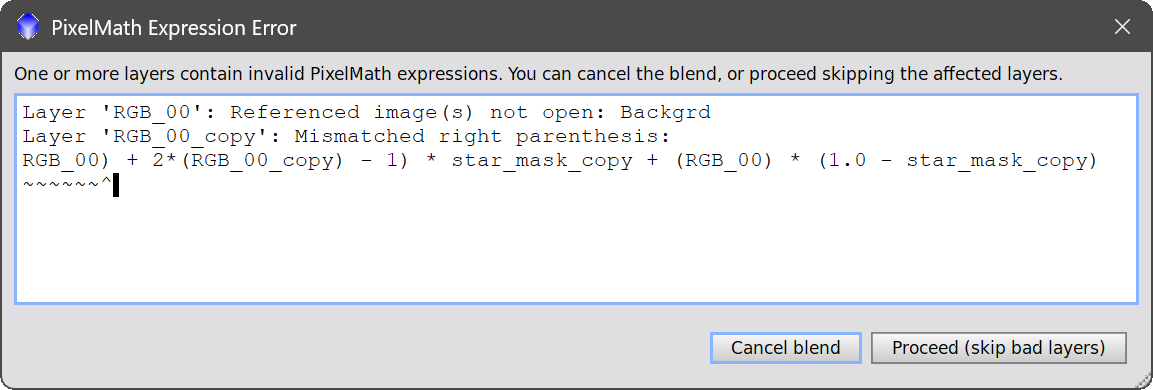
Prior to running a blend that contains PixelMath layers, LayerBlender checks if all the formulas will run okay in PixelMath, and let us know which ones failed, and where.
This saves time by catching mistakes early rather than discovering them during or after a long blend operation. LayerBlender only validates PixelMath expressions right when it's about to execute a blend, not when we edit the expressions.
6.7 PixelMath predefined formulas
As stated in Section 6.2, anytime we select a blending mode, the PixelMath expression field is populated with the formula for that blending mode in PixelMath language, for reference or further custom editing. Here is a list of all the PixelMath-equivalent formulas LayerBlender will show. The formulas below do not take into account masks or opacity, but these properties are included when LayerBlender shows us the formula. Also, here we use $A (top layer) and $T (base layer), but the formula field always replaces them by the actual image names. This table mostly defines what the core formulas are, in PixelMath language.
| Mode | PixelMath’s equivalent |
| Normal | $A |
| Multiply | $T * $A |
| Screen | combine( $T, $A, op_screen() ) |
| Overlay | combine( $T, $A, op_overlay() ) |
| Soft Light | combine( $T, $A, op_soft_light() ) |
| Hard Light | combine( $T, $A, op_hard_light() ) |
| Vivid Light | combine($T, $A, op_vivid_light() ) |
| Linear Light | $A + 2 * $T - 1 |
| Pin Light | combine( $T, $A, op_pin_light() ) |
| Hard Mix | iif( $A < 1 - $T, 0, 1 ) |
| Difference | abs( $T - $A ) |
| Exclusion | combine( $T, $A, op_exclusion() ) |
| Darken | min( $T, $A ) |
| Lighten | max( $T, $A ) |
| Darker Color | iif( CIEL($A) < CIEL($T), $A, $T ) |
| Lighter Color | iif( CIEL($A) > CIEL($T), $A, $T ) |
| Linear Dodge | $T + $A |
| Linear Burn | combine( $T, $A, op_linear_burn() ) |
| Color Dodge | combine( $T, $A, op_color_dodge() ) |
| Color Burn | combine( $T, $A, op_color_burn() ) |
| Subtract | combine( $T, $A, op_sub() ) |
| Divide | $T / $A |
| Dissolve | iif( random() < $opacity, $A, $T ) |
| Luminosity | CIEL($T) |
| Hue | Can't be computed in RGB/K, empty. |
| Saturation | Can't be computed in RGB/K, empty. |
| Color | Can't be computed in RGB/K, empty. |
As stated earlier, these are the equivalent formulas that LayerBlender applies internally when doing a blend, with one exception: Soft Light.
6.7.1 The Soft Light mode
For Soft Light, the PixelMath-equivalent formula uses op_soft_light(), which is an internal PixelMath function that applies the Pegtop simplified quadratic:
(B > 0.5) ? ~(~A * ~(B - 0.5)) : A*(B + 0.5)
Whereas LayerBlender’s internal blending engine applies the standard W3C/Photoshop Soft Light blending mode, which uses a bicubic curve, ensuring smooth transitions between bright and dark areas:
	(B <= 0.5f)
		? (A - (1.f - 2.f * B) * A * (1.f - A))
		: (A + (2.f * B - 1.f) * (((A <= 0.25f)
			? ((16.f * A - 12.f) * A + 4.f) * A
			: Sqrt(A)) – A));
Neither is intrinsically better than the other. They’re just different, producing slightly different results. Generally speaking, linear data would benefit from using the Pegtop blend, whereas non-linear data responds better to the W3C blend. In astrophotography, a Soft Light blend doesn’t make any sense on linear data under almost any circumstances, and its use on near-finished images is still a daring artistic license.
6.7.2 The formula-less modes
The last three modes appear listed as “Cannot be computed in RGB/K”. Indeed, in order to recreate the formulas used internally by LayerBlender, we would need to have access to the individual R, G, and B values. But we don't have access to PixelMath's individual R, G, and B channels (neither symbols), in LayerBlender's PixelMath editor. There are ways to get approximated results with the tools provided by PixelMath at the RGB/K level, but in reality the results would diverge quite a bit, and they’re more of a hack. In the case of Soft Light, both formulas are widely used as Soft Light filters. Here, we would be doing something else. Not misrepresenting the blend was the final choice.
6.7.3 The Dissolve mode
As we briefly mentioned earlier, Dissolve treats opacity different than the other blending
modes, and that’s why $opacity is in the PixelMath equivalent from the start. The Dissolve mode is unique among blend modes: opacity doesn't linearly interpolate between two pixel values to determine how strong the blend is — it controls the probability that each pixel is drawn from the blend layer vs. the base. So when we do iif(random() < $opacity, ..., ...) at 100% opacity
every pixel comes from the blend layer, at 50% opacity half the pixels are randomly selected from each, at 0% opacity you see only the base. This is the canonical definition across all major compositing tools: Photoshop, GIMP, Affinity Photo, Krita, … and LayerBlender. Whether
the Dissolve method has any use for astrophotography is a different question.
7 Process Layers
[hide]
Process layers are one of LayerBlender's most distinctive features. Instead of blending pixel data, a process layer applies a PixInsight process to the accumulated blend result at that point in the stack — non-destructively, as part of the compositing workflow.
Think of it this way: as LayerBlender builds the final image from the bottom of the stack upward, it can pause at any process layer and run a PixInsight process — CurvesTransformation, HistogramTransformation, ColorSaturation, NoiseXTerminator, or any other process — on the result so far, then continue compositing the remaining layers on top of that adjusted result.
This is a not a novel concept, but it is made much more powerful and versatile thanks to PixInsight’s process serialization. It means we can, for example, apply a luminance mask stretch to the accumulated starless data mid-stack, and then blend additional narrowband layers on top of the stretched result. Or we can apply a noise reduction pass at a specific point in the processing chain. The possibilities are as broad as PixInsight's own process library.
7.1 Adding a Process Layer
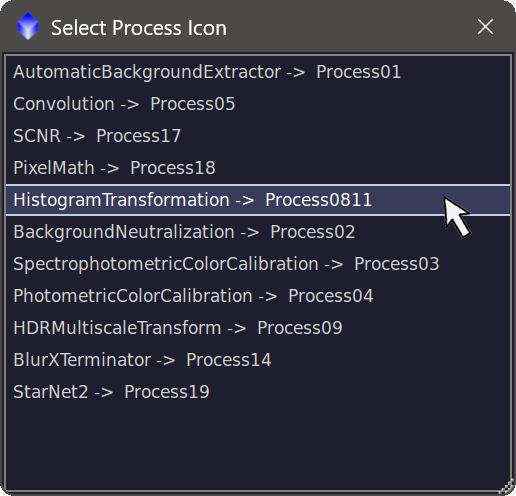
To add a process layer, we first need a PixInsight process icon in our workspace. This is the only way LayerBlender (or any other independent PixInsight process) can currently receive process instances of other PixInsight processes and work with them. Here is the workflow:
- Open any PixInsight process — for example, CurvesTransformation.
- Set the parameters we want — adjust the curve, set the stretch, whatever we need.
- Drag the process triangle to the PixInsight workspace to create a process icon. Give it a recognizable name, or not.
- In LayerBlender, click the +Process (Add process layer) button in the toolbar.
- A dialog appears (see screenshot above) listing all eligible process icons currently on the workspace. We select the one we want and click on it.
The new process layer appears in the layer stack with a pale violet gradient background and the process name and Id, making it immediately distinguishable from image layers.
Why can’t we just drag the process’s instance over LayerBlender, rather than having to go through dropping the process icon on the workspace, etc? Because PixInsight doesn’t currently allow that. Only processes that belong to a common module accept drops between themselves. This is what HistogramTransformation and STF do, for example, both part of the IntensityTransformations module - see it loading in the console when PixInsight starts.
7.2 Process Layers are Self-Contained
This is one of the most important things to understand about process layers: a process layer captures and stores the full state of the process at the moment we add it. Once the process layer is in our stack, it is independent of the original process icon.
In practice, this means:
- We can delete the original process icon from the workspace. The process layer keeps working.
- We can save our layer stack as XISF and reopen it on a different day, in a different PixInsight session — even on a different computer — and the process layer will execute exactly the same way it did when we created it. The full process configuration travels with the file.
- We can build a library of LayerBlender XISF files, each with their own embedded processes, and share them as self-contained recipes for future LayerBlender sessions or for sharing with others. Recipients do not need our original process icons — everything they need is in the file.
Internally, when we add a process layer, LayerBlender serializes the process icon to a complete textual representation of all its parameters. That serialization is stored with the layer and used to reconstruct and execute the process whenever we run the blend.
XISF is an advanced, meta-data rich image container, designed to transport images, not individual, serialized processes. So, when we save a whole stack, process layers included, by clicking the Save XISF button in the toolbar, LayerBlender saves the serialized process in the file by telling the XISF engine it’s just another image. This could have done it in a number of different ways just using metadata, but in the end, this implementation made sense. And ultimately, the serialized process ended up storing an actual image with it. Try opening from the PixInsight interface (not from LayerBlender) a LayerBlender XISF file with process layers in it, and smile.
If we want to update the parameters of a process layer after it has been added, one simple approach is to remove it and add it again from a fresh process icon with the updated parameters. The layer captures the icon's state at the moment of addition; subsequent edits to the original icon do not propagate to the layer. There is, however, another way.
7.3 Inspecting and editing a Process Layer's source code
Process Layer Source Editor —
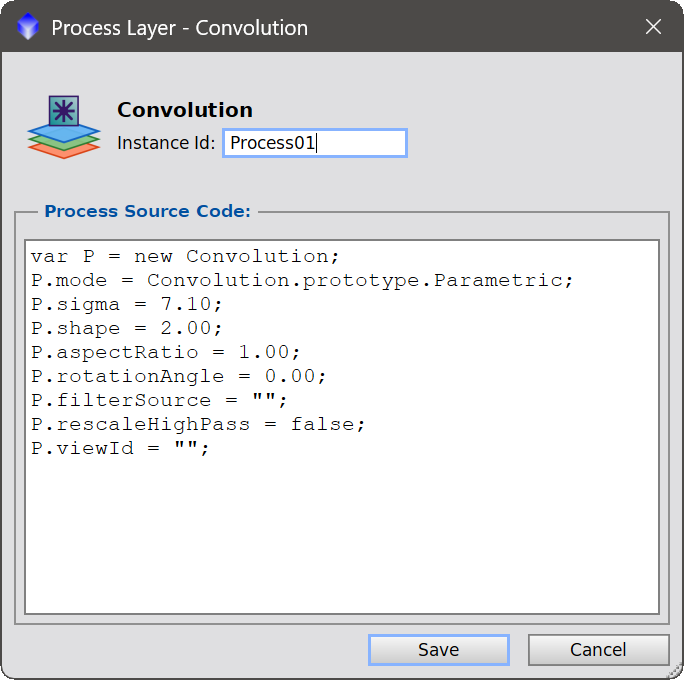
LayerBlender's source editor allows us to modify the process parameters and process Id.
Every process layer stores a complete textual description of the process it holds and its parameters values. We can inspect this textual description (source code) at any time by clicking directly on the process layer's icon in a process layer row.
A modal dialog opens showing the full serialized source of the stored process. This is the same, unencoded representation that LayerBlender writes into the XISF file (but encoded) and uses to reconstruct the process at blend time. The code looks exactly the same as what we would get if we examine the source code of the process icon that we imported to create this process Layer.
This is a powerful diagnostic and transparency feature. It lets us:
- Confirm that the correct process was captured when the layer was added.
- Inspect exactly what parameters are stored, at the level of the process's script representation.
- Verify process integrity before running a blend on an XISF file received from someone else.
We can also edit the stored process right in this dialog, should we want to modify the value of any given parameter of the process. Editing the process parameter values has exactly the same effect as launching the actual process and adjusting its parameter values, but here we’re doing it at a lower level, in a text editor.
If we want to change the process layer id, we are free to give it any name we want. No constraints. Real process icon id names cannot have spaces, start with digits and other restrictions. However, LayerBlender gives us this freedom because once a process instance makes a process layer its home, it will not go back to the workspace as a new process icon. At least, that is not possible with the current version of LayerBlender. Therefore, the name restriction is generously lifted. Should LayerBlender be able to export process instances back to PixInsight in a future release, we'd sanitize those Ids back to PI-acceptable levels.
LayerBlender does not verify syntax or correctness of our edits against what is expected by the process that will receive those parameters, as every process is unique and has its own parameter checks. If we save a modified source that breaks the process during execution, we will only be notified when the blend runs. At that time, the process itself (be it CurvesTransformation, HRDMultiscaleTransform, etc) might write an error message to the console, or it might just leave silently.
Regardless, if the code is broken, the process that needs to run will get confused about what it needs to do. A PixInsight crash is unlikely, as most processes have well implemented parameter serialization guards, but it cannot be ruled out, especially when running poorly written 3rd party processes that may not respond properly to an incoherent source string or to wrong parameters, Regardless, except in some particular cases, the blend would simply continue, and we would still get a blended image, but without the broken processes being applied.
Bottom line: we should only modify the source code of process layers if we know what we’re doing.
7.4 Process Layer Integrity Protection
Every process layer saved in a LayerBlender XISF file is protected by a cryptographic signature. When LayerBlender saves a process layer, it computes a keyed hash (HMAC-SHA256) of the layer's stored process source and writes it alongside the source data in the file. When the file is loaded, LayerBlender recomputes the hash and compares it to the stored one. If they don't match, the process layer is flagged in the console, rejected, and it then falls back to icon-based execution rather than running the stored source.
This integrity check protects against the most common form of tampering: someone editing a LayerBlender XISF file in a text editor and modifying the process source to inject unexpected behavior. Without knowing the secret signing key, an attacker cannot produce a valid signature for modified content.
What this does not protect against: A signature can be forged by someone who creates a malicious process in PixInsight and adds it to a LayerBlender stack through the normal workflow. The signature only guarantees that the stored source was written by a copy of LayerBlender and that it has not been tampered with, not that the process itself is safe. As with any PixInsight process, we should only blend LayerBlender XISF files from sources we trust, and when in doubt, we should examine the source of the process layers, as explained in Section 7.3.
It is worth understanding what “malicious” means in this context. Any risk is contained entirely within the "damage" that existing PixInsight processes can already cause. Process layers execute PixInsight's processes, which are already limited to what they can do, unlike the PixInsight Core application itself. As long as we haven't installed any suspicious process or script to our PixInsight installation, we should be completely safe. Can running the process Convolution erase our hard drive? In the end, the risk of blending unknown XISF files is much lesser than, say, running unknown process icons.
7.5 How Process Layers Execute
When we run a blend, LayerBlender processes the stack from bottom to top. When it reaches a process layer, it:
- Takes the accumulated blend result so far (all layers below this process layer, already composited together).
- Reconstructs the stored process from its serialized state.
- Applies the process to the accumulated result.
- Continues compositing the layers above the process layer on top of the now-processed result.
The process is executed via PixInsight's own process engine — exactly as if we had applied it manually to the image blend at that point. All parameters are preserved faithfully from the moment the process layer was created – unless we edit them afterward as explained in 7.3.
If the process layer refers to a process that is not installed in the active PixInsight session, LayerBlender will treat the process layer as a completely transparent layer, not affecting the rest of the blend in any way.
7.6 The Process Blacklist
A small set of PixInsight processes is excluded from the process layer dialog because they cannot meaningfully be used as compositing layers. Trying to apply them inside a layer stack would either fail outright or produce nonsensical results, so LayerBlender simply does not list them, even if we have some of their process icons in our workspace: LayerBlender itself (cannot be nested inside another LayerBlender), ProcessContainer, ImageIntegration, StarAlignment, SubframeSelector (these require multiple inputs or special contexts that the layer pipeline cannot provide), Blink, and a few others.
Every other PixInsight process is fair game. This includes the standard PixInsight library — CurvesTransformation, HistogramTransformation, ColorSaturation, UnsharpMask, GradientCorrection, ChannelCombination, StarNet, and many others — as well as any third-party processes installed in our PixInsight environment that can be applied to an image.
It is worth noting that the blacklist only filters out processes in the official PixInsight distribution that LayerBlender knows will not work as process layers. It does not vouch for every other process that will be available. Some processes may behave unexpectedly when run inside a layer stack, particularly ones that:
- Require multiple input images at once.
- Modify global PixInsight state (preferences, view properties beyond the target view, etc.).
- Expect to be run interactively rather than in one-shot.
- Create additional images, unless we want to examine those images as well. Yes, if a process inside a process layer naturally generates new images, these new images will be created as the blend is executed.
As explained in great detail in Section 7.3, if we add a process layer for a process that turns out not to work well in a layer-stack context, the result is on us, the user. The general rule of thumb: if the process works the same way every time we apply it manually to the same image, it will work as a process layer.
7.7 Process layers and the Dynamic Preview
Like layers with PixelMath Expression, process layers are not evaluated in the live Dynamic Preview. The preview skips process layers and shows the blend as if they were not there. A small overlay banner appears on the top-left corner reminding us there are process layers in the stack and they are not being applied.
This is by design: applying a number of independent PixInsight processes at every refresh of a live preview would be impractical, and many processes open their own progress dialogs that would interrupt the live update.
To see a preview of the actual blend including process layers without running a full blend, we use the Nuclear Preview button (the eye with the yellow rays over a PixInsight blue cube). The Nuclear Preview runs the full engine, PixelMath and process layers included, into the same Dynamic Preview window. See Section 12 for the difference between the live and Nuclear previews.
8 Masks
[hide]
Masks control where and how strongly each layer contributes to the blend. In LayerBlender, a mask can be any open view in the PixInsight workspace — grayscale or color. If we assign a color image as a mask, LayerBlender automatically extracts its luminance (L) component and uses that as the mask data.
Bright areas of a mask allow the layer to show through fully. Dark areas hide the layer. Values in between produce a proportional blend. This makes masks a precise and flexible way to control exactly which parts of a layer are visible in the final result.
8.1 Assigning a Mask
We assign a mask to the current layer the same ways we can add an image, but using the Mask drop-down in the Current Layer Settings area, or by dragging any open view directly onto the mask thumbnail of the layer widget, or double-clicking on the mask thumbnail. The mask thumbnail appears immediately, giving us a quick visual reference.
The mask must match the dimensions of the layer stack. If we try to assign a mask of the wrong size, LayerBlender will warn us.
8.2 Enabling and Disabling Masks
We can temporarily disable a mask without removing it by clicking the Mask button in the toolbar, or by using Disable mask / Enable mask in the context menu that appears when we right-click over the mask thumbnail (see Section 11). This is useful for quickly checking what a layer looks like with and without its mask, especially with the Dynamic Preview window open.
8.3 Inverting Masks
The right-click context menu (Section 11) offers two ways to invert a mask:
- Invert mask — inverts the mask only within LayerBlender's internal blend calculations. The source image used as the mask is not modified. This is a non-destructive operation.
- Invert source mask — inverts the actual source image that is being used as the mask.
This is “destructive” because it modifies data outside LayerBlender, in this case the
image in the PixInsight workspace assigned as this mask. This action cannot be reversed via Undo. It can only be reversed by re-inverting the image, either repeating this operation in LayerBlender, or using the menu
IMAGE > Invertoption in PixInsight.
8.4 Clipping Masks
See Section 5.7 for a full description of Clipping Masks.
9 Solo View
[hide]
Solo View is a view-only feature that helps us inspect individual layers without the visual clutter of having every image in the stack open at once. When Solo View is on, out of all images included in the stack, only the image of the currently selected layer is visible in PixInsight's workspace; all other layer images are hidden. As we click on different layers in the stack, the visible image follows our selection.
This is particularly useful when working with stacks of many layers — say, a multi-channel narrowband composition with separate Hα, OIII, SII layers, plus continuum subtraction layers, plus process layers. Without Solo View, all of those windows could be open at once, cluttering the workspace.
LayerBlender only hides images that have been assigned to at least one layer. Images that are not part of the stack are left alone - if we want those images also minimized, that's on us.
9.1 Toggling Solo View
We toggle Solo View using its dedicated button in the toolbar. The button has two visual states — one for Solo View off, one for on (blueish background) — so we can tell at a glance which mode the tool is in.
When we turn Solo View on:
- LayerBlender hides every view in our layer stack except the currently selected layer's image (and its mask, if it has one assigned). Any open view that is not assigned to any layer is left as it is.
- As we click on a different layer, LayerBlender hides the previously visible image (and mask) and shows the new one, and the mask right behind, if the layer has a mask assigned.
When we turn Solo View off, every layer image in the stack is made visible again. We can resume working with all layer imagess visible at once.
Solo View is a state toggle that, as stated earlier, does not modify anything other than the visibility of the images in the stack. Therefore, it is not registered within LayerBlender’s Undo/Redo engine. In other words, doing Undo after toggling Solo View will not restore the toggle state, but instead it will undo whatever action we did prior to that.
9.2 Performance Notes
Hiding and showing image windows is not a free operation in PixInsight — each visibility change involves real work behind the scenes. With a stack of many layers, switching between layers in Solo View may have a brief but visible delay while PixInsight hides one window and shows another. This is normal and unavoidable; it reflects the cost of the underlying operation, not a problem with LayerBlender.
In practice, the delay is usually small enough not to bother the workflow. If we find Solo View sluggish on a particularly large stack, the simplest workaround is to keep Solo View off and instead minimize or move the windows we are not currently interested in.
10 File Formats
[hide]
10.1 Importing Layered TIFF and PSD Files
LayerBlender supports importing Photoshop’s layered TIFF and PSD files, currently supporting 8-bit, 16-bit, and 32 bit layered TIFF/PSD files.
All valid compression methods used in TIFF and PSD files (LZW, ZIP and RLE) have been added to LayerBlender's TIFF/PSD support. LayerBlender currently does not support certain Photoshop-specific features such as confining layers to layer groups, layer styles (Shadow, Inner/Outer Glow, Emboss, etc), and other features that aren’t normally needed during most astrophotography workflows. Other than that, TIFF/PSD imports should work well most of the time, if not always.
To load a layered TIFF or PSD file, we click on the Open Stack button in the toolbar. After we’ve selected a TIFF/PSD file, LayerBlender will decode, read, and reconstruct the following:
- 8-bit, 16-bit, and 32-bit image data of all images and masks in the file.
- Layer names
- Layer blend modes
- Layer visibility and opacity values
- Layer masks
- Layer order
- Flat fallback — if the TIFF/PSD has no layer data (single image TIFF/PSD) or the data cannot be read for some reason, LayerBlender falls back to importing the flattened composite.
After loading the TIFF/PSD file, LayerBlender will construct the layer stack, and map all that information faithfull.
A word of context: TIFF is a general-purpose image format that was never designed to carry layer data. Adobe used the TIFF format to inject proprietary layer information derived from Photoshop's own PSD file format into a TIFF formatted file. Yes, layered TIFFs are nothing but a proprietary (and rather chaotic) Adobe hack.
As a result, none of the available TIFF libraries support layered TIFF files, and they only load the composited, final image, which is all the TIFF specifications cover, also stored in the TIFF (it does not need to be blended) – this is what PixInsight does when we load a multi-layered TIFF file directly from PixInsight. This means layered TIFF support in third-party tools is quite limited, and adding this level of support to LayerBlender has not been as easy as .
In any case, despite the broad TIFF/PSD support offered by LayerBlender for most astrophoto editing needs, it is strongly recommended to use LayerBlender's own XISF-based format (Section 10.2) for any work we want to save and revisit, and to treat TIFF/PSD imports as a one-way, one-time bridge for getting Photoshop compositions into LayerBlender.
10.2 Saving and Loading XISF Layer Stacks
XISF (Extensible Image Serialization Format) is PixInsight's native image format — an open standard designed specifically for scientific and astrophotography image data. LayerBlender uses XISF as its native layer stack format.
To save our complete stack in a single XISF file, we click the Save XISF button in the toolbar.
When we save a layer stack as XISF, LayerBlender writes every layer's image data, mask data, all global and per-layer metadata — blend mode, opacity, visibility, clipping mask settings, PixelMath expressions, and the full serialized state of every process layer — all into a single XISF file.
Loading the file, by clicking on the Open Stack button in the toolbar (the same we use to open TIFF/PSD files) restores the complete layer stack exactly as it was when saved.
This is the recommended way to save, share, and archive our LayerBlender work. LayerBlende's layered XISF format:
- Uses the XISF format, which is open and documented.
- Lossless — pixel data is preserved exactly.
- Complete — all layer metadata is stored alongside the image data, including full process layer state.
- PixInsight-native. All images in the file will be opened when the file is loaded from any PixInsight installation or XISF viewer. To load the XISF as a stack, we just need LayerBlender installed, also.
Internally, the XISF file is identified with a LayerBlender signature property (LB:Format) so that LayerBlender can recognize its own files and rebuild the stack properly.
When we load a standard XISF file created by PixInsight (but not by LayerBlender), if the XISF file only contains one image, LayerBlender will create a one-layer stack with that image. If, on the other hand, the XISF file contains several images, LayerBlender will create a stack with all the images inside the file, placing them on the stack as it finds them.
If the images inside the XISF file are of different sizes, LayerBlender does a number of things that, because layers of different sizes are uncommon in astrophoto stacks, rather than describing the entire logic here, we defer that task to Sections 13 (briefly) and 17.
11 Layer Contextual Menus
[hide]
Right-clicking anywhere on any layer row opens a context menu with a number of operations. Depending on whether we right-click on the image thumbnail, the mask thumbnail, or on the rest of the layer area, we would get a slightly different menu. Also in each menu, the available options depend on the state of the layer — some options are only shown when they are applicable.
Destructive vs non-destructive
First, a distinction needs to be made between destructive and non-destructive actions in this context. We mentioned it earlier, but this is the time to confront it. In LayerBlender jargon, a destructive action is when LayerBlender modifies something outside of LayerBlender and cannot be undone. It sounds destructive enough, all right.
For example, deleting a layer is non-destructive because although the action “destroys” one layer, we can undo the change in LayerBlender, and the change happens inside LayerBlender. The image and mask that were assigned to that layer, if any, remain untouched, they're just no longer assigned to that layer since we deleted it.
In contrast, the option Rename image is destructive because it changes something outside of LayerBlender, in this case the name of an image, and it cannot be undone - we can rename it again, easy enough, but we cannot go back, only forward.
The Rename image option is quite mild, but the rest
of destructive actions modify pixel data in an image, and that's more serious business. Whenever an
option is destructive, a red lightning icon
![]() is shown left of the destructive option. It's there for this reason. Reading the tool-tip can remind us what exactly that option will modify outside of LayerBlender. Let's define all the options in the three different contextual menus that we may get, depending on where we right-clicked. Options
that appear in all three menus are described last, in Section 11.3.
is shown left of the destructive option. It's there for this reason. Reading the tool-tip can remind us what exactly that option will modify outside of LayerBlender. Let's define all the options in the three different contextual menus that we may get, depending on where we right-clicked. Options
that appear in all three menus are described last, in Section 11.3.
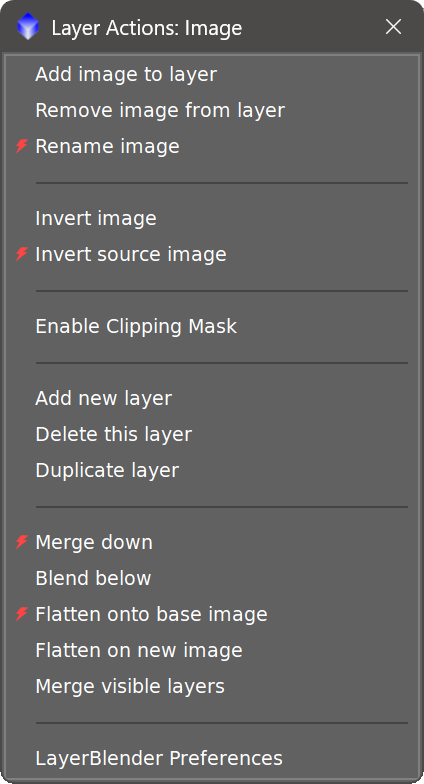
11.1 Image menu options only
Add image to layer:
Opens the image selector to assign or change the image for this layer from a List of all images (views) currently opened in PixInsight.Remove image from layer
Clears the image from this layer without deleting the layer from the stack, nor the source image from the workspace.Rename image 
Allows us to change the view id of the image. This option will literally change the view id of the image, and that's something LayerBlender does not Undo. Therefore, although it's a minor detail, this option is marked as destructive.
Invert image
Inverts the layer image non-destructively — only within LayerBlender. The source image in the workspace is not modified by this action. If we then modify the image outside of LayerBlender, say we adjust the image's histogram, LayerBlender will continue showing the inverted image, but always its current version, not the version we had when we inverted the image. This is how LayerBlender works, always using the current version of the images in the stack.Invert source image
Inverts the actual source image in the PixInsight workspace – and the change will also be reflected in the stack. This is a destructive action that cannot be undone, but can be reversed by re-inverting the source image again.
Enable/Disable Clipping Mask
This and the remaining options in this menu are described in Section 11.3.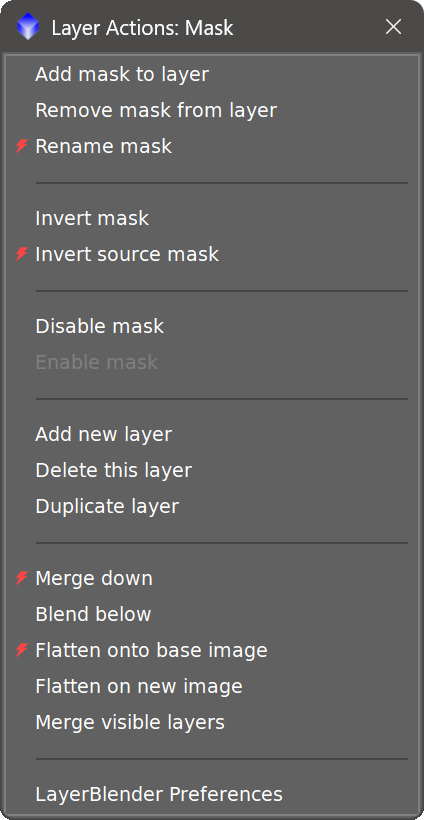
11.2 Mask menu options only
Add mask to layer
Opens the mask selector to assign or change the mask for this layer.Remove mask from layer
Clears the mask from this layer without deleting the layer from the stack, nor the source mask image from the workspace.Rename mask
Change the view id of the mask. This option will change actual the view id of the image. Destructive.
Invert mask
Inverts the layer mask non-destructively — only within LayerBlender. The source mask in the workspace is not modified.Invert source mask
Inverts the actual source mask image in the PixInsight workspace. This is a destructive process, but easily reversible.
Disable mask
Temporarily ignores the mask for this layer during blending. The mask assignment is preserved.Enable mask
Re-enables a previously disabled mask.Enable/Disable Clipping Mask
This and the remaining options are described in Section 11.3.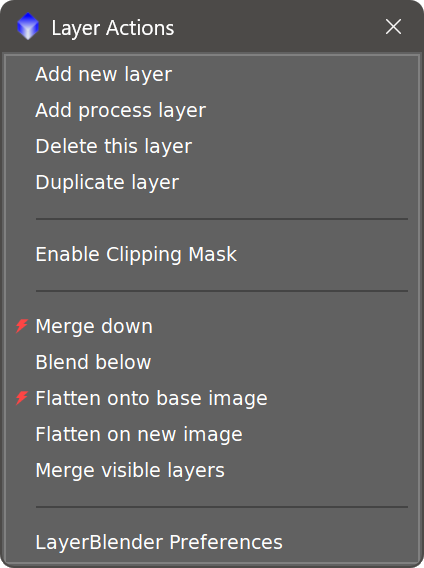
11.3 Layer and common menu options
Add new layer
Inserts a new empty layer directly above this layerAdd process layer
Opens the process icon instance selector to select a process instance and add it as a process layer, directly above this layer.Delete this layer
Permanently removes this layer from the stack. The images that were assigned to this layer are left untouched.Duplicate layer
Creates a copy of this layer, placed directly above the original. This option does the same as the Duplicate layer toolbar button.Enable/Disable Clipping Mask
Toggles the Clipping Mask for this layer, which uses the layer below as a mask. Same as clicking on the Clipping mask icon on the layer area.Merge down
Merges this layer with the layer directly below it, permanently applying the blend mode and opacity of the upper layer to the source image of the merged layer. Destructive, as the source image for the layer below is modified with the blend results. We should only use this option when we want that image to literally become the blend of both, from that point forward in our workflow.
Blend below
Blends this layer with the layer directly below it. It works like Merge down, but instead of updating the lower layer's source image with the result, it creates a brand new image, it places the results in that image, and replaces the two layers being merged with this one. Blend below therefore does not modify any source image. In fact, if the images in the layers being merged are not used anywhere else on the stack, they stop being part of the LayerBlender stack, and are, of course, left untouched.
The name for the new image will be the same as the bottom layer plus the “_lb” postfix.
Flatten onto base image
Blends all visible layers onto the base (bottom) layer's source image and updates the base layer with the result. Destructive because the source image for the base layer is modified. Same considerations as with Merge Down.
Flatten on new image
Blends all visible layers into a brand new PixInsight view, and discards all disabled layers. The layer stack is replaced with a single layer showing the result.
Merge visible layers
Collapses all visible layers into a single layer within LayerBlender. The difference with “Flatten on new image is that after executing this option, hidden layers are preserved in the stack (though still hidden), whereas Flatten on new image would discard them.
LayerBlender Preferences
Loads LayerBlender’s main preferences window. This is the same as clicking on the wrench icon near the bottom right of LayerBlender’s window. See Section 13.
Merge Down confusion
When using Merge down, there is one particular case we need to be aware of, as it may give the impression that it's not working as it should. When the two layers being merged use the same image source (entirely possible in LayerBlender) and the blend model is Normal, Dissolve, Darken, Lighten, Darker color, Lighter color, Hue, Saturation, Luminosity or Color, a Merge down blend will always be identical to the bottom image, even if any of the images has a mask, giving the impression that Merge down simply deleted the top layer. The rest of blending modes are not affected by this logic, which, if we think about it, it makes a lot of sense.
But then, why do Blend below which does the same thing but on a new window, may show different results when masks are also involved? In both cases we are getting the correct mathematical result. What happens is that when blending an image onto itself using a blend mode that does f(x, x) = x, the result is always the source image. For example, the formula for the Normal blend mode (the simplest form of blending):
result =
So, a blend of an image onto itself, let’s call it myImage, would compute as:
      result = myImage  × (1−α) + myImage × α
             = myImage
The same.
So, why the difference? Merge Down does what we see in the formula above. Blend Below too, but because Blend below is putting the results against a new image, if the source images in the blend created any transparency via masks, that transparency translates to blending the results against the new window's background - a color we can define in the Preferences, Section 13.
12 Dynamic Preview
[hide]
The pair of eye-shaped buttons in the LayerBlender toolbar open the Dynamic Preview, a real-time preview window shared across all Deep Sky Colors modules. It is our own live-preview engine replacement for PixInsight's built-in Real-Time Preview, rebuilt from the ground up to be far more capable. Where the native RTP is a single fixed panel that can only show one rendition of the result, the Dynamic Preview is a true, freely resizable window that adds its own zoom, pan, pixel readout, screen-stretch toggle, pixel grid, render-quality control, and one-click extraction to a new image. Everything updates live as we work on the stack.
For LayerBlender, the Dynamic Preview shows the current blend result, refreshed after every change to the stack: blend modes, opacity, mask assignments, layer visibility, adding or removing layers, reordering, edits to PixelMath formulas, and so on.
The Dynamic Preview window
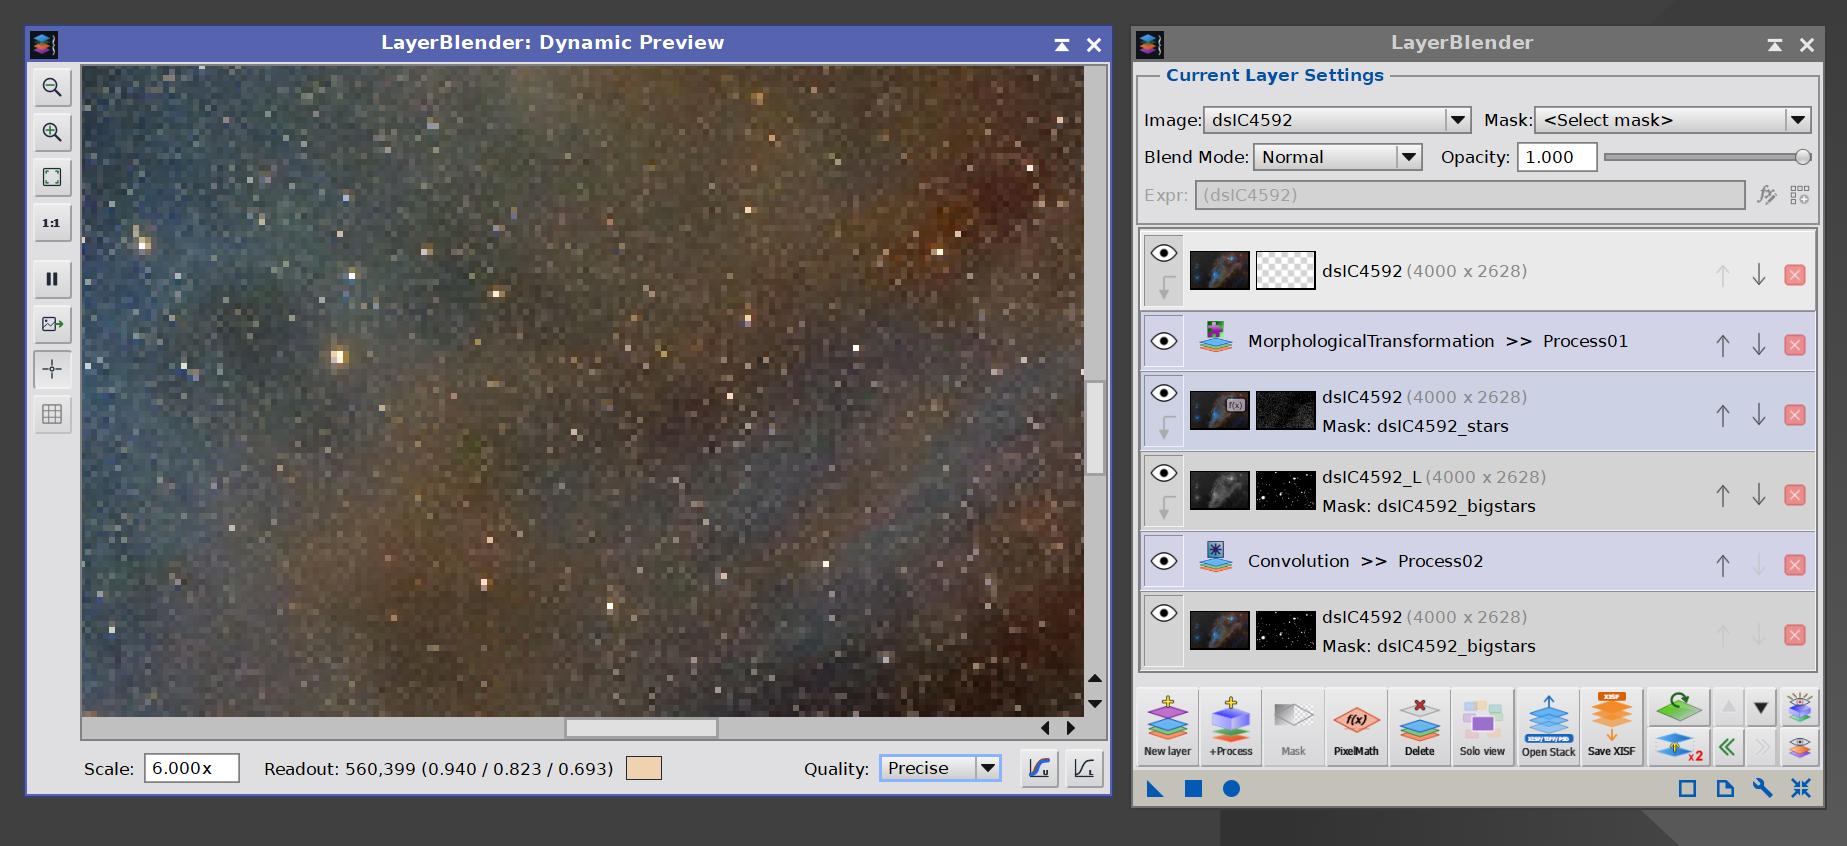
The Dynamic Preview displaying a zoomed-in live blend of the current stack. The toolbar on the left holds zoom, readout, grid, pause, and extract controls. The bottom toolbar holds the current scale/zoom, readout information while in readout mode, quality, and screen-stretch controls.
12.1 Opening the Dynamic Preview
Two preview buttons in the LayerBlender toolbar share the same eye motif and are stacked vertically, one above the other. They open the same Dynamic Preview window, but each runs a different kind of blend:
- Preview: the bottom eye. Opens (or closes) the Dynamic Preview in live mode. The blend refreshes on every change to the stack. PixelMath expression layers and Process layers are skipped during the live refresh, since both can be slow or open dialogs of their own that would interrupt a fast live update. The rest of the stack is composited normally, and a small overlay banner appears in the window when there are skipped layers, so we know the preview is not the final result.
- Nuclear Preview: the top eye, with yellow rays. A one-shot, full-quality preview that includes every layer in the stack, PixelMath and Process layers included. It runs the same engine the real blend uses, into the same Dynamic Preview window. Slower than the live preview, but exact. The next mutation in the stack replaces the nuclear result with a regular live preview. To hold the nuclear result on screen, use the Pause button inside the Dynamic Preview window.
Clicking the Preview button again, or closing the Dynamic Preview window, dismisses it; clicking once more brings it back where we left it. The Nuclear Preview button does not toggle: it always triggers a fresh full-quality render.
12.2 The Dynamic Preview controls
Inside the Dynamic Preview window, a toolbar gives us everything we expect from a capable viewer:
- Zoom: buttons to zoom out, zoom in, fit to window, and 1:1, plus a Scale field to type an exact zoom. Pan with the middle mouse button, the scrollbars, or the arrow keys. We can also zoom in and out by using the mouse wheel or the + and - keys.
- Linked STF: toggles a screen global auto-stretch on the preview, so linear data is viewable. It opens matching the target view's current stretch state.
- Unlinked STF: same as Linked STF but doing a per-channel auto-stretch on the preview. We choose the STF mode by clicking on one button or the other. When clicking on the button that is currently active, STF is switched off.
- Pause: freezes updates so the preview stops recomputing until we resume. Useful during a long burst of edits, or to hold a Nuclear Preview result on screen.
- Readout: switches left-click from panning to reading the pixel value under the cursor, shown in the status bar with a color swatch.
- Grid: overlays a pixel grid at high zoom.
- Extract: creates a new image window from the current preview, when we want to keep a snapshot of it.
- Quality: Smooth (bilinear) for natural viewing, or Precise for crisp pixel boundaries when zoomed in.
The Dynamic Preview is a normal floating window: we resize it, move it, and leave it open wherever it is convenient while we keep working on the image.
12.3 Live preview vs. Nuclear Preview
The live Preview deliberately skips two kinds of layer:
- PixelMath expression layers: custom formulas require the full PixelMath engine and are skipped during the live refresh. The preview treats those layers as transparent.
- Process layers: applying a PixInsight process during a live refresh would be too slow, and some processes might even open progress dialogs of their own that would interrupt the live update. Process layers are skipped during the live refresh.
This means that when our stack has no PixelMath or Process layers, the live Dynamic Preview gives us an accurate representation of what the final blend would be. When PixelMath or Process layers are present, the live preview differs from the final blend, and a small overlay banner appears to remind us.
The Nuclear Preview button runs the engine without any of these omissions, on the same preview canvas. It produces what the actual blend would render, so we can verify the full result without running a full, long blend. Because the Nuclear Preview is a one-shot pass and may involve dialogs (for PixelMath validation, for example), it runs only when we click the button rather than on every change.
12.4 Empty stack
When the stack has nothing the engine would actually composite (no visible layers with assigned images, no Process layers with content), the Dynamic Preview shows a neutral dark background rather than the base-color fill the engine would produce. This is on purpose: a single-color canvas looks identical to a single-color render and could be mistaken for the actual blend result. As soon as we add a visible layer (or unhide one), the preview refreshes normally.
13 Preferences
[hide]
The Preferences dialog is accessible from the right-click context menu on any layer row (last option), and from the wrench icon in the interface. It contains global settings that apply to all layer stacks, and other areas. Settings are remembered across PixInsight sessions.
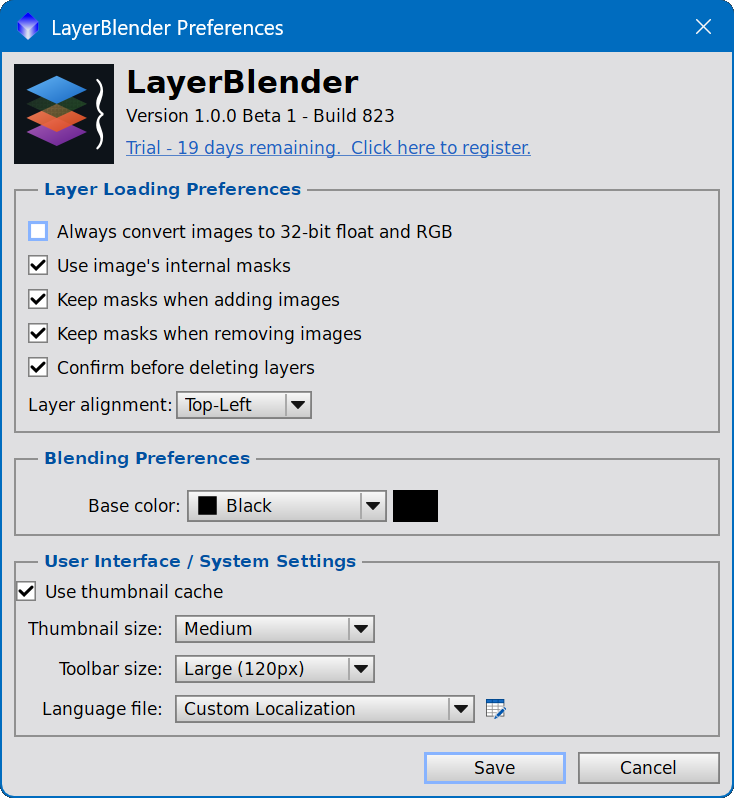
13.1 Layer Loading Preferences
These settings control what happens when we add views to layers from the workspace.
| Always convert images to 32-bit float and RGB. |
When enabled, views being added to a layer are automatically converted to 32-bit float RGB if they are not already in that format. When disabled, LayerBlender asks first. Converting views modifies them in the workspace, so if we would rather control our views and be asked what to do when a conversion is needed instead, we uncheck this option. When adding a grayscale image as a mask, the image is not converted to RGB. However, if the image is not in 32-bit float, it would be converted to 32-bit float when this option is checked. |
| Use image’s internal masks |
When a view in the PixInsight workspace already has a PixInsight mask attached to it, this setting controls whether LayerBlender automatically picks up that mask as the layer's mask when we add the image to a layer. When off, only the view itself is added, we must assign masks separately. When on, the PixInsight mask is also added, as the mask. The default option is usually fine. Change only if we notice our workflow could benefit from it. |
Keep masks when adding images |
When enabled, adding a new image to a layer that already has a mask keeps the existing mask. When disabled, adding a new image clears the existing mask. This is another behavioral preference. Both options are manageable, we just need to know which one is in place. |
Preserve masks when removing images |
When enabled, removing the image from a layer keeps the mask in place. When disabled, removing the image also removes the mask. |
| Confirm before deleting layer |
When enabled, LayerBlender shows a confirmation dialog before deleting a layer. Useful for users who delete by accident; can be turned off for users who prefer faster, quieter operation. We can always undo after a layer deletion, regardless. |
| Layer alignment |
When loading a multi-image XISF file with images of different sizes (a very rare occurrence in astrophotography), but wihout a global canvas size, and per-layer offset placement and scale (usually never needed in astro processing), LayerBlender needs to decide how and where to place each image in the layer stack. This setting controls whether where images will all be aligned to the top-left corner (0,0 coordinates) or centered within the canvas, which, in the absence of canvas info, LayerBlender will assume it to be the size of the layer with largest dimensions. No layer rescaling is done. All layers are blended at their native resolution. Again, XISF file with images of different sizes is extremely rare in astrophotography, and LayerBlender always stores all the required metadata in layered XISF files (so there's always canvas info, etc), meaning that for the most part, we can leave the defaults, and come back here only when we notice something odd about the geometries applied to the different layers in the blend. For most astrophotography workflows, this option is irrelevant, and the Top-Left default is the best compromise. do. |
13.2 Blending Preferences
Base color |
The color used when rendering transparent or semi-transparent areas of a layer. If we don’t use alpha channel transparency in our processing workflow, or don't apply opacity or masks to the bottom layer, we can safely ignore this parameter and its value. Otherwise, the best way to understand this parameter is by assuming that our entire layer stack sits on an image of this color. Usually, suitable colors are black, gray or white, but have a blast. Most astrophotography workflows don’t normally use the Alpha channel component to define transparency: all pixels count equally. So running into blending against this "virtual background layer" is uncommon. This is because this version of LayerBlender does not process Alpha-channel information as real transparency (it will in a near future upgrade), but it knows about it, and this is what it does instead: replacing it with the color we choose here. |
13.3 User Interface / System Settings
| Use thumbnail cache |
When enabled, LayerBlender caches the thumbnail bitmap for each layer and reuses it across redraws. This results in much faster rendering of the layer stack, especially when working with more than a handful of layers and big images. Otherwise, thumbnails are recreated by reading and scaling the actual images (views) every time, which can be very costly (slow) after a few layers. Thumbnail cache is enabled by default, and should remain enabled, except in the rare situation when we need immediate updating of the thumbnails, at the cost of a much slower response of LayerBlender's graphical interface. When thumbnail cache is enabled, if any of the images in the stack changes (say, we just applied some process to it), thumbnails may not update immediately, but they normally do within a second or less. |
| Thumbnail size | Controls the size of the thumbnails of the images and masks in the layer rows in the stack, which also resizes the height of each layer row. Five sizes are available — we can choose based on our screen, and how many layers we are working with, or simply, how well do we want to see the thumbnails in LayerBlender. Larger sizes show more detail; smaller sizes let more layers fit on screen at once. Process layers are always shown at a proportionally smaller height. |
| Toolbar size | Controls the size of LayerBlender's main toolbar. The default is Small, however, if we want or need bigger buttons - might be a problem especially for those using high resolution monitors - the bigger option could make using LayerBlender a more comfortable experience. |
| Language | Set the language for LayerBlender’s graphical interface. See Section 14 below for all the details. |
14 Language and Localization
[hide]
PixInsight is a software that is not well internationalized for localization. In fact, it has neglected this aspect of software development from its inception, with no clear signs that this is going to change anytime soon. So in order to offer LayerBlender in other languages, a simple but efficient localization system was created.
Yes, LayerBlender's interface can be displayed in languages other than English. Currently, LayerBlender ships with eleven machine-translated, mostly untested language files for Spanish, Italian, French, German, Portuguese, Dutch, Swedish, Finnish, Norwegian, Danish and Catalan, in addition to English. They are available via the Language option in the Preferences (Section 13.3).The Language option also allows us to edit our own personal version of the LayerBlender "language", if we must, by selecting Custom Localization, which appears last in the list of available languages. We can think of it as a way to personalize each and every text string used by LayerBlender (a few hundred!). See next section for details.
Any time we change the language, the change happens the moment we save our preferences, no need to restart PixInsight or LayerBlender.
LayerBlender’s language support is currently limited to Western languages. Future versions may include support for languages beyond the Latin1 encoding, although at the time of this writing, other tasks in the pipeline have a higher priority.
14.1 The Localization Editor
When we select Custom Localization in the Language settings, a small button that looks like a pencil over a table appears. If we do nothing else and leave, perhaps changing other preferences, the Custom Localization would appear as if it had simply set to English.
Now, if we click on the pencil button, then LayerBlender's Localization Editor appears. The Localization Editor is a customized editor written exclusively so we can modify every single text string used by LayerBlender, and use that set instead of the prefedined languages. Where does that modified set go? In the Custom Localization mode!
Important! As stated earlier, LayerBlender’s language support is currently limited to Western languages (Latin1, ISO 8859-1). Therefore, any modifications made to the strings with the Localization Editor that contain non-Latin1 characters, later will most likely display as garbage. We must limit our edits to Latin1 characters, or not use the Localization Editor at all.
LayerBlender's Localization Editor —
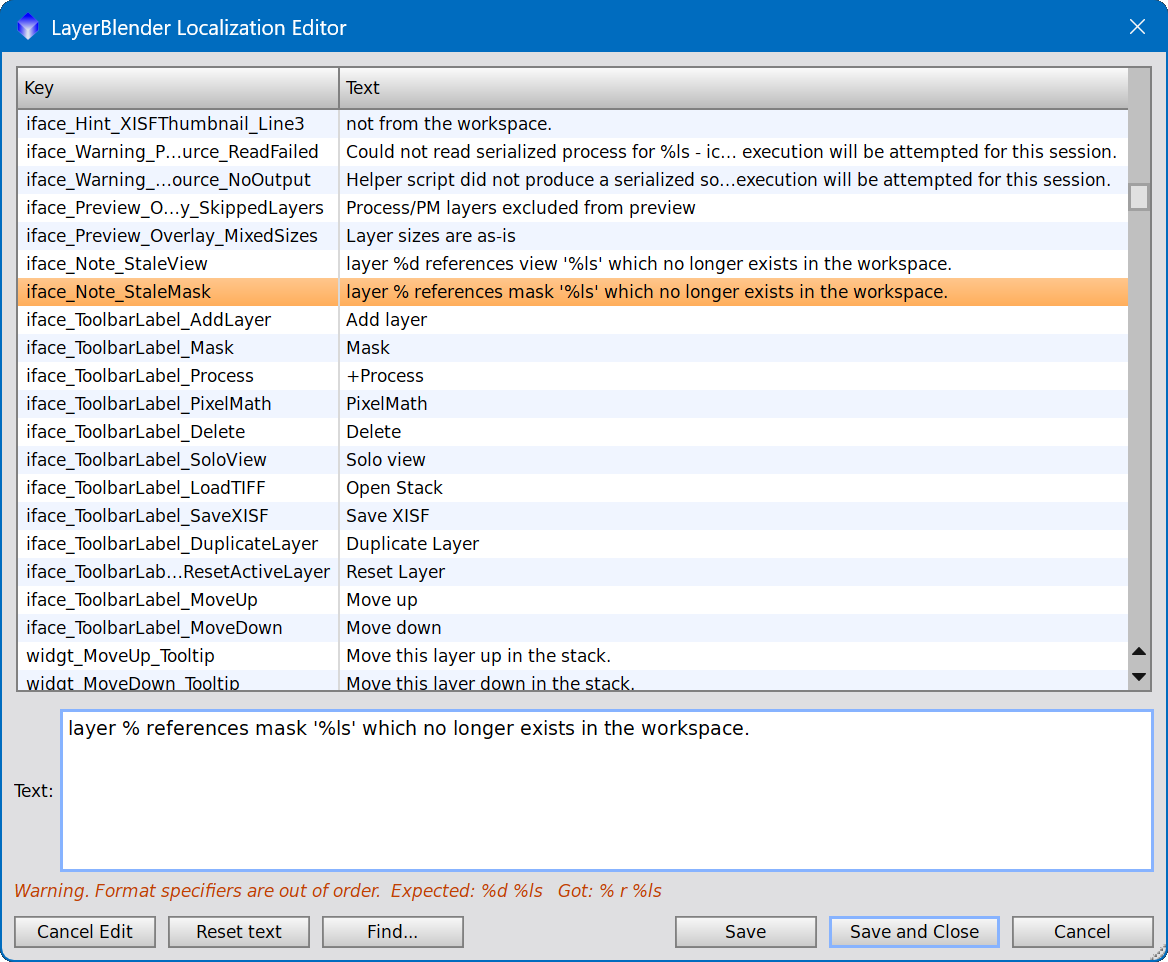
If we modify/reorder/delete any of the format specifiers (%d, %s, etc), LayerBlender allows the change, but it will display a warning, as any alteration to those format specifiers could result in LayerBlender throwing exceptions or even crashing.
This means that we can always go back to English (or any of the other offered languages), and we can always go back to this personalized version, which will grow, or not, as we make new edits.
Important: Our personal Localization Editor data is stored locally on the computer running the PixInsight installation. If we install LayerBlender on a different machine, it will not have any customization we may have made on any other installation. There are ways to transport language data from one computer to a different one, but they are not officially supported.
Likewise, if we wanted our custom language to start in a language different than English - for example, to adapt the Spanish version to our liking - it is also possible, but it is also not supported officially, as it involves overwriting config files requiring administrative privileges.
14.2 Working with the Localization Editor
LayerBlender's Localization Editor is simple, but it comes with a number of handy features to make easier editing the strings.
The String Table
The main panel shows all localizable strings as a two-column table:
- Key — the internal identifier (e.g., iface_AddLayer_Tooltip). Keys are read-only and cannot be modified.
Text — the current value. If a string has been customized (differs from the built-in default), its row is shown in green. Rows shown in the default color are still using the built-in English text.
Click any row to select it. The full text of that string loads into the edit field below for modification
Editing a String
Select a row, then edit its text in the field below the table. Changes are not committed to the table — or to the file — until you use one of the two "Save" buttons.
Cancel Edit
Discards any changes you have typed in the edit field since you last selected this row (or since your last Save), and restores the field to the value currently in the table. Use this when you've been typing and want to start over without affecting what's already saved. A one-step Undo.
Reset Text
Replaces the edit field — and the table entry — with the value of that key at the beginning of this editing session. We use this to undo a translation and revert to what it was when we first the editor, regardless of how many times we have modified the string in this session or click Save. The row will return to the default (non-green) color once it has been reset.
Find...
Opens a small search dialog. Type any text and it will search both keys and text values, starting at the currently selected Key/Text position.
Save and Close
Writes permanently the current state of all modified strings, and closes the editor. The changes are permanent for this LayerBlender installation until we edit them here again.
Save
Exactly the same as Save and Close with two differences. One, Save leaves the editor open so we can continue editing. We can use Save periodically to avoid losing work. The other difference is that when we click Save, as long as the editor remains open, doing a Reset Text will reset the string to the original when we last opened the Localization Editor. When we do Save and Close
Cancel
Closes the editor without saving. Any changes made since the last Save are discarded.
Format Specifier Validation
Many strings contain format specifiers — placeholders like %d, %s, or %.3f — that LayerBlender replaces at runtime with a number, a name, or other dynamic content.
When we edit a string that contains format specifiers, the editor validates that our new text contains the same specifiers as the original, and that it has them in the same order.
If there is a mismatch, a warning is shown directly below the edit field. The warning will tell us what was expected and what it found in our text instead, identifying what the specific problem is: whether the format specifiers are present but in the wrong sequence/order, are missing, or unexpected.
Important: We should never save a string that displays a format specifier warning. LayerBlender uses these placeholders to insert values at runtime — a mismatch will cause incorrect output or a crash when that string is used. Once a string has been permanently saved with the wrong format specifiers, LayerBlender will no longer remeber what the original string looked like, and the Custom Localization mode would be broken until we reinstall LayerBlender.
Persistence and Scope
The language data for the Custom Localization mode is a plain-text .lang file stored on our local machine. LayerBlender loads it automatically at startup.
Changes take effect the next time we launch PixInsight. The file is local to the machine where it is saved.
If the file is moved or deleted, LayerBlender reverts entirely to built-in English with no error beyond a console note at startup, and the Custom Localization mode starts fresh, in English.
15 Technical Notes
[hide]
15.1 Image Format
LayerBlender processes all images in 32-bit floating-point RGB, and it only accepts images at that bit depth. Images used as masks can be grayscale, but the 32 bit float requirement is also enforced. This is PixInsight's native precision for calibrated astrophotography data and ensures no loss of dynamic range during blending. If we load images in other formats (8-bit, 16-bit), LayerBlender can convert them to 32-bit float automatically before adding them to the stack.
Masks can be either RGB or grayscale. Color masks are automatically converted to their luminance component internally (L in the CIE L*a*b* color space) during blending.
15.2 Layer Size Constraints
All layers in a stack must have the same pixel dimensions. The first image or mask added to a stack sets the canvas size for that stack. Subsequent images must match this size exactly.
This is an intentional design decision. LayerBlender is built for astrophotography, where the layers in a typical composition are different views of the same field, processed in different ways: different stretches of the same data, different starless versions, different narrowband channels of the same target, and so on. In every case the underlying scene and dimensions are the same.
If we were to allow layers of different sizes to coexist, the tool would quickly need to grow into something it is not: layer transforms (translation, rotation, scaling), bounding-box management, edge handling for layers that extend beyond the canvas, alignment helpers, and so on. Each of those is reasonable in a general-purpose editor, but in an astrophotography context they are usually not what we need — we typically have already aligned and registered our data before bringing it into LayerBlender.
So LayerBlender keeps things simple: same canvas, same dimensions, throughout the stack. The one place this rule has a special exception is layered imports (Section 10.1) where, rather than rejecting them outright, it felt right to support them as a one-way import tool to later realize that half-baked support was not going to cut it. So currently LayerBlender sits in the middle, enforcing single size stack when adding layers, while allowing imports of files with layers of different size. It's not an easy world, but we go by.
15.3 Alpha Channel
LayerBlender v1.0 does not use the alpha channel of images for blending. Transparency in the compositing sense is handled entirely through the mask system. If an image has an alpha channel, it is computed during blending, until it hits the bottom, and any transparency left at that point is replaced by the Base color we selected in the Preferences.
15.4 PixelMath Integration
LayerBlender's PixelMath expression integration uses PixInsight's own PixelMath engine directly. Expressions are validated using an identical parser to the one used by the PixelMath process, and are executed by the PixelMath engine at blend time. This means the full power of PixelMath's expression language — including all built-in functions, mathematical operators, and image references — is available inside LayerBlender.
15.5 Process Layer Execution
Process layers are reconstructed from their stored serialization and executed via PixInsight's JavaScript Runtime (PJSR), through internal scripts that LayerBlender fires on its own. The reason LayerBlender resorts to using the PJSR for these tasks is to avoid a bug in the PCL that crashes PixInsight, and to circunvent a dead PCL function. Thankfully neither issues are present in the PJSR. The storage of the serialized process is what allows a process layer to run faithfully across sessions and across machines, without requiring the original process icon to be present in the workspace.
16 Known Issues / Future Features
[hide]
16.1 Known Issues
Issue loading projects including LayerBlender
When we open a project that includes a LayerBlender instance, and the project was saved with the LayerBlender dialog open on the workspace, when the project restores LayerBlender's dialog, an exception or API error may be thrown, and several messages in red may appear in the console. PixInsight and LayerBlender will continue working, but any exception could make the entire platform unstable, and restarting PixInsight is recommended.
The workaround in the meantime appears to be moving the LayerBlender dialog to a different workspace before saving the project. Then, when we reopen the project, the exception should not happen. We then can move back the LayerBlender dialog to our working workspace and continue to work normally.
Clicking fast and repeatedly the Undo/Redo buttons may cause an exception
Currently, when we click the Undo/Redo buttons, they do their thing rebuilding the stack. But the buttons may become responsive for a new click faster than PixInsight's GUI engine (Qt) can redraw the stack. So, when we click the button fast several times while Qt is not done redrawing the stack from a previous click, an exception is very likely.
Unexpected Qt exceptions
LayerBlender utilizes a massive amount of graphical resources, compared to most, if not every other PixInsight process. And Qt, the graphical framework used by PixInsight to manage all user interface components, is famous for firing exceptions when a program gets ahead of whatever Qt needs to do at any given time. During the development of LayerBlender, controlling Qt exceptions has not been an easy task, but overall, most of them have been resolved. Some may still linger, but without a clear picture of when they might happen.
If we run into an exception, PixInsight and usually LayerBlender often appear to continue working fine in spite of all the red warnings. It is however highly recommended that after an exception we save our work and restart PixInsight. Despite it may appear to work fine, exceptions can make the process or even PixInsight unstable, and often times we start getting many more exceptions as we continue using LayerBlender, by doing actions that otherwise would work fine.
16.2 Future Features
There are a number of "features" that were decided to be left for an updated release, although most of them are bug fixes, performance related, and the new most visible features will likely be driven by the feedback received from v1.0.
One feature that is high on our list is being able to decide whether a process layer will be applied to the results of blending everything below it (current behavior), or it only be applied only over the mask in the layer below, then the blend would continue using the "processed" mask.
Another feature that should soon see the light is having a No thumbnails mode that would not only remove the visual thumbnails but give more importance in the user interface to other things like process layer information and custom PixelMath formulas, which could be useful when we are using LayerBlender mostly mathematically, and the thumbnails only create an unneeded distraction while the math is not as directly accessible (although it is) and manageable.
One last big feature to be mentioned here that should be coming soon is supporting complete PixelMath symbols and individual R, G, and B components in PixelMath layers in addition to the currently supported RBG/K component. Currently, should we need a PixelMath expression that uses symbols or individual R, G, B expressions, we can always add the whole PixelMath instance as a process layer instead.
Much faster layered XISF load and save operations.
And a few others as well, not to mention any bug fixes that come along the way.
17 LayerBlender Layered XISF Format — Technical Specification
[hide]
17.1 Overview
A LayerBlender stack is saved as a standard PixInsight XISF file (version 1.0). The file is a structurally valid XISF and can be opened by any XISF reader, but it uses a reserved property namespace to encode layer stack information. Any program able to load standard XISF files will still open all the images in LayerBlender layered XISF files. They will not recognize this namespace and simply see a flat sequence of images.
Identification
The file is identified as a LayerBlender stack by the presence of the file-level property:
Property |
Type |
Value |
|---|---|---|
Layer:Format |
String |
"LayerBlenderStack" |
Layer:FormatVersion |
Int32 |
100 |
The property Layer:Format aims at defining a general layer specification that may follow their own subspecifications.
A Layer:Format value of LayerBlenderStack defines this XISF file as a LayerBlender's layered XISF file.
In LayerBlender, any XISF file lacking Layer:Format is treated as a plain XISF file, containing one or more images, but no layer information. If the value of Layer:Format is different than LayerBlenderStack, currently LayerBlender also treats it as a plain XISF file.
LayerBlender v1.0 will also treat as plain XISF files any LayerBlenderStack that has a Layer:FormatVersion different than 100.
17.2 File-Level Properties
Different file-level properties may be assigned, depending on their own Layer:Format sub-specification. For a Layer:Format = , the following file-level properties are recognized:
LayerBlenderStack
| Property | Type |
Description |
|---|---|---|
Layer:Format |
String |
Format identifier — always "LayerBlenderStack" |
Layer:FormatVersion |
Int32 |
Format version — currently 1.0. This value is the result of MajorVersion * 100 + MinorVersion. |
LB:LayerCount |
Int32 |
Number of layer images (does not count mask images) |
LB:SizeMode |
Int32 |
Layer size mode. Legacy from early development, still supported. See below. |
LB:Placement |
Int32 |
Alignment enum used when SizeMode is 1 or 2 |
LB:Width |
Int32 |
Canvas width in pixels |
LB:Height |
Int32 |
Canvas height in pixels |
These are written once per file and describe the canvas as a whole.
LB:SizeMode is currently authoritative, and a property planned to be dropped soon. Values used in this implementation are:
0: All layers have the same geometry/dimensions. Any other value implies otherwise.
4: File contains canvas and per-layer extended geometry metadata (offset and scaling), which is properly accounted for.
LB:SizeMode = 1, 2, or 3, are legacy values that go along with LB:Placement, which determines bitmap placement (left=top or center). Currently, values 1, 2 and 3 fire LB:Placement to determine placement. LB:Placement is ignored, otherwise.
Next specification will drop this property and LB:Placement completely. Placement and geometry will be determined at runtime, based on the data that is available. Currently:
- When all layers have the same dimensions,
LB:SizeMode = 0should be used. - When there are images or masks of different sizes,
LB:SizeMode = 4should be used, and canvas, per-layer offsett and scaling information must be included. For any ommitted geometry property, the following defaults are assumed:Scale lb:Width/lb:Height determine scale LB:Width Largest width of all images in the stack LB:Height Largest height of all images in the stack lb:OffsetX/lb:OffsetY 0 lb:maskOffsetX/lb:maskOffsetY 0 In the current LayerBlender implmementation, the "vacant"
LB:SizeModemodes 1, 2 and 3 (different layer sizes and no placement/offset info) were covering different scaling cases that now have been replaced by the above defaults.
17.3 Per-Image (Layer) Properties
As with file-level properties, all per-image properties are dependent on the value of Layer:Format. LayerBlender's LayerBlenderStack format defines the following per-layer properties (they all use the lowercase lb: namespace prefix):
Property |
Type |
Default |
Description |
|---|---|---|---|
lb:Index |
Int32 |
— |
Stack position (0 = bottom). Presence of this property identifies the image as a layer record. |
lb:Width |
Int32 |
0 |
Layer pixel width |
lb:Height |
Int32 |
0 |
Layer pixel height |
lb:imageId |
String |
|
PixInsight view ID of the source image |
lb:maskId |
String |
|
PixInsight view ID of the associated mask; empty if none |
lb:maskWidth |
Int32 |
|
Mask width. Ignored when LB:SizeMode is 0. |
lb:maskHeight |
Int32 |
|
Mask height. Ignored when LB:SizeMode is 0. |
lb:maskOffsetX |
Int32 |
|
Mask X placement offset. Only used when LB:SizeMode is 4. |
lb:maskOffsetY |
Int32 |
|
Mask Y placement offset. Only used when LB:SizeMode is 4. |
lb:isVisible |
Boolean |
|
Layer visibility |
lb:maskActive |
Boolean |
|
Whether the mask is enabled |
lb:opacity |
Float32 |
|
Layer opacity (0.0–1.0) |
lb:blendMode |
Int32 |
|
Blend mode index (0=Normal, 1=Multiply … 27=PixelMath; see Blend Mode Index Values below) |
lb:actionId |
Int32 |
|
Layer type: 0=NormalBlend, 1=PixelMath, 2=ProcessLayer |
lb:customFormula |
String |
|
For PixelMath layers: the expression. For ProcessLayer: "ProcessId:IconId" |
lb:invertNd |
Boolean |
|
Non-destructive image inversion |
lb:invertMaskNd |
Boolean |
|
Non-destructive mask inversion |
lb:clippingMask |
Boolean |
|
Clipping mask flag |
lb:OffsetX |
Int32 |
|
Image X placement offset. Only used when LB:SizeMode is 4. |
lb:OffsetY |
Int32 |
|
Image Y placement offset. Only used when LB:SizeMode is 4. |
lb:processSource |
String |
|
The serialized source of the process instance for this process layer, encoded in Base64. Only read when lb:actionId=2 |
lb:psMAC |
String |
|
Cryptographic signature (HMAC-SHA256) for the source string. Currently generated with an undisclosed secret key. Also only used when lb:actionId=2 |
17.4 Image Order and Layout
LayerBlender writes the images in the file in stack order (bottom layer first), but the order in which images are saved or loaded does not determine the position of an image in the layer stack. The image’s LB:Index property does that.
If a layer has an associated mask, LayerBlender immediately adds the corresponding mask image. Again, the order in which images are added does not matter. The total image count is therefore between LB:LayerCount and
2 × LB:LayerCount.
A layer image carries a full set of lb: per-image properties. Non-applicable properties can be assigned, but will be ignored. For example, assigning a value to lb:OffsetX on a stack with
LB:SizeMode other than 4 under the current implementation.
A mask image carries no lb: properties at all, except when
LB:SizeMode = 4. in which case, lb: offset and size properties must be included. Regardless, the connection is implicit: the owning layer's lb:maskId property names the mask image's XISF image ID.
Readers distinguish layer images from mask images by checking for the presence of lb:Index on each image: if the property exists, it is a layer; otherwise it is a mask belonging to the layer that has that image's Id as maskId.
17.5 Blend Mode Index Values
  0  Normal      	 9  Linear Burn		18 Pin Light		27 PixelMath
  1  Multiply    	10  Darker Color	19 Hard Mix
  2  Screen      	11  Color Dodge		20 Difference
  3  Overlay     	12  Linear Dodge	21 Exclusion
  4  Darken      	13  Lighter Color	22 Divide
  5  Lighten     	14  Soft Light		23 Dissolve
  6  Subtract    	15  Hard Light		24 Hue
  7  Color       	16  Vivid Light		25 Saturation
  8  Color Burn  	17  Linear Light	26 Luminosity
17.6 Load Validation
[TBD]
17.7 Process Layer Integrity
When lb:actionId == 2 (ProcessLayer), the process source is stored in lb:processSource and a keyed HMAC is stored in lb:psMAC. LayerBlender verifies the MAC on load and refuses to execute a process layer whose source has been tampered with. External writers that construct ProcessLayer records must either leave both fields empty (the layer will be inert) or produce a valid MAC using the same key, which is not publicly documented.
Copyright © 2026 Deep Sky Colors. All Rights Reserved.