1 Introduction
[hide]
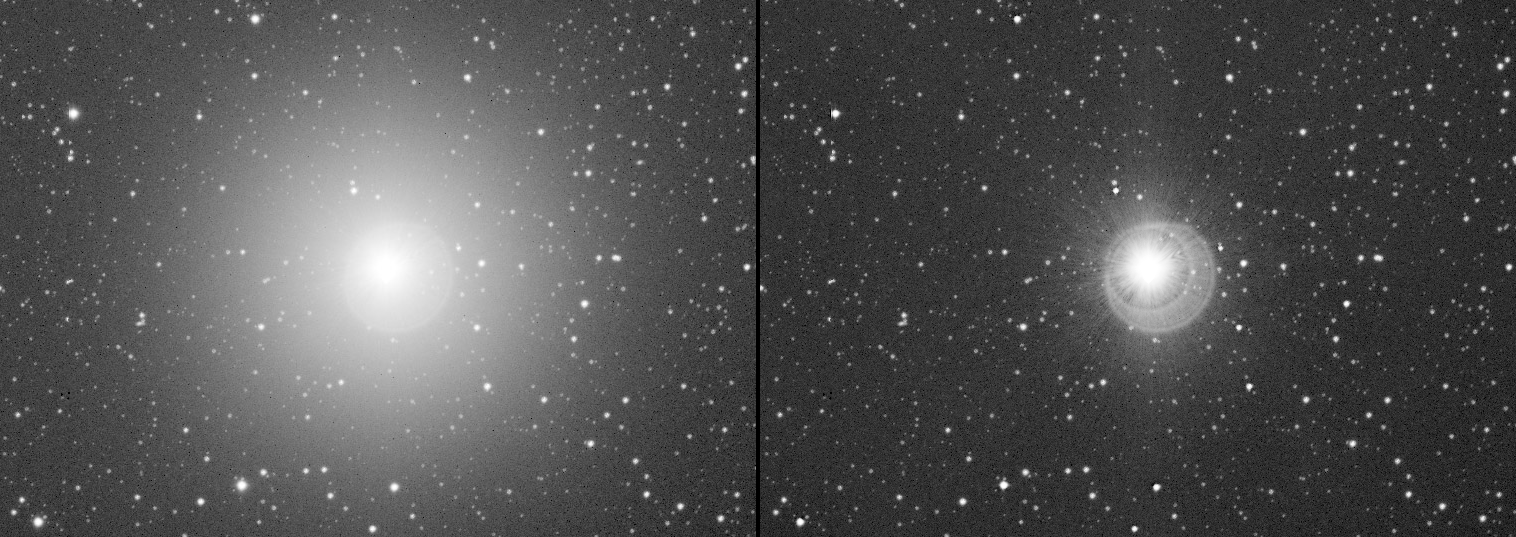
PhotometricGlowSubtraction removes the glow that bright stars spread across an astronomical image. It measures the telescope’s own point spread function from the stars of the image, out to several arcminutes, and then, using each star’s position and brightness from the Gaia DR3 catalog, subtracts every bright star’s glow, including stars just outside the frame whose light still reaches in. The cores of the stars are left untouched, and nothing in the image is smoothed or filtered: what comes off is a physical model of the stray light, and it can be saved as an image of its own and inspected.
Why it matters: the glow around bright stars is often brighter than the faintest things a deep image is after, such as galactic cirrus, the tidal streams and outer halos of galaxies, and the faint edges of a nebula. Gradient and background tools cannot remove it, because it is not a gradient: it is centered on each star, a different size around each one, and it overlaps from star to star. PhotometricGlowSubtraction takes it off star by star, using the same approach low surface brightness astronomers use. It works on linear, plate-solved images, early in processing, before background extraction and before any stretch, and leaves the background for the gradient tool of our choice.
A star is not a dot. The optics, the filters and the window of the sensor scatter a small part of every star’s light far from it, out to many arcminutes. For an ordinary star that light is lost in the noise, but around a bright star it is a wide, faint glow, and it is brighter than the things a deep image is after: faint dust, the tidal streams and outer halos of galaxies, the faintest parts of a nebula. A gradient tool cannot remove it, because it is not a gradient: it is centered on each bright star, it is a different size around each one, and it overlaps from star to star.
The glow has one thing in its favor: its shape is the same for every star of an image, and its level scales with each star’s brightness. That shape is the outer part of the image’s point spread function, the extended PSF. PhotometricGlowSubtraction measures it and subtracts it:
- The shape is measured on the image’s own stars: the faint ones give its inner part, where the bright ones are saturated, and the bright ones give its outer part, where the faint ones are lost in the noise.
- Each star’s brightness comes from its Gaia DR3 magnitude and color, checked against the star itself on the image. Stars just outside the frame are included: their glow reaches into it, and Gaia knows where they are and how bright they are.
- The glow of every bright star is drawn with that shape and that brightness and subtracted. The star itself is left in place: only its glow goes.
2 Setup and Installation
[hide]
2.1 Installing
PhotometricGlowSubtraction is installed and updated through PixInsight’s own update system. We add the Deep Sky Colors repository in RESOURCES > Updates > Manage Repositories, then run RESOURCES > Updates > Check for Updates, and PixInsight installs the module, verifying our signatures before it completes. PixInsight verifies the module’s signature again every time it loads it.
https://repo.deepskycolors.com/PhotometricGlowSubtraction/
Keeping that repository in the list is how updates arrive: PixInsight checks it with the others.
2.2 Launching PhotometricGlowSubtraction
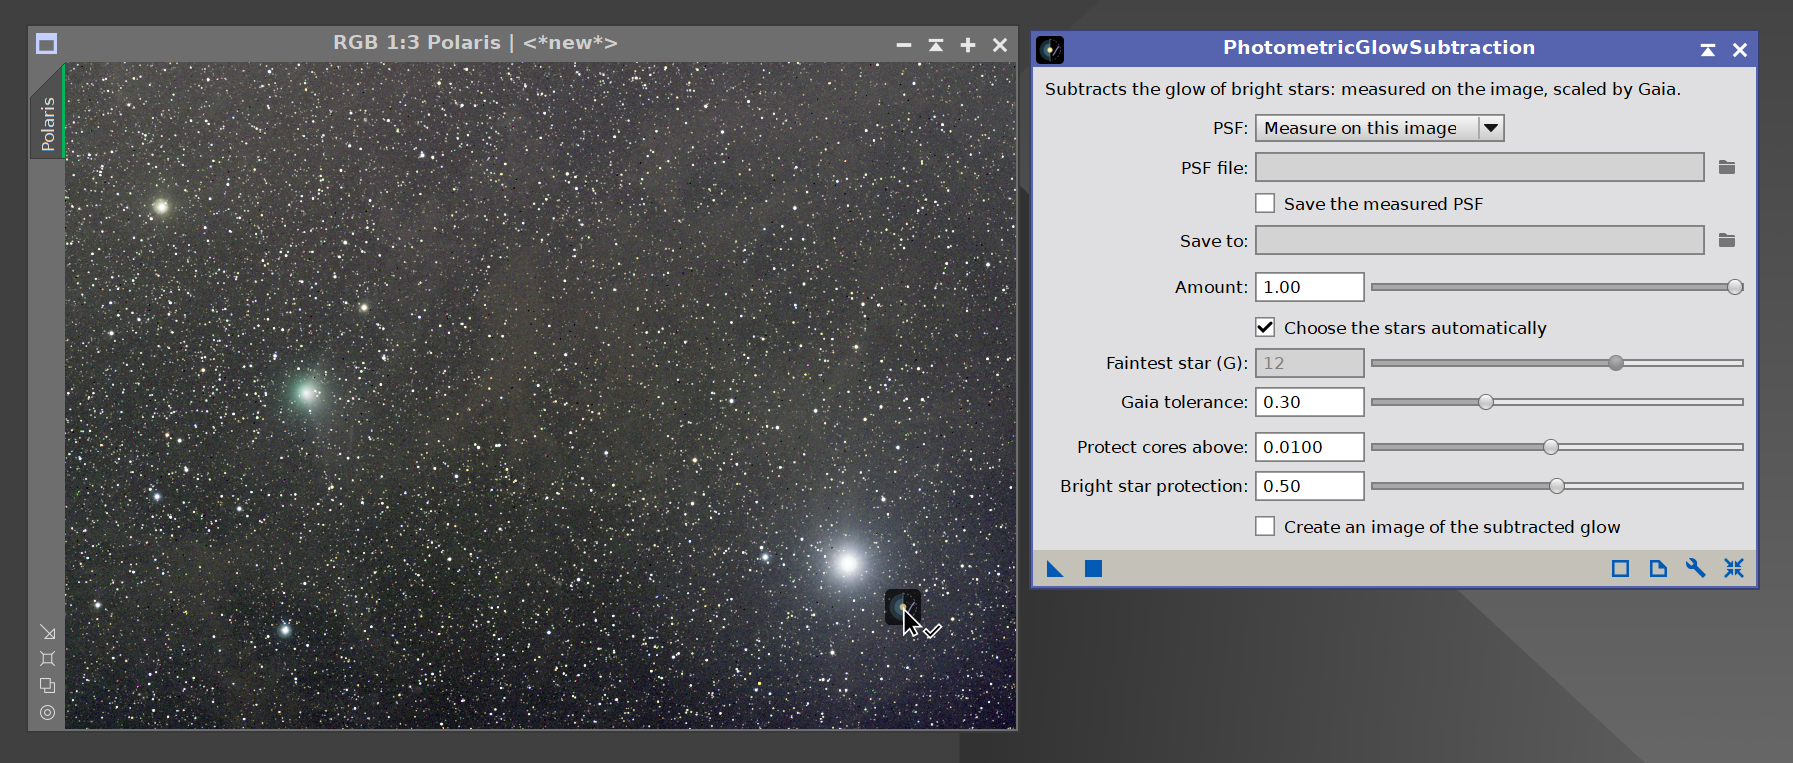
In Process Explorer or through the PROCESS menu, PhotometricGlowSubtraction is listed under the DeepSkyColors, BackgroundModelization and Photometry categories. It is applied to an image like any other process: from its window, from a process icon, from a Process Container or from a script. It works on a whole image, never on a preview: the glow in any part of the frame comes from stars all over it.
The control bar of its window has the usual drag triangle (to make a process icon), the button that opens this page, and the wrench, which opens the license window (see 2.4).
2.3 What an image needs
- An astrometric solution. PhotometricGlowSubtraction finds every star through it. An image without one is refused, with a message: we plate solve it first (
SCRIPT > Astrometry > ImageSolver). A solution with or without distortion correction will do: the positions are checked against the stars of the image and corrected (see 4.3). - The Gaia DR3 database, installed and selected in PixInsight’s Gaia process (
PROCESS > Astrometry > Gaia, wrench button, Gaia DR3). It is searched on this computer through that process: PhotometricGlowSubtraction makes no network connection. The very brightest stars of the sky are missing from Gaia; PhotometricGlowSubtraction adds them from its own copy of the Hipparcos catalog (see 4.2). - A linear image, as it comes from integration, or after operations that keep it linear. The glow is a physical amount of light, and after a stretch it no longer is.
- Stars: at least five whose glow shows above the noise, when the PSF is measured on the image. A field with fewer can still be processed with a PSF measured on another image (see 7).
Grayscale and RGB images are both accepted. An RGB image is measured and corrected channel by channel, each channel with its own PSF and its own brightness scale.
2.4 Licensing
PhotometricGlowSubtraction is licensed software with a 30-day trial, which starts the first time the module runs. While the trial lasts, everything works, and the Process Console says how many days remain whenever its window is opened.
When the trial ends, PhotometricGlowSubtraction stops until a license is registered. Its window does not open: a window says that the trial has ended and offers Get my license, which opens the purchase page in the web browser, and OK, which opens the registration dialog. A process icon, a Process Container or a script does not run it either: the run stops with a message that says how to register.
To register, we click the wrench on the window’s control bar, then Click here to register, enter the e-mail address the license was issued to, exactly as it appears in the license e-mail, paste the registration key, and click Register. The license takes effect at once, with no restart. The license window shows the version, and either the days remaining in the trial or the address the module is licensed to.
The license is checked on this computer; nothing is sent anywhere.
3 Quick start
[hide]
- Open the linear image, plate solved. A master straight from integration is ideal.
- Open PhotometricGlowSubtraction, leave every parameter at its default, and turn on Create an image of the subtracted glow.
- Apply it to the image. The Process Console reports what was measured (see 6), and a new image,
<image>_glow, holds what was subtracted. - Compare the result with the original under the same, strong screen stretch: around the bright stars the glow should be gone, and the background should look like the background elsewhere.
- If the background around a bright star comes out darker than elsewhere, raise Bright star protection; if that is already at 1, lower Protect cores above, or Amount (see 8). One Undo brings the image back for another try.
4 How it works
[hide]
4.1 The shape of the glow
Around each star of the catalog, PhotometricGlowSubtraction measures the median light in rings, from the core out to about 43 arcminutes, with the other stars and small objects masked and with the glow of the star’s neighbors taken out. A ring where the star is saturated is not used. Each star’s profile is then scaled by its brightness, and the profiles of all the stars are combined, ring by ring, into one profile: the extended PSF. The brighter a star, the more its rings count, because the bright stars are the ones that show the outer glow at all.
The PSF is known as far out as the combined profile stands clearly above its own uncertainty; the Process Console reports how far that is. Beyond it, the profiles of the brightest stars, where they still show their glow, carry it further, as a shape only: their level comes from the measured part.
The very brightest stars of a field (those whose glow at 30 arcseconds is a thousand times the noise) have a profile of their own that departs from the shared one in places, and the model follows each of them.
4.2 Each star’s brightness
How much glow a star has is read from its Gaia G magnitude and its BP-RP color, through a zero point and a color term fitted on this image’s own stars. The catalog is the anchor: a star’s brightness is then adjusted on the star itself, within a tolerance (see 5.4), never beyond. Without that anchor, a close pair of stars would split its light at random, and a star in front of a galaxy or a nebula would be taken for brighter than it is. Stars outside the frame cannot be measured and take the catalog’s value.
Gaia does not have the brightest stars of the sky, which are the ones with the widest glow (Alnilam and Alnitak, in Orion’s belt, are two of them). Every star brighter than V = 5 that the Gaia search does not return is added from the Hipparcos catalog, with a Gaia magnitude and color worked out from its V and B-V, and the Process Console lists them.
If the stars of the image do not follow the catalog at all, the catalog is not on them, and the run stops with a message rather than draw glows where there are no stars.
4.3 Where each star is
The catalog positions come from the astrometric solution, and a glow drawn a few pixels beside its star leaves its glow on one side and a dark hole on the other. So the positions are checked against the image before anything is measured:
- Outside the frame, every star is placed with the solution’s linear part only. A distortion model was fitted on the stars inside the image and has nothing to say about the space around it.
- Inside the frame, the bright unsaturated stars are looked for near their catalog positions, and a smooth correction of the solution is fitted to the differences and applied to every star, the saturated ones and those outside the frame included.
- Each star is then moved onto its own center. A saturated star has no peak to find: its center is the center of its saturated disc.
4.4 What is subtracted, and what is left alone
Each star’s glow is drawn with the PSF and the star’s brightness, and the glows of all the stars are added up and subtracted. Three things limit what a star loses:
- The core. Nothing is taken from the center of a star, and nothing above a set brightness (see 5.5 and 5.6), so the stars stay and only their glow goes.
- The star’s own light. Around every star measured out to its far rings, the glow drawn is never more than the light measured around that star. Where something makes a model too strong, this is what keeps a dark area from being dug around the star; the Process Console says how many stars it held back.
- The edge. Each star’s glow fades out over the last part of its radius, so the model has no edge anywhere.
The stars’ profiles. The core of each star is left as it was, so its FWHM, its centroid and a PSF fitted to it do not change. Its wings do: the glow is the outer part of the star’s own profile, and once it is subtracted the star is more compact, with the same core and less glow. Photometry with apertures that reach into the wings, or with a background annulus near a bright star, reads less after PhotometricGlowSubtraction than before; measure on the original when that matters.
4.5 The background
To measure the stars, PhotometricGlowSubtraction needs to know where the sky is. It fits a smooth polynomial to the image’s background, with the stars’ glow taken out, and refits it as the model improves. That polynomial is part of the measurement only: it is never applied to the image. The image keeps its own background and gradients, for the background tool of our choice to deal with afterwards.
5 Parameters
[hide]
5.1 PSF
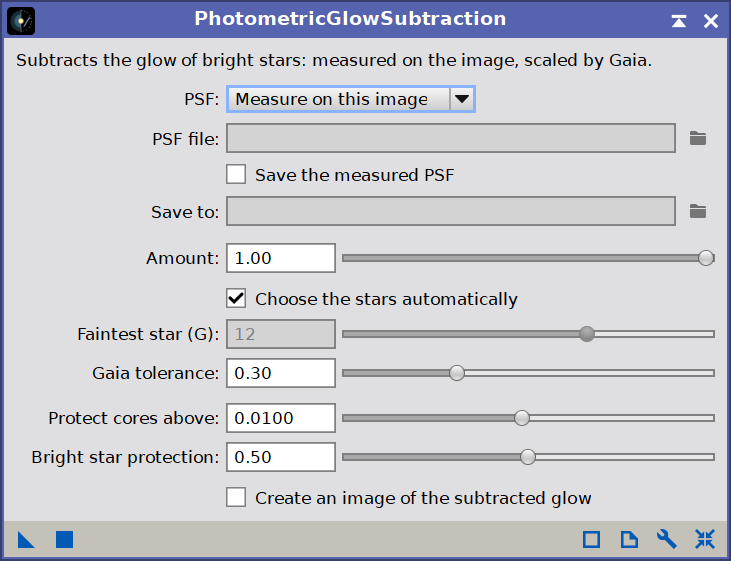
PSF says where the shape of the glow comes from:
- Measure on this image (the default): from the image’s own stars (see 4.1). This is the choice for a field of galaxies, faint dust or ordinary stars in front of an empty sky.
- Load from file: a PSF measured earlier on another image taken with the same telescope, camera and filter, chosen in PSF file. This is the choice when the bright stars of the image sit in nebulosity, or when the image has too few stars (see 7).
Save the measured PSF, with the file chosen in Save to, writes the PSF measured on this image to a file, to load it on other images later.
5.2 Amount
How much of the measured glow is subtracted: 1 (the default) all of it, 0 nothing, 0.5 exactly half. Everything that is subtracted is scaled alike, so Amount changes how much, never where. The glow image (see 5.7) holds what was subtracted at that Amount.
5.3 Which stars
With Choose the stars automatically (the default), the glow of every star whose glow shows above the noise of the image is subtracted. Without it, Faintest star (G) sets the faintest Gaia G magnitude whose glow is subtracted. Setting it to the magnitude of the few brightest stars of a field removes only their glow.
This only changes which stars lose their glow. The shape of the glow and the brightness scale are always measured on every star that shows them: removing the glow of three stars still needs the others to tell what that glow looks like.
5.4 Gaia tolerance
How far, in magnitudes, the brightness of a star may be adjusted to brighter than its Gaia prediction (default 0.30). How far it may be adjusted to fainter is fixed, at 0.3 magnitudes. 0 uses the Gaia prediction alone.
This is the limit that keeps a star in front of a nebula from being over-subtracted: the nebula adds light to the rings the star is measured on, the star is taken for brighter than it is, and a dark area is what is left around it. Lower it when a star is over-corrected; raise it when stars keep part of their glow.
5.5 Protect cores above
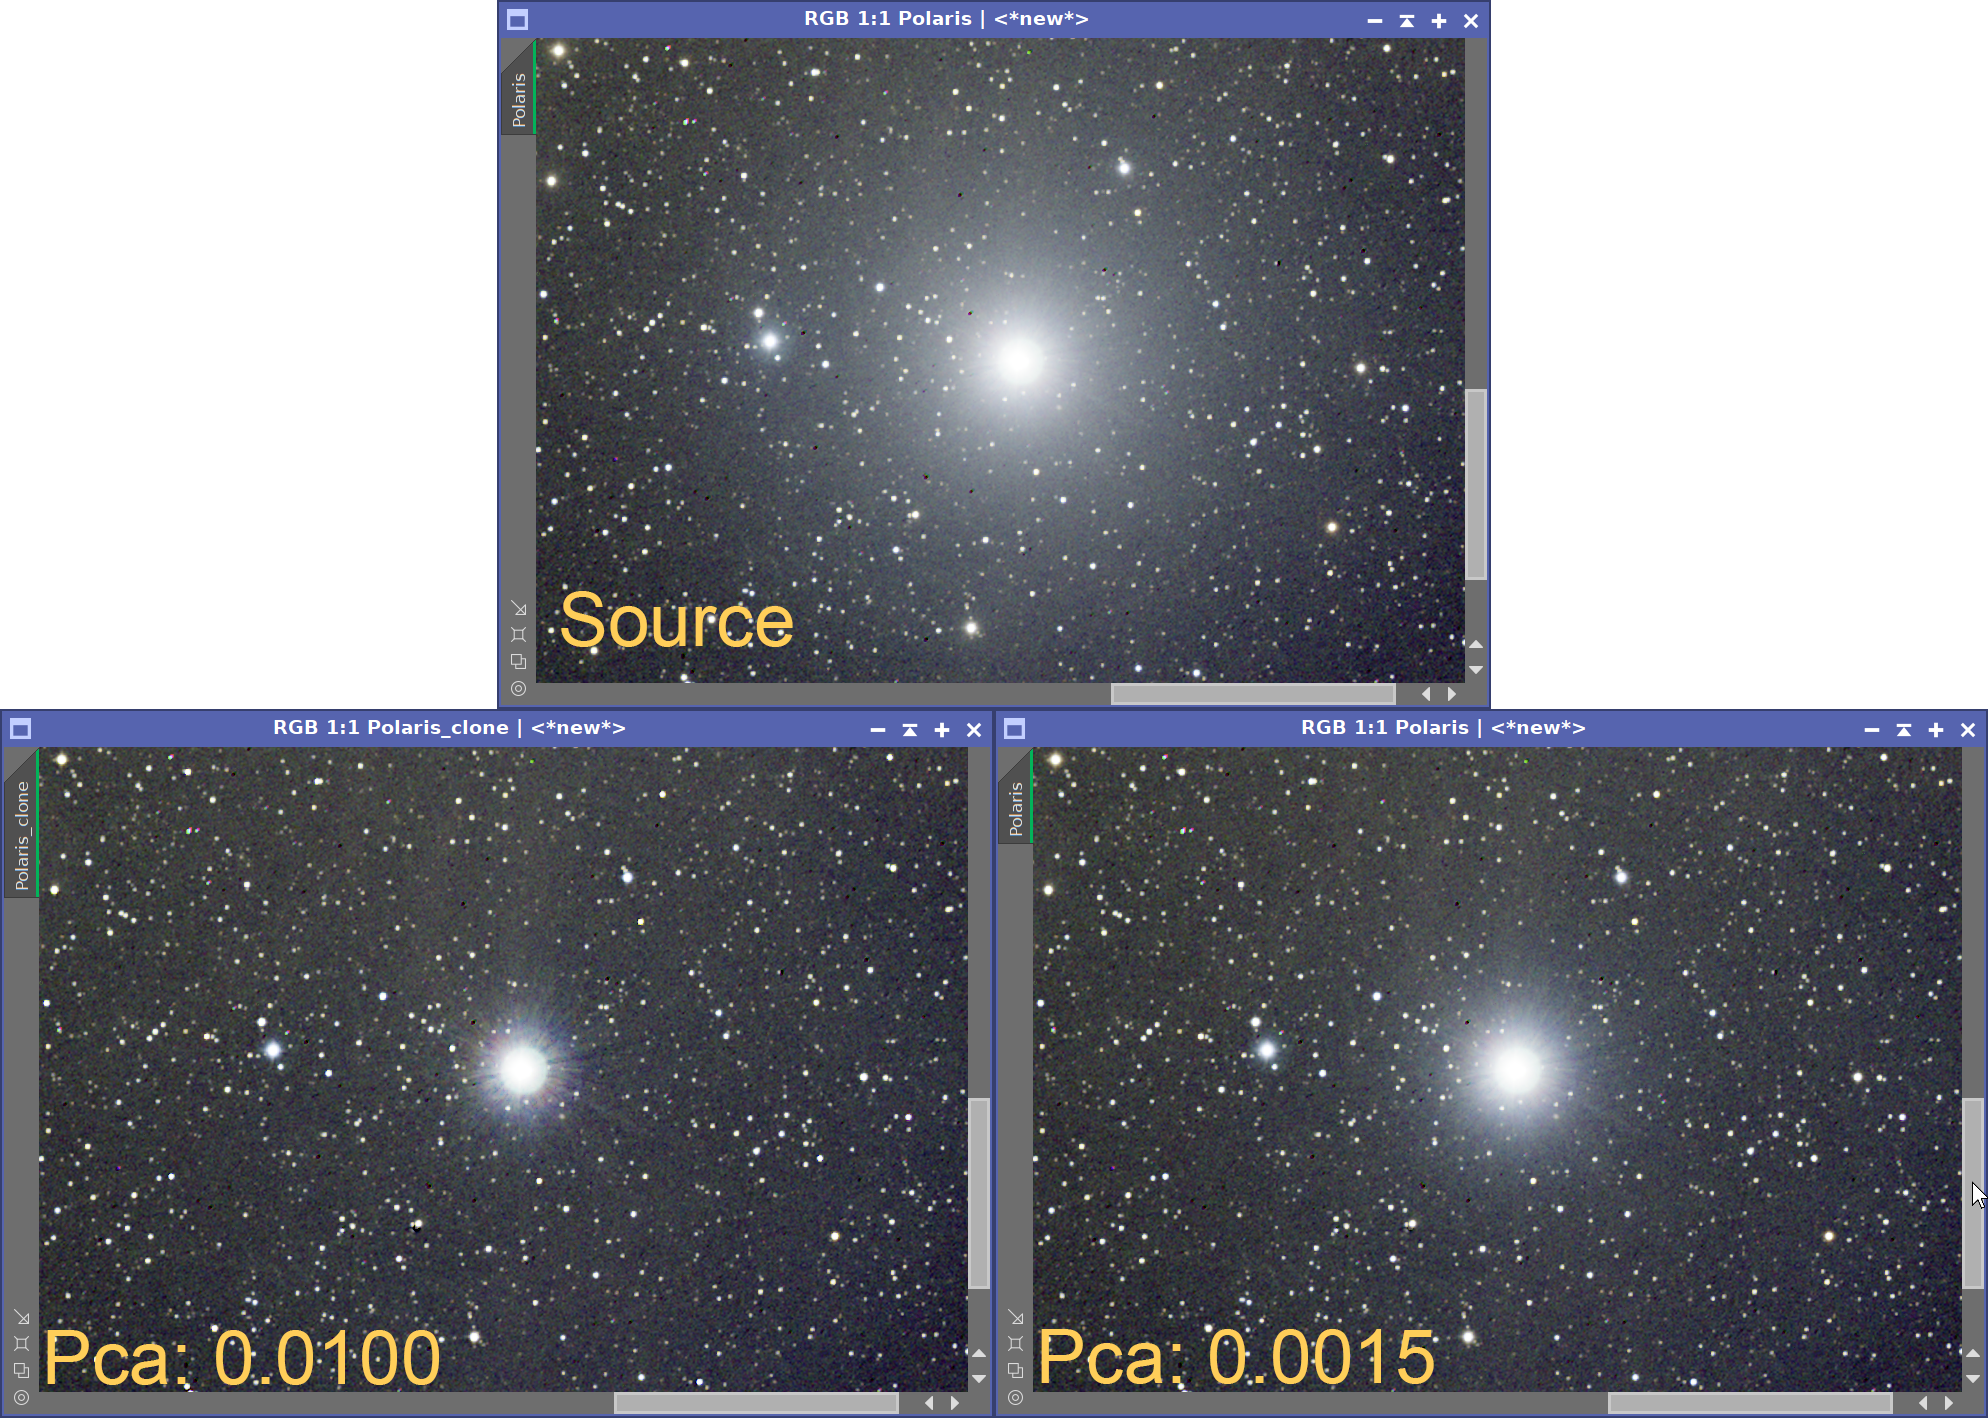
A surface brightness, in the units of the image (0 to 1), above which a star is left alone: what is subtracted from one star does not exceed it, so the stars stay and only their glow goes. The default is 0.01.
Lower it to leave more of each star untouched, which also takes less of the glow nearest the stars; raise it to subtract closer to the cores. The useful values are usually between 0.001 and 0.01, so its slider is logarithmic: each tenfold step takes the same length of it. A value can also be typed in its box.
5.6 Bright star protection
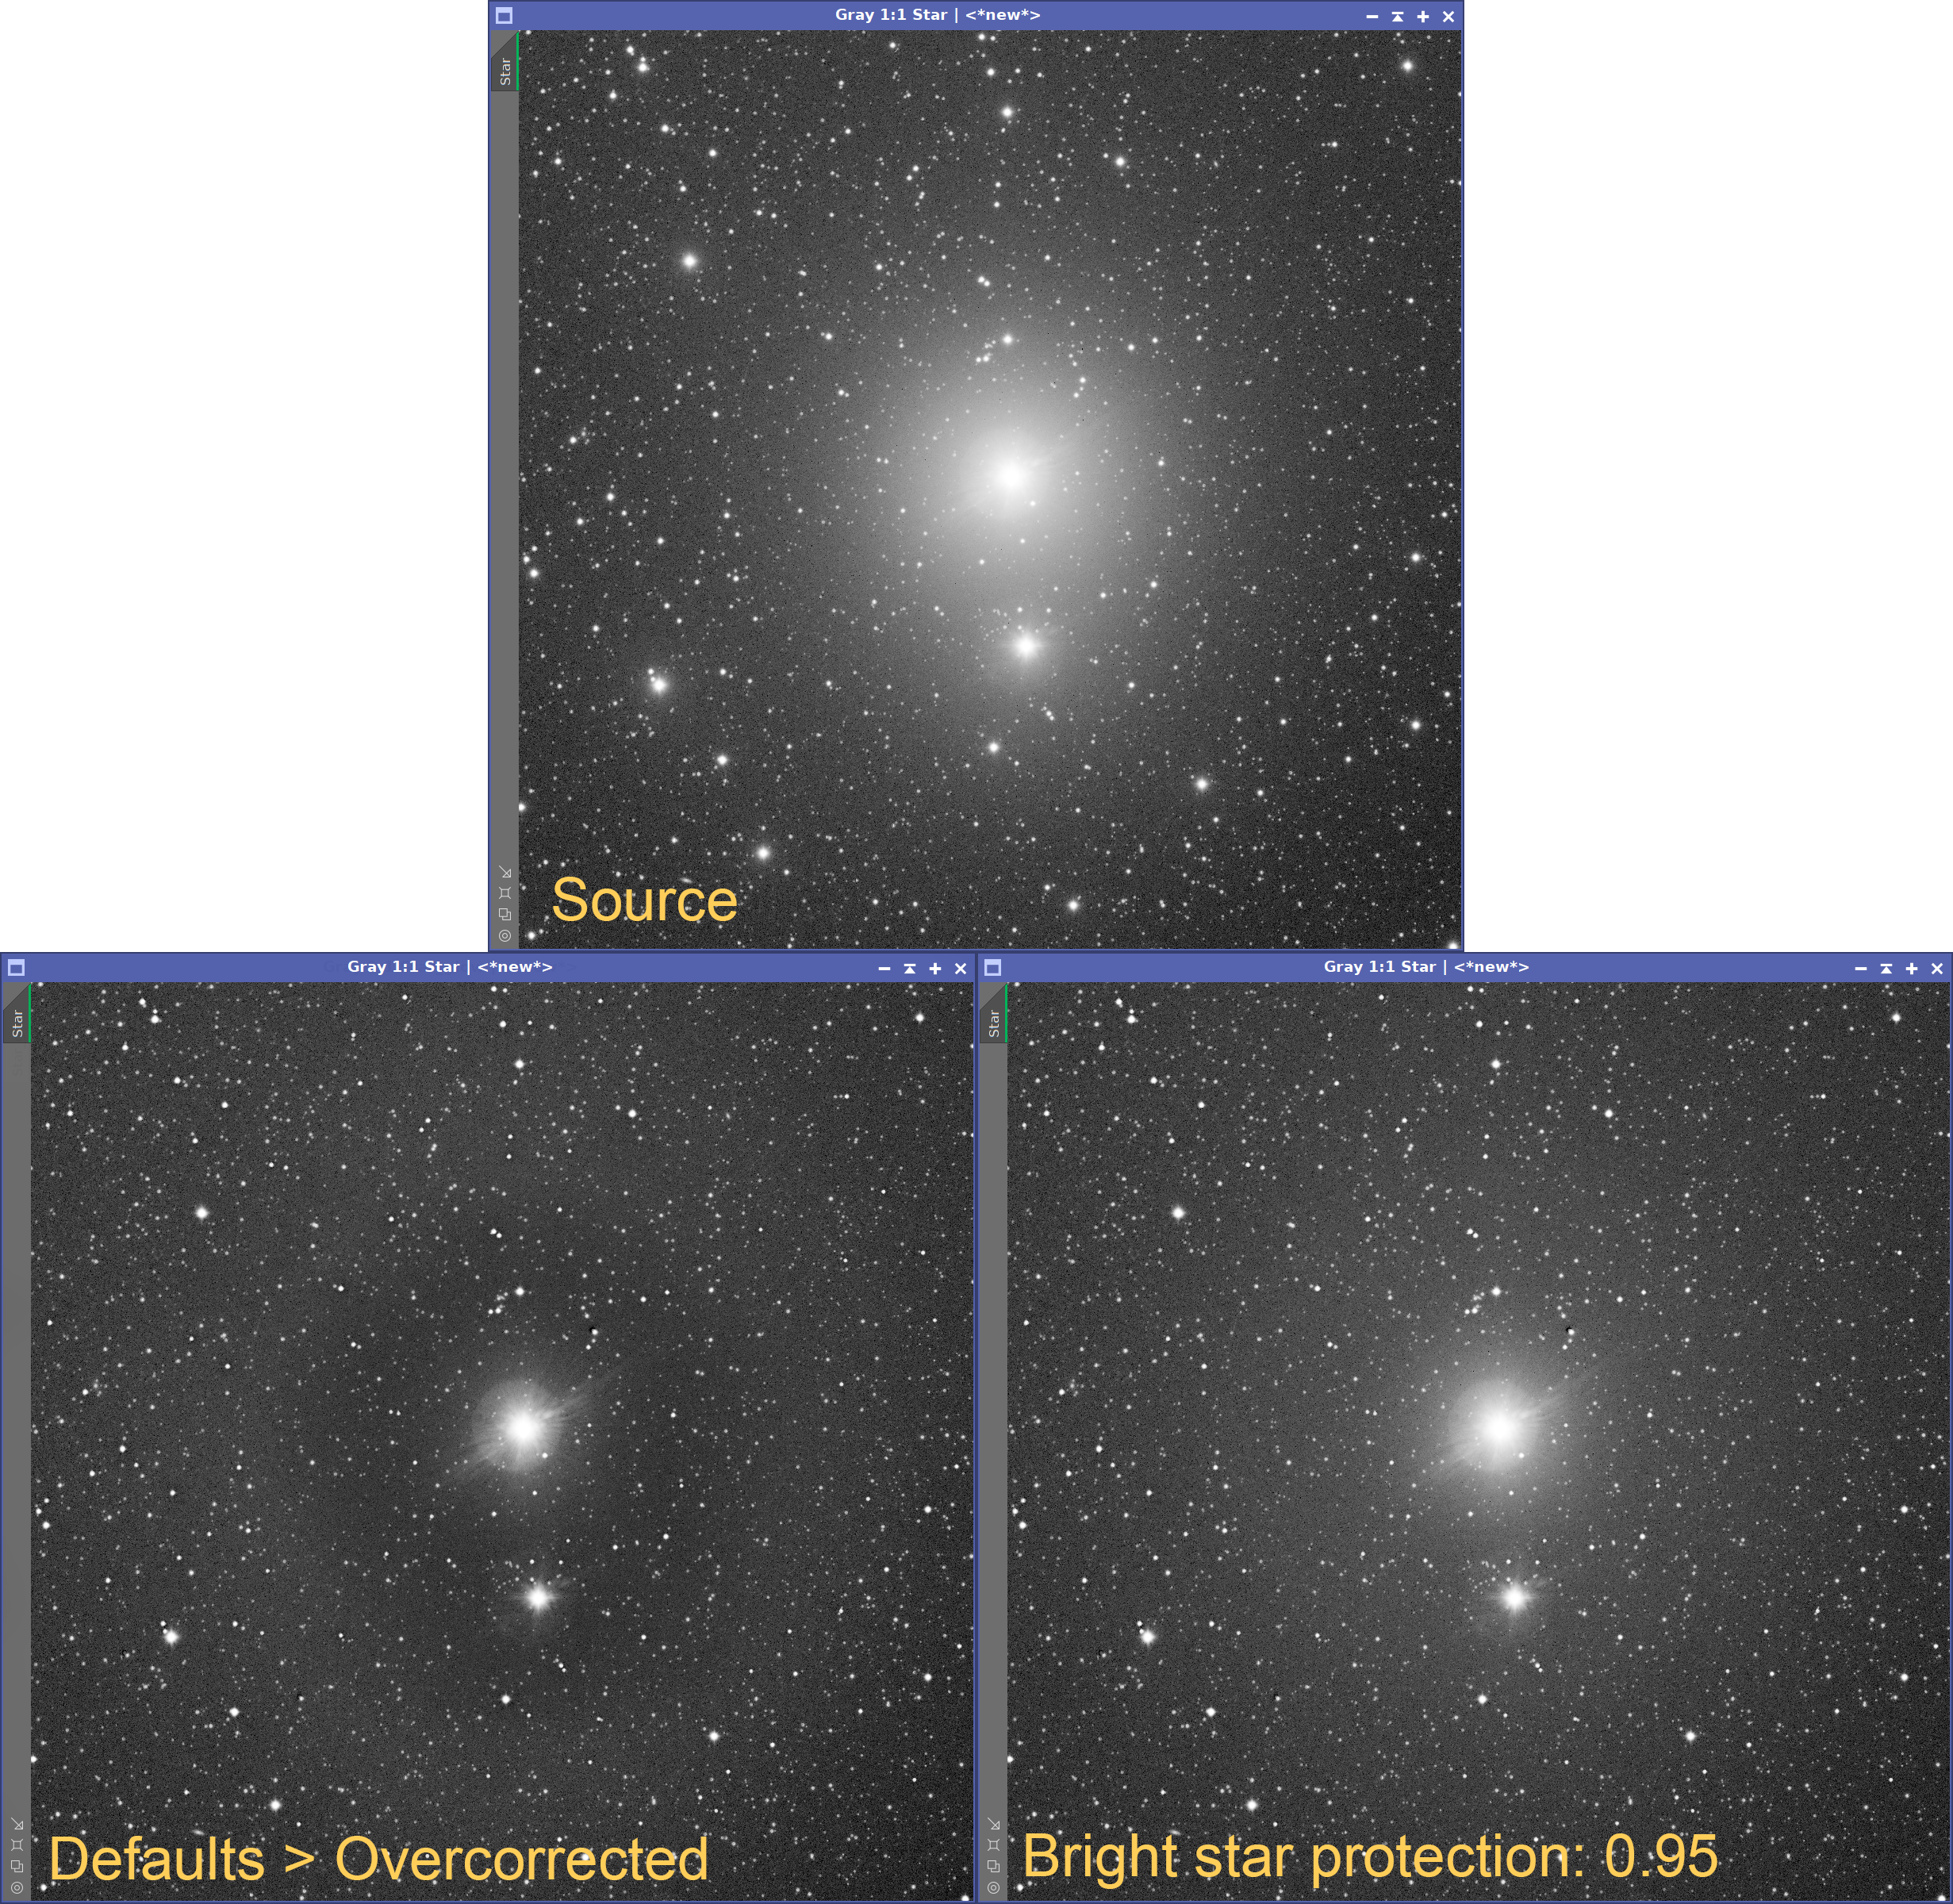
The very bright stars have far more glow than the value of Protect cores above, so with that fixed value each would lose only a part of its glow. For each star, the level that is left alone therefore grows with its own brightness, to a fifth of it, up to 20 times the value of Protect cores above.
Bright star protection is how much of that growth is held back, from 0 to 1 (default 0.5). At 0 the level grows fully, and the glow of the brightest stars is subtracted as far in as the star allows. At 1 every star keeps the fixed level of Protect cores above, and the brightest stars keep a good part of their glow. Raise it when the brightest stars are over-corrected (darker areas around them).
5.7 Create an image of the subtracted glow
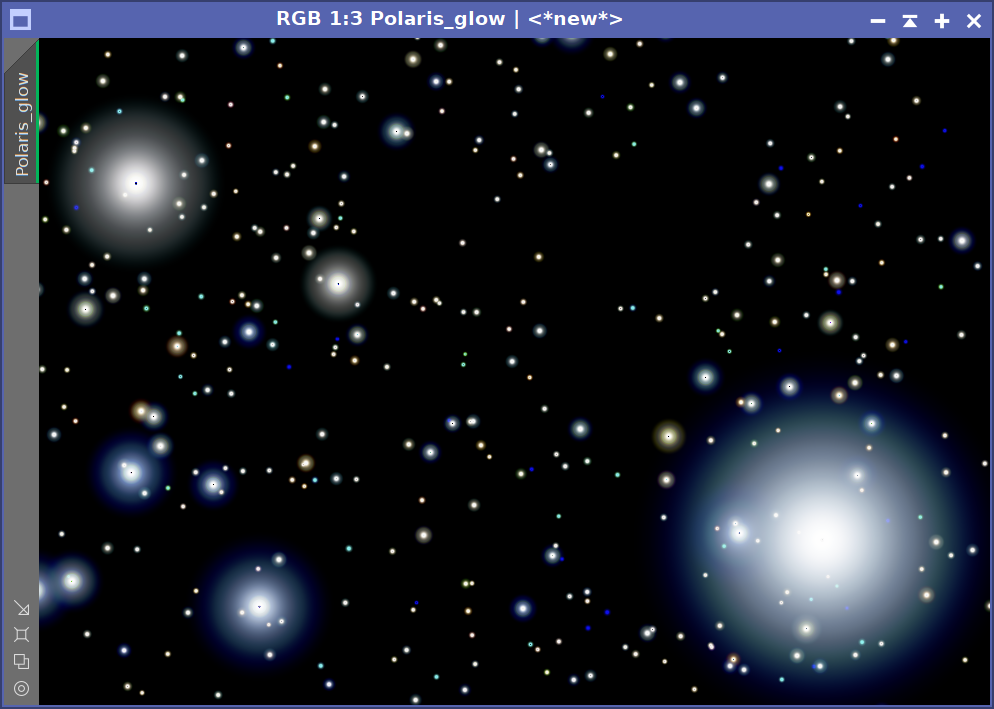
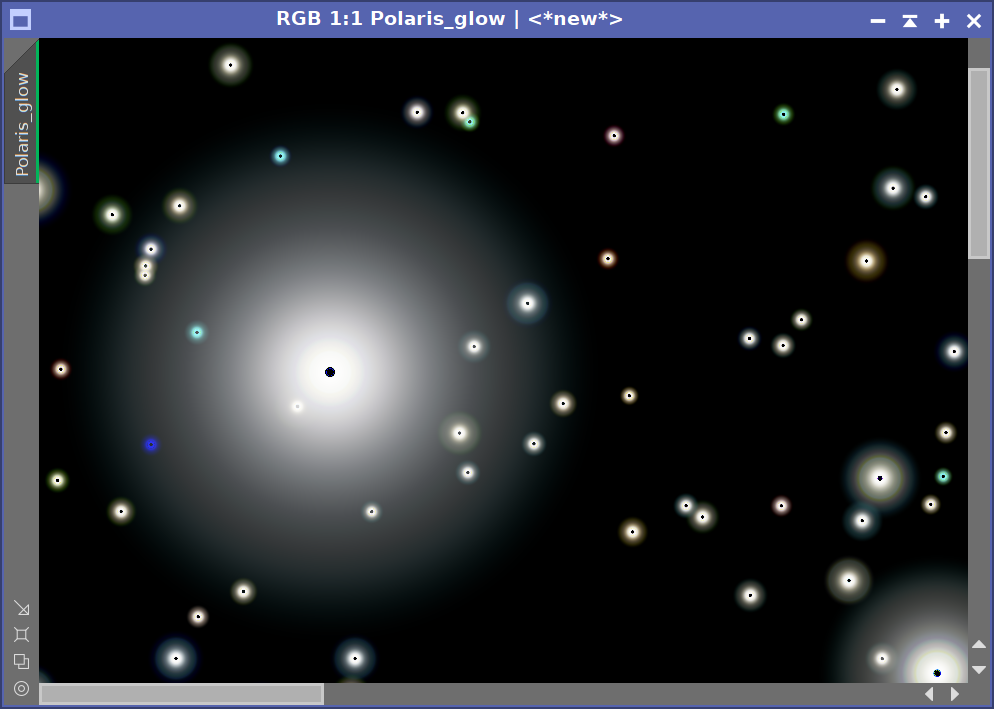
Opens a new image, <image>_glow, with exactly what was subtracted, so that the original is the result plus that image. It carries the astrometric solution of the image it came from.
The glow image is a model, so it looks smooth: a disc of glow around each bright star, with a dark dot at its center where nothing was taken from the core. It is the place to look when something in the result is not right: a disc where there is no star, or one that is not centered on its star, says what went wrong.
6 Reading the Process Console
[hide]
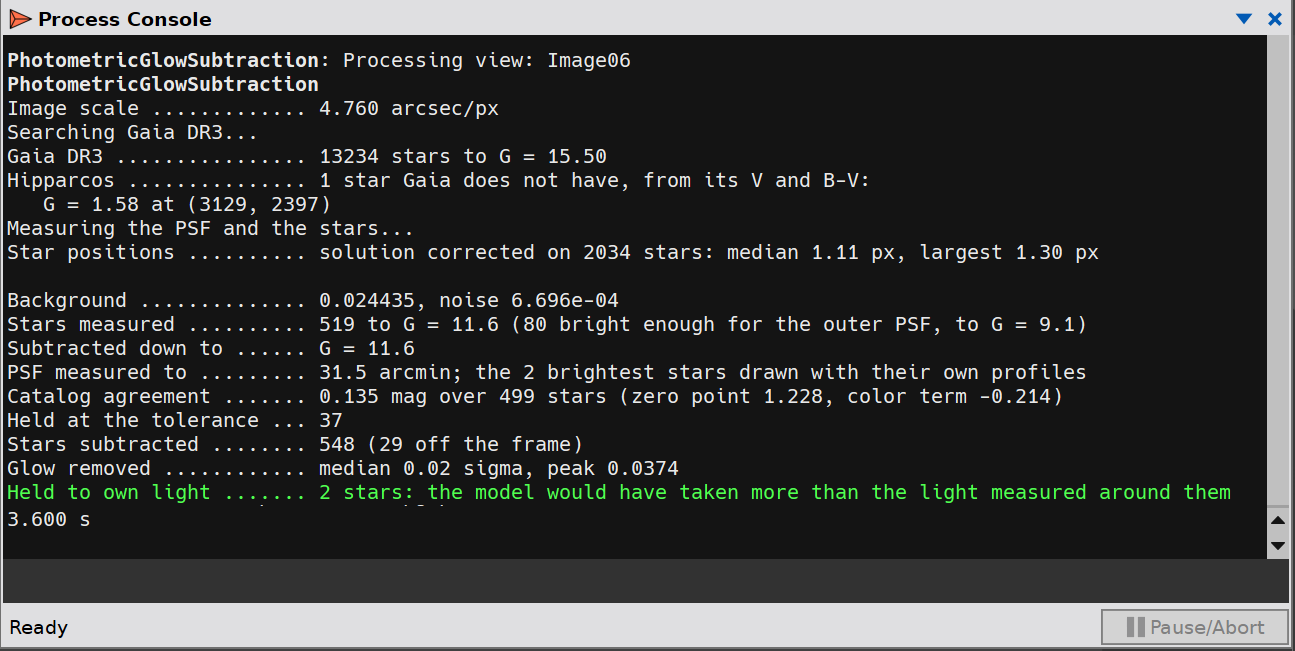
Every run reports what it found. For an RGB image, the measurements are reported for each channel.
Image scale | Arcseconds per pixel, from the astrometric solution. Above 6 arcseconds per pixel the glow of most stars covers only a few pixels, and a warning says to expect little. |
Catalog positions | How many stars inside the frame the solution’s distortion model put more than a few pixels from where its linear part does; those take the linear position. |
Gaia DR3, Hipparcos | How many catalog stars were found, inside the frame and around it, and to what magnitude; then the bright stars Gaia lacks, added from Hipparcos. |
Star positions | How many stars the correction of the solution was fitted on, and how far it moved them. A note follows when it moved them several pixels, and a warning when too few stars were found near their catalog positions to check the solution at all. |
Background | The median level of the background and its noise. |
Stars measured | How many stars were measured, down to which magnitude, and how many of them are bright enough to show the outer part of the PSF. |
Subtracted down to | The faintest magnitude whose glow was subtracted (see 5.3). |
PSF measured to | How far out the PSF is known from the stars together, how much further the brightest stars carry it, and how many of the brightest stars were drawn with their own profile. |
Catalog agreement | How closely the stars follow their Gaia prediction, in magnitudes, with the zero point and color term that were fitted. Below 0.15 is typical of a clean field. Above 0.2 a warning follows: when the bright stars sit in nebulosity, a PSF from a cleaner field is the better choice. In a shallow image, where the glow of most stars is lost in the noise, the zero point is taken from the few stars whose glow stands clearly above it, sometimes a single one, and the line says how many. |
Held at the tolerance | How many stars wanted to be adjusted further than the Gaia tolerance allows. |
Stars subtracted | How many stars’ glow was subtracted, and how many of them are outside the frame. |
Glow removed | The median of what was subtracted over the whole image, in units of the noise, and its highest value. |
Held to own light | How many stars would have lost more than the light measured around them, and were held to it (see 4.4). |
7 Saving and loading a PSF
[hide]
Some fields cannot give a clean PSF of their own. Around the Pleiades, the reflection nebula is brightest right around the bright stars, and star glow and nebula cannot be told apart on that image alone. A field with few stars, or a short exposure, may not show enough glow to measure at all.
The glow is a property of the optics, not of the field, so a PSF measured on one image serves another taken with the same telescope, camera and filter:
- Choose an image of a field with many bright stars and nothing else around them, taken with the same equipment.
- Apply PhotometricGlowSubtraction to it with Save the measured PSF on. The PSF is written to a
.pgspsffile. - On the difficult image, set PSF to Load from file, choose that file, and apply. Only the brightness scale is then measured on the image, which needs a few stars at most.
The PSF is stored against radius in arcseconds, so it serves images of a different binning or crop as well. A .pgspsf file is plain text: the radius of each sample and the value of the PSF there, per channel, with the name of the image it was measured on.
8 When the result is not right
[hide]
- The background around a bright star is darker than elsewhere. The star lost more than its glow. Raise Bright star protection; if it is already at 1, lower Protect cores above (between 0.01 and 0.001 is where most images land), lower the Gaia tolerance, or lower the Amount.
- Bright stars keep part of their glow. The opposite: lower Bright star protection, or raise Protect cores above, or raise the Gaia tolerance.
- A dark spot on one side of a star, and its glow left on the other. The star’s glow was drawn beside it. The glow image shows where. The positions are checked against the image, so this points to an astrometric solution far off near that star: solve the image again.
- A disc of glow where there is no star. Seen in the glow image. A star was placed where it is not: the same remedy.
- The nebula around a bright star got darker. Near a star, nebula and glow look alike. Use a PSF measured on a cleaner field (see 7), and lower the Gaia tolerance.
The runs that stop do so with a message in the Process Console:
| No astrometric solution | Plate solve the image first. |
| The Gaia DR3 database is not available | Install its files and select them in the Gaia process (see 2.3). |
| Too few stars show enough of their glow to be measured | The image needs more, or deeper, stars, or a PSF loaded from another image. |
| The PSF could not be measured near the reference radius | Too few stars are neither saturated nor lost in the noise at about 30 arcseconds from their centers. A PSF loaded from another image is the way around it. |
| The stars of the image do not match the catalog | The astrometric solution does not fit this image: solve it again. |
| No star on the image shows enough of its glow to tie the stars to the catalog | The image is too shallow: a single subframe rarely is deep enough. Apply PhotometricGlowSubtraction to an integrated master. |
9 Where everything is stored
[hide]
*.pgspsf | A saved PSF, as plain text, where we chose to save it. PhotometricGlowSubtraction keeps no copy of its own. |
| A temporary file | Each run asks PixInsight’s Gaia process for the stars of the field, and the Gaia process hands them over in a file in the system’s temporary folder. PhotometricGlowSubtraction deletes it as soon as it has read it. |
PhotometricGlowSubtraction makes no network connection. The only thing it opens outside PixInsight is the license purchase page, in the web browser, when we click Get my license.
Copyright © 2026 Deep Sky Colors. All Rights Reserved.
This product is based on software from the PixInsight project, developed by Pleiades Astrophoto and its contributors (https://pixinsight.com/).