1 Introduction
[hide]
Welcome to SpotHealing — a PixInsight process module for removing unwanted spots and artifacts by painting over them. Wherever we drag the brush, instead of painting a color, SpotHealing reconstructs the area underneath: it estimates the local background from the surrounding pixels and fills the painted region so the blemish disappears and the result blends seamlessly into its surroundings.
This makes it ideal for the everyday nuisances of astrophotography — satellite and aircraft trails, dust motes, hot pixels, residual stars, plate defects, and other localized intrusions — without the manual matching of a clone stamp. The fill follows the local gradient, matches the surrounding noise, and can even repopulate stars so a patch over a busy starfield doesn't read as an obvious hole.
SpotHealing is a dynamic tool: we paint directly on the image and see each correction immediately. Every stroke is a discrete, undoable step, and the complete sequence is serialized into the process instance — so it can be saved, dragged to a process icon, and re-applied later.

2 Setup and Installation
[hide]
The only official distribution of SpotHealing is via a PixInsight repository. This is the safest way to install a module or script, as the installation is handled by PixInsight itself, which will fetch the module directly and safely from our PixInsight repository at:
https://repo.deepskycolors.com/SpotHealing/
Make sure the trailing / is part of the URL. Also, be sure to keep our repository URL in your list of PixInsight repositories to receive timely updates.
By distributing SpotHealing only via our PixInsight repository, installation comes with the guarantee of our Developer and Repository certificates, verified by PixInsight itself from the moment it connects to our repository, until it validates and completes installation of the SpotHealing module.
If we ever want to be sure that we have the latest version available to us, we go to PixInsight’s RESOURCES menu, select Updates,
then Manage Repositories to make sure our repository is still there, then RESOURCES > Updates > Check for Updates.
2.1 Launching SpotHealing
SpotHealing is a dynamic process, so it operates on whichever view we point it at first, and then we work with SpotHealing to clean it up, rather than adjusting parameters on the process dialog first and selecting a target later.
To launch it:
- Open the image we want to work on.
- In Process Explorer or via the PROCESS menu, locate SpotHealing under the DeepSkyColors category.
- The SpotHealing interface opens and PixInsight enters dynamic mode.
- Move the cursor over the target image and begin painting — the first stroke selects that view as the target.
While in dynamic mode the cursor shows a circle the size of the current brush over a valid target view, and each stroke is healed live on the image.
2.2 Licensing
SpotHealing runs on a trial-then-registered licensing model. During the trial period, the tool is fully functional with no feature restrictions. When the trial expires, SpotHealing will display a notice at startup and will not open until a valid registration key is entered (see 3.5 Registration and licensing). No internet connection is needed: keys are validated offline.
3 The SpotHealing Interface
[hide]
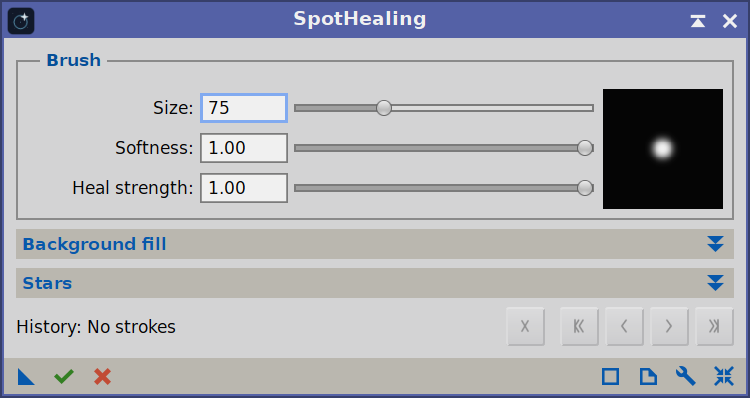
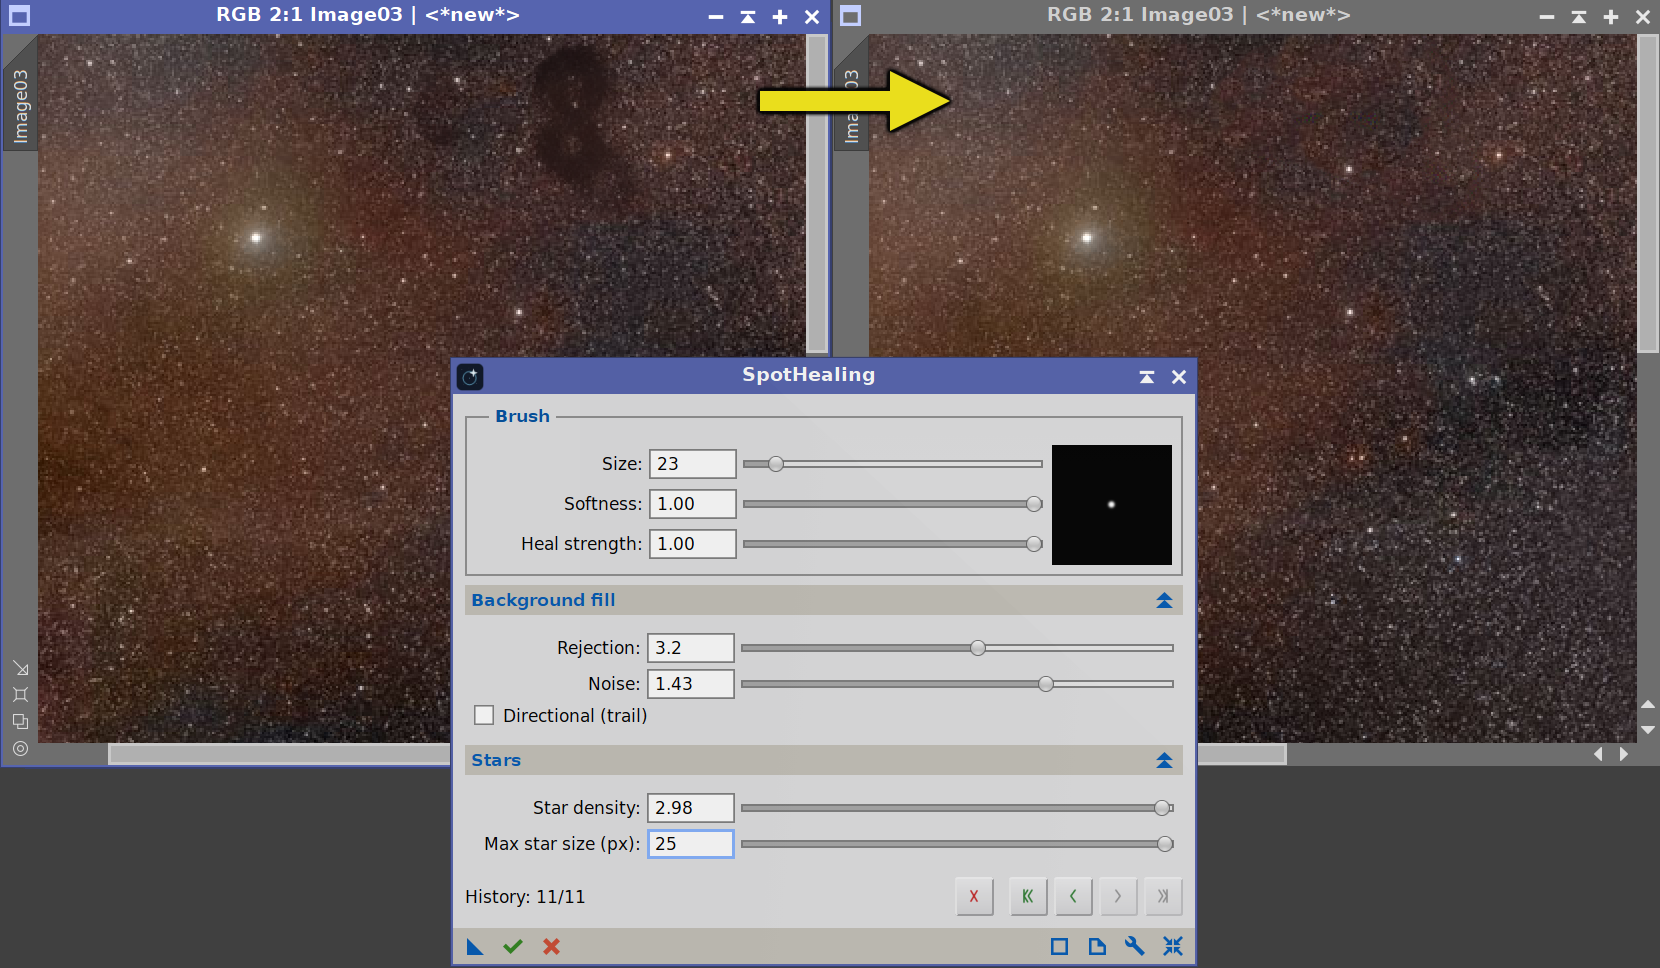
The SpotHealing panel is organized top to bottom into: an always-visible Brush group (with a live brush preview), two collapsible sections — Background fill and Stars — that hold the reconstruction controls, a History bar, and the classic PixInsight interface bar at the very bottom. The rest of the interaction happens directly on the image, where we paint and see each correction live.
The SpotHealing Interface —
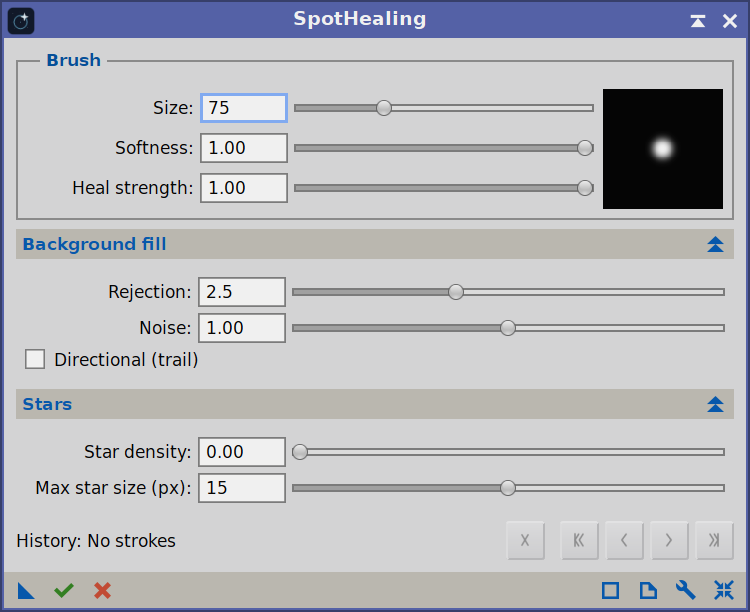
The Brush group is always visible; Background fill and Stars start collapsed and expand on click.
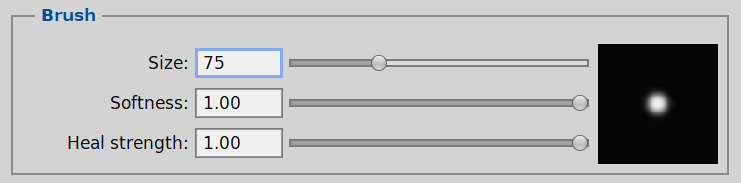
3.1 Brush
The Brush group controls the shape and strength of each correction. The square preview to its right shows the brush profile (size and softness) at a glance.
- Size (1–255 px) — the radius of the brush. We choose a size a little larger than the blemish we want to remove, so the brush comfortably covers it.
- Softness (0–1) — how feathered the brush edge is. 0 is a hard edge; 1 is very soft. Softer edges blend the healed patch more gradually into the surrounding pixels and are usually what we want for a seamless result.
- Heal strength (0.01–1) — how strongly the reconstructed background replaces the original under the brush. 1 is a full replacement; lower values blend the reconstruction with the original pixels, useful for a partial, subtle correction.
SpotHealing also respects the target view's mask: if the image has an active mask, the correction is attenuated by the mask just like any other process, so we can protect areas we don't want touched.
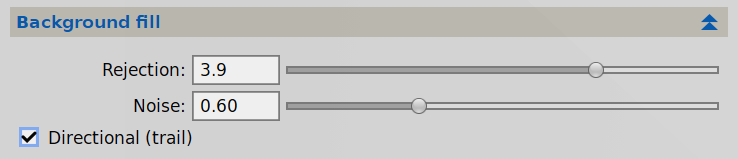
3.2 Background fill
This section governs how SpotHealing reconstructs the area under the brush. For each correction it samples a ring of pixels just outside the brush, estimates the local background from them, and fills the painted region with that estimate.
- Rejection (1–5, sigma) — when estimating the background, SpotHealing rejects outliers in the sampling ring so that bright neighbors (stars, other artifacts) don't bias the fill. This is the sigma-clip threshold: lower values reject more aggressively (useful when a bright star sits right next to the spot we're healing), higher values keep more of the surrounding pixels.
- Noise (0–2) — a freshly filled area would be too smooth against a grainy background, so SpotHealing re-injects noise matched to the surroundings. The value is the fraction of the measured background noise to add back: 1.0 matches the source's noise (the usual choice), 0 leaves the patch perfectly smooth, and higher values exaggerate the grain.
- Directional (trail) — for long, thin features such as satellite or aircraft trails. When enabled, SpotHealing fills across the stroke (perpendicular to the direction we paint) rather than from an all-around ring, blending the two clean sides of the trail. This preserves structure that crosses the trail (a gradient, a nebula edge) instead of smearing along it. We simply paint along the trail. Leave this off for compact spots.
3.3 Stars
When we heal over a populated starfield, a clean background fill leaves an obvious star-free hole. SpotHealing can repopulate the patch with stars: it detects real stars in the surrounding ring and transplants copies of them into the healed area, matched to the local star density.
- Star density (0–3) — a multiplier on the surrounding star density used to repopulate the patch. 0 (the default) invents no stars and leaves a clean background; 1 matches the density of the surrounding field; higher values add more. Repopulation is independent of how many stars happen to fall under the brush — it is driven by the density we measure around it.
- Max star size (5–25 px diameter) — the largest star that may be transplanted. Lower values keep only smaller stars (useful when we don't want a conspicuous bright star dropped into the patch); the maximum value (25) means no limit. This is independent of Star density: it filters which sizes are eligible, not how many are placed.
Because the transplanted stars are real stars copied from the immediate surroundings, they carry believable shapes, sizes and colors for that part of the image. A genuinely starless region (no stars detected nearby) is left clean regardless of these settings.
3.4 History bar
The History buttons —
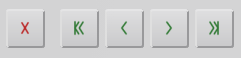
Every stroke is a step we can move through; we can undo and redo freely, or delete a stroke, before committing the result.
The History bar holds a set of controls with a stroke counter beside them. Every stroke we paint is one step we can move through:
- Delete — remove the current/last stroke.
- Undo All — jump back to the original, unhealed state.
- Undo — step back one stroke.
- Redo — step forward one stroke.
- Redo All — jump forward to the most recent stroke.
The information label reports the current state (the number of strokes). Keyboard shortcuts work while the cursor is over the image (dynamic mode):
-
Ctrl+Z Undo Ctrl+Shift+Z Undo All Ctrl+Y Redo Ctrl+Shift+Y Redo All Delete Delete
The Reset button on the interface bar at the bottom of the panel clears all strokes and restores every control to its default value.
3.5 Registration and licensing
The Preferences button (the wrench icon on the process interface bar) opens the SpotHealing license information dialog. This dialog reports the current license state:
- Licensed — shows the email the module is licensed to.
- Trial — shows the number of trial days remaining.
- Expired — prompts us to register to keep using the tool.
When the module is not yet licensed, the dialog shows a “Click here to register” link. Clicking it opens the registration dialog, where we enter our email and license key. The fields are validated as we type, and the Register button enables only once a valid email/key pair is entered. After a successful registration the info dialog refreshes in place to the “licensed to” state — no need to reopen it.
4 Healing with SpotHealing
[hide]
A typical healing workflow:
Launch SpotHealing and move the cursor over the target image. The first stroke locks that view as the target.
Set the Size a little larger than the blemish, and pick a Softness (a soft edge usually blends best). Leave Heal strength at 1 for a full removal.
Paint over the spot, dust mote, hot pixel or stray star. Each stroke is reconstructed immediately.
For a satellite or aircraft trail, enable Directional (trail) and paint along the trail with a brush just wider than it.
Over a starfield, raise Star density so the patch is repopulated with stars instead of leaving a hole; cap Max star size if needed.
If the patch looks too smooth or too grainy, adjust Noise; if a bright neighbor is pulling the fill, lower Rejection.
Use the history controls (or Ctrl+Z / Ctrl+Y) to step back and forth as we refine.
When satisfied, Execute the process to commit the result to the image as a single, undoable step.
How the heal is built (overview). For each dab along a stroke, SpotHealing samples a ring of pixels just outside the brush and sigma-clips it to discard outliers (stars, other artifacts). From the surviving pixels it fits a smooth background surface — a quadratic that follows the local gradient and curvature — and fills the painted disc with it, so the patch matches a sloped or curved background rather than appearing as a flat blob. It then re-injects noise matched to the surrounding grain and, if Star density is above zero, transplants real stars detected in the ring back into the patch (subject to Max star size). In Directional mode the fill instead interpolates across the stroke from its two clean sides. Strokes accumulate live; Execute commits them all as one process step, and the full sequence is serialized into the instance for reuse.
5 Usage tips and tricks
[hide]
SpotHealing is not a "magic eraser" tool. It is not intended to be used as those tools that remove people or unwanted objects from photographs. It can be used that way and it migth do an okay job, but SpotHealing is what its name says: a tool to remove unwanted spots.
Size the brush just larger than the defect. The reconstruction is best when the brush comfortably covers the blemish and the sampling ring lands on clean background.
Keep edges soft. A high Softness blends the patch gradually into its surroundings and hides the boundary — usually preferable to a hard edge.
For trails, go Directional and paint along. A narrow brush dragged along the trail with Directional enabled removes it while preserving whatever crosses it.
Leave Star density at 0 on smooth backgrounds. Invented stars on a plain background look wrong; raise the density only when healing over a populated field, so the patch isn't an obvious star-free hole.
Lower Rejection next to bright stars. If a bright neighbor is dragging the fill brighter, a stricter rejection clips it out of the background estimate.
Match the noise. Noise at 1.0 reproduces the surrounding grain; nudge it down if the patch looks noisier than its surroundings, up if it looks too clean.
Build up with several small strokes rather than one large dab — it gives finer, more controllable corrections, and each stroke is independently undoable.
Use a mask to protect detail. SpotHealing honors the target view's active mask, so we can shield structure we don't want altered near an artifact.
Save our work as a process icon. Because the full set of strokes and settings is serialized into the instance, we can drag it to a process icon and re-apply or tweak the exact same corrections later.