1 Introduction
[hide]
Welcome to SubframeStudio: a PixInsight process module for the job every deep-sky project starts with, deciding which subframes are worth keeping. It loads a set of frames, measures the per-frame quality metrics that matter (FWHM, eccentricity, PSF signal weight, star count, SNR, noise and more), and then lets us blink, plot, threshold, group and weight them so we can separate the keepers from the frames dragged down by wind, clouds, poor focus or tracking.
The idea is to bring the two halves of frame selection into a single, interactive surface: the visual side, where we flip through frames and see the differences with our own eyes, and the measured side, where numbers and thresholds do the sorting objectively. We can lean on either as much as we like, and a manual decision always wins over an automatic one.
SubframeStudio is an interface-only tool. It is not applied to a view and it is not run globally: we open the cockpit, load our frames into it, work through them, and export the approved set (optionally with a per-frame weight) for stacking. Our whole session, including the loaded frames, their metrics, the thresholds and the grades, can be saved to a session file and reopened later exactly where we left off.
2 Setup and Installation
[hide]
The only official distribution of SubframeStudio is via a PixInsight repository. This is the safest way to install a module or script, as the installation is handled by PixInsight itself, which will fetch the module directly and safely from our PixInsight repository at:
https://repo.deepskycolors.com/SubframeStudio/
Make sure the trailing / is part of the URL. Also, be sure to keep our repository URL in your list of PixInsight repositories to receive timely updates.
By distributing SubframeStudio only via our PixInsight repository, installation comes with the guarantee of our Developer and Repository certificates, verified by PixInsight itself from the moment it connects to our repository, until it validates and completes installation of the SubframeStudio module.
If we ever want to be sure that we have the latest version available to us, we go to PixInsight's RESOURCES menu, select Updates, then Manage Repositories to make sure our repository is still there, then RESOURCES > Updates > Check for Updates.
2.1 Launching SubframeStudio
SubframeStudio does not operate on a target view, so there is nothing to select first. We just open the cockpit and load frames into it:
- In Process Explorer or via the PROCESS menu, locate SubframeStudio under the DeepSkyColors category.
- Double-click it to open the SubframeStudio cockpit.
- Click Add (or simply double-click the empty preview area) and choose the image files to load. FITS, XISF, TIFF and camera RAW formats (CR2, CR3, NEF, ARW, DNG and the other common raw extensions PixInsight's RAW format module supports) are all accepted.
As soon as the frames are added, SubframeStudio begins loading and measuring them in the background, on several threads at once, so previews appear quickly and the metrics fill in as each frame is measured. A slim progress bar just above the status line tracks the load: a moving highlight while the very first frames are still being read and measured (there is nothing to report yet at that point), then a two-tone fill, previews landed and frames fully measured, once real progress starts arriving. Measured frames are cached, so re-loading the same files later is close to instant.
One-shot-color (OSC) subframes are detected from the file's Bayer pattern metadata and demosaiced automatically before display and measurement, so they show up in color like any other frame. For a subframe whose file declares no Bayer pattern at all, see Force CFA in Preferences (3.8 Preferences and licensing).
2.2 Licensing
SubframeStudio runs on a trial-then-registered licensing model. During the trial period, the tool is fully functional with no feature restrictions. When the trial expires, SubframeStudio will display a notice at startup and will not open until a valid registration key is entered (see 3.8 Preferences and licensing). No internet connection is needed: keys are validated offline.
3 The SubframeStudio cockpit
[hide]
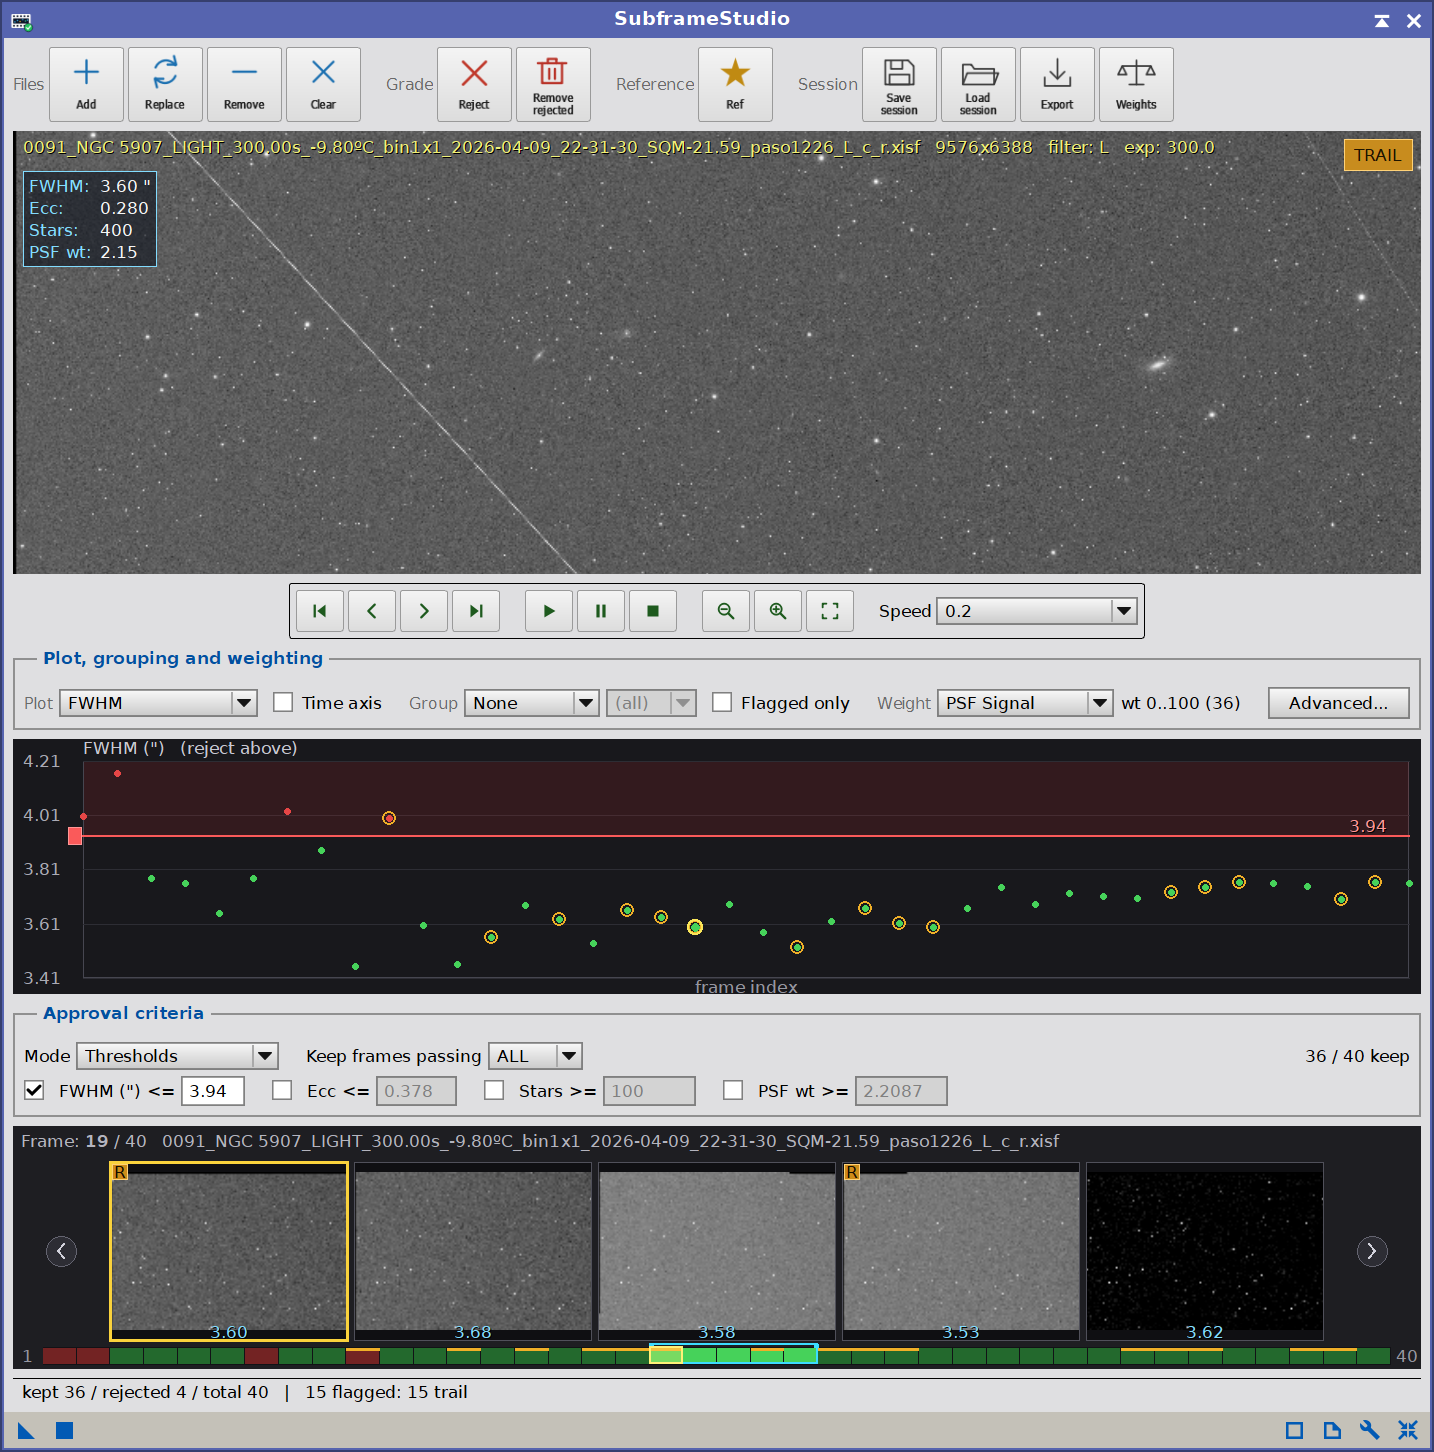
The cockpit is organized top to bottom into: an action toolbar, a display and analysis control strip, a live preview with its transport bar, the metric plot, the approval criteria panel, and the filmstrip navigator. A status line at the very bottom reports the running tally of kept, rejected and flagged frames. The following subsections walk through each area.
3.1 The action toolbar
The toolbar along the top holds the file, grade, reference and session actions, grouped under small labels. Every button carries an icon and a caption.
Files.
- Add: add one or more image files (FITS, XISF, TIFF or camera RAW). Files already loaded are skipped, so we can add to the list at any time.
- Add folder: add every supported image found in a folder, which is usually quicker than selecting a night's subframes by hand. After picking the folder we are asked whether to include its subfolders, so a tree of session or filter folders can be loaded in one step. Files already loaded are skipped here too.
- Replace: clear the current list and load a fresh selection (asks to confirm first).
- Remove: remove the current frame from the list. This is not a rejection; it just drops the frame, and we can add it back any time.
- Clear: remove all frames and start over (asks to confirm).
While frames are loading, a slim progress bar above the status line tracks previews landing and measurements completing, and once enough frames have finished to estimate a rate, the status line adds a projected time remaining for the rest of the batch.
Grade.
- Grade: approve or reject the current frame. The button label follows the frame, reading Reject when the frame is approved and Approve when it is rejected. Grading is non-destructive and is a manual override: once we grade a frame by hand, the automatic criteria will not change it back.
- Remove rejected: remove every frame currently graded reject from the list (asks to confirm). This is distinct from the grade itself: it prunes the list rather than just flagging.
Reference.
- Ref: pick the best registration reference frame by a weighted quality score (deep, sharp, round, star-rich). The chosen frame is marked with a REF badge; this is an advisory pick and does not affect grading.
Session.
- Save session: save the loaded frames, their metrics, the thresholds and the grades to a
.cullsession file. The last file we used is remembered, so a later Save re-targets it. - Load session: reopen a
.cullsession file: it re-opens the listed images and restores their metrics, grades and thresholds. - Export: copy the approved frames to a folder (rejected frames go into a
rejected/subfolder) and write ameasurements.csvalongside them. Non-destructive: the originals are untouched. - Weights: write the approved frames to a folder with the
SSWEIGHTFITS keyword set to each frame's weight, ready for weighted stacking in ImageIntegration. For a fully configurable export (custom folder, prefix, postfix, keyword name and error policy) use the Advanced window's Output panel instead (see 4.5 Output).
3.2 Preview and transport
The preview shows the current frame, stretched with a single locked screen stretch that is computed once and held constant across the whole set, so brightness does not jump as we flip through frames and differences read honestly. A small heads-up overlay reports the file name, the frame's FWHM, eccentricity, star count and PSF weight, and the image dimensions.
We zoom with the mouse wheel or the transport zoom buttons, pan by dragging with the left button, and fit the frame to the window with the Fit button. A double-click anywhere in the preview is a shortcut for Add, so an empty cockpit is one double-click away from loading files.
The transport bar under the preview drives navigation and the blink animation:
- First, Previous, Next, Last: jump to the first, previous, next or last frame among those currently in view, honoring the Group selection and the Flagged only filter (see 3.3 Display and analysis controls).
- Play / Pause / Stop: blink through the frames currently in view as an animation, so subtle differences in focus, tracking or transparency become obvious as motion.
- Zoom out, Zoom in, Fit: the same zoom controls available from the mouse, plus a one-click fit-to-window.
- Per-frame stretch: a toggle button. Off (the default) keeps the one locked stretch shared by the whole set, so brightness never jumps as we flip through frames. On, the preview and every visible filmstrip thumbnail switch to that frame's own auto-stretch instead, including while Play is running, which is useful for judging a single frame's real exposure or detail independent of the rest of the set.
- Detach preview: a toggle button that moves the preview into its own floating window, which can be resized and positioned independently of the cockpit. It is aimed mainly at two-monitor setups, with the image on one screen and the plot, criteria and filmstrip on the other, though it is just as usable on one screen when the image wants more room than the cockpit can spare. While the preview is detached the cockpit gives its preview area to the plot and filmstrip and the window shrinks by that much; re-attaching gives it straight back. The floating window keeps everything the preview normally responds to: the wheel zooms, dragging pans, double-clicking adds files, and the keys below work there as well. Closing the floating window brings the preview home.
- Speed: the blink interval, chosen from a list of preset delays in seconds (or Full steam ahead for the fastest the display allows). Choosing Custom... reveals a field for any delay we like. Changing the speed while Play is running takes effect immediately, with no need to stop and restart the animation.
PixInsight can be set to draw its interface windows translucent, and it applies that to windows that do not have the focus. This is worth knowing about when working with the detached preview: while blinking with the cockpit focused, the preview is usually the window without the focus and the one being watched, and focus, star shape and noise cannot be judged honestly through an image blended with whatever sits behind it. Translucency can be turned off for a single window: right-click its title bar and uncheck Translucent. Doing that on the detached preview leaves every other PixInsight window with the chosen appearance.
Two thin drag handles let us trade vertical room between panels: the one just below the preview resizes the preview against the plot, and the one just above the approval criteria panel resizes the plot against the filmstrip. Handy for pulling extra height into the preview for a closer look at a single frame, or into the filmstrip when working through a large set. Each handle remembers where we left it between sessions.
3.3 Display and analysis controls
The control strip above the plot, framed and titled, selects what the plot shows and how the frames are ordered, grouped and weighted. These controls describe the set as a whole, so they become available once loading and measurement have finished; while frames are still arriving the strip stays inactive.
- Plot: the metric drawn in the plot below. The choices are FWHM, Eccentricity, PSF weight, Star count, Noise, Median, Star residual and SNR, plus a special Approval criteria item that plots how many criteria each frame passes instead of a single metric.
- Time axis: spread the plot's X axis by acquisition time (DATE-OBS) instead of by frame index. It falls back to frame index automatically if the set has no readable dates.
- Order: the order of the frames themselves, with a second selector for ascending or descending. The choices are Load order (the order the frames were added in), Acquisition time (the DATE-OBS header), File name, Weight, and any of the measured metrics. This reorders the list rather than filtering it, so the filmstrip, the blink sequence and the plot's frame-index axis all follow it. Frames with no readable date, and frames without measurements when ordering by one, sort to the end. The order is saved in the session file, and Load order returns to the original sequence at any time.
- Group: partition the set by Filter or Exposure (or None). With a group active, a second selector picks the group value; for Exposure, this lists the exposure times found in the current set, in seconds (for example 300s). The plot, the status tally, the filmstrip and frame-to-frame navigation all scope to that group. Grading follows the group too, but only for some Approval criteria modes: Sigma-clip and Score / keep best judge each frame against its own group's statistics, while Thresholds and Expression apply the same values to every frame regardless of group (see 3.5 Approval criteria).
- Flagged only: show only the frames that carry an anomaly flag, to review them quickly. This is a view filter; it does not reject anything.
- Weight: the preset that drives each frame's export weight: PSF Signal (the normalized PSF signal weight), FWHM-based, Star count, or Custom blend (a user expression set in the Advanced window). The small readout beside it summarizes the current weighting.
- Advanced...: open the SubframeStudio Advanced window (see 4 The Advanced window).
3.4 The metric plot
The plot draws one dot per frame for the selected metric, in frame order (or by time). Its header names the metric and reminds us which way is worse, since the reject direction is fixed by the metric: FWHM, eccentricity, noise, median and star residual reject above the line (bigger is worse), while PSF weight, star count and SNR reject below it (bigger is better).
When the current metric has a threshold, a horizontal line marks it and the rejected side is shaded. We drag the line to set the threshold live: frames on the reject side flip grade immediately, and the criteria panel, the filmstrip and the status tally all follow. A small grab handle sits in the left margin, clear of the axis numbers, so we can pick the line up without fighting the labels.
Selecting the Approval criteria item in the Plot selector switches the plot to a pass-count view: instead of a single metric it shows how many of the enabled criteria each frame passes, which is a fast way to see how close the borderline frames are to the cut.
3.5 Approval criteria
The Approval criteria panel, in its own titled frame below the plot, is where the automatic grading is defined. A Mode selector chooses which engine decides keep versus reject, and a running keep count shows how many frames survive. Whichever mode is active, a frame we have graded by hand keeps our decision.
- Thresholds: one threshold per metric, each with a checkbox to enable it. The panel shows a cell for FWHM, Eccentricity, Star count and PSF weight, each with its fixed comparator and a value field; the same thresholds can also be dragged directly on the plot. A Keep frames passing selector combines the enabled thresholds with ALL (a frame must pass every one) or ANY (a frame must pass at least one). Threshold values apply to the whole set regardless of Group.
- Score / keep best: rank every frame by a single composite quality score and keep the top of the list. A sub-mode chooses how much to keep: the top N percent, the best N frames, or every frame at or above a score value. With Group active, the ranking is done separately within each group, so "top 20%" or "best 10" applies per group rather than across the whole set.
- Sigma-clip: reject the statistical outliers of one metric. We pick the metric and a number of sigmas k, and frames on the bad side of the median by more than k standard deviations are rejected. With Group active, the median and deviation are computed within each frame's own group, so a frame is judged against others sharing its filter or exposure rather than the whole set.
- Expression: grade with our own expression over the frame metrics. The panel shows a read-only summary of the active expression and a button that jumps to the Advanced window's Expressions editor, where the expression is written and applied (see 4.3 Expressions). The expression is evaluated the same way for every frame regardless of Group.
In the Score and Sigma-clip modes the plot's Approval criteria view shows a draggable cutoff line as well, so the boundary can be nudged by hand and read back as a value.
3.6 The filmstrip navigator
The filmstrip along the bottom is a scrolling strip of thumbnails with a colored grade ribbon beneath them. Each thumbnail shows its frame's FWHM, and the ribbon paints a green bar for an approved frame and a red bar for a rejected one, so the balance of the whole set is visible at a glance even for hundreds of frames. The current frame is boxed, and the frames currently shown in the thumbnail window are bracketed on the ribbon so we always know where we are.
- Click a thumbnail (or a spot on the ribbon) to select that frame.
- Drag on the ribbon to scroll the thumbnail window through a long set without changing the selection.
- Double-click a thumbnail to toggle its grade (approve / reject), the same as the Grade button or the Space key.
- The chevrons at either end page the thumbnail window left and right.
Frames that tripped an anomaly detector carry a small orange flag marker on the strip, and their reason (focus, tracking, cloud or dropped) is summarized in the status line. The flags are advisory: they call our attention to a frame but never reject it on their own. Which detectors are active is set in Preferences (see below).
3.7 Keyboard shortcuts
With the cockpit focused, a few keys speed up the review:
-
Left Select the previous frame in view Right Select the next frame in view Space Approve / reject the current frame P Play / pause the blink animation
The Left and Right keys stop the blink animation if it is running, so we can pause on a frame and step through by hand. P starts it again, or pauses it where it is; it needs more than one frame in view, exactly as the Play button does. These keys work in the detached preview window too, so a whole review pass - step, blink, grade - can be done there without returning to the cockpit.
3.8 Preferences and licensing
The Preferences button (the wrench icon on the process interface bar) opens the SubframeStudio preferences dialog.
Anomaly flags. A group of checkboxes turns each advisory detector on or off: Focus (frames whose FWHM is well above the set), Tracking (an eccentricity spike), Cloud (high background or a low star count), and Dropped ((near-)empty frames). The flags are statistical and relative to the loaded set, so if a detector is firing on frames that look fine to us, we can simply turn it off here.
Input frames. A Force CFA checkbox treats a single-channel subframe as a Bayer CFA mosaic and demosaics it even when the file declares no Bayer pattern at all (no BAYERPAT keyword and no CFA type from the format reader), assuming the common RGGB pattern for those frames; a file that does declare a pattern always uses it, Force CFA or not. This is off by default every time we open SubframeStudio: it is not a permanent preference but a property of the loaded set, saved to and restored from the .cull session file along with the frames themselves.
Color STF chooses how the automatic screen-transfer stretch treats color channels: Linked computes one black-point/midtones pair from all channels together and applies it to red, green and blue alike; Unlinked computes each channel's own pair independently. This affects only how frames are displayed in the preview and filmstrip; measurements, grading and exports are unaffected, and mono frames are unaffected either way. The setting applies to frames as they are loaded, so a frame already open needs to be reloaded (Replace, or reloading the session) to pick up a change.
User Interface. A Toolbar size selector sets how large the action toolbar is drawn. Standard is the normal size, with a small caption naming each group of actions. Large draws every button half again as big, with its icon and caption redrawn at that size rather than magnified, so the captions stay sharp and comfortably readable on high-resolution displays; the group captions make way for the larger buttons, and a vertical rule marks each group boundary instead. The change takes effect immediately.
Metrics cache. A Data folder field shows where SubframeStudio keeps the metrics cache and the saved expression library. The location is chosen per user by PixInsight and so differs between platforms; the field is read-only, but the text can be selected and copied, which is what makes the folder easy to find for a backup.
A Clear cache button opens the Clean cache dialog described below. The source images are never touched by anything in it; removing an entry only means that frame is measured again the next time it is loaded.
Clean cache. The cache grows across every project and every session, so clearing all of it to reclaim the stale part throws away measurements that are still wanted. This dialog removes entries by rule instead. The rules add together, and a line above the buttons reports how many of the total would go before anything is written:
- Entries that can never be reused: entries recorded before the cache key included the star-detection settings. A lookup can only reject them, so they cost time on every load and can never produce a match.
- Entries whose image file is missing: the image is no longer at the recorded path. Leave this unchecked when the images live on a drive that is currently disconnected, since those entries would still be good once it returns.
- Entries for images older than a chosen period, judged by the image file's own date.
- Entries not used in a chosen period, judged by when the entry was last written or last produced a cache hit. Entries recorded before SubframeStudio began tracking this carry no such date and are never removed by this rule; they acquire one the next time they are used.
- Entries in these folders: a list of the source folders the cache refers to, with the number of entries in each, most populated first.
A separate Remove everything button deletes the whole cache in one step, after asking.
LocalNormalization data. An optional fallback folder (with Browse...) for the .xnml files that PSFScale and PSFScaleSNR read (see 4.3 Expressions). Leave it blank to look only next to each subframe, which covers the common case.
License information. A License information... button opens the license dialog, which reports the current state:
- Licensed: shows the email the module is licensed to.
- Trial: shows the number of trial days remaining.
- Expired: prompts us to register to keep using the tool.
When the module is not yet licensed, the dialog offers a link to register. Clicking it opens the registration dialog, where we enter our email and license key; the fields are validated as we type, and the Register button enables only once a valid email and key pair is present. After a successful registration the info dialog refreshes in place to the licensed state, with no need to reopen it.
4 The Advanced window
[hide]
The Advanced... button on the plot control strip opens a companion window with the power-user surface: a full measurements table, a distribution histogram, and a tabbed panel holding the expression editors, the star-detection settings and the output options. It is a separate, always-available window that reads and drives the same one model as the cockpit, so a change made in either place is reflected immediately in the other. Its header shows the live count of frames and how many are approved. The Expressions, Star detection and Output tabs share one collapsible section, Settings, which works like the Measurements and Distribution sections.
The Advanced window:
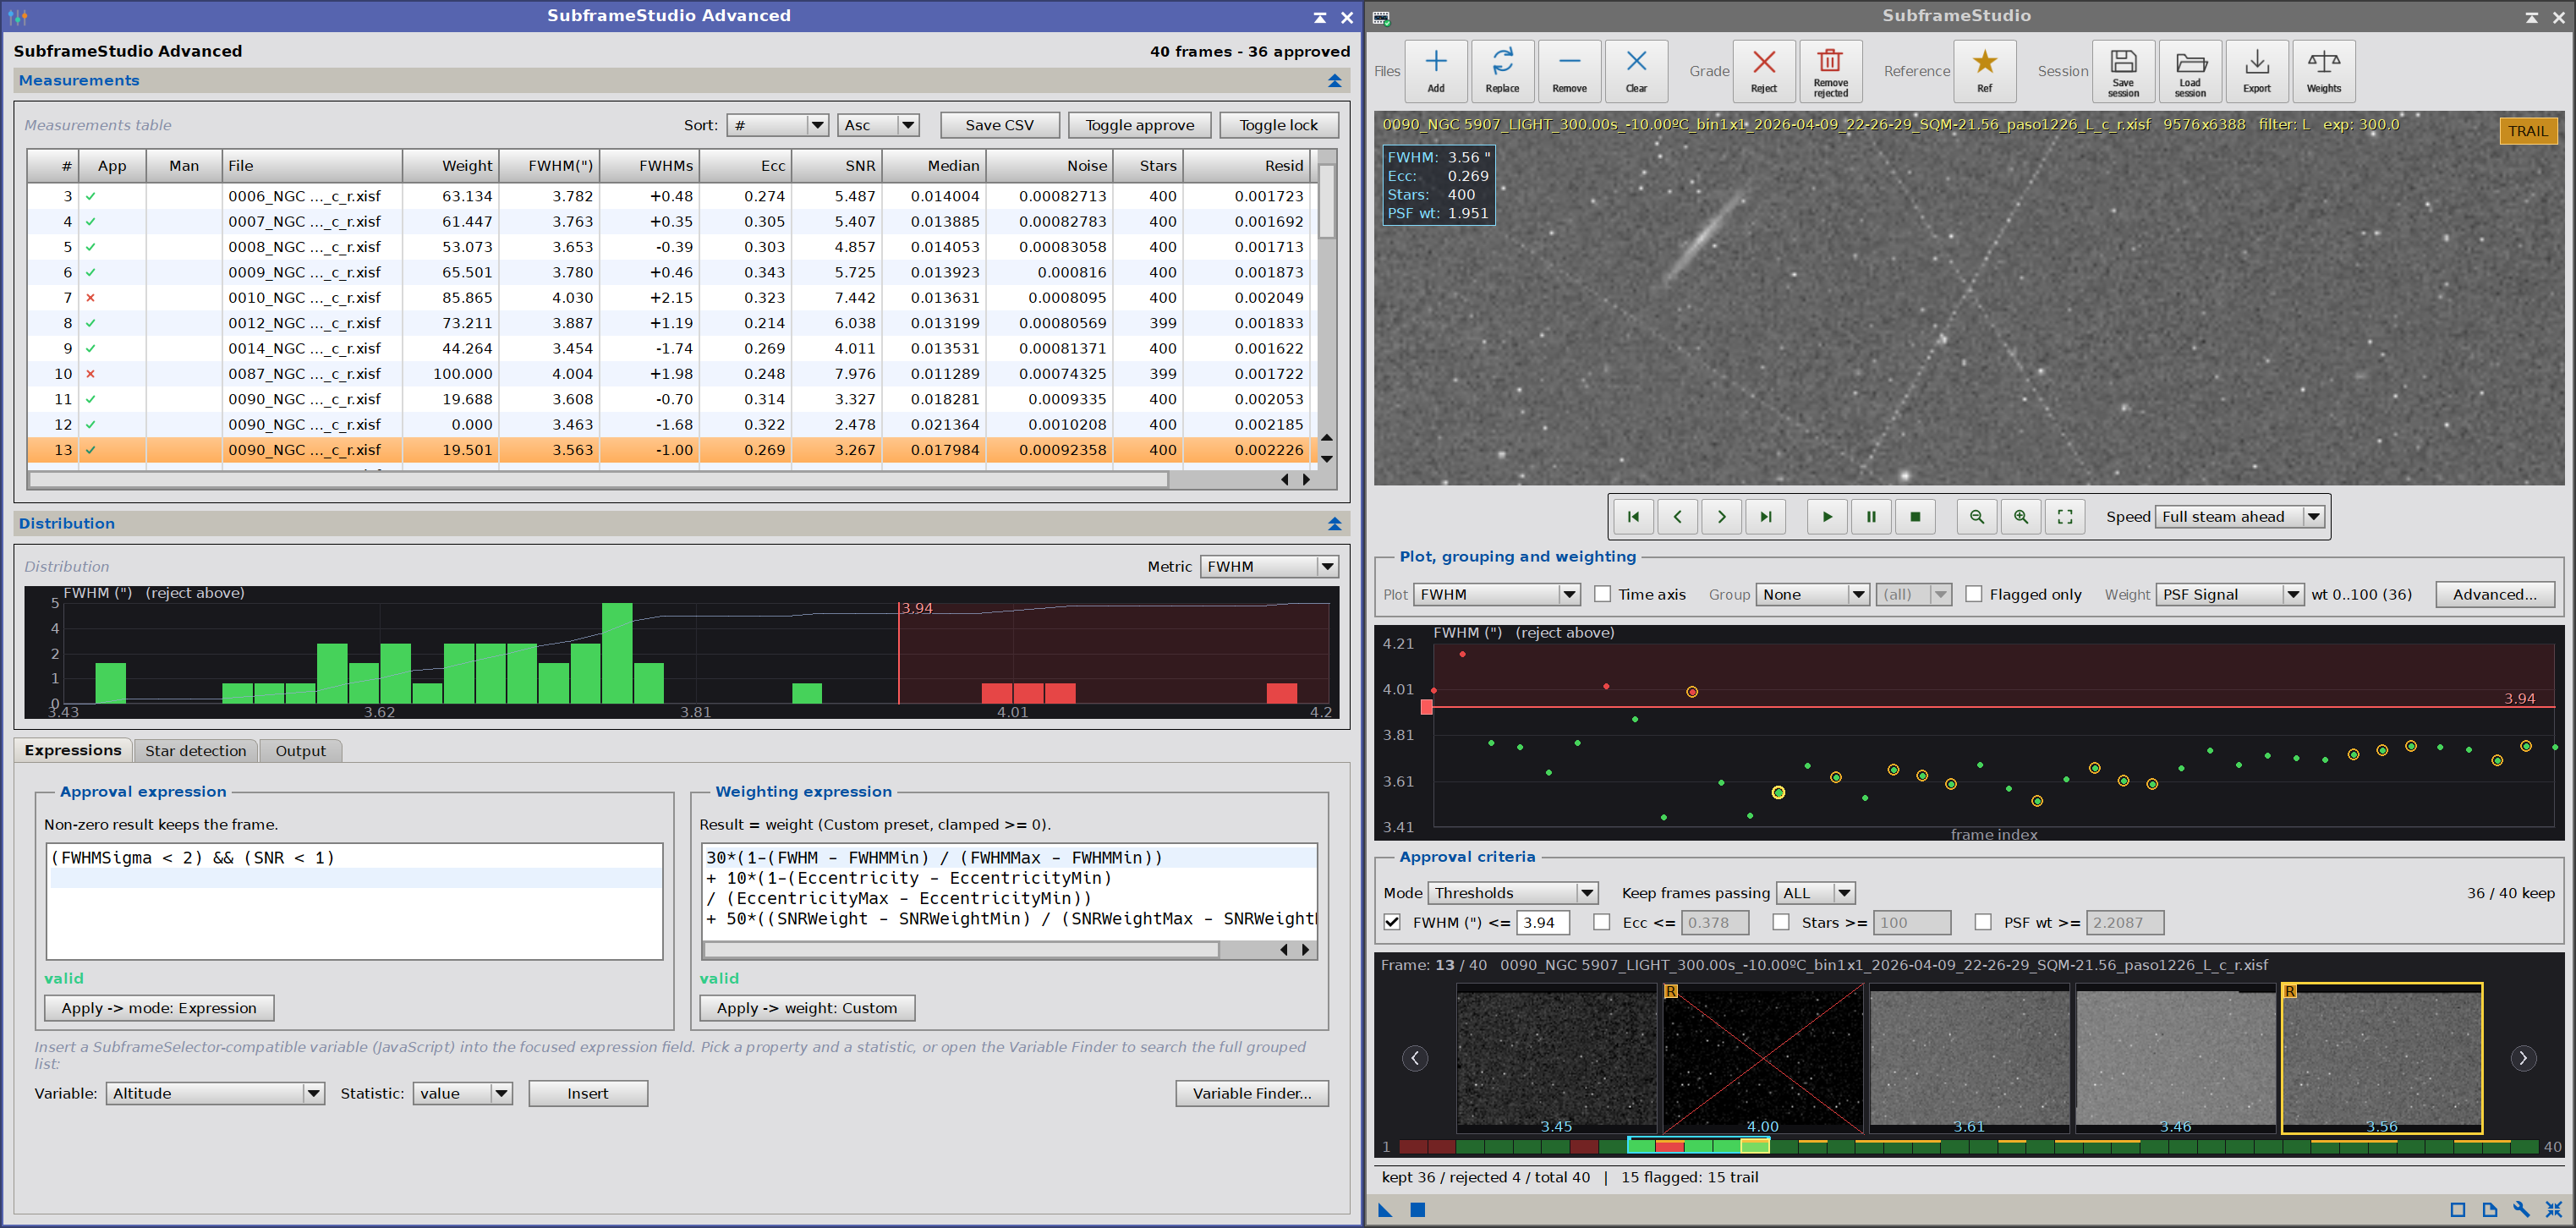
As we interact with the Measurements table, Distribution histogram and the Expressions, the main window updates all pertinent information, image, etc.
4.1 Measurements table
The measurements table lists every loaded frame, one row per frame, with all of its metrics side by side. The columns are: a frame number, an App column (a green check for approved, a red cross for rejected), a Man column (a padlock when a manual grade is locking the frame), the File name, the Date of acquisition (the DATE-OBS header), the export Weight, and then the metric columns: FWHM, FWHMs (the frame's FWHM in standard deviations from the set), Ecc, SNR, Median, Noise, Stars, Resid (the PSF goodness-of-fit residual) and PSFwt (the PSF signal weight). Cells fill in live as the background loader measures each frame.
A toolbar above the table controls sorting and per-row actions:
- Sort column and Asc / Desc: order the rows by any column, ascending or descending. Sorting is numeric where the column is numeric, and chronological on the Date column. This orders the table only; to reorder the frames themselves use Order in the cockpit (see 3.3 Display and analysis controls).
- Save CSV: write every column of the current table (including the sigma column) to a comma-separated file.
- Toggle approve: flip the grade of the selected frame (a manual override).
- Toggle lock: lock the selected frame at its current grade (or unlock it), so the automatic criteria will not change it.
Clicking a row selects that frame in the cockpit; double-clicking a row toggles its grade.
4.2 Distribution
The distribution panel is a histogram of one metric over the measured frames, with its own metric selector that is independent of the cockpit plot. Each bar is split into a green (kept) and a red (rejected) portion, and a thin curve traces the cumulative distribution, so we can see both the shape of the metric across the set and where the current cut falls. When the chosen metric has a threshold, a vertical line marks it and the rejected side is shaded; dragging the line moves the very same threshold the cockpit plot and criteria panel use.
4.3 Expressions
The Expressions tab holds two independent editors, side by side, for driving the grade and the weight with our own formulas. The expressions are written in JavaScript and are 100% compatible with SubframeSelector: an approval or weighting expression written for SubframeSelector runs here unchanged, with the same variable names and the same syntax.
- Approval expression: a boolean (or numeric) JavaScript expression over the frame's measurements. A frame is approved when the result is non-zero. For example:
FWHM < 3.5 && Eccentricity < 0.55. - Weighting expression: a numeric JavaScript expression giving each frame's weight, used when the weighting preset is Custom blend; negative results clamp to zero. For example:
PSFSignalWeight * SNRWeight.
Each editor shows a live validity indicator as we type, reporting a syntax error or an unknown variable and pointing at the character it objects to; hovering the indicator shows the full message when it is long. Typing never changes anything on its own: a change is applied only when we press that editor's Apply button, which sets the cockpit's approval mode to Expression (or its weighting preset to Custom). A variable inserter below the editors composes a variable and drops it at the cursor of whichever editor we last clicked in: pick a property from the Variable list, pick value, Min, Max, Median or Sigma from the Statistic list, then press Insert.
For the full set, the Variable Finder... button opens a separate, non-modal window with every variable organized into a searchable, grouped tree (star shape, signal and noise, flux, position, and so on). Type in its filter box to narrow the list, then double-click a name to insert it, again into whichever editor last had focus. The Variable Finder can stay open alongside the Advanced window while we build an expression.
Saving expressions. A worked-out expression can be kept and reused. Each editor has a Save... button, which asks for a name and files the expression away under it: labels like LRGB Primary, RGB Stars or SHO Strict describe what a rule is for far better than the formula itself, which matters once separate star processing pushes the selection criteria into several variants held in mind at once. Saving under a name that already exists updates that entry, after asking. The library is stored in SubframeStudio's own data folder, so it is there from the moment the module opens, in every project, and it can be backed up or copied to another machine like any other file.
The Load... button beside it opens the Expressions window, a separate non-modal window listing every saved expression with its kind: whether it is filed as an approval rule or a weighting formula. Selecting an entry shows its name, kind and source below the list, where all three can be edited; Save changes stores them, New starts a fresh entry, and Delete removes the selected one after confirming. The kind is set from whichever editor the expression was saved from, but it is free to change: the same text can serve as an approval rule or a weighting formula, so the tag is there to keep the list organized rather than to restrict anything.
Load into Approval and Load into Weighting put the expression into the corresponding editor, and a double-click in the list loads an entry into whichever editor it is filed under. Loading only fills the editor: as everywhere else here, nothing changes until we press that editor's Apply button, so we can read through the library without disturbing the current grade.
Available variables. Every measurement is exposed as a per-frame value plus four set-wide statistics, named <Property>Min, <Property>Max, <Property>Median and <Property>Sigma (the last is the frame's deviation from the set median, in mean-deviation units). So FWHM, FWHMMin, FWHMMax, FWHMMedian and FWHMSigma are all available, which lets us write set-relative rules such as FWHM < FWHMMedian or FWHMSigma < 2. The measurement properties are:
-
Stars, FWHM, Eccentricity number of detected stars, median FWHM, median eccentricity FWHMMeanDev, EccentricityMeanDev, StarResidualMeanDev the dispersion of those values across the frame's stars StarResidual PSF goodness-of-fit residual PSFSignalWeight (alias PSFSignal), PSFSNR PSF signal weight and PSF signal-to-noise ratio SNRWeight (alias SNR) noise-scaling signal-to-noise weight PSFFlux, PSFFluxPower, PSFTotalMeanFlux, PSFTotalMeanPowerFlux, PSFCount PSF flux estimates and the count of PSF-fitted stars Median, MedianMeanDev image median and its trimmed mean deviation, with extreme values (saturated stars, registration borders) excluded MStar, NStar background and noise estimates from the PSF fits Noise, NoiseRatio the frame's noise estimate, and the fraction of pixels it was measured on Altitude, Azimuth read from the OBJCTALT / OBJCTAZ keywords when present Weight the frame's current export weight Index the frame index (this one has no statistics)
FWHM units. Exactly like SubframeSelector, FWHM (and its statistics) is reported in the unit chosen in the Star detection tab: pixels, or arcseconds when an image scale is set. Storage and grading are unaffected; only the value the expression sees follows the unit.
PSFScale and PSFScaleSNR. These read the relative scale factor from a LocalNormalization .xnml file, exactly as SubframeSelector does: SubframeStudio does not compute local normalization itself, it only reads an existing .xnml. For each subframe it looks for <subframe-basename>.xnml next to the subframe file (LocalNormalization's own default output location), and, if not found there, in an optional fallback folder set in Preferences (see 3.8 Preferences and licensing). A subframe with no matching .xnml found leaves both at zero, the same as any other measurement with nothing to measure.
Noise and signal from calibration. When a frame carries the noise and PSF signal estimates that PixInsight's preprocessing stores in it (the PCL:Noise and PCL:Signal properties of an XISF file, or the equivalent FITS keywords), SubframeStudio uses them for Noise, NoiseRatio, MStar, NStar, the PSF flux properties, PSFSignalWeight, PSFSNR and SNRWeight, exactly as SubframeSelector does. Those estimates are taken on the calibrated frame, before registration. Registration interpolates pixels, which smooths the noise, so a registered frame measured again reads a lower noise and higher weights than it really has. When a frame has no stored estimates, SubframeStudio measures them itself, with the same multiscale noise estimator SubframeSelector uses.
4.4 Star detection
The Star detection tab exposes the detector and PSF-fit settings that drive every measurement. The defaults reproduce a robust general-purpose configuration, but undersampled, noisy or wide-field data can measure better with a tuned detector. The controls are:
- Structure layers: the wavelet scale of detected structures; larger values detect larger stars.
- Noise layers: small-scale wavelet layers removed before detection, to keep noise from being detected as stars. Raise it for very noisy subframes.
- Hot pixel radius: a median prefilter that removes hot pixels before detection (0 disables it).
- Noise reduction radius: a Gaussian prefilter applied before detection (0 disables it).
- Min structure size: the smallest star area, in pixels, that will be measured (0 selects it automatically).
- Sensitivity: detection sensitivity; higher values detect fainter stars (and more noise).
- Peak response: lower values accept flatter, less peaked stars, such as slightly saturated ones.
- Max distortion: the maximum star distortion allowed; lower values reject elongated or trailed detections.
- Upper limit: stars with peaks above this normalized level are rejected as saturated (1.0 keeps everything).
- Max stars: the maximum number of stars fitted per frame, brightest first, where 0 means no limit. The default is 8000. A lower cap measures faster, but FWHM, eccentricity, the star residual and their deviations are then computed from the brightest stars only, whose profiles are broader, so FWHM reads higher than a fit over the whole field. Stars is the number of detected stars and is not affected by this cap.
- PSF fit function: the analytic profile fitted to each star to derive FWHM and eccentricity (Gaussian, several Moffat betas, or Lorentzian).
Edits here are staged: nothing is recomputed until we press a button, so several knobs can be dialed at once. Apply & re-measure commits the settings and re-measures the whole set (frames already measured under identical settings re-use the cache, so it is instant when nothing changed). Preview on current frame commits the settings without a full re-measure and opens the current frame in a new image window with the detected stars marked, for quick visual tuning. Reset defaults restores the default settings and re-measures.
A final row controls how FWHM is reported: Report FWHM in Pixels or Arcseconds, with an Image scale field in arcseconds per pixel. This is a display choice only, applied live: switching to arcseconds shows FWHM as pixels times the image scale everywhere it appears (the table, the plots, the readouts and the FWHM threshold), while the values stored internally, and therefore the grading, stay in pixels.
4.5 Output
The Output tab is the fully configurable version of the toolbar's Weights export. It writes a copy of every approved frame with each frame's weight embedded in a FITS keyword, using options we set here:
- Output directory (with Browse...): the folder to write the copies into; leave it blank to write each copy next to its own source file.
- Prefix and Postfix: text added to the start and end of each output file name (the postfix defaults to
_a). - Weight keyword: the FITS keyword the per-frame weight is written to (
SSWEIGHTby default); leave it blank to write the image without a weight keyword. - Never overwrite existing files: when on, an output file that already exists is skipped and logged rather than overwritten.
- On error: what to do if a frame fails to write: Ask, Continue (log and carry on) or Stop (abort the export).
Two action buttons finish the panel: Output approved runs the export with the options above, and Star-detection preview re-runs the detector on the current frame and opens a new image window with the detected stars marked (the same preview available from the Star detection tab).
5 A typical culling workflow
[hide]
Open SubframeStudio and Add the night's subframes. Let the background loader measure them; the previews and the plot fill in as it works.
If the session mixes filters or exposures, set Group so we grade each group on its own terms.
Blink the frames with Play to catch the obvious failures (trailing, wind shake, passing cloud), and glance at the filmstrip flags for the frames SubframeStudio thought were anomalous.
Pick an Approval criteria mode. For a quick pass, drag the FWHM (and maybe eccentricity) threshold on the plot until the keep count looks right. For a fixed keep fraction, use Score / keep best; to clip statistical outliers, use Sigma-clip; for a bespoke rule, write an Expression in the Advanced window.
Fine-tune by hand: step through with the arrow keys and toggle any frame with Space (or a double-click in the filmstrip or the table). Manual grades stick, so the automatic criteria will not undo them. Use Toggle lock in the table to pin a decision explicitly.
Open the Advanced window to read exact numbers in the table, check a metric's Distribution, and, if the default measurements look off for this data, tune the Star detection settings and re-measure.
Choose a Weight preset (or a Custom weighting expression) so the approved frames carry a sensible weight.
Export: use the toolbar's Weights, or the Advanced Output panel for full control, to write the approved frames with their
SSWEIGHTfor weighted integration. Save session if we want to revisit the exact selection later.
6 Usage tips and tricks
[hide]
Let the eye and the numbers agree. Blink first to catch gross failures the metrics might not rank obviously, then let the thresholds do the bulk sorting. The two together are stronger than either alone.
Drag thresholds, watch the keep count. The fastest way to a cut is to grab a threshold on the plot and watch the keep count and the filmstrip ribbon respond, rather than typing values blind.
Group before grading mixed sessions. FWHM and star counts are not comparable across filters or exposure times; set Group to Filter or Exposure so each group is judged on its own distribution.
Report FWHM in arcseconds to compare nights. Set the image scale and switch the unit to arcseconds so seeing reads in the same units from session to session; grading is unaffected because it stays in pixels internally.
Tune star detection for unusual data. If FWHM or star counts look wrong on undersampled, very noisy or wide-field frames, adjust the detector in the Advanced window and use Preview on current frame to check the detected stars before committing a re-measure.
Treat the flags as hints, not verdicts. Anomaly flags are relative to the loaded set; on a very consistent night they may fire on perfectly good frames. Turn off the detectors you do not want in Preferences.
Manual grades always win. A frame graded by hand keeps our decision through any threshold change; use Toggle lock in the table when we want that decision to be explicit and obvious.
Save the session. A
.cullsession stores the frames, metrics, thresholds and grades, so we can reopen the exact selection later or hand it off without re-measuring.
7 Scripted measurement
[hide]
SubframeStudio can also run as a process from a script, to measure a list of frames without opening the cockpit. A scripted run only measures: grading and weighting stay in the cockpit.
The frames to measure go in the frames table, one row per frame, holding an enabled flag and a file path. The star detection settings are parameters too (structureLayers, noiseLayers, hotPixelFilterRadius, noiseReductionFilterRadius, minStructureSize, sensitivity, peakResponse, maxDistortion, upperLimit, psfType, maxStars, forceCFA), with the same defaults as the Star detection tab. localNormalizationFolder is the fallback folder for .xnml files described in 4.3 Expressions. With useCache on (the default), frames already measured under the same settings are read from the metrics cache, and new measurements are added to it. With it off, the cache is neither read nor written.
After executeGlobal(), the read-only measurements table holds one row per frame. When outputCSVPath is set, the same rows are also written to a CSV file. The columns, in order, are Path, Ok, FromCache, Stars, FWHM, Eccentricity, PSFSignalWeight, PSFSNR, Noise, NStar, NoiseRatio, Background, Median, MedianMeanDev, StarResidual, FWHMMeanDev, EccentricityMeanDev, StarResidualMeanDev, SNRWeight, PSFFlux, PSFFluxPower, PSFTotalMeanFlux, PSFTotalMeanPowerFlux, PSFCount, Altitude, Azimuth, LocalNormScale, Trail, Filter, Exposure and DateObs.
var P = new SubframeStudio;
P.frames = [ [ true, "/data/light_001.xisf" ], [ true, "/data/light_002.xisf" ] ];
P.outputCSVPath = "/data/measurements.csv";
P.executeGlobal();
var m = P.measurements;   // m[i][0] is the path, m[i][3] the star count, ...
A scripted run needs an active license, like the cockpit.