1 Introduction
[hide]
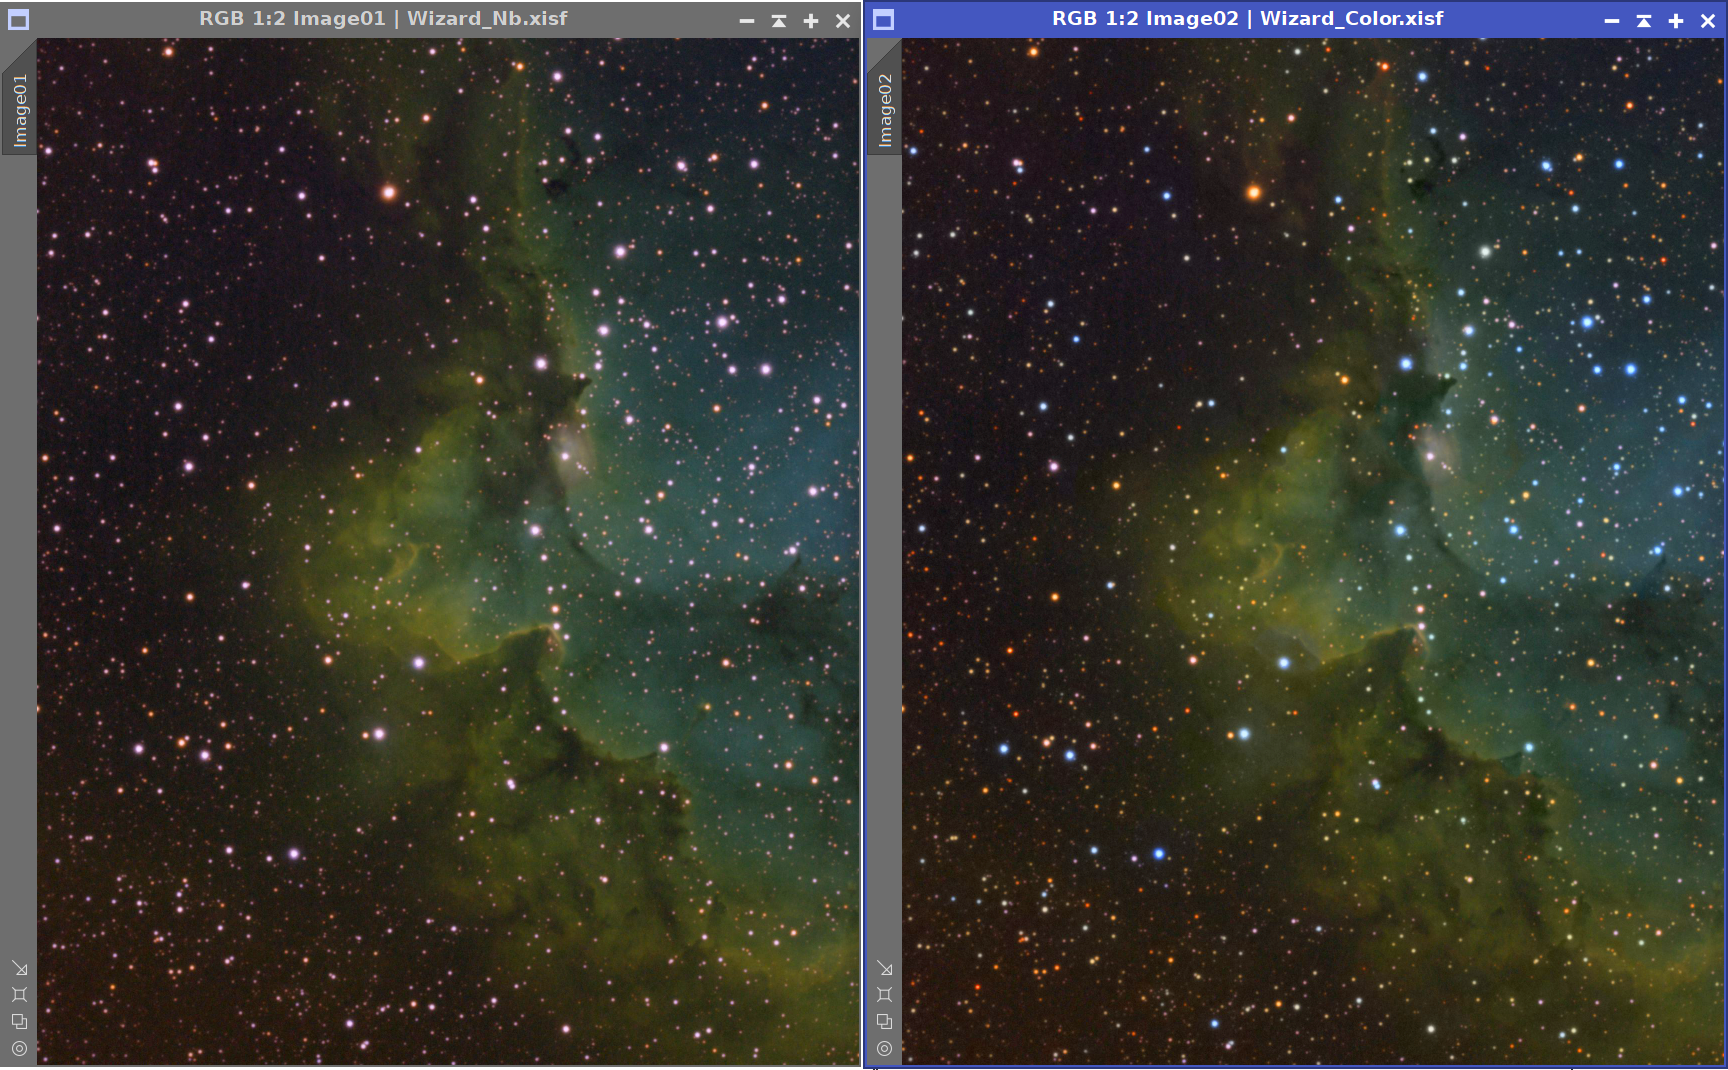
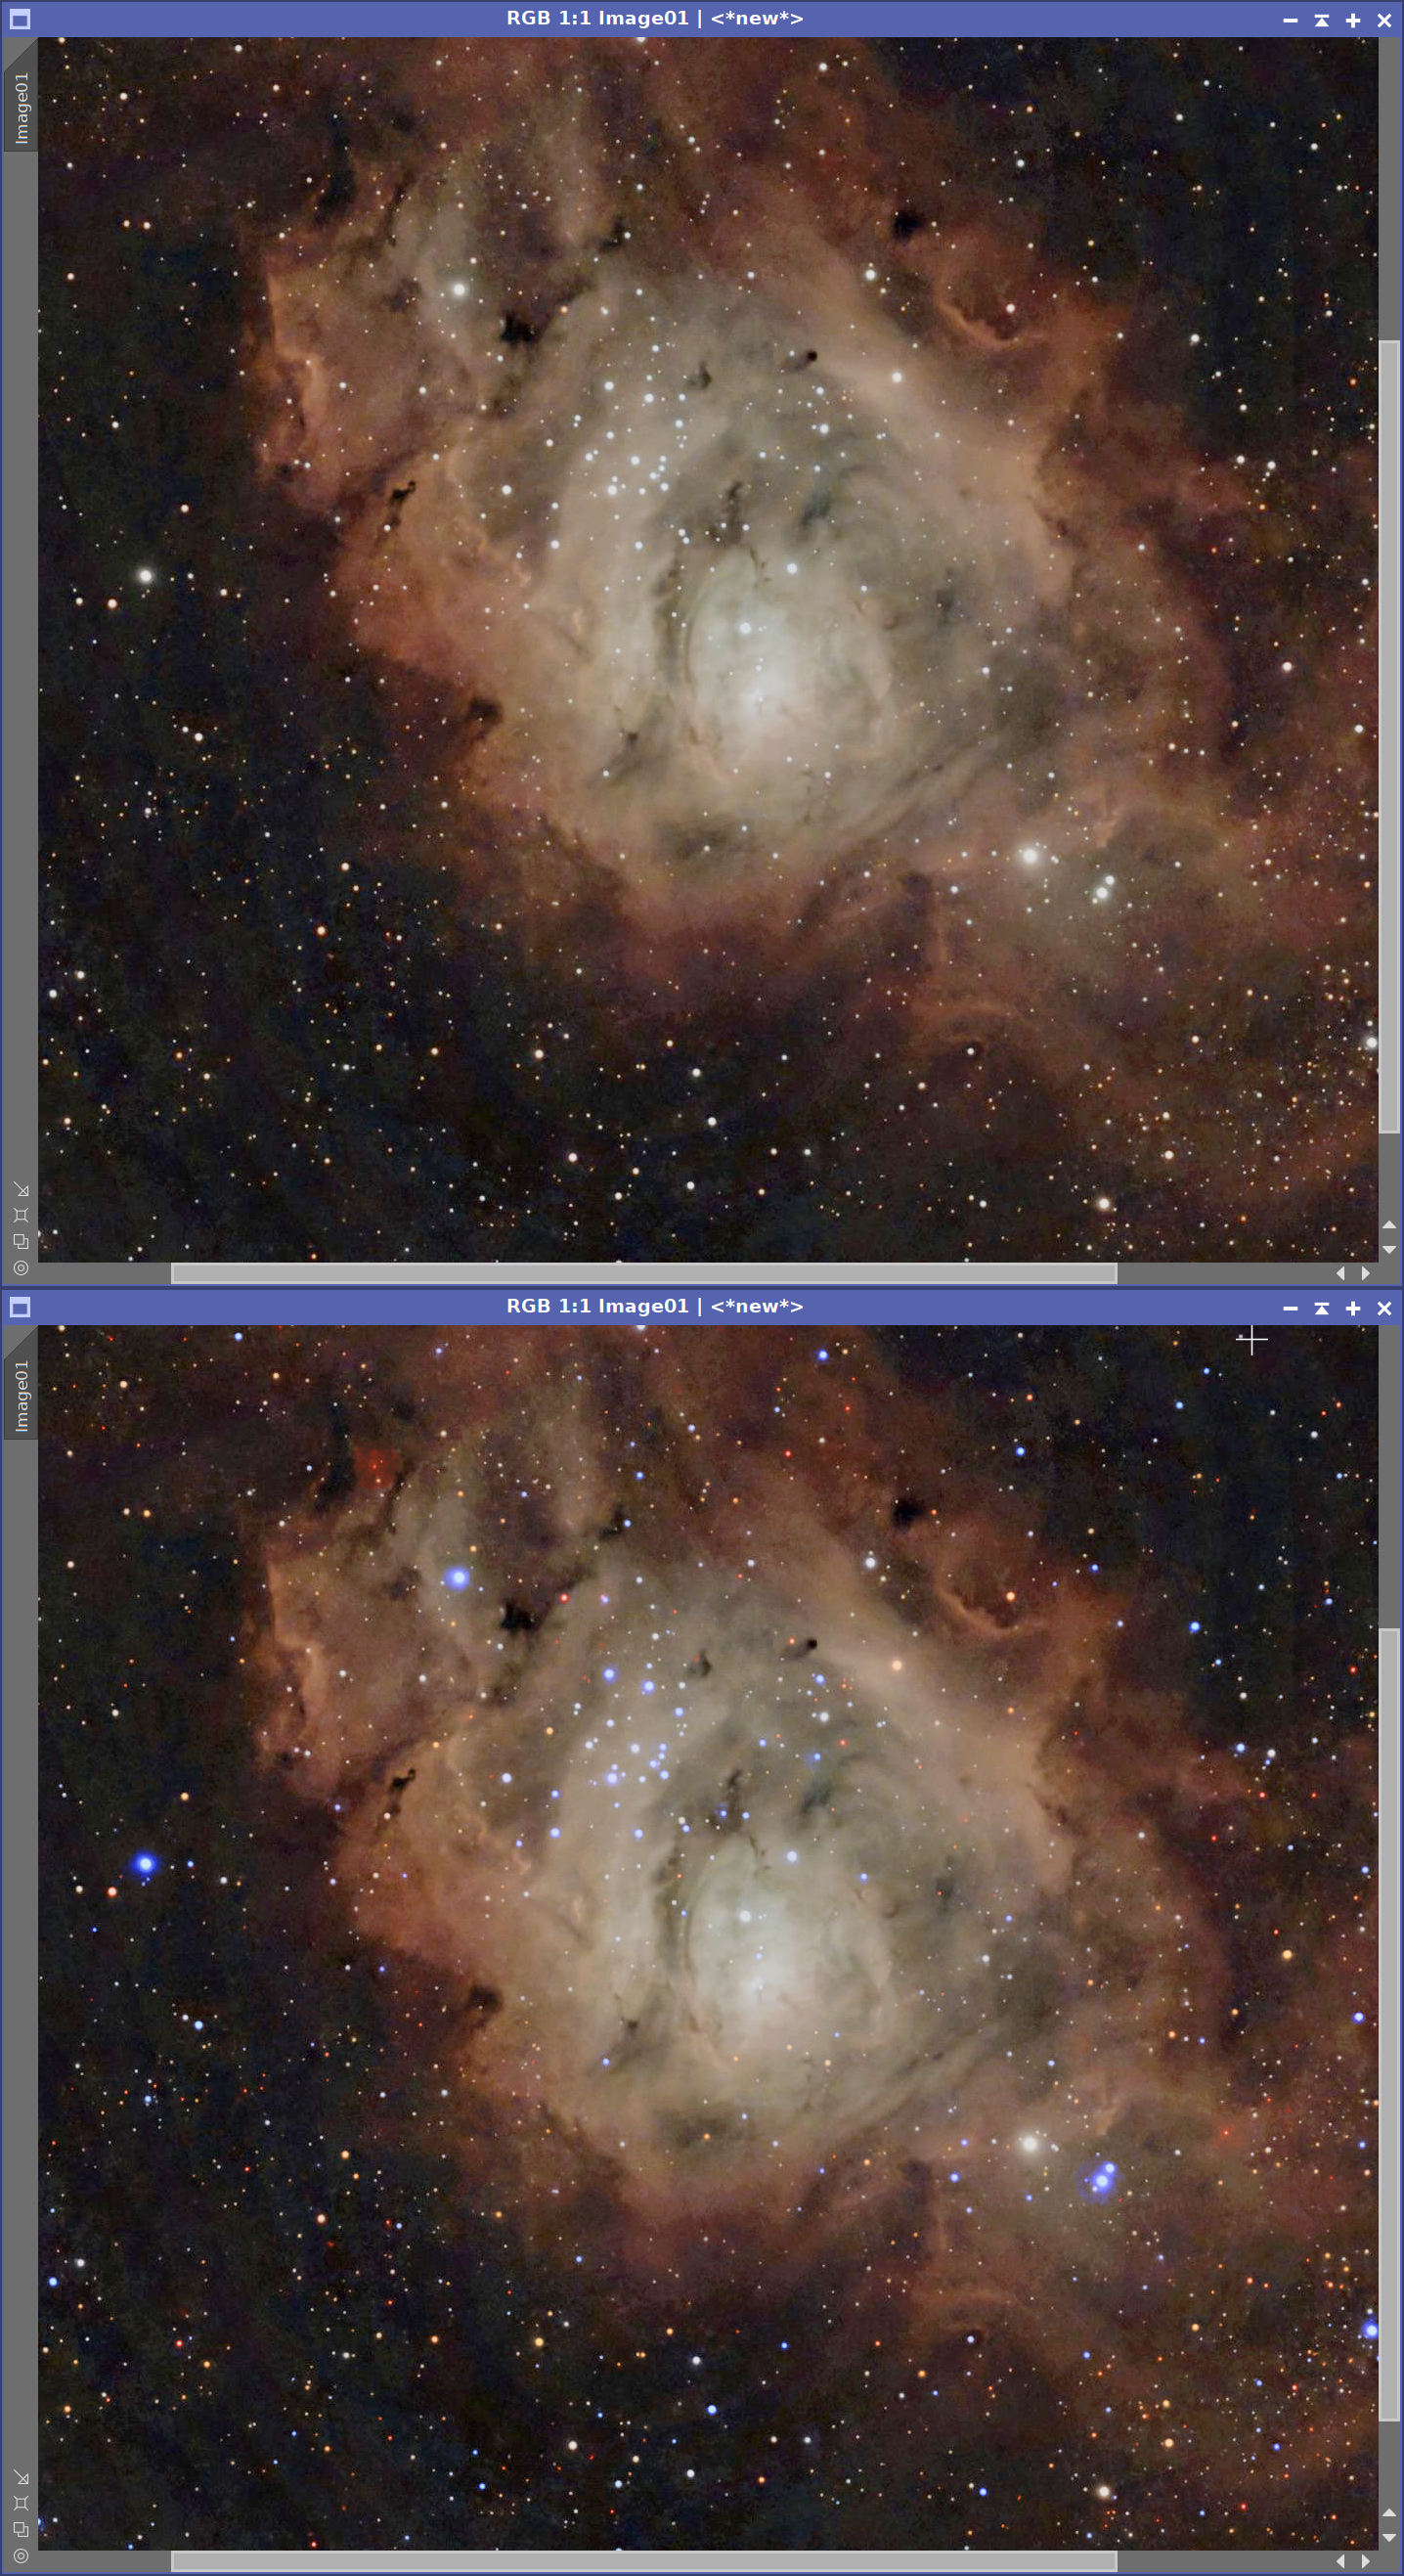
Narrowband filters show a nebula as nothing else does, and they give its stars colors that mean nothing: a narrowband filter samples a star's spectrum at one line, so a palette built from three of them paints the stars magenta, green or whatever the palette happens to do with those three samples. Until now there were two ways out. One is to shoot RGB data only for the stars. The other is to fake the colors, with a narrowband mode of color calibration or by hand.
CatalogStarColor is a third: it gives every star the color it has in a broadband RGB exposure, without shooting one. The Gaia mission has measured the spectrum of more than two hundred million stars. CatalogStarColor takes the spectrum of each star in our field, passes it through the transmission curves of a set of RGB filters and a sensor, exactly as an exposure through those filters would, and obtains the red, green and blue the star would have shown.
That color is then applied to the star as our image shows it. CatalogStarColor finds the stars on the image, measures each one where it is and as large as it is, from the faintest to a saturated star with its halo, and replaces the color of its light. Each star is measured on its own: no PSF model is fitted to the image, so a saturated core or a wide halo, which no model would fit, is covered like any other star. No star is drawn, and no star is moved, resized or reshaped.
Only color changes. The luminance of every pixel is the same before and after, so the stars keep their brightness, their profile and their size. The nebula under and around a star keeps its own color. Pixels outside the stars are not touched at all.
The same computation also works the other way: on a broadband RGB image, it shows the colors its stars should have, which makes CatalogStarColor a way to check a color calibration (see 6 Checking the color calibration of an RGB image).
The image needs an astrometric solution, which is how the catalog stars are located on it, and PixInsight needs the Gaia DR3/SP database, the same one SpectrophotometricColorCalibration uses.
2 Setup and Installation
[hide]
The only official distribution of CatalogStarColor is via a PixInsight repository. This is the safest way to install a module or script, as the installation is handled by PixInsight itself, which will fetch the module directly and safely from our PixInsight repository at
https://repo.deepskycolors.com/CatalogStarColor/
Make sure the trailing / is part of the URL. Also, be sure to keep our repository URL in our list of PixInsight repositories to receive timely updates.
By distributing CatalogStarColor only via our PixInsight repository, installation comes with the guarantee of our Developer and Repository certificates, verified by PixInsight itself from the moment it connects to our repository, until it validates and completes installation of the CatalogStarColor module.
If we ever want to be sure that we have the latest version available to us, we go to PixInsight's RESOURCES menu, select Updates, then Manage Repositories to make sure our repository is still there, then RESOURCES > Updates > Check for Updates.
2.1 Launching CatalogStarColor
CatalogStarColor is a standard PixInsight process: we set its parameters on the process dialog and apply it to a view. To launch it:
- Open the narrowband color image whose stars we want to color.
- In Process Explorer or via the PROCESS menu, locate CatalogStarColor under any of the DeepSkyColors, ColorCalibration, or Photometry categories.
- The CatalogStarColor interface opens.
- Set the parameters, then apply the process to the target view (drag the triangle onto the image, or drag the instance onto the view).
CatalogStarColor works in place: it modifies the view it is applied to, and PixInsight's history lets us undo it like any other process. It runs on RGB color images in any sample format, linear or stretched. Pixels it does not change keep their original values bit for bit.
A grayscale image has no color to replace, so CatalogStarColor converts it to RGB first, keeping its grayscale appearance, and then colors the stars in the result. By default it asks: Convert this image turns the image itself into RGB, and a single undo brings the grayscale image back; Create a new image leaves the image untouched and works on an RGB copy, which opens when the process finishes and carries the astrometric solution the run used; Cancel stops without changing anything. The Grayscale images option makes that choice in advance, for scripts and Process Containers that cannot answer a dialog (see 3.1 Input image). A preview of a grayscale image is refused: we apply the process to the image itself.
We can also apply CatalogStarColor to a preview, which is the quick way to try settings: the preview is located on the sky through the astrometric solution of its image, and only the catalog stars inside it are used. A star cut by the edge of the preview is measured from the part that is inside.
A short report is printed to the Process Console: the color rendition in use, the image the astrometric solution came from when it is not the target, how many catalog stars the field holds and whether that search was reused from the previous run, how many stars were detected and colored and from what, how many were left unchanged, the median star color and the sizes of the stars.
2.2 What the image and PixInsight need
An astrometric solution on the image. The catalog gives each star's position on the sky, and the solution is what turns it into a position on our image. We plate solve the image with
SCRIPT > Astrometry > ImageSolverif it is not solved already. A solution with distortion correction places the stars more accurately in the corners. A star image produced by a star removal tool usually has no solution of its own; we do not need to copy one to it: we choose the image it came from under Astrometry from (see 3.1 Input image).The Gaia DR3/SP database. This is the Gaia DR3 catalog with the sampled BP/RP mean spectra, the database SpectrophotometricColorCalibration uses. We download its files from the PixInsight software distribution site and select them in the Gaia process: open Gaia, click its wrench button, choose Gaia DR3/SP and add the files. If SpectrophotometricColorCalibration already works on our machine, there is nothing to do. Without this database CatalogStarColor does not run, and its error message says so.
The Gaia DR3 database, optional. Gaia has a spectrum for stars down to about magnitude 17.6. For fainter stars it has a color index, BP-RP, in the Gaia DR3 database, which many of us already have installed for plate solving. With it, CatalogStarColor also colors the stars that have no spectrum (see 3.4 Catalog). Without it those stars are left as they are, and the console says so.
CatalogStarColor reads the filter, sensor and white reference curves from the spectrum databases that ship with PixInsight. Nothing needs to be set up for them.
2.3 Licensing
CatalogStarColor runs on a trial-then-registered licensing model. During the 30-day trial, the tool is fully functional with no feature restrictions. When the trial expires, CatalogStarColor displays a notice when its interface is opened, and the process no longer runs until a valid license key is entered (see 3.6 Registration and licensing). This applies however the process is run: from its interface, from a process icon, from a Process Container or from a script. No internet connection is needed: keys are validated offline.
3 The CatalogStarColor Interface
[hide]
The panel has, from top to bottom, the image that provides the astrometric solution and what to do with a grayscale image, the two color controls, the controls that decide which stars are colored and how far out, the star map option, the catalog options, and a collapsed Color Rendition section that we can leave alone. Nothing on the panel asks what filters the image was taken with: CatalogStarColor does not need to know.
The CatalogStarColor Interface:
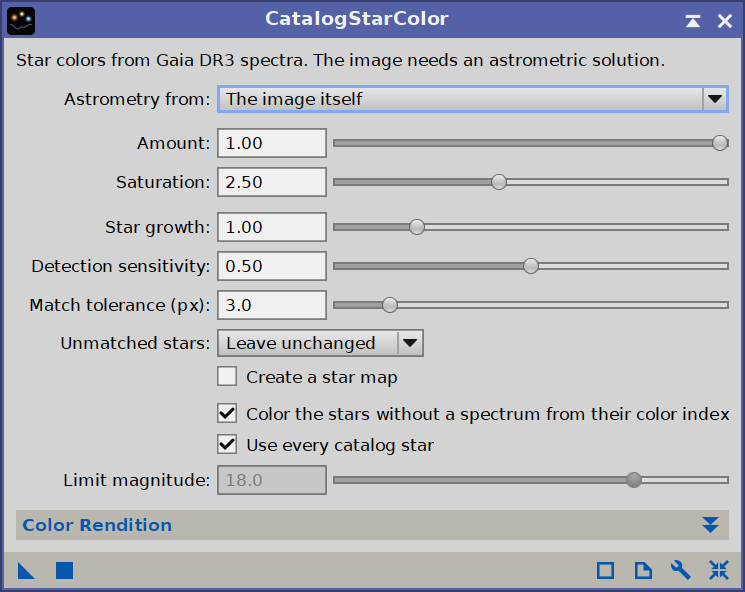
Astrometry from, Grayscale images, Amount and Saturation, Star growth, Detection sensitivity, Match tolerance, Unmatched stars, Create a star map, the catalog options, and the collapsed Color Rendition section.
3.1 Input image
Astrometry from: the image whose astrometric solution locates the catalog stars. The image itself, the default, uses the solution of the image the process is applied to.
We choose another image when ours has no solution but was made from one that has. A star image from a star removal tool keeps every star exactly where it was in the original, so the original's solution fits it as it is, and nothing needs to be copied. The two images must be the same frame, with the same size: CatalogStarColor refuses to run otherwise, and says why. The chosen image is only read, never changed.
The list shows the open images that have a solution, and follows images as they are opened, closed, renamed or solved. A process icon remembers the image by its identifier; when that image is not open, the list shows it as not open or not solved, and applying the instance says so instead of falling back to another solution.
Grayscale images: what happens when the image is grayscale. CatalogStarColor needs an RGB image, and makes one from a grayscale image that looks exactly the same.
Ask (the default) opens a dialog offering the two conversions below, or to cancel.
Convert the image turns the image itself into RGB, and colors its stars. A single undo brings the grayscale image back.
Create a new image leaves the image as it is and colors an RGB copy, which opens when the run finishes.
Do not process stops with an error, before any catalog search.
A dialog waits for someone to answer it, so in a script, a Process Container or a batch of process icons we choose one of the last three. Color images are not affected by this option.
3.2 Color
Amount: how far each star's color is replaced by its catalog color, from 0 to 1. The default is 1.00, which replaces it entirely. At 0 the image is left as it is, and values in between mix the two.
Saturation: the strength of the star colors, from 0 to 6, with a default of 2.50. At 0 every star is white. At 1 each star has exactly the color a linear RGB exposure records, and higher values deepen it.
The default is not 1 because the real thing is fainter than we expect: measured on linear data, a red star is only about 1.4 times redder than a white one, and a blue star about 1.6 times bluer, which reads as almost no color at all. The star colors we are used to seeing come from images whose processing deepened them. Saturation does the same here, and it does it without changing any star's hue: red stars get redder, blue stars bluer, and the order of the stars from one to the other stays as the catalog gives it, however far we go.
Neither control changes luminance. Whatever the amount and the saturation, each pixel keeps the luminance it had.
3.3 Stars
Star growth: each star is recolored out to the radius where its measured profile stops falling (see 4). This multiplies that radius. The range is 0.50 to 3.00, and the default is 1.00. We raise it when a rim of the old color is left around the stars, which can happen on stars with wide, faint halos, and lower it to keep the change tighter around each star.
Detection sensitivity: the sensitivity of the star detection, from 0 to 1, with a default of 0.50. Higher values reach fainter stars. Lower values help when small knots of the nebula are being taken for stars, although such a knot only changes if the catalog has a star at its position.
Match tolerance (px): the largest distance accepted between a star on the image and its catalog position projected through the astrometric solution. The range is 0.5 to 20.0 pixels, and the default is 3.0. We raise it when the solution has no distortion correction and the corners are several pixels off, which shows as corner stars reported as left unchanged.
Unmatched stars: what to do with a detected star that the catalog does not have.
Leave unchanged (the default) keeps it exactly as it is. This is also what protects a nebula knot, a galaxy core or anything else that was detected as a star and is not one.
Field average gives it the median color of the stars that were matched.
White gives it the white reference.
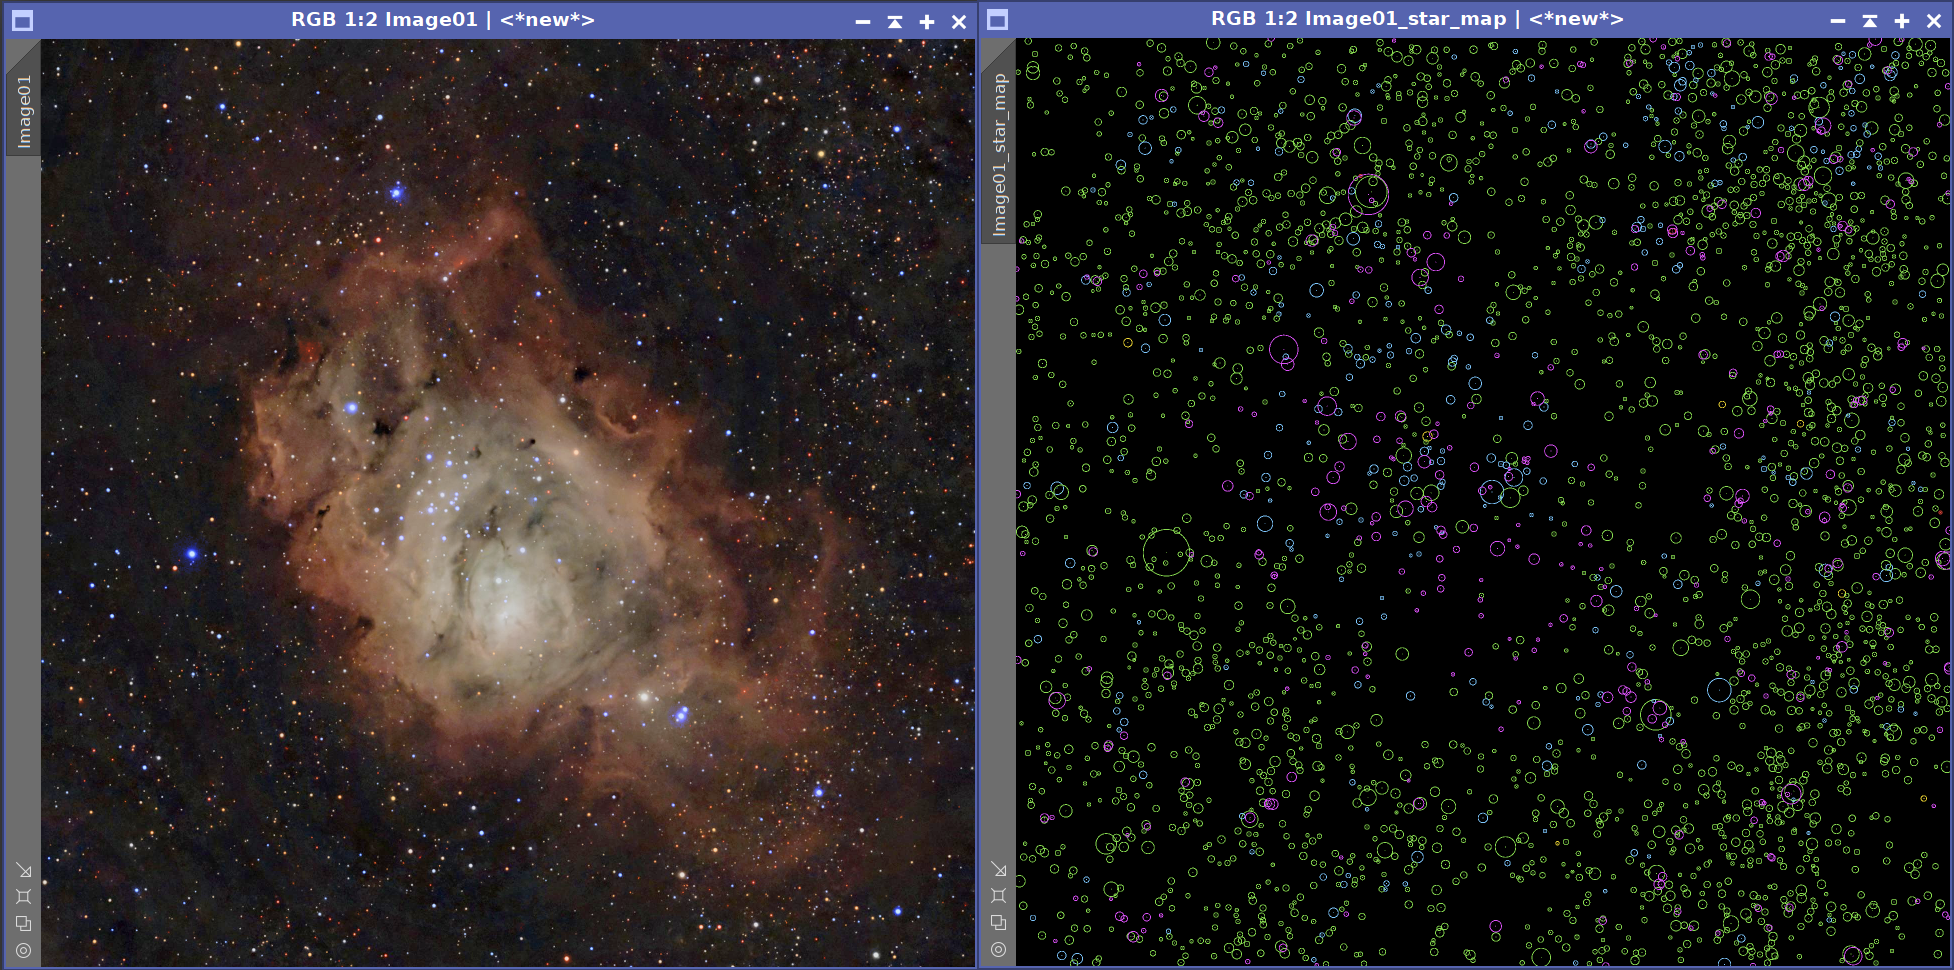
Create a star map: unchecked by default. When checked, every run also opens a new image, <image>_star_map, with a ring around every star at the radius it was recolored out to and a dot at its center. The color of the ring says where the star's color came from:
green: its BP/RP spectrum.
cyan: its color index.
yellow: the field average, because its catalog photometry is contaminated.
magenta: located by the catalog: a bright star the detection missed.
white: not in the catalog, colored by the Unmatched stars option.
red: left unchanged.
The map has the size of the view the process was applied to. A map of a whole image carries the astrometric solution the run used. It is the way to find out why a particular star did or did not change, and the legend is repeated in the console.
3.4 Catalog
Color the stars without a spectrum from their color index: checked by default. Stars too faint to have a Gaia spectrum still have a BP-RP color index in the Gaia DR3 database. With this option they are colored from that index, through a relation that CatalogStarColor fits on the spot: it takes the stars of our own field that have both a spectrum and a color index, and learns from them what red, green and blue a given index corresponds to, through the filters we chose. Nothing is assumed in advance, so the relation follows our filters, our white reference and the reddening of our field. It needs the Gaia DR3 database and at least 20 spectrum stars in the field. When either is missing, only the spectrum stars are colored and the console says why.
Use every catalog star: checked by default. The catalogs are searched down to their faintest stars. Unchecked, the search stops at the limit magnitude below, and fainter stars are left unchanged.
Limit magnitude: the faintest Gaia G magnitude searched when Use every catalog star is unchecked. The range is 6.00 to 21.50, and the default is 18.00.
In a very wide or very rich field CatalogStarColor stops at 150,000 spectrum stars and 1,500,000 color index stars, keeping the brightest. The console reports the magnitude it stopped at.
3.5 Color Rendition
This section is collapsed, and most of us never need to open it. It has nothing to do with the filters our image was taken with: there is nothing here to match to our equipment, and nothing to look for in its lists.
It exists because a catalog star has a spectrum, not a color. To turn a spectrum into red, green and blue, something has to say what red, green and blue are, and that is what a set of RGB filters does. The curves in this section are that set: the RGB exposure CatalogStarColor simulates. The defaults give the star colors of a typical color camera, on any image, whatever narrowband filters it was made with.
We open it only to change the rendition of the star colors, for example to match the stars of another image taken through a particular RGB set, or to check the color calibration of an RGB image, where the curves should be those of the filters it was taken with (see 6 Checking the color calibration of an RGB image). The lists are PixInsight's own filter and white reference databases, the ones SpectrophotometricColorCalibration offers.
Red, Green, Blue: the transmission curves of the simulated RGB set. Each list shows the filters of its own channel.
Sensor QE: the quantum efficiency curve of the simulated sensor. The default is the ideal curve, which leaves the filters as they are. This is also the right choice when the filter curves are those of a color sensor, which already include the sensor's response.
White reference: the spectrum that comes out white. A star with this spectrum gets equal red, green and blue, and every other star is colored relative to it. The default is the average spiral galaxy, PixInsight's default white reference. Choosing a G2V star instead makes sun-like stars white and shifts every star slightly toward blue.
Each selector starts on the item PixInsight's database marks as the default for it. An instance keeps a curve only once we choose one that is not the default: the curve itself is stored in the instance, so a process icon gives the same colors on another machine. A curve that came with an instance and is not in our database is shown as stored in the instance.
3.6 Registration and licensing
The Preferences button (the wrench icon on the process interface bar) opens the CatalogStarColor license information dialog. This dialog reports the current license state:
- Licensed: shows the email the module is licensed to.
- Trial: shows the number of trial days remaining.
- Expired: prompts us to register to keep using the tool.
When the module is not yet licensed, the dialog shows a Click here to register link, and a Get your license link that opens the CatalogStarColor page on our website. Clicking Click here to register opens the registration dialog, where we enter our email address and license key. The fields are validated as we type, and the Register button enables only once a valid email and key pair is entered. After a successful registration the information dialog refreshes in place to the licensed to state.
When the trial has expired, opening CatalogStarColor shows the trial-expired notice instead of the interface. OK opens the registration dialog, Get my license opens the CatalogStarColor page on our website, and Cancel closes the notice without opening CatalogStarColor.
4 How CatalogStarColor works
[hide]
Knowing what CatalogStarColor does with our image makes its console report, and its decisions about individual stars, easy to read.
The color of a star. For each star, the Gaia spectrum is multiplied by the transmission of a filter and by the sensor's quantum efficiency and summed over wavelength, once per filter. The white reference spectrum goes through the same three sums, and the star's red, green and blue are its three results divided by the white reference's. This is the computation SpectrophotometricColorCalibration uses to predict star colors, used here in the opposite direction: not to calibrate an image against the stars, but to give the stars the colors the image could not record. The Gaia spectra cover 336 to 1020 nm, the whole range of any RGB filter set.
Where the stars are. Catalog positions are brought to the date of our image, with each star's proper motion, and projected onto it through the astrometric solution. The stars are also detected on the image itself, and each detection is matched to the catalog stars within the Match tolerance. The star is then treated at its detected position, so a solution that is slightly off does not shift any color. When two catalog stars fall on one detected star, an unresolved pair, it gets the color of their combined light.
How large each star is. CatalogStarColor measures every star on the image: the median brightness on rings around its center, outwards, until the profile stops falling. That radius is where the star ends, at whatever brightness the profile settles: a star inside a bright nebula ends where the nebula takes over, not where the distant sky begins. It is measured the same way for a faint star of a few pixels and for a saturated one with a wide halo, with no assumption about the shape of the PSF. A ring median also ignores what crosses it, such as a neighbor star, a diffraction spike or a filament of the nebula. The largest radius is one third of the shorter side of the image, up to 1024 pixels. The console reports the median radius and the largest.
What is recolored. Just outside each star, CatalogStarColor measures the local background in each channel: the nebula and sky the star is standing on. Inside the star, each pixel is the sum of that background and the light above it. Only the light above the background is recolored: it keeps its luminance and takes the star's color. The background keeps the color it had, so a star in front of a red nebula becomes a correctly colored star in front of the same red nebula. The recoloring is also limited, pixel by pixel, to the light the star's own profile accounts for at that distance from its center: a filament or a knot of the nebula that crosses a star and outshines it there keeps its own color. The change fades out over the outer quarter of the star's radius, so no star ends in an edge.
Luminance is preserved. The recolored light has the same luminance as the light it replaces, by construction. CatalogStarColor then restores the CIE Y of each pixel in the image's RGB working space to its original value, so the lightness (CIE L*) we would extract from the image is the same before and after, whatever the luminance coefficients and gamma of that working space.
Saturated cores turn white. A pixel at or near full scale has no room for color at its luminance. CatalogStarColor moves such a pixel toward the gray of the same luminance just as far as needed to fit. The result is what a real RGB exposure shows: a white core, with the color of the star in the halo around it.
Overlapping stars. Where two stars overlap, each pixel takes the two colors in proportion to the light each star puts on it, according to their measured profiles.
Bright stars the detection misses. A heavily saturated star can be too large and too flat to be detected as a star, and it is the one whose wrong color shows most. For catalog stars brighter than the typical matched star that were not detected, CatalogStarColor looks at the catalog position itself, and colors the star if a clear peak is there. The console reports them as located by the catalog.
Stars the catalog cannot color. Gaia flags the stars whose blue and red measurements carry light that is not theirs, from a close neighbor or from the emission of a bright nebula around them. Their spectra and color indices do not describe the star. CatalogStarColor does not use them: such a star gets the median color of the stars of the field, and the console counts it under field average. This is common in the bright core of an emission nebula and rare elsewhere.
Stars not in the catalog. A detected star with no catalog star within the tolerance follows the Unmatched stars option, and is left unchanged by default. The console reports how many stars were left unchanged.
5 Coloring the stars of an image
[hide]
A typical workflow:
Open the narrowband color image and make sure it has an astrometric solution. If not, solve it with
SCRIPT > Astrometry > ImageSolver, or, if it was made from a solved image, open that one too and choose it under Astrometry from.Launch CatalogStarColor. There is nothing to set up: it does not need to know what filters the image was taken with.
Define a preview over a region with stars of different brightness, and apply the process to it. Read the console: how many stars were colored, from what, and how many were left unchanged.
Judge the result, undo, and adjust. Saturation sets how strong the colors are, Star growth how far out each star is recolored. If many stars are reported as left unchanged, check Create a star map to see which ones, and raise Match tolerance or Detection sensitivity. Runs after the first reuse the catalog searches, so each adjustment is quick.
Apply the process to the whole image.
Save the instance as a process icon to reuse the settings on other images.
CatalogStarColor fits anywhere in a workflow where the image is a color image with an astrometric solution, its own or another image's of the same frame: on the linear narrowband composite, on the stretched image, or on a star image separated from its nebula.
6 Checking the color calibration of an RGB image
[hide]
CatalogStarColor is not only for narrowband data. On a broadband RGB image it shows the colors its stars should have, according to their Gaia spectra and the filters the image was taken with, and so it becomes a way to check a color calibration. Since it changes only color, and only the stars, comparing the image before and after shows nothing but the difference between the star colors we have and the ones the catalog predicts.
Start from the linear, color-calibrated image, with its astrometric solution, and make a duplicate of it. The comparison is made on the duplicate.
Open Color Rendition and select the filters and sensor the image was actually taken with, and the white reference used for its calibration. This is the one case where these curves should match our equipment: we are asking what this exposure should have recorded. For a color camera, we select the sensor's own R, G and B curves and the ideal QE curve.
Set Saturation to 1, the color exactly as a linear exposure records it, and Amount to 1. Check Create a star map.
Apply CatalogStarColor to the duplicate, and compare it with the original under the same screen stretch, side by side or with the Blink tool.
When the calibration agrees with the catalog, the stars barely change. When it does not, the stars of the duplicate move together in one direction: if they all turn bluer, the image's stars were too red, and the other way around. That shared drift is what matters, not single stars: a variable star, an unresolved pair or a star in front of bright nebula can differ on its own.
The star map tells which stars to trust. Stars in green (spectrum) and cyan (color index) carry the catalog's colors; stars in yellow, white or red were not colored from the catalog and say nothing about the calibration.
Two things can look like a calibration error and are not. A different white reference from the one the calibration used moves every star the same way, which is why the two must match. And the background does not take part: CatalogStarColor only recolors the light above the local background of each star, so an unneutralized background does not change the comparison, although it will still show in the image.
7 Usage tips and tricks
[hide]
Linear or stretched. Both work. In both cases the star light takes its color from the catalog and keeps its luminance. We set Saturation by eye: 1 is the color ratio a linear RGB exposure records, and the default is well above it.
Try it on a preview first. A preview runs in a fraction of the time, and everything the console reports applies to that region.
Adjusting is fast after the first run. CatalogStarColor remembers its catalog searches for the session. A new run on the same image or preview, with the same astrometric solution, catalog options and color rendition, reuses them and goes straight to the stars: changing Amount, Saturation, Star growth, Detection sensitivity, Match tolerance or Unmatched stars costs no catalog time. The console says same search as the previous run when that happens. Changing the color rendition repeats the spectrum search, and solving the image again repeats both.
Why did that star not change? Check Create a star map and run again: the ring around the star says what happened to it.
Many stars left unchanged in the corners. The astrometric solution is off there. Solve the image again with distortion correction, or raise Match tolerance.
A rim of the old color around bright stars. Raise Star growth. The radius of a star is where its profile stops falling, and a wide halo fainter than the noise can extend a little past it.
Stars in the core of a bright nebula. Gaia's color measurements are contaminated there, and those stars get the field's median color. They are reported as field average in the console.
Faint stars keep their old color. They are fainter than the catalog search reached, or the Gaia DR3 database is not installed. With Use every catalog star and the color index option both checked, CatalogStarColor reaches Gaia's own limit, near magnitude 21. Fainter than that, Unmatched stars set to Field average colors them like the rest.
Star images. A star image produced by a star removal tool is colored like any other image. If it has no astrometric solution, we choose the image it came from under Astrometry from.
My filters are not in the list. They are not meant to be. The lists under Color Rendition are RGB filters for the simulated exposure, not the filters of our image, and the defaults work for any narrowband or broadband data.
Choosing the white reference. Under Color Rendition, the white reference decides which stars come out white, and with it the overall cast of the star field. The average spiral galaxy is the usual choice for deep sky images. A G2V star gives the classic rendition where the Sun is white.
Checking that only color changed. Extract the CIE L* component of the image before and after and subtract one from the other: the difference is zero, within the rounding of the image's sample format.
Watch the console. It reports the color rendition in use, where the astrometric solution came from, the catalog stars found and whether the search was reused, the stars colored and from what, the stars left unchanged, the median star color and the star sizes.