1 Introduction
[hide]
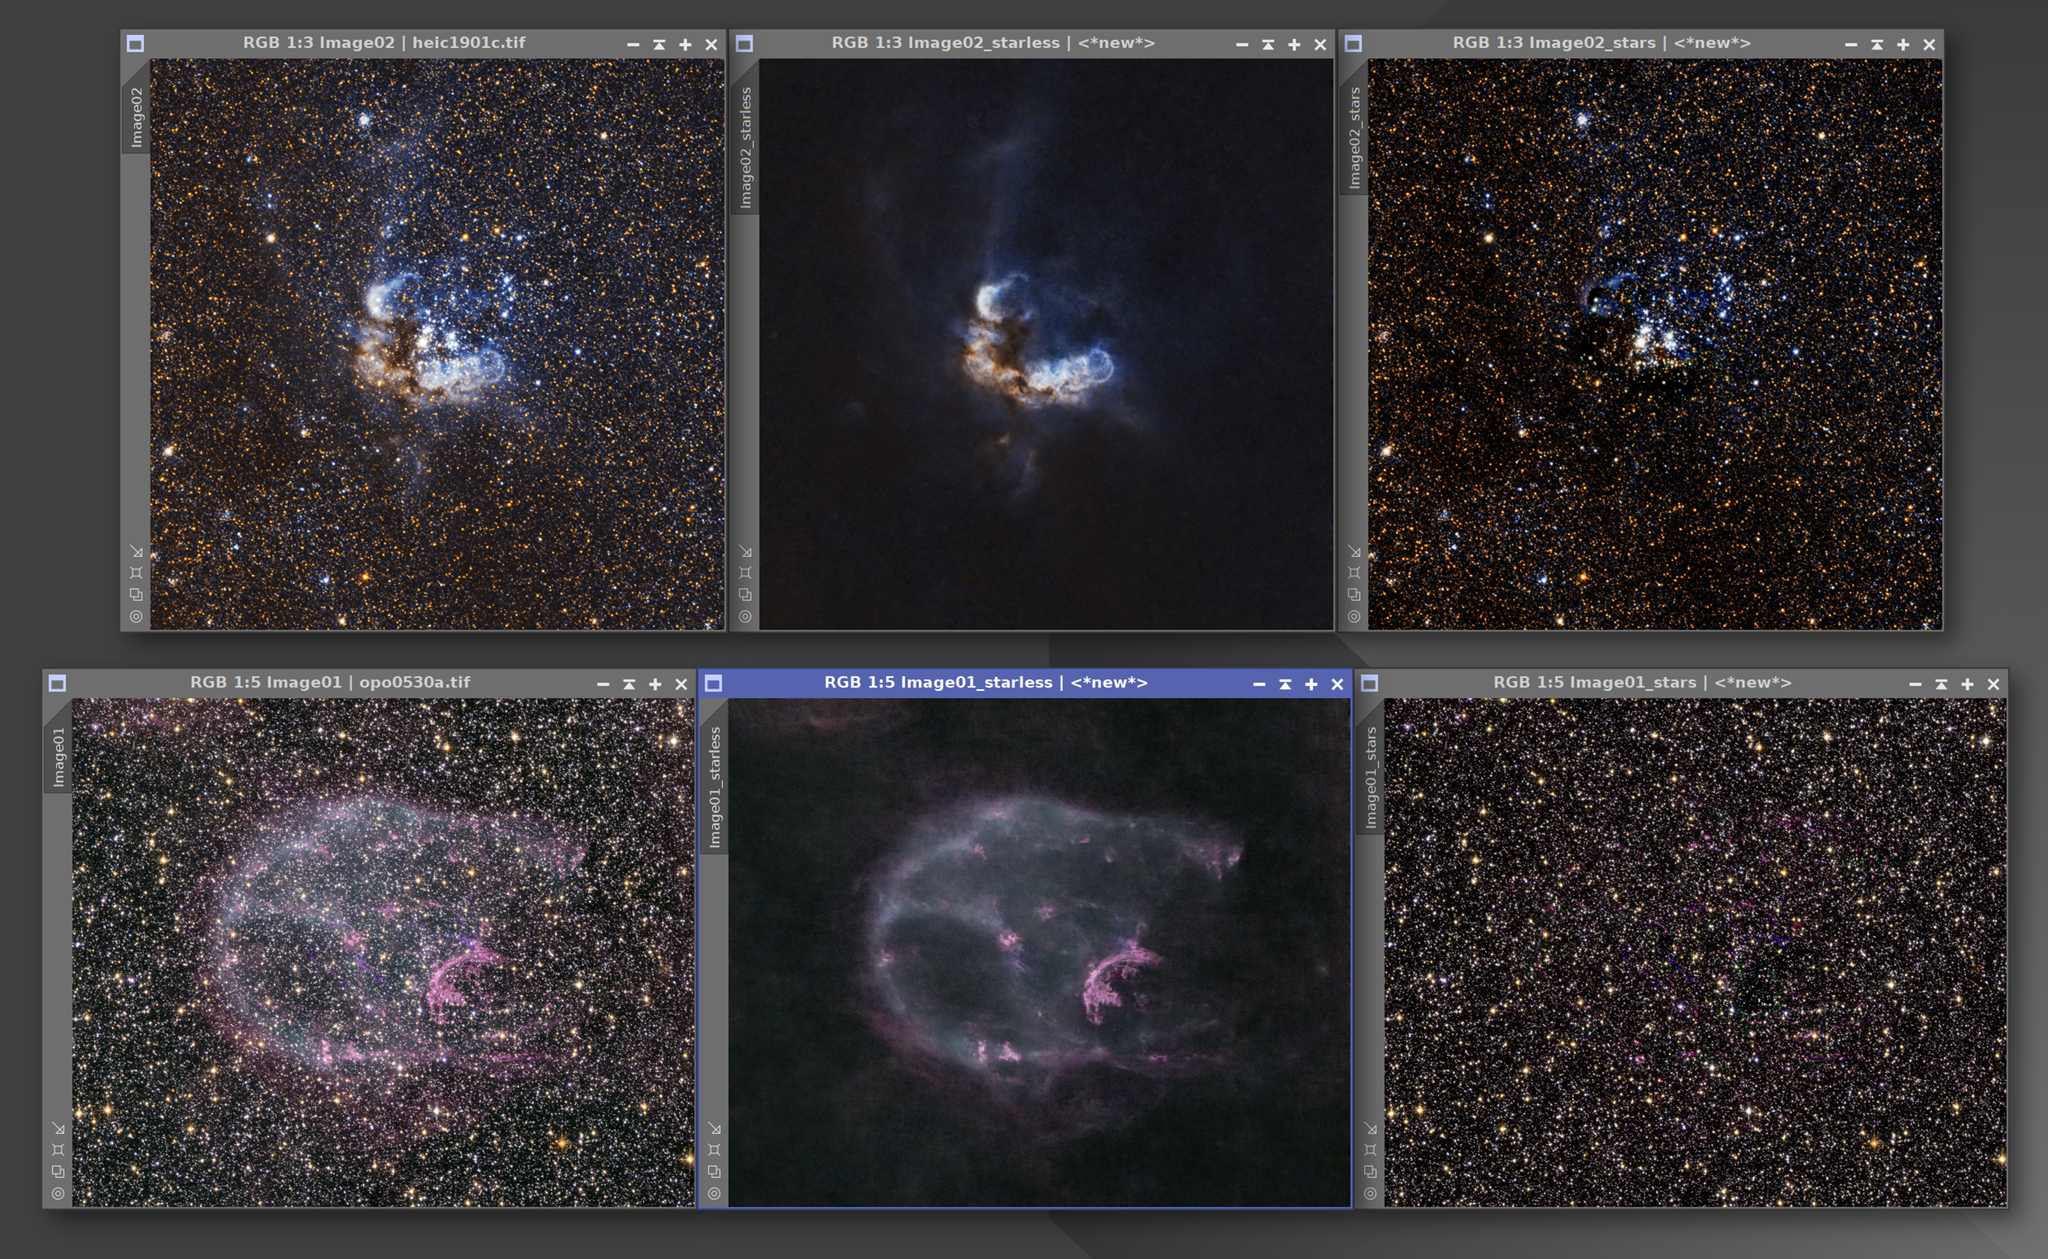
DeepStarRemoval removes the stars from an image with a trained AI model, leaving the nebulosity, dust and background behind. Alongside the starless image it can produce a star image holding exactly the star light that was taken out, so we can process the two separately and put the stars back at the end.
The removal itself is a single step with no parameters to tune: the model looks at the image and fills every star with what it expects to find underneath. What we control is what happens to that result — how much of the star light is removed, where the starless image goes, how the star image is built so it recombines cleanly, and whether the process should work in the linear or the stretched domain.
Star removal is never perfect, and two artifacts are common enough that DeepStarRemoval repairs them for us. The filled areas tend to come out greyish and desaturated, and the fills of large, bright stars tend to come out darker than their surroundings. Both repairs are measured from the image itself: the stars-only result tells DeepStarRemoval where each star was, and the pixels immediately around it tell it which color and which brightness the fill should have. They are on by default, and each can be turned off.
DeepStarRemoval works on color and grayscale images, on the whole view or on a preview, and its model runs inside PixInsight through the ONNX runtime. It runs on the GPU: CUDA where a CUDA-capable ONNX Runtime is installed, otherwise DirectML on any Direct3D 12 GPU, including AMD and Intel. It falls back to the CPU. The model is ethically sourced: it is trained only on the author's own images and on material explicitly released to the public domain or under CC0, so it respects intellectual property by design.
2 Setup and Installation
[hide]
The only official distribution of DeepStarRemoval is via a PixInsight repository. This is the safest way to install a module or script, as the installation is handled by PixInsight itself, which will fetch the module directly and safely from our PixInsight repository at
https://repo.deepskycolors.com/DeepStarRemoval/
Make sure the trailing / is part of the URL. Also, be sure to keep our repository URL in our list of PixInsight repositories to receive timely updates.
By distributing DeepStarRemoval only via our PixInsight repository, installation comes with the guarantee of our Developer and Repository certificates, verified by PixInsight itself from the moment it connects to our repository, until it validates and completes installation of the DeepStarRemoval module and its AI model.
If we ever want to be sure that we have the latest version available to us, we go to PixInsight's RESOURCES menu, select Updates, then Manage Repositories to make sure our repository is still there, then RESOURCES > Updates > Check for Updates.
2.1 Launching DeepStarRemoval
DeepStarRemoval is a standard PixInsight process — we set its parameters on the process dialog and apply it to a view. To launch it:
- Open the image we want to remove the stars from.
- In Process Explorer or via the PROCESS menu, locate DeepStarRemoval under the DeepSkyColors category.
- The DeepStarRemoval interface opens.
- Set the parameters, then apply the process to the target view: click the Apply button at the bottom of the panel, drag the triangle onto the image, or drag a process icon onto the view.
By default the target image becomes starless and a new <view>_stars window opens with the star image. A short report is printed to the Process Console: the settings used and how many pixels each repair adjusted, and, on the first run of each session, whether the model runs on the GPU or the CPU and how long that run took.
We can also apply DeepStarRemoval to a preview rather than to the whole view, which is the quick way to try settings on a large frame.
2.2 The AI model
DeepStarRemoval needs its AI model file, which the repository installs together with the module at
<PixInsight>/lib/DeepStarRemoval/dsr_stls.onnx
Ethically sourced, and respectful of intellectual property. DeepStarRemoval's AI model is trained exclusively on images the author owns, together with images explicitly released into the public domain or under a CC0 dedication. No copyrighted or third-party work was used in its training. The model is ethically sourced by design, so the results you produce with it carry no such baggage.
The model runs through the ONNX runtime. On Windows the module carries its own copy, so nothing else has to be installed; on Linux and macOS it uses the one that comes with PixInsight. It runs on the GPU: CUDA where a CUDA-capable ONNX Runtime is installed, otherwise DirectML on any Direct3D 12 GPU, including AMD and Intel. It falls back to the CPU. A runtime you install yourself in the PixInsight bin directory takes precedence over the bundled one, which is how a CUDA setup is used. The console reports which runtime and which processor ran.
The line at the top of the panel reports the model's state. AI model: ready. in green means everything is in place; hovering over it shows where the model was loaded from. If the model or the runtime cannot be loaded, the line turns red and the Process Console prints the reason together with the exact path where the model file is expected. The model is loaded once per session, so after replacing the file we restart PixInsight.
2.3 Licensing
DeepStarRemoval is free and fully functional throughout the v1.x series. There is no trial period and nothing expires: every feature is available to everyone, in every 1.x release.
The free version shows a small advertisement banner at the bottom of the interface, usually promoting other Deep Sky Colors tools for PixInsight. The banner is a single clickable image; it never interrupts our work and it makes no attempt to track us. If we click on the banner, DeepStarRemoval opens our default browser with the direct destination link, without saving nor tracking any information about the click at all.
Registering DeepStarRemoval removes the banner, in this and every later v1.x release (see 3.4 Registration and licensing). No internet connection is needed: keys are validated offline.
3 The DeepStarRemoval Interface
[hide]
Below the model status line, the panel is organized into two collapsible groups — Star removal, which decides what the process produces, and Adjustments, which repairs the areas where stars were removed. Star removal opens expanded; Adjustments opens collapsed, because its defaults suit most images. In the free version an ad banner sits at the bottom of the panel.
The DeepStarRemoval Interface —
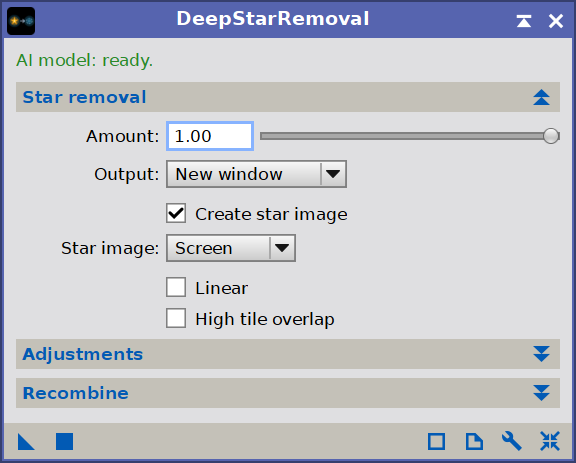
The model status line and the Star removal group, with Adjustments collapsed.
3.1 Star removal
Amount: the fraction of the star light that is removed. At 1, the default, the stars are removed completely. Lower values reduce the stars instead: every star keeps a proportional part of its light, so at 0.7 each star keeps 30% of it. The star image always holds exactly what was taken out, so recombining the two still gives back the original.
Output: where the starless result goes.
Replace target: the target image itself becomes starless. This is a normal history step: it can be undone, and an active mask on the target is honored.
New window: the target is left untouched and the starless image opens in a new window named
<view>_starless. Nothing is added to the target's history, and its mask does not apply.
Create star image: also opens the star image in a new window named
<view>_stars. Enabled by default; we turn it off when we only want the starless image.Star image: how the star image is built, which decides how it recombines with the starless image. Available while Create star image is enabled.
Screen (default): the star image is built to be recombined with a screen blend,
1 - (1 - starless)*(1 - stars). A screen blend never clips, even after the starless image has been brightened, which makes it the safe choice for stretched images.Additive: the star image is the plain difference between the original and the starless image, recombined by addition,
starless + stars. Simple and exact, but bright stars can clip if the starless image has been brightened in the meantime.
Both are exact: recombining the unprocessed starless and star images with the matching operation gives back the original. See 4.1.
Linear: enable for linear (unstretched) images. The AI model was trained on stretched images, so with Linear enabled DeepStarRemoval applies an automatic screen stretch internally before removing the stars, and returns both the starless and the star image to the original's linear intensity scale. Leave it disabled for images that are already stretched. The stretch used is reported to the console.
High tile overlap: the image is processed in 512 px tiles blended across their overlap. Enabling this option widens the overlap from 64 to 192 px, which hides tile seams on difficult images at roughly 2.5 times the processing time. Disabled by default; most images never need it.
3.2 Adjustments
This group repairs the two artifacts star removal most often leaves behind. Both are measured on the removal itself, before Amount and the Linear conversion are applied, and both only touch the areas where stars were removed. They are enabled by default.
The Adjustments group —
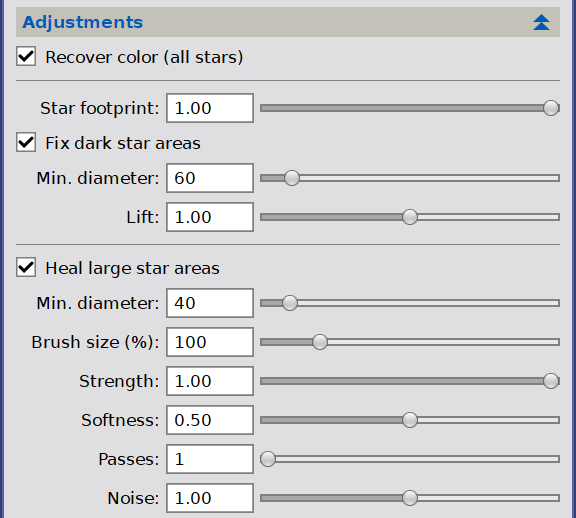
Recover color, Star footprint, Fix dark star areas with its two settings, and Heal large star areas with its six.
Recover color (all stars): star removal tends to fill the areas where stars were with a greyish, desaturated tint. With this option enabled, each of those areas — as given by the stars-only result — is re-tinted with the color of the star-free pixels immediately around it, while its brightness is kept. How far around each star the color is sampled follows the star's size automatically: a small star takes its color from a few pixels away, a large one from just beyond its halo. The new color is blended in across a soft edge, so there is no seam. It applies to every removed star, whatever its size, and has no settings. Color images only.
Star footprint: how far each large star's footprint reaches. The footprint is traced in the stars-only result, outward from the star's center, until the removed star light falls to a fraction of the star's peak: 80% at 0, 50% at 0.5, 20% at 1 (the default). Higher values give larger footprints. It is shared by the two options below: it sets the area Fix dark star areas brightens, and for Heal large star areas it decides which areas qualify and how large each heal is. It is available whenever either of them is enabled.
Fix dark star areas: the fills of large, bright stars are sometimes darker than their surroundings, leaving a visible hole. With this option enabled, DeepStarRemoval brightens each large star's footprint up to the level of the ring of pixels immediately around it. The correction follows gradients across the star, keeps the texture of the fill, and only ever brightens. It works on color and grayscale images.
Min. diameter: the minimum diameter, in pixels, of a star to be checked for a dark fill. Smaller stars are left untouched. Range 20 to 500, default 60.
Lift: how much of the measured darkening is added back. At 1, the default, the dark area is brought to the level of its surroundings; values up to 2 over-correct, and lower values correct only part of the way.
Heal large star areas: the areas left by the largest stars often need more than a brightness correction. With this option enabled, each of them is replaced outright, the way SpotHealing does it: a smooth fill fitted to a ring of pixels around the area, with noise added to match that ring, blended in across a soft edge. Each heal covers the star's footprint generously, and the areas of other removed stars are never used as reference. The heal runs after the other adjustments. It uses the same large-star detection and Star footprint as Fix dark star areas, whether that option is enabled or not, but not its Min. diameter.
Min. diameter: the minimum diameter, in pixels, of a removed-star footprint to be healed. Smaller areas are left to the other adjustments. Range 10 to 400, default 40.
Brush size (%): the size of the healing brush, in percent of the size computed for each area, from 10% to 500%. At 100%, the default, each heal covers the star's footprint generously; larger values reach farther into the surroundings, smaller values stay closer to the center.
Strength: the opacity of the healing brush, from 0.1 to 1. At 1, the default, the area is replaced fully within the brush's soft edge; lower values blend the healed fill with what is there, leaving more of the original.
Softness: how gradually the healed fill fades into the image toward the brush edge, from 0 (a hard edge) to 1 (a fade from the center outward). Default 0.5. The fade is relative to the brush, so doubling the brush size also doubles its width.
Passes: how many times each area is healed, from 1 to 4, much like going over a star more than once with SpotHealing. At 1, the default, each area is healed once, at its center. With 2 to 4 passes, the heals are placed half a brush radius from the center: 2 to the left and right; 3 at 12, 4 and 8 o'clock; 4 at 12, 3, 6 and 9 o'clock. Each pass builds on the previous ones.
Noise: the noise added to the healed areas, relative to the noise measured around each one. At 1, the default, it matches the surroundings; lower values give a smoother fill, higher values a grainier one.
3.3 Recombine
This section puts a starless image and a star image back together in a new window, without a trip to PixelMath. It is collapsed by default, and it is independent of everything above it: it works with any pair of images, whoever produced them.
Starless and Stars: the two images to combine. Both lists show the open images, and refresh whenever the panel is shown.
Mode: how they are combined: Screen (the default) for a star image created in Screen mode, Add for one created in Additive mode, or Lighten for the brighter of the two pixels. See Putting the stars back for what each one does and when it reproduces the original.
Recombine: creates a new 32-bit floating point window named after the starless image, with
_recombinedappended. The two images must have the same dimensions; a grayscale image may be combined with a color one.
3.4 Saved settings and Reset
Every selection on the panel is saved as soon as we change it, so DeepStarRemoval opens next time exactly as we left it, even after restarting PixInsight. Importing a process icon into the panel saves its values too.
The Reset button (the double arrow at the bottom right of the panel) restores the factory defaults, which then become the saved selections.
3.5 Registration and licensing
The Preferences button (the wrench icon on the process interface bar) opens the DeepStarRemoval license information dialog. This dialog reports the current state:
- Free: fully functional, with the ad banner at the bottom of the panel.
- Registered: shows the email the module is registered to, and the banner is gone.
When the module is not yet registered, the dialog shows a "Click here to register" link, and a "Get your license" link that opens the purchase page. Clicking the first opens the registration dialog, where we enter our email and license key. The fields are validated as we type, and the Register button enables only once a valid email/key pair is entered. After a successful registration the info dialog refreshes in place to the "registered to" state — no need to reopen it, and the banner disappears immediately.
A license is tied to our e-mail address and to the v1.x series: it removes the banner in every 1.x release, present and future. It is checked offline, so no internet connection and no activation server are involved.
4 Removing stars
[hide]
A typical workflow:
Open the image and launch DeepStarRemoval. Check that the status line reads AI model: ready.
Tell it which domain the image is in. Enable Linear for a linear image; leave it disabled for a stretched one.
Decide what we want back. Leave Amount at 1 to remove the stars, or lower it to reduce them. Choose Replace target or New window, and keep Create star image enabled if we plan to put the stars back later — with Screen unless we specifically want an additive recombination.
Try it on a preview. On a large frame, define a preview over an area with some large, bright stars and apply DeepStarRemoval to it first. That is where both repairs matter most, and where tile seams would show if High tile overlap were needed.
Adjust the repairs only if needed. If a large star still shows a dark hole, raise Star footprint or Lift in the Adjustments group; if smaller stars need the fix too, lower the dark fix's Min. diameter.
Apply the process to the whole view. Save the instance as a process icon to reuse the recipe later.
Repairing the removed areas —
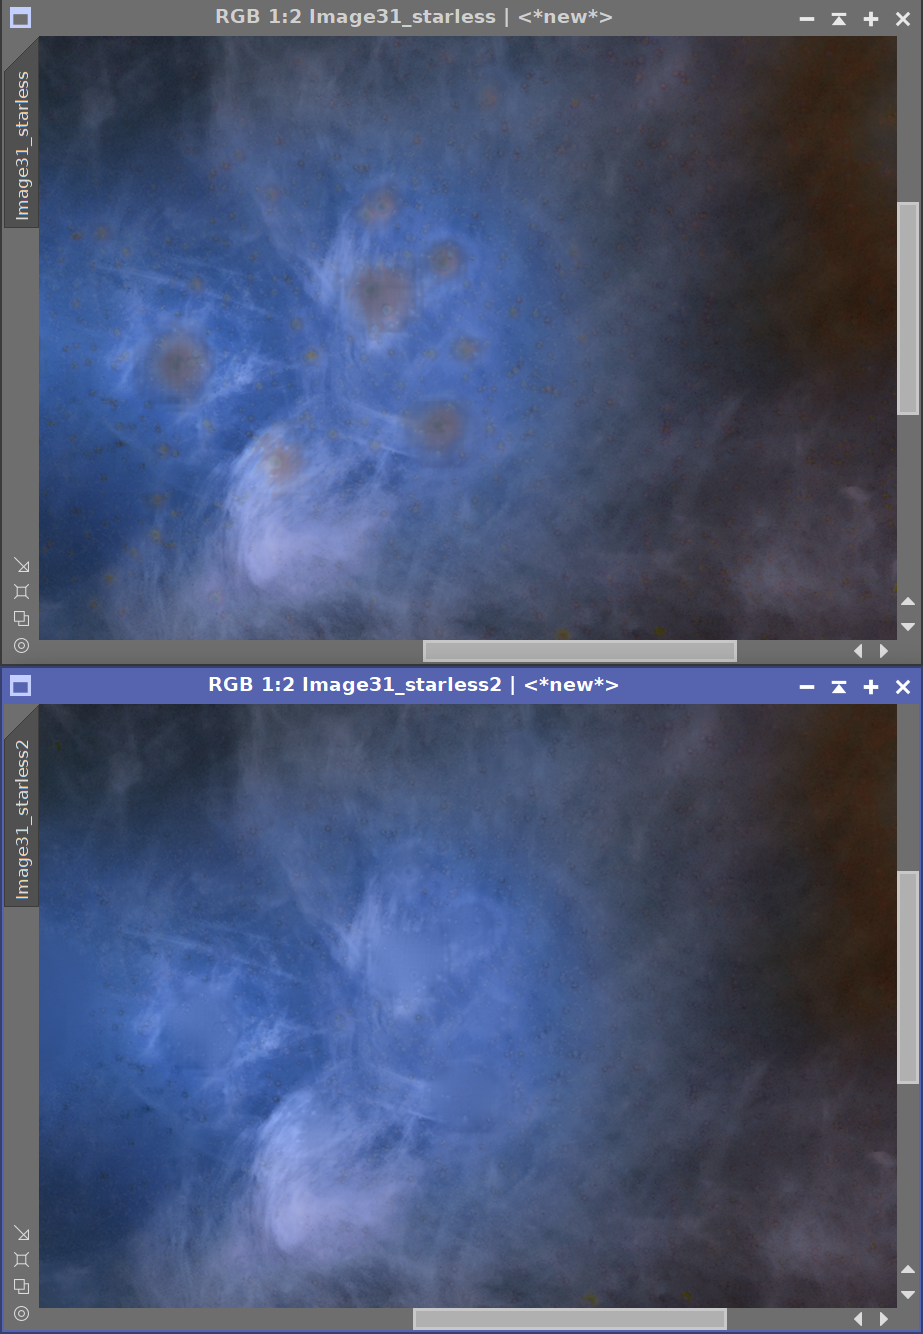
A large star removed without and with the adjustments. Without them the fill is grey and darker than its surroundings; with Recover color and Fix dark star areas it matches the nebula around it.
4.1 Putting the stars back
The point of separating the stars is to process the starless image freely — stretching, sharpening, color work — and then add the stars back. We recombine with the operation that matches the Star image mode the stars were created with.
The quickest route is the Recombine section of the panel: pick the two images, pick the mode, and click Recombine. The equivalent in PixelMath, applied to the processed starless image, with stars being the star image's identifier:
| Star image | PixelMath expression |
|---|---|
| Screen | ~((~$T)*(~stars)) |
| Additive | $T + stars |
| either, approximate | max( $T, stars ) |
Screen and Additive each reproduce the original exactly, provided the star image was created in that mode. Lighten — the last row — keeps whichever image is brighter at each pixel. It never brightens the background, which makes it forgiving when the two images no longer match, but it does not reproduce the original: where star light and background overlap, the fainter of the two is discarded instead of being added.
The star image can be processed on its own before recombining as well — reduced, desaturated or softened — and blended back at less than full strength by scaling it first, for example ~((~$T)*(~(0.8*stars))).