Keywords: morphology, erosion, dilation, opening, closing, median, selection, midpoint, structuring element, reconstruction, halo clamp, star reduction, area opening, attribute filter, h-maxima, h-minima, custom structuring element, smoothing.
Contents
[hide]
- 1 Introduction
- 2 Setup and Installation
- 3 The DeepMorphology Interface
- 3.1 Operation: operator and structuring element
- 3.2 Filtering options
- 3.3 Reconstruction: the halo clamp
- 3.4 Attribute filters
- 3.5 The structuring element editor
- 3.6 Dynamic Live Preview
- 3.7 Registration and licensing
- 4 Using DeepMorphology
- 5 Usage tips and tricks
- Related Tools
1 Introduction
[hide]
DeepMorphology is a sophisticated and versatile morphological transformation process. Its main function is to reshape the structures in an image by comparing each pixel against a small neighborhood defined by a structuring element. It is a modern successor to classic morphology tools like PixInsight's own MorphologicalTransformation, keeping everything they did well and adding the parts that were missing, and then some more.
It offers the full set of rank-order operators (erosion, dilation, opening, closing, median, selection and midpoint) through a selectable structuring element, with interlacing, range thresholds, iterations and an amount blend. On top of that it adds two capabilities that the conventional tools lack:
- Geodesic reconstruction, an optional halo clamp that keeps an erosion, dilation, opening or closing from over or undershooting the local background. It is the classic fix for the dark rings left behind by aggressive star reduction, and with a graduated extent control it becomes a halo-safe star-reduction tool.
- Attribute filters, which work on connected components rather than on a fixed kernel: area opening and closing remove bright or dark regions smaller than a chosen area, and h-maxima / h-minima suppress features by their contrast (dynamic) rather than their size.
A built-in structuring element editor lets us paint a custom element by hand, with multiple ways, shape presets and transforms.
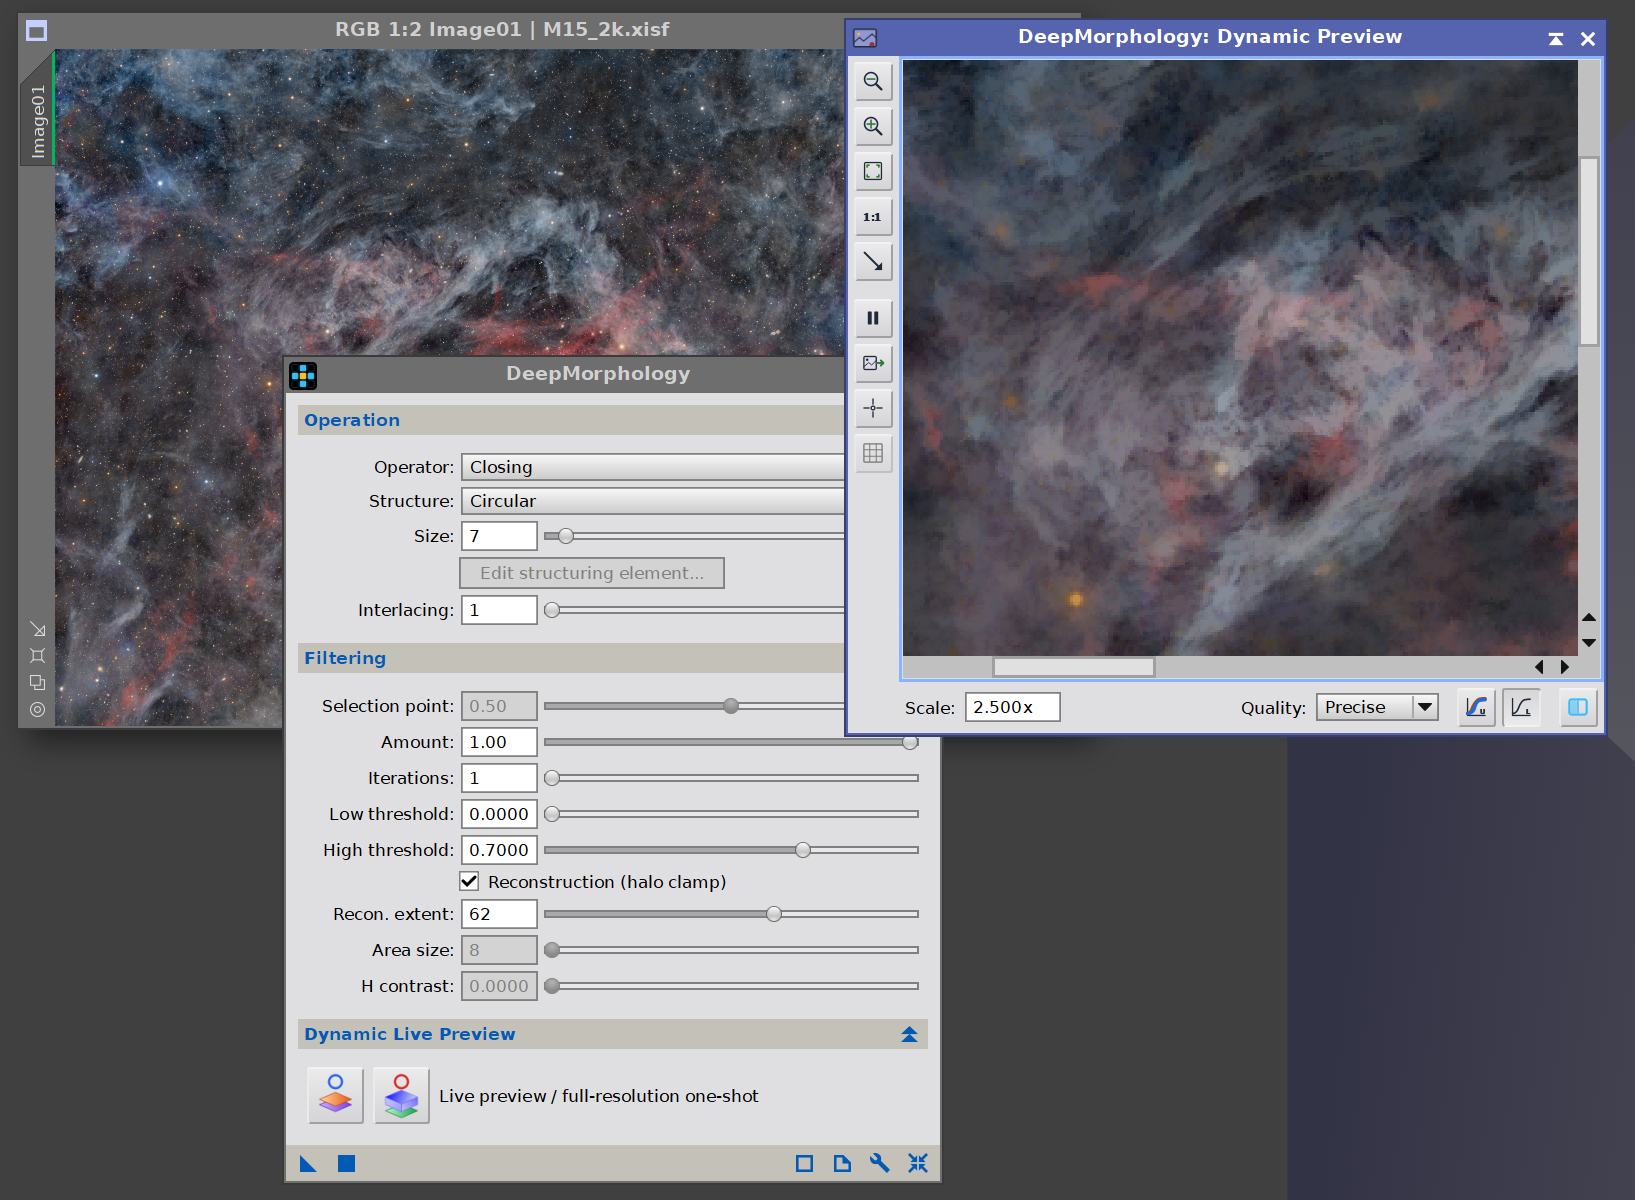
And everything is tuned in real-time through our own Dynamic Live Preview: a dedicated window that shows the transformed image and refreshes live as we move the controls, where we can zoom in/out, pan, and other features that simply do not exist in PixInsight's old RT-Preview window. Morphological transformations can now be examined really up close, in real time. No more guessing. We can even edit the structuring element and see how that affects our image in real time, at up to x32 zoom! This is something impossible with PixInsight's own MT process.
2 Setup and Installation
[hide]
The only official distribution of DeepMorphology is through DSC Hub, our free PixInsight process for installing and updating everything Deep Sky Colors makes. One address covers every one of our processes:
https://repo.deepskycolors.com/
Adding that repository to PixInsight installs DSC Hub, and PixInsight handles that installation itself, with our Developer and Repository certificates verified before it completes. We then open PROCESS > DeepSkyColors > DSCHub, select DeepMorphology in the list, and click Download and install.
DSC Hub checks every download against a catalog that is digitally signed, and refuses anything whose checksum does not match. PixInsight then verifies the module's own signature every time it loads it, so a module altered after we published it is refused.
Keep that repository in the list. DSC Hub tells us at startup when an update for DeepMorphology is waiting, and installs it in a couple of clicks. There is nothing else to add: the older per-module repositories are no longer needed, and DSC Hub offers to clear them away.
If you'd rather bypass DSC Hub and add one repository per process, DeepMorphology still has its own: https://repo.deepskycolors.com/DeepMorphology/ DSC Hub will offer to remove it. Do NOT use these individual repositories and DSC Hub at the same time. We would be asked to install the same modules twice, if we do.
2.1 Launching DeepMorphology
DeepMorphology is a standard PixInsight process: we set its parameters on the process dialog and apply it to a view. To launch it:
- Open the image we want to transform.
- In Process Explorer or via the PROCESS menu, locate DeepMorphology under the DeepSkyColors or Morphology categories.
- The DeepMorphology interface opens.
- Tune the parameters, ideally with the Dynamic Live Preview open, then apply the process to the target view (drag the triangle onto the image, or drag the instance onto the view).
Applying the process replaces the pixels of the target view with the transformed result, so it works in place like the other PixInsight transformations. Save the instance as a process icon to reuse the exact same settings later.
2.2 Licensing
DeepMorphology runs on a trial-then-registered licensing model. During the trial period, the tool is fully functional with no feature restrictions. When the trial expires, DeepMorphology will display a notice at startup and will not open until a valid registration key is entered (see 3.7 Registration and licensing). No internet connection is needed: keys are validated offline.
3 The DeepMorphology Interface
[hide]
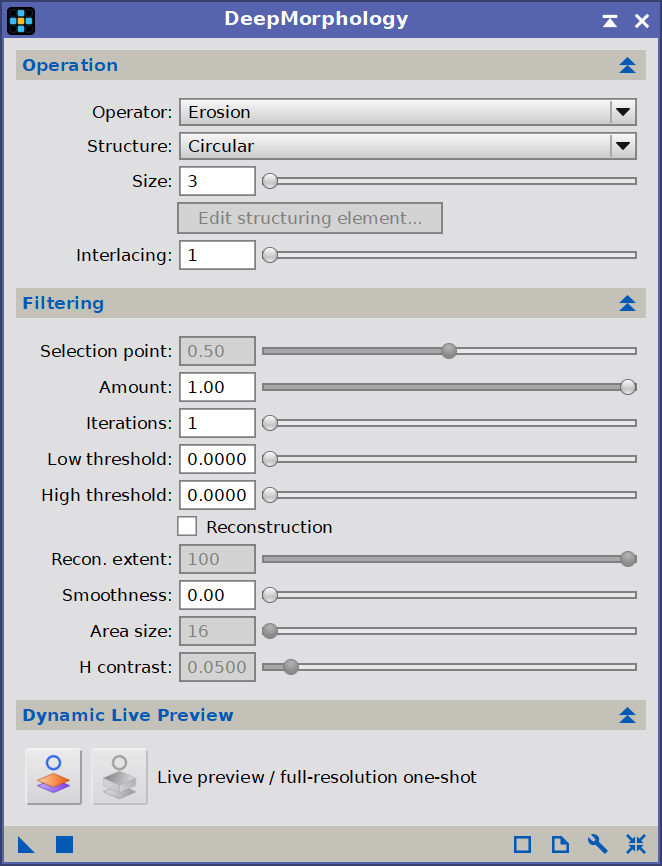
The panel is organized into three collapsible groups: Operation (the operator and its structuring element), Filtering (the modifiers that shape the result), and Dynamic Live Preview (the interactive preview controls). Controls that do not apply to the current operator are disabled automatically, so the panel always shows only what is relevant.
A note on responsiveness. The live preview is debounced: a burst of changes (dragging a slider, painting in the structuring element editor) collapses into a single render once we pause, so tuning stays smooth on large frames.
3.1 Operation: operator and structuring element
The Operator menu selects the operation to apply. The first seven are classical structuring-element operators:
- Erosion: the minimum over the neighborhood. Shrinks bright structures and enlarges dark ones.
- Dilation: the maximum over the neighborhood. Enlarges bright structures and shrinks dark ones.
- Opening: a dilation followed by an erosion (matching PixInsight's standard MorphologicalTransformation convention).
- Closing: an erosion followed by a dilation.
- Median: the median of the neighborhood. A robust smoothing / despeckle operator.
- Selection: a percentile (order-statistic) of the neighborhood, set by the Selection point below: 0 is erosion, 0.5 is median, 1 is dilation, and values in between balance the two.
- Midpoint: the average of the neighborhood minimum and maximum.
The last four (Area opening, Area closing, H-maxima and H-minima) are attribute filters that ignore the structuring element entirely; they are described in section 3.4.
For the structuring-element operators, the Structure menu selects the shape of the element:
- Box: every cell of the square.
- Circular: a disk. Preserves small round structures (such as stars) better than a box.
- Orthogonal: a horizontal and vertical cross.
- Diagonal: the two diagonals.
- Star: the cross and diagonals combined.
- Custom...: a structuring element we paint by hand in the structuring element editor.
Two more controls round out the element:
- Size: the size of the structuring element in pixels. Even values are rounded up to the next odd value. In Custom mode the size is owned by the editor window, so this control is disabled.
- Interlacing: the spacing between structure samples (also called lacing). It enlarges the effective footprint of the element without adding samples, so a small element can reach across a larger area at the same cost.
3.2 Filtering options
The Filtering group holds the modifiers that shape how the operator is applied:
- Selection point: the percentile used by the Selection operator (0 to 1). It is enabled only when the operator is Selection.
- Amount: the opacity of the transformed result blended over the original (0 to 1). A value of 1 is the full effect; lower values mix the result back toward the original, for a partial transformation.
- Iterations: the number of times the operation is applied successively. Each iteration feeds the previous result back in, so an erosion with two iterations erodes twice.
- Low threshold and High threshold: range limits that restrict the change by how far the transformed value differs from the original. A pixel whose result is below the original by less than the low threshold (or above by less than the high threshold) is only partially changed. They let us limit the operation to changes above a certain magnitude.
The Reconstruction checkbox and its extent control sit below these; they are described next. A final Smoothness control (0 to 1, where 0 is off) closes the group. It is an optional polish applied after every other step, softening the hard edges the operator leaves. The smoothing is confined to the parts of the image the operator actually changed, plus a small feather just beyond them, so the untouched background stays sharp and only the affected structures (such as reduced stars) are softened. Its reach grows with this value and the structure size, and it applies to the structuring-element operators.
3.3 Reconstruction: the halo clamp
A plain erosion or opening can pull bright structures (and their glow) down past the surrounding background, leaving a dark ring or moat: the classic artifact of morphological star reduction. Reconstruction is a geodesic post-step that clamps this: it constrains the result to the original image so it cannot over- or undershoot the local background. It applies to the four classical operators (erosion, dilation, opening, closing) and is disabled for the others.
The Recon. extent control, a percentage from 0 to 100, decides how far the reconstruction goes:
- 100 = full reconstruction. This is the textbook behavior: structures smaller than the structuring element are removed entirely, and everything larger is restored to its exact original shape, with no net reduction. It is a clean "remove the small things, perfectly protect the large things" tool: small stars, hot pixels and speckle vanish while large structures are left untouched (and free of any ring).
- Below 100 = partial reconstruction. Instead of restoring the survivors completely, they grow back only part of the way. The net result is a graduated shrink (for erosion / opening) or grow (for dilation / closing) with the dark halo clamped: a halo-safe star reduction. A large structure size sets how much the operator can reduce, and the extent sets how much of it is given back.
- 0 = no reconstruction. The raw eroded or dilated result: maximum reduction, and the dark rings the reconstruction would otherwise clamp.
So 100 is binary despeckle (remove small, perfectly protect large), and values below 100 are the dial for halo-safe star reduction: the lower the extent, the stronger the reduction.
Reconstruction:
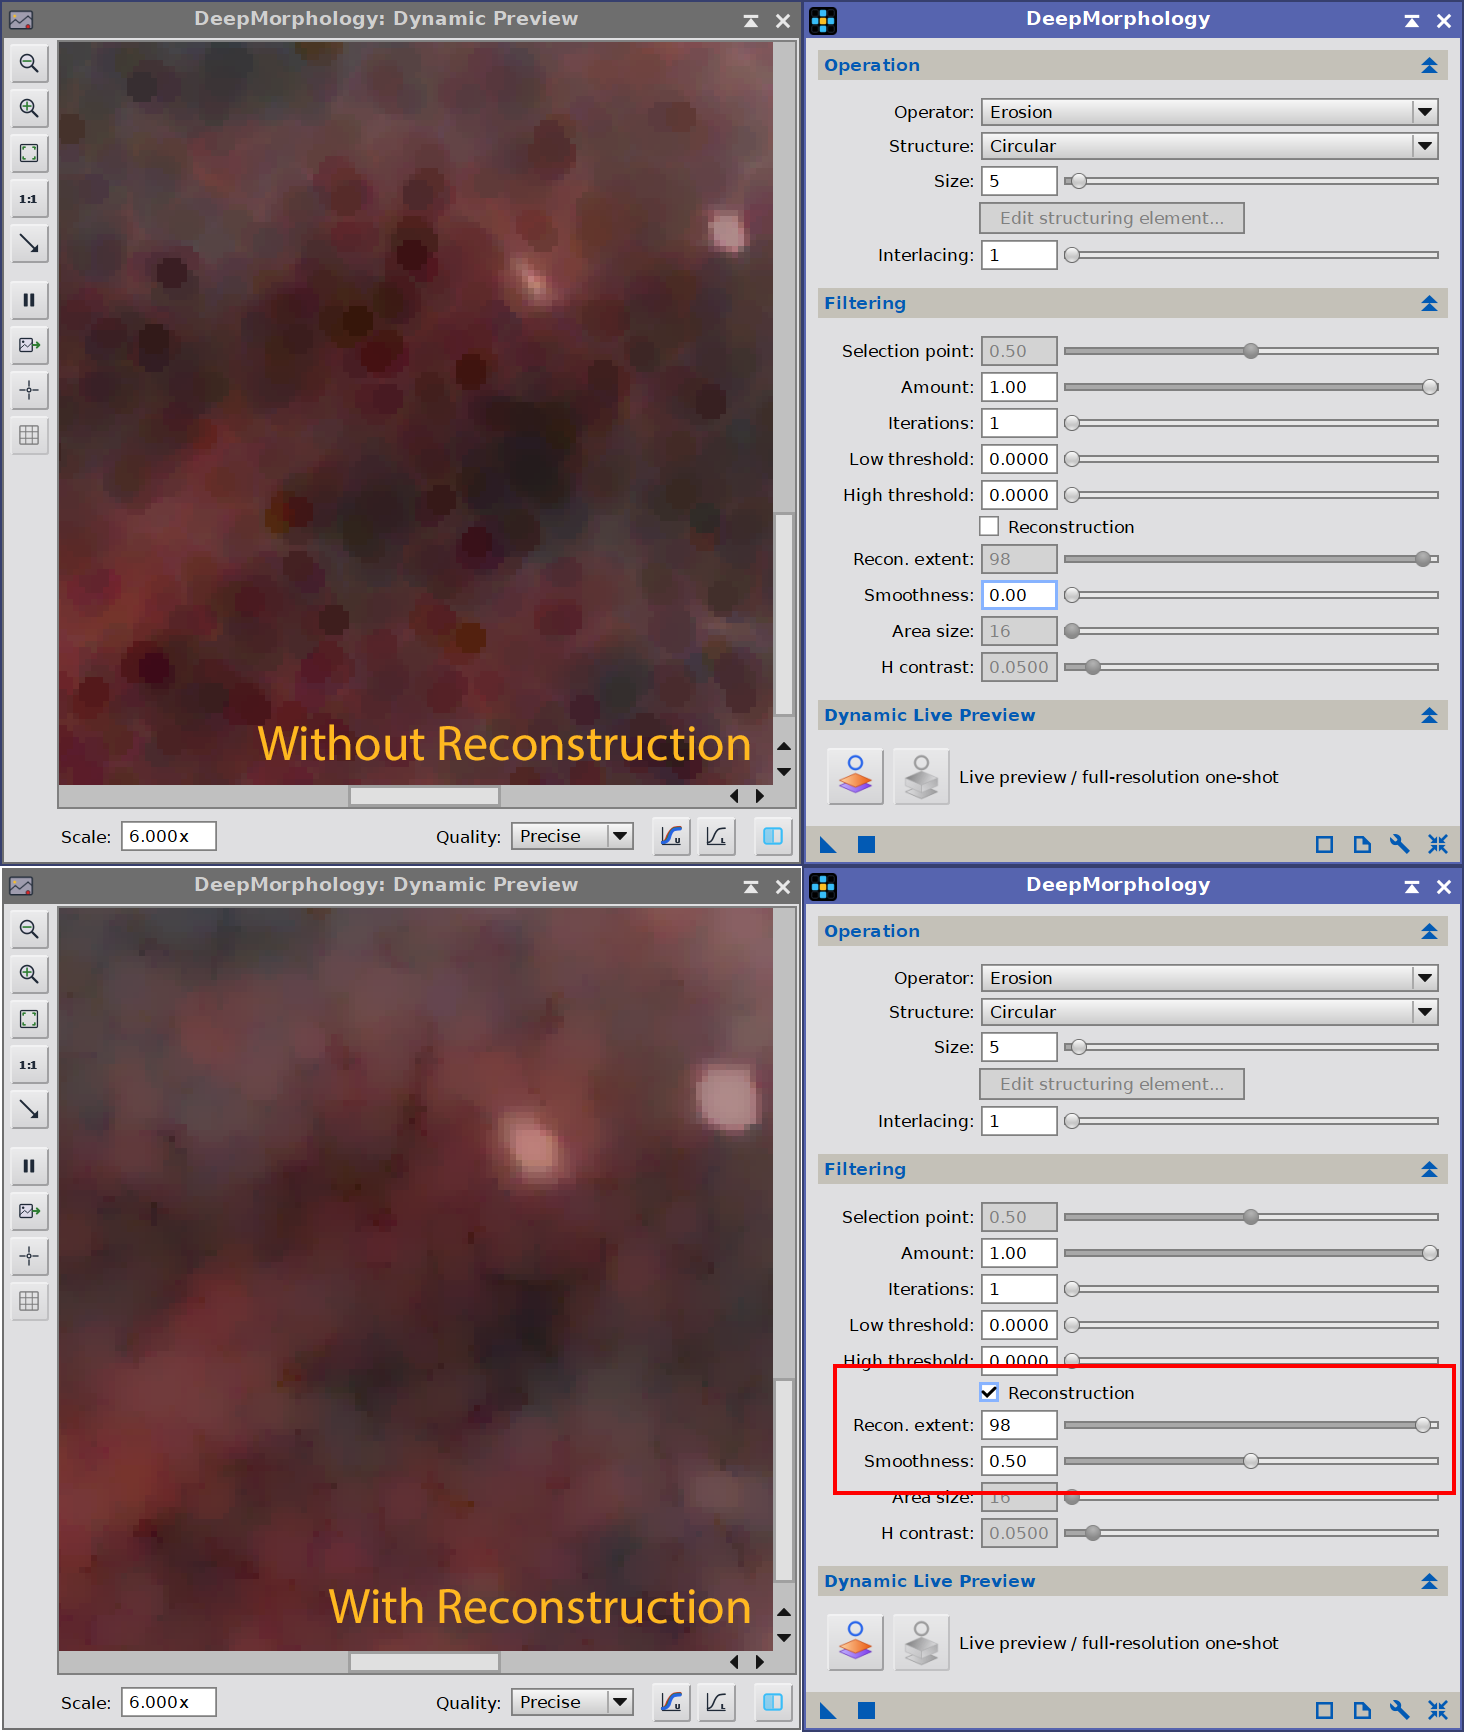
Top: a plain erosion pulls the glow down but leaves a dark patch around the star's location. Bottom: with Reconstruction on, the result is clamped to the original and the patch is gone.
Note that these are unmasked results, so we can see the full extent of the transformation. For good star removal with DeepMorphology, the use of a star mask is highly recommended.
3.4 Attribute filters
The last four operators are attribute filters. They do not use a structuring element at all; instead they act on connected components, removing or suppressing features by an attribute (area, or contrast). Because they ignore the structuring element, the Structure, Size, Interlacing, Iterations and threshold controls are disabled while one of them is selected.
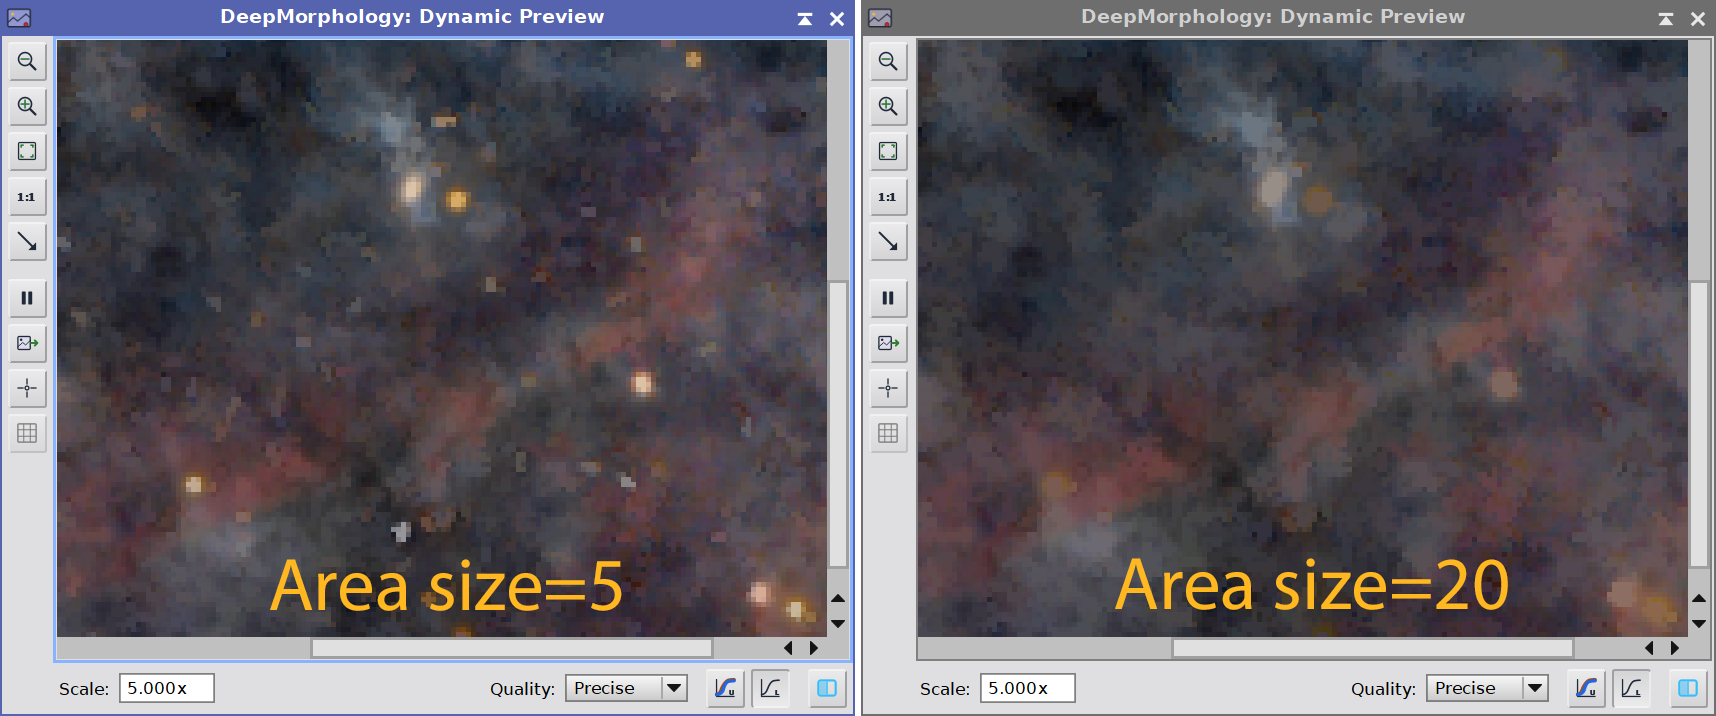
- Area opening and Area closing: remove connected bright (opening) or dark (closing) regions smaller than a chosen area. The Area size control sets the minimum area, in pixels. Area opening is an ideal despeckle: it erases small stars and hot pixels of a given size while leaving larger structures perfectly crisp, with no shape distortion from a kernel.
- H-maxima and H-minima: suppress bright maxima (h-maxima) or dark minima (h-minima) whose contrast, that is their height or depth relative to their surroundings, is below a chosen value. The H contrast control sets that value, normalized to the [0,1] range. Unlike the area filters, these select by how much a feature stands out rather than by how big it is, so they can knock back low-contrast blobs of any size while keeping high-contrast features.
3.5 The structuring element editor
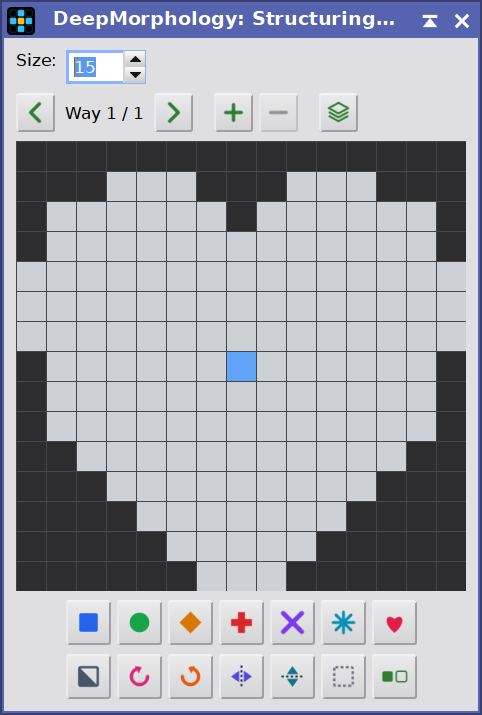
When we select Custom... in the Structure menu, an Edit structuring element... button appears. It opens a dedicated, floating editor window where we paint the element by hand. The window stays open alongside the process panel and updates the live preview as we paint.
The editor is built around a paint grid:
- Painting. Left-click sets a cell and right-click erases it; click-drag paints a stroke. A paint-mode toggle (the last button of the transforms toolbar) changes what the left button does: when it is on, left-click toggles each cell on or off instead of always setting it, while right-click still erases. Filled cells are part of the element; the highlighted center cell is the element's origin.
- Size. A spin box at the top sets the grid size (odd). Changing it re-fits the painted element, keeping it centered.
- Ways. A structuring element can hold several ways, each a separate mask. The operator is applied through every way and the partial results are combined. The top toolbar navigates them: previous / next, add a way, delete the current way (up to eight ways), and a Show all ways toggle that overlays the other ways, dimmed, behind the one we are editing.
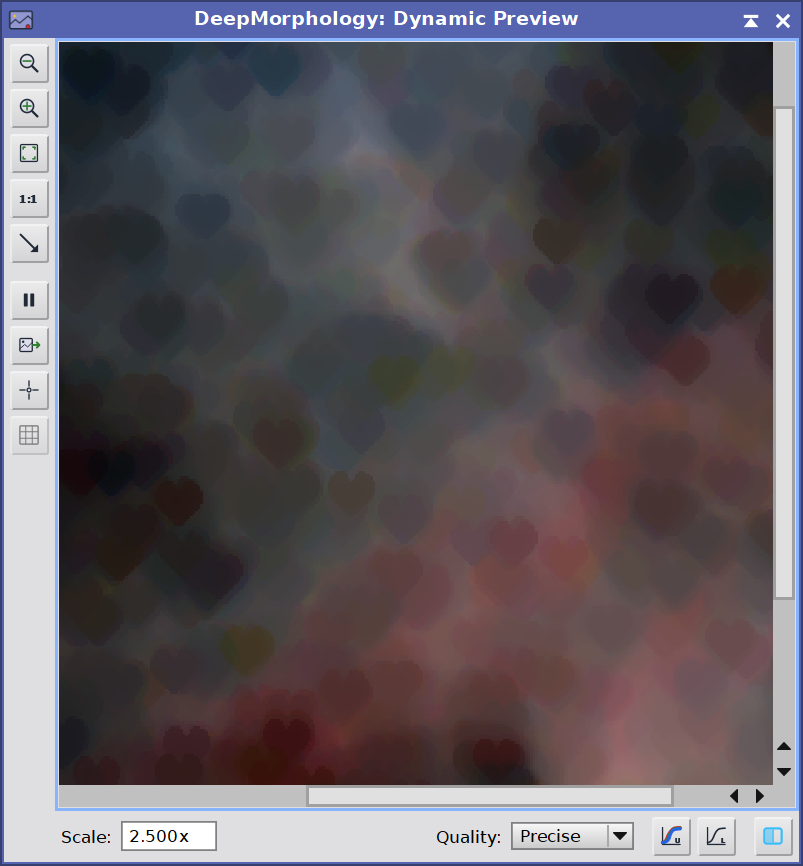
- Presets. The first bottom toolbar seeds the current way with a shape: box, circle, diamond, cross, the diagonals, a star, or a heart. We pick a starting shape, then tweak it by hand.
- Transforms. The second bottom toolbar acts on the current way: invert, rotate 90 degrees clockwise or counter-clockwise, mirror horizontally or vertically, and clear. Its last button is the paint-mode toggle described above, which changes how the grid responds to clicks rather than transforming the way.
Every edit flows straight into the instance and the live preview, so what we paint is what gets applied (for erosion; dilation, by definition, applies the reflected element). There is no separate apply step: closing the window just hides it, and the element is stored with the instance.
3.6 Dynamic Live Preview
Instead of guessing and re-applying, we open a dedicated Dynamic Preview window that shows the transformed image and refreshes live as we move any control. The group has a small two-button toolbar.
Preview button (blue-ring icon): opens or closes the Dynamic Preview window. The window has its own toolbar (zoom in / out / fit / 1:1, an STF auto-stretch so a linear image is not near-black, and panning), and we can zoom in up to 32x. The source image is captured when we open the preview; it can be the main view or a selected preview region.
Show original (a toggle button on the preview window's own toolbar): flip the display between the morphological result and the original source image, to compare before and after at a glance. Turned on it shows the untouched source; turned off it returns to the transformed result. It flips instantly, and the comparison stays in sync as we tune: changing a parameter while the original is shown recomputes the result underneath, ready for when we flip back.
How the speed works. On large frames the live preview computes on a downscaled copy of the image, with the size-dependent parameters (structure size, interlacing, area size) scaled to match, so the preview approximates the full-resolution result while staying fast. On images that already fit within the preview, no downscale is needed and the live preview is full resolution to begin with.
Nuclear Preview button (red-ring icon): a one-shot that renders the preview once at full resolution, exactly as Apply will produce it. It is useful to confirm the exact result, since the live preview is approximate on downscaled images. DeepMorphology enables this button only when it would actually differ from the live preview: when the image is downscaled and the current operation is one the downscale distorts (a small structuring element, an attribute filter, reconstruction, or a custom element). Otherwise the live preview already matches Apply and the button stays disabled.
Because the Dynamic Preview is a genuine image-display engine (not PixInsight's built-in Real-Time Preview), it can zoom and pan freely, which is why DeepMorphology uses it. The same engine is shared across our Deep Sky Colors tools.
3.7 Registration and licensing
The Preferences button (the wrench icon on the process interface bar) opens the DeepMorphology license information dialog. This dialog reports the current license state:
- Licensed: shows the email the module is licensed to.
- Trial: shows the number of trial days remaining.
- Expired: prompts us to register to keep using the tool.
When the module is not yet licensed, the dialog shows a "Click here to register" link. Clicking it opens the registration dialog, where we enter our email and license key. The fields are validated as we type, and the Register button enables only once a valid email/key pair is entered. After a successful registration the info dialog refreshes in place to the "licensed to" state, with no need to reopen it.
4 Using DeepMorphology
[hide]
A few common recipes:
Despeckle / remove small features. Select Area opening and set Area size to just above the size of the specks or small stars to remove. Connected bright regions smaller than that area disappear; everything larger keeps its exact shape. Area closing does the same for small dark holes and gaps.
Remove small stars cleanly. Select Erosion, turn Reconstruction on and leave Recon. extent at 100 (its default). Choose a structure Size a little larger than the stars to remove. Stars smaller than the element vanish; larger stars and structures are restored to their original shape, with no dark rings.
Halo-safe star reduction. Select Erosion, a Circular structure with a moderately large Size (this sets how much the operator can shrink), turn Reconstruction on, and lower Recon. extent from 100 (this sets how much of the shape is given back). Keep Amount at 1 while tuning. A higher extent reduces less; a lower extent reduces more. The dark halo is clamped throughout. For an even smoother result, add a touch of Smoothness to feather the reduced stars.
Knock back low-contrast blobs. Select H-maxima and raise H contrast until the unwanted bright features (regardless of their size) are suppressed while the high-contrast structures remain.
A custom kernel. Set Structure to Custom..., open the editor, seed a preset or paint a shape, and optionally add ways to combine several directional ranks. Apply as usual: the painted element is what gets used.
In every case, open the Dynamic Live Preview first so we can watch the effect as we tune, and use the Nuclear button to confirm the exact full-resolution result before applying.
A finished result:
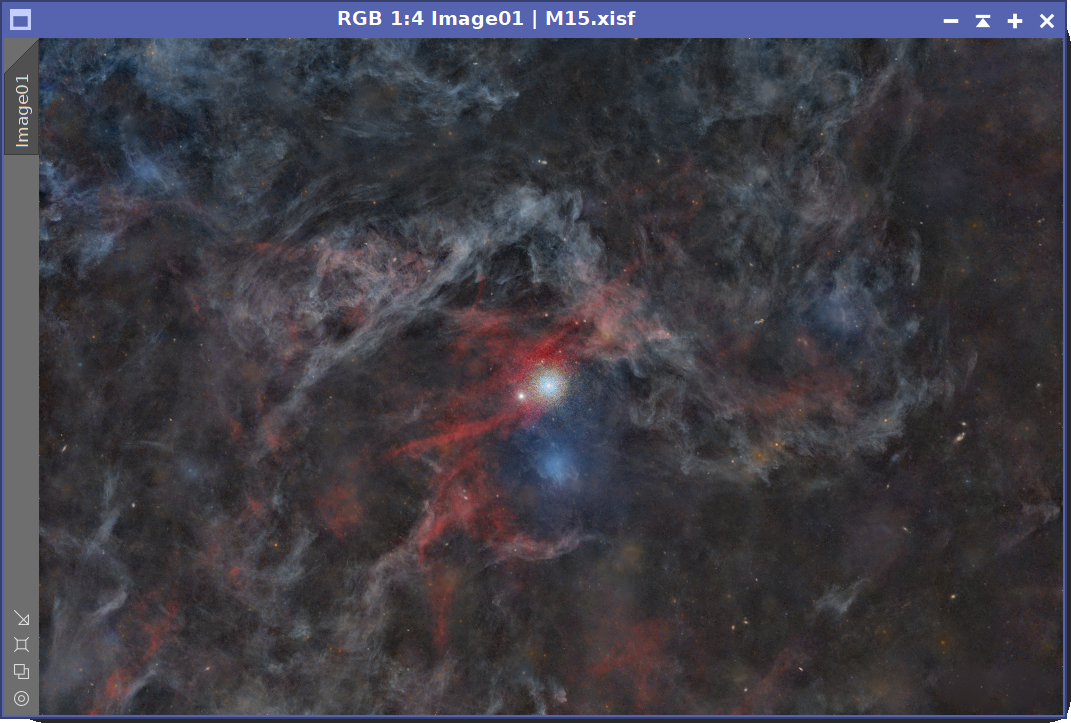
Patch/halo-safe star reduction: a circular erosion with strong Reconstruction shrinks the stars while clamping the dark patches or halos, and preserving small galaxies with a DeepStarMask mask.
5 Usage tips and tricks
[hide]
Opening and Closing match the standard tool. DeepMorphology follows PixInsight's MorphologicalTransformation convention (Opening is a dilation then an erosion, Closing is an erosion then a dilation), so results are consistent when migrating an existing recipe.
Reconstruction is binary at full extent. At Recon. extent 100 (the default), large structures are restored exactly and are not reduced at all: that is the clean despeckle mode. For a graduated reduction, lower the extent below 100.
Area filters do not distort shape. Because they work on connected components rather than a kernel, area opening / closing remove features by size without the rounding or carving a structuring element would introduce. They are often the cleanest choice for despeckle.
Circular preserves stars. When eroding or opening on a starfield, a circular structure keeps round structures truer than a box.
Smoothness feathers only what changed. The final Smoothness control softens the result only where the operator actually altered the image (plus a small feather), leaving the background sharp. A little goes a long way when feathering reduced stars, so raise it gradually.
Keep Amount at 1 while tuning. Lowering Amount blends the result back toward the original, which can mask the difference between settings (and between the live and Nuclear previews). Tune at full strength, then dial Amount down at the end if a partial effect is wanted.
Use Nuclear to confirm. The live preview is approximate on large, downscaled images, especially for small structuring elements and attribute filters. When the Nuclear button is enabled, it shows the exact result; when it is disabled, the live preview already matches Apply.
What you paint is what is applied. A custom element is applied as drawn for erosion. Dilation, by definition, uses the reflected element, so an asymmetric custom shape will appear reflected under dilation: this is correct morphology.
Save as a process icon. The full parameter set, including a custom structuring element, is serialized into the instance, so we can drag it to a process icon and re-apply the same recipe to other frames.
Copyright © 2026 Deep Sky Colors. All Rights Reserved.