
1 Introduction
[hide]
Welcome to DynamicLasso, a PixInsight process module for building grayscale masks by drawing regions directly on an image. Instead of relying on pixel value ranges or star detection, we trace the areas we want by hand — freehand, as a rectangle, an ellipse, a polygon, or by using the magic wand — and DynamicLasso turns those regions into a standard mask image we can apply to any view.
Each region we draw is a discrete, editable step. We can keep adding regions, subtract from what we have, soften the edges with feathering, grow or shrink the selection with contract/expand, and invert the whole result. Because every action is recorded in a history, we can undo and redo freely, and the complete selection is serialized into the process instance, so it can be saved, dragged to a process icon, and re-applied later.
DynamicLasso is especially useful whenever a mask is easier to point at than to describe mathematically: isolating a galaxy or nebula, protecting a foreground, masking stars or a specific structure, or quickly carving out an arbitrary area for local adjustments.
2 Setup and Installation
[hide]
The only official distribution of DynamicLasso is via a PixInsight repository, which will fetch the module directly and safely from our PixInsight repository at:
https://repo.deepskycolors.com/DynamicLasso/
Make sure the trailing / is part of the URL. Also, be sure to keep our repository URL in your list of PixInsight repositories to receive timely updates.
By distributing DynamicLasso only via our PixInsight repository, installation comes with the guarantee of our Developer and Repository certificates, verified by PixInsight itself from the moment it connects to our repository, until it validates and completes installation of the DynamicLasso module.
If we ever want to be sure that we have the latest version available to us, we go to PixInsigh’s RESOURCES menu, select Updates,
then Manage Repositories to make sure our repository is still there, then RESOURCES > Updates > Check for Updates.
2.1 Launching DynamicLasso
DynamicLasso is a dynamic process, so it operates on whichever view we point it at first, and then we work with DynamicLasso to define our mask, rather than adjusting parameters on the process dialog first, and then selecting the target when we're ready to apply the process.
To launch it:
- Open the image we want to work on.
- In Process Explorer or via the PROCESS menu, locate DynamicLasso under either the DeepSkyColors or MaskGeneration categories.
- The DynamicLasso interface opens and PixInsight enters dynamic mode.
- Move the cursor over the target image and begin drawing. The first stroke selects that view as the target.
While in dynamic mode the cursor changes over a valid target view, and the overlay (the regions we draw) is rendered live on top of the image.
2.2 Licensing
DynamicLasso runs on a trial-then-registered licensing model. During the trial period, the tool is fully functional with no feature restrictions. When the trial expires, DynamicLasso will display a notice at startup and will not open until a valid registration key is entered (see 3.8 Registration and licensing). No internet connection is needed: keys are validated offline.
3 The DynamicLasso Interface
[hide]
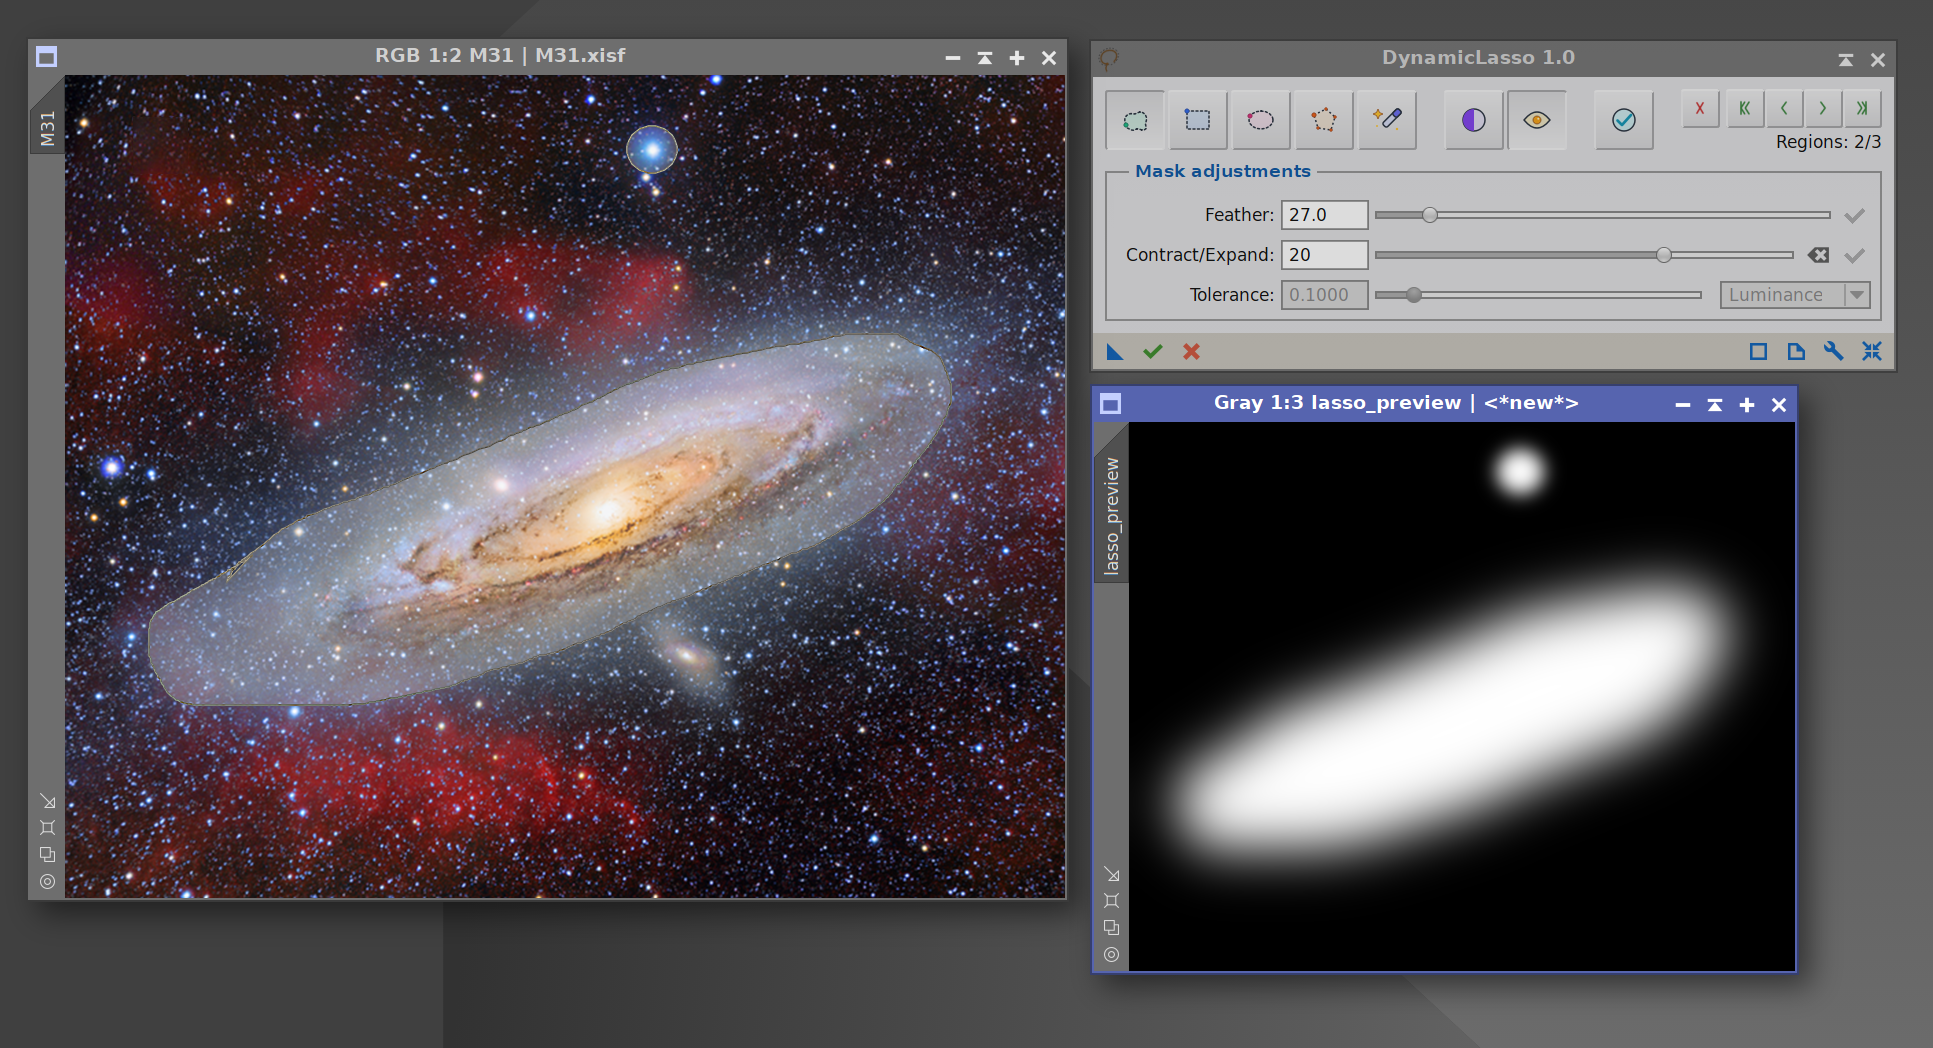
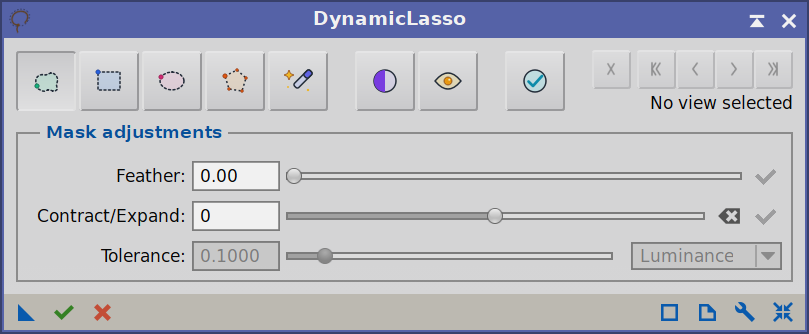
The DynamicLasso panel is organized top to bottom into: a tool toolbar (which also holds the history controls and the region counter at its right end), a Mask adjustments group containing the Feather, Contract/Expand, and Magic Wand (Tolerance) controls, and the classic PixInsight interface bar at the very bottom. The rest of the interaction happens directly on the image, where we draw and see the live overlay.
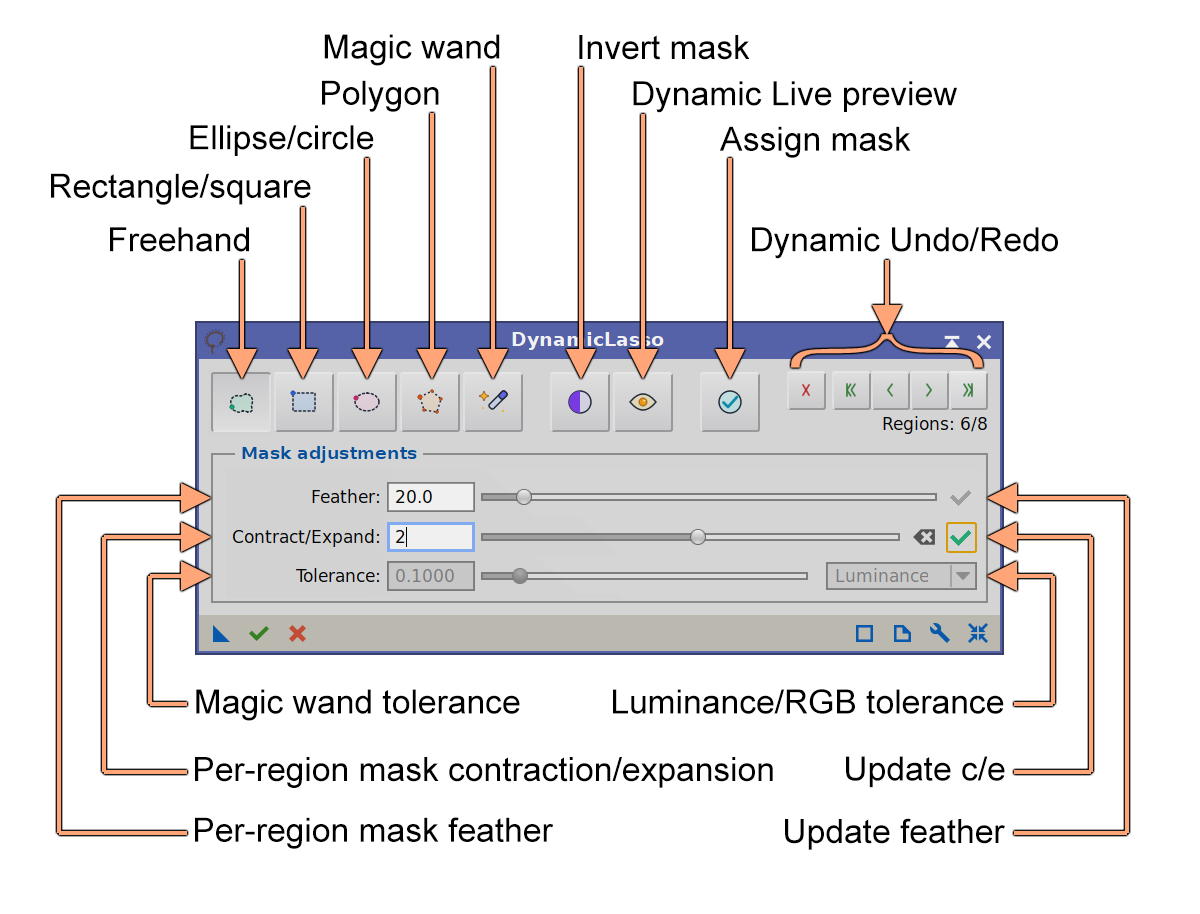
3.1 Toolbar
The toolbar at the top of the panel holds the drawing and mask-operation tools, plus the history controls at its right end.
Drawing-mode buttons (mutually exclusive — we pick one):
- Freehand: Drag to trace an arbitrary lasso shape. Releasing the mouse closes the shape into a region.
- Rectangle: Drag from one corner to the opposite corner. Hold Shift while dragging to constrain it to a square.
- Ellipse: Drag to define a bounding rectangle; the ellipse is inscribed in it. Hold Shift to constrain to a circle.
- Polygon: Click to place straight-edged vertices one at a time; a rubber-band edge follows the cursor between clicks. Close the polygon by clicking on the first vertex, by double-clicking anywhere, or by pressing Enter. Backspace (or Delete) removes the last placed vertex, and Esc abandons the polygon. Whether the polygon adds or subtracts is decided at the first click (hold Alt on that first click to subtract).
- Magic Wand: Click a pixel to select a contiguous area of similar pixels (a flood fill from the click point). How similar a neighbor must be, and whether similarity is judged by luminance or by RGB, is set by the Magic Wand options. The wand is a single click — there is no drag.
Mask-operation buttons:
- Invert: Flips the current mask (selected becomes unselected and vice versa). The overlay updates immediately, and the invert becomes one step in the undo history. Click again to invert back. Regions we draw after an invert add to the displayed result.
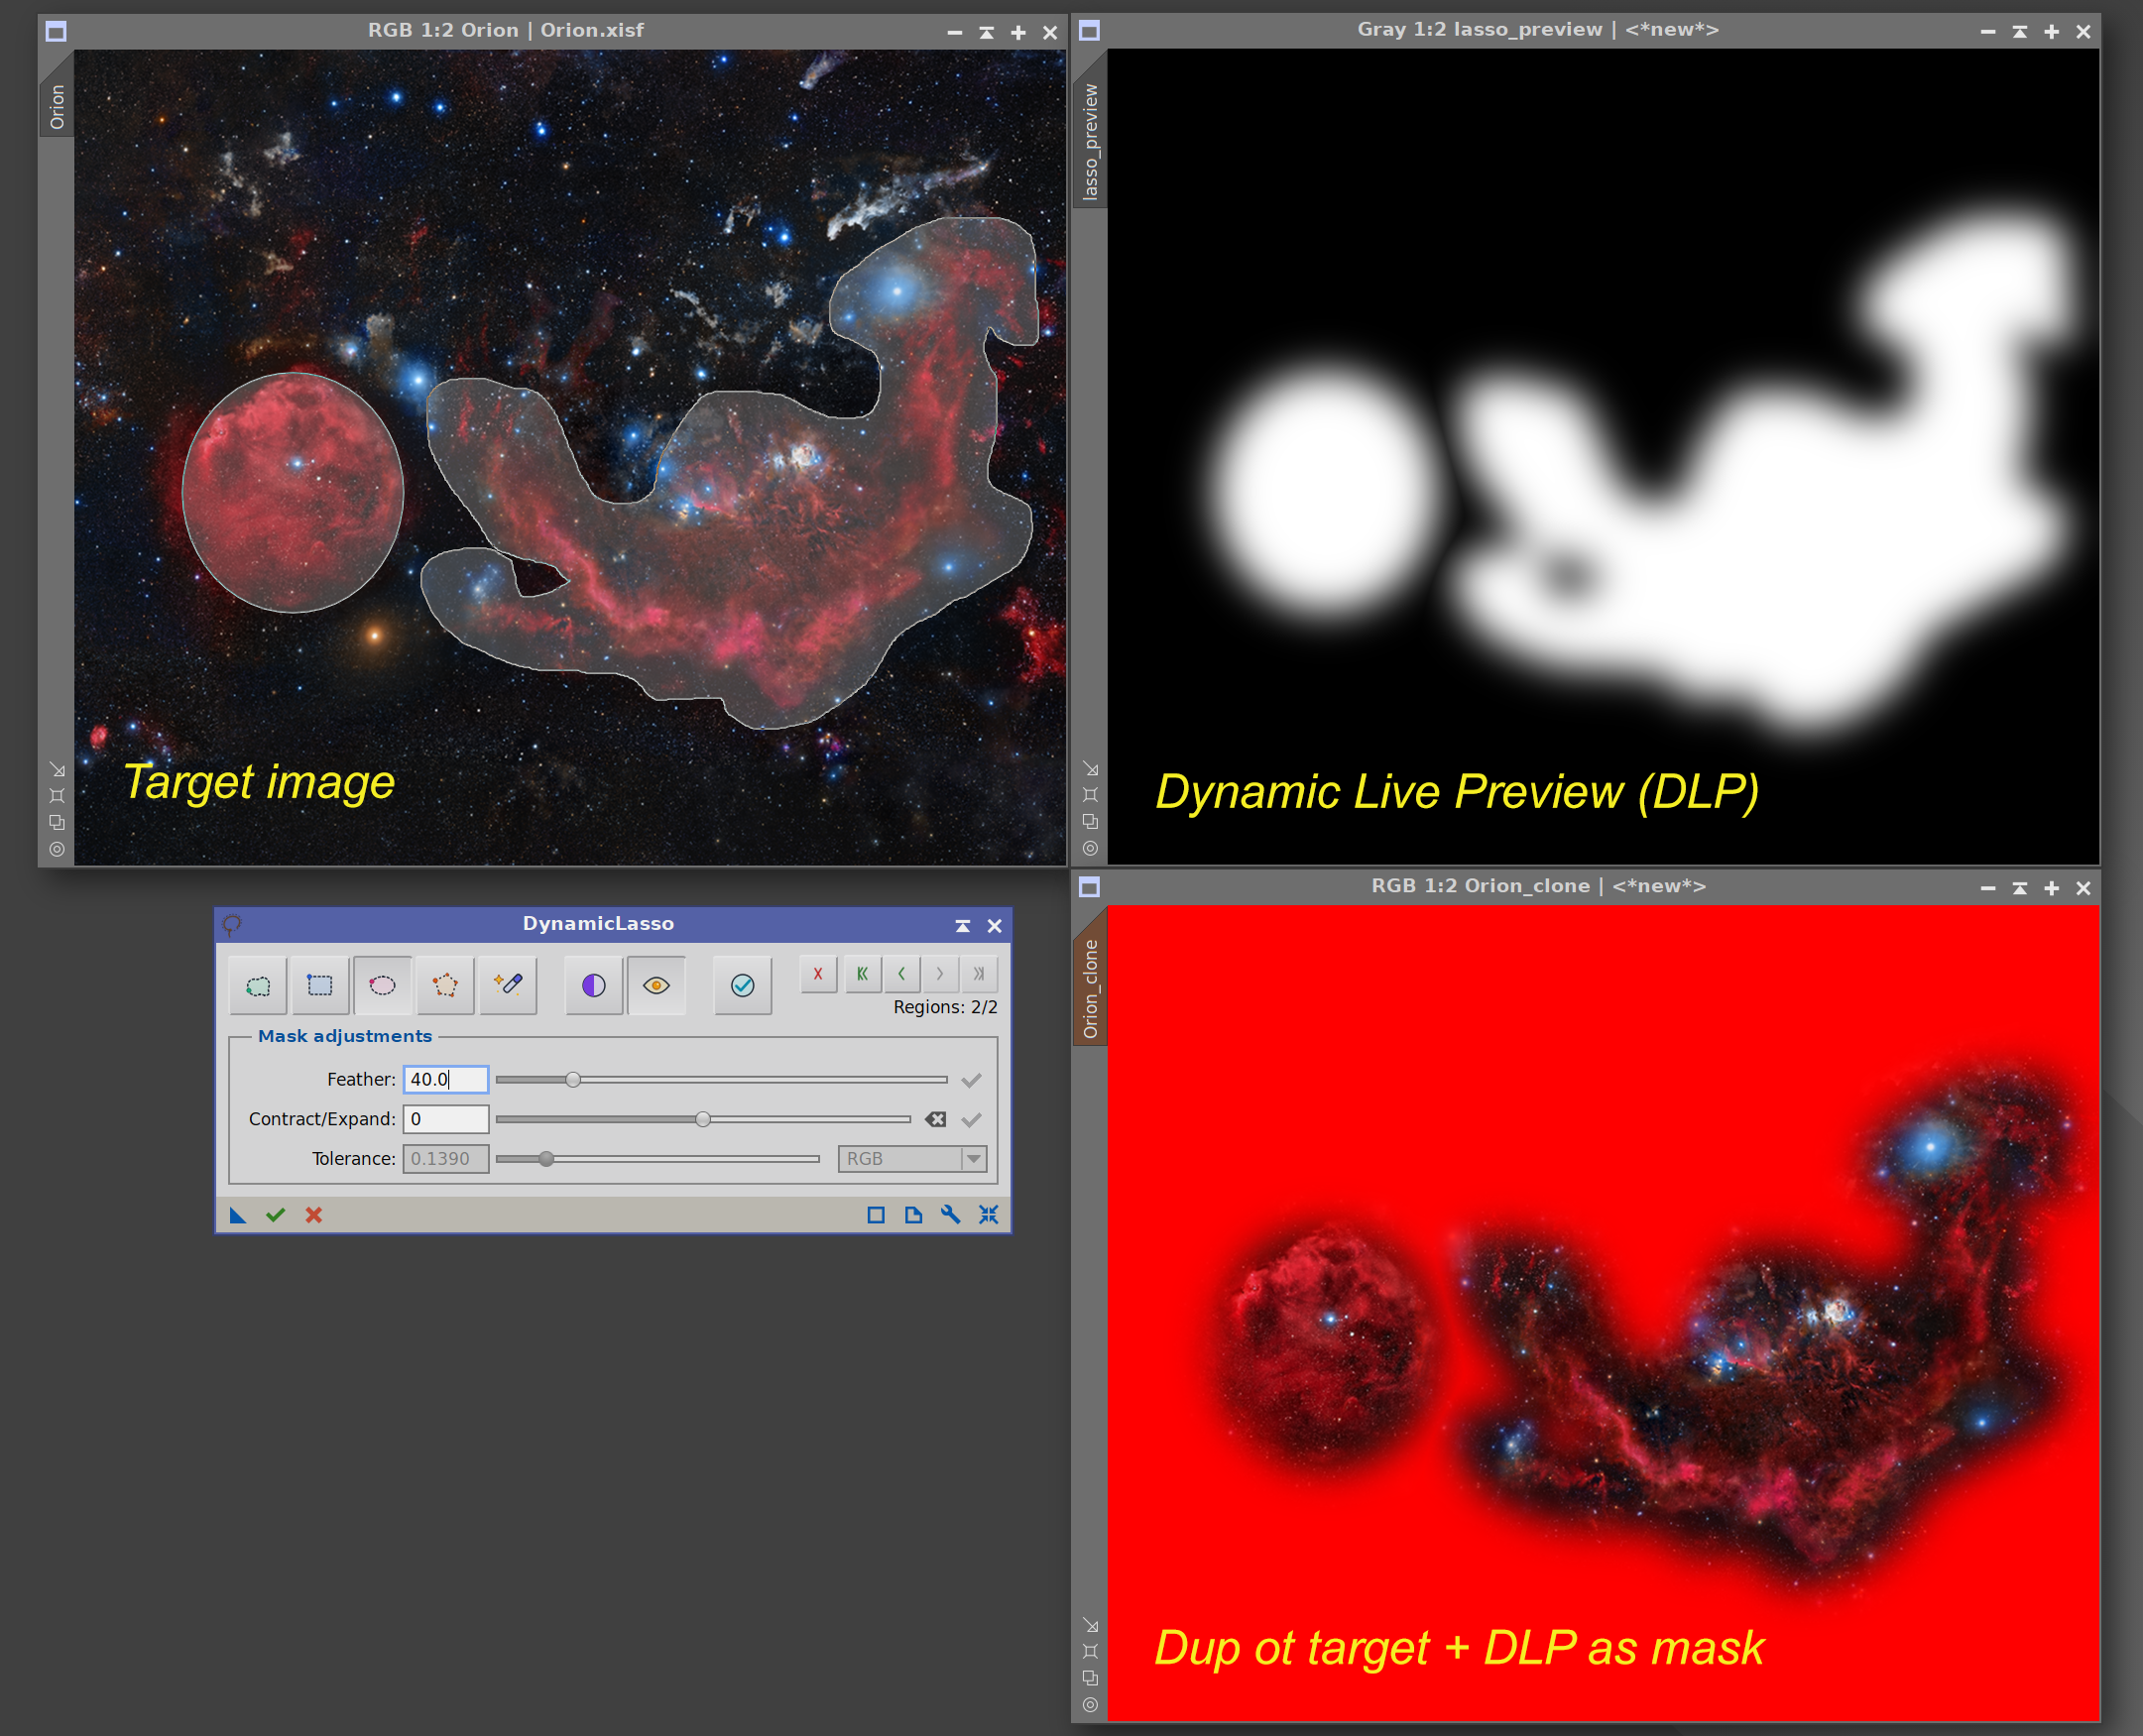
- Dynamic Live preview: (toggle) Opens the Dynamic Preview, a real-time preview window (our own replacement for PixInsight's Real-Time Preview) that refreshes after every stroke, undo/redo, feather, invert, or contract/expand change. It shows the actual rendered mask over the image, with soft (feathered) edges, morphology and invert all included, without having to run Execute, and lets us switch between image, mask and overlay views. (See 3.6 Dynamic Live preview.)
- Apply mask: (toggle) — when enabled, after execution the generated mask is assigned as the mask of the target image and the target window is brought to the front, so we can immediately see and use the mask in context.
And one independent edit toggle, set apart from the drawing and mask-operation buttons:
- Move / Rotate: An edit mode, not a drawing tool. When active, drawing is suspended and a transform box appears on the region we created most recently, letting us drag it to a new position, rotate it by a corner handle, or resize it by a side handle. Every shape modification is quietly added to the history, without increasing the number of regions, so these can also be navigated via the Undo/Redo history buttons. See Moving, rotating and resizing regions.

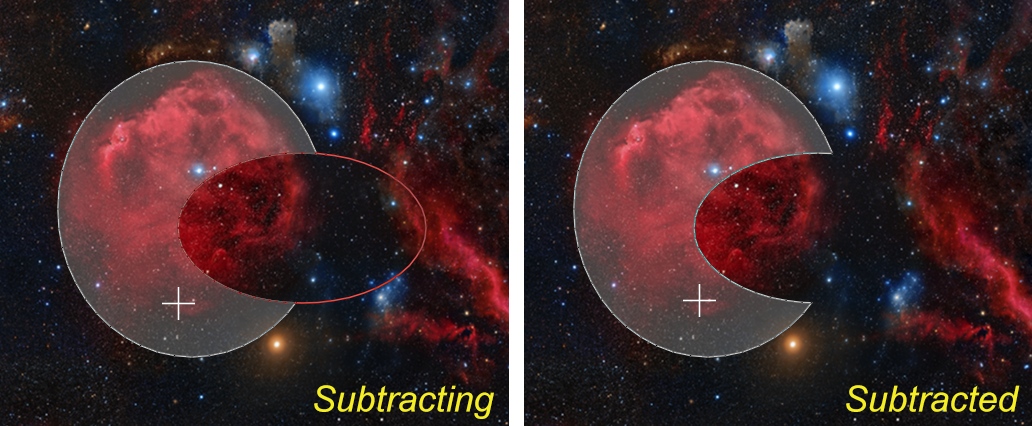
Note on Add vs. Subtract. By default each new region is added to the mask. To subtract a region instead (cut a bite out of the existing mask wherever it overlaps), we hold Alt while drawing. The subtract applies globally to the accumulated mask, not just to the most recent region.
3.2 Feather
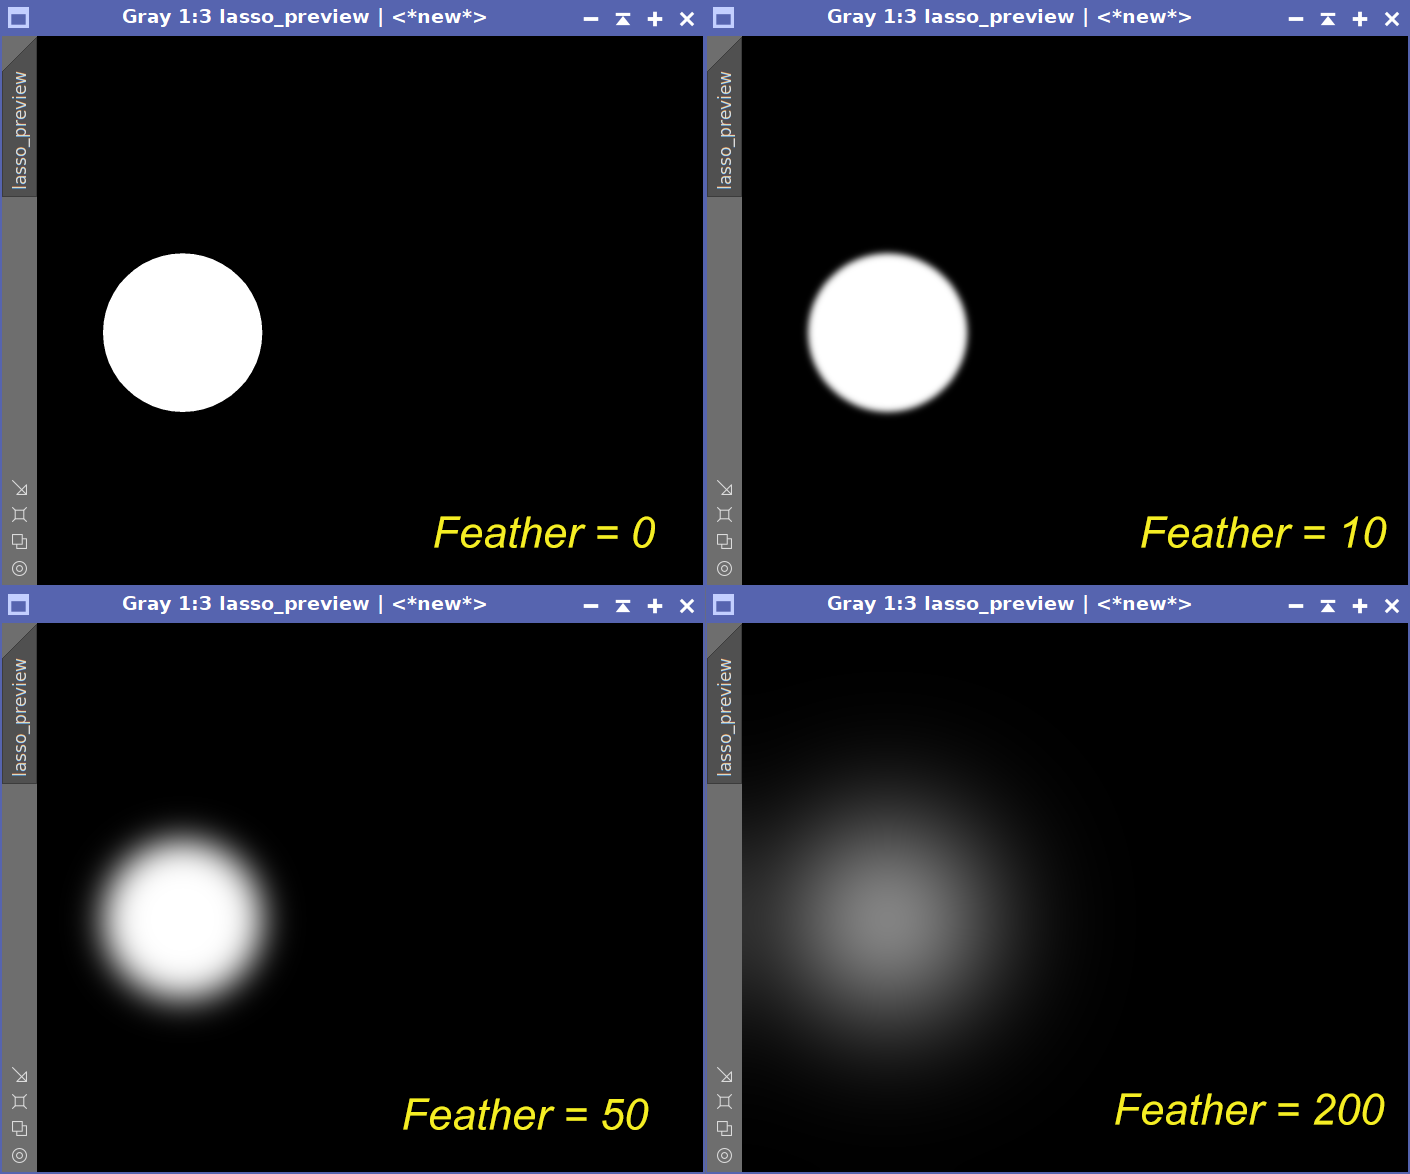
The Feather control sets a soft-edge radius (a Gaussian sigma, in pixels) that is applied to new regions as we create them. A feather of 0 produces a hard-edged mask; larger values produce progressively softer transitions at the region borders.
Feathering is stored per region: each region remembers the feather value it was drawn with, so regions with different softness can coexist in the same mask. As we move through the history (see History bar), the slider updates to show the feather of the current region, so we always see the value that region was drawn with.
To change the feather of a region we have already drawn, we navigate the history to that region, set the slider to the new value, and click the small Apply (checkmark) button at the end of the Feather row. The button lights up whenever the slider differs from the current region's stored value, signalling a pending change; clicking it re-feathers that region in place. This is not a separate history step. Undoing the region removes the feather change along with it. (Invert steps carry no feather, so the Apply button is unavailable on them.) When we import an existing instance, the slider snaps to the feather value of the most recently added region.
3.3 Contract / Expand
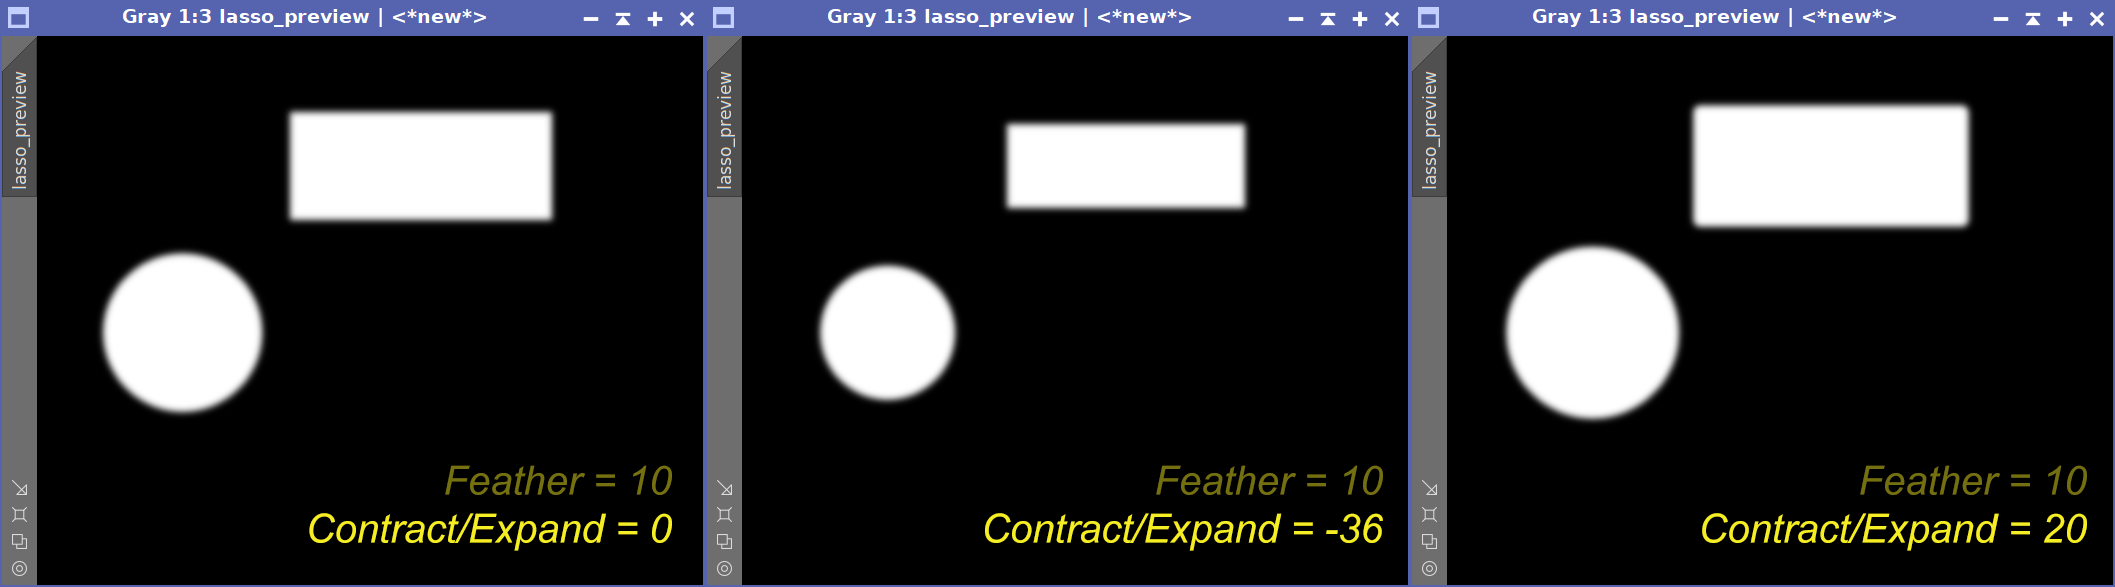
The Contract/Expand control resizes a region by a number of pixels before feathering is applied:
- Negative values contract (erode) the selection, pulling the edges inward.
- Positive values expand (dilate) the selection, pushing the edges outward.
- Zero leaves the geometry unchanged.
Just like Feather, Contract/Expand is stored per region and works the same way: the value applies to new regions as we draw them, the slider tracks the current region as we travel the history, and an Apply (checkmark) button at the end of the row commits a new value to a region we have already drawn (it lights up while a change is pending). The reset button next to it returns the displayed amount to 0. Handy as a quick way to clear the value before drawing the next region, or before Applying 0 to the current one. This is ideal for tightening a selection just inside an object’s boundary, or growing it to safely cover a structure plus a margin.
3.4 Magic Wand options
These two controls govern the Magic Wand tool and are active only while the wand is the selected drawing mode:
- Tolerance: (0–1) How different from the clicked pixel a neighboring pixel may be and still join the selection. A low tolerance selects only pixels very close to the seed; raising it grows the selection to span a wider range of tones or colors.
- Metric: How similarity is measured. Luminance compares brightness; RGB compares the individual color channels (the largest per-channel difference must stay within tolerance), which is more selective about color.
The wand grows a contiguous area. It spreads outward from the click point through connected matching pixels and stops at borders that exceed the tolerance, so it does not select matching pixels elsewhere in the image. Each wand selection is recorded as an ordinary region, so it participates in Add/Subtract, Feather, Contract/Expand, Invert, and the history exactly like a drawn shape.
3.5 History bar
The History buttons —
We can jump to any state in our history, then edit its feather and contract/expand settings, or delete the entire region from the sequence, leaving all other actions untouched.
The right end of the toolbar holds a set of history controls with a region counter beneath them. Every action — each added region, each subtract, and each invert — is one step we can move through:
- Delete: Remove the current/last step.
- Undo All: Jump back to the empty state.
- Undo: Step back one action.
- Redo: Step forward one action.
- Redo All: Jump forward to the most recent action.
The information label reports the current state (for example, the number of regions). Keyboard shortcuts work while the cursor is over the image (dynamic mode):
-
Ctrl+Z Undo Ctrl+Shift+Z Undo All Ctrl+Y Redo Ctrl+Shift+Y Redo All Delete Delete
3.6 Dynamic Live preview
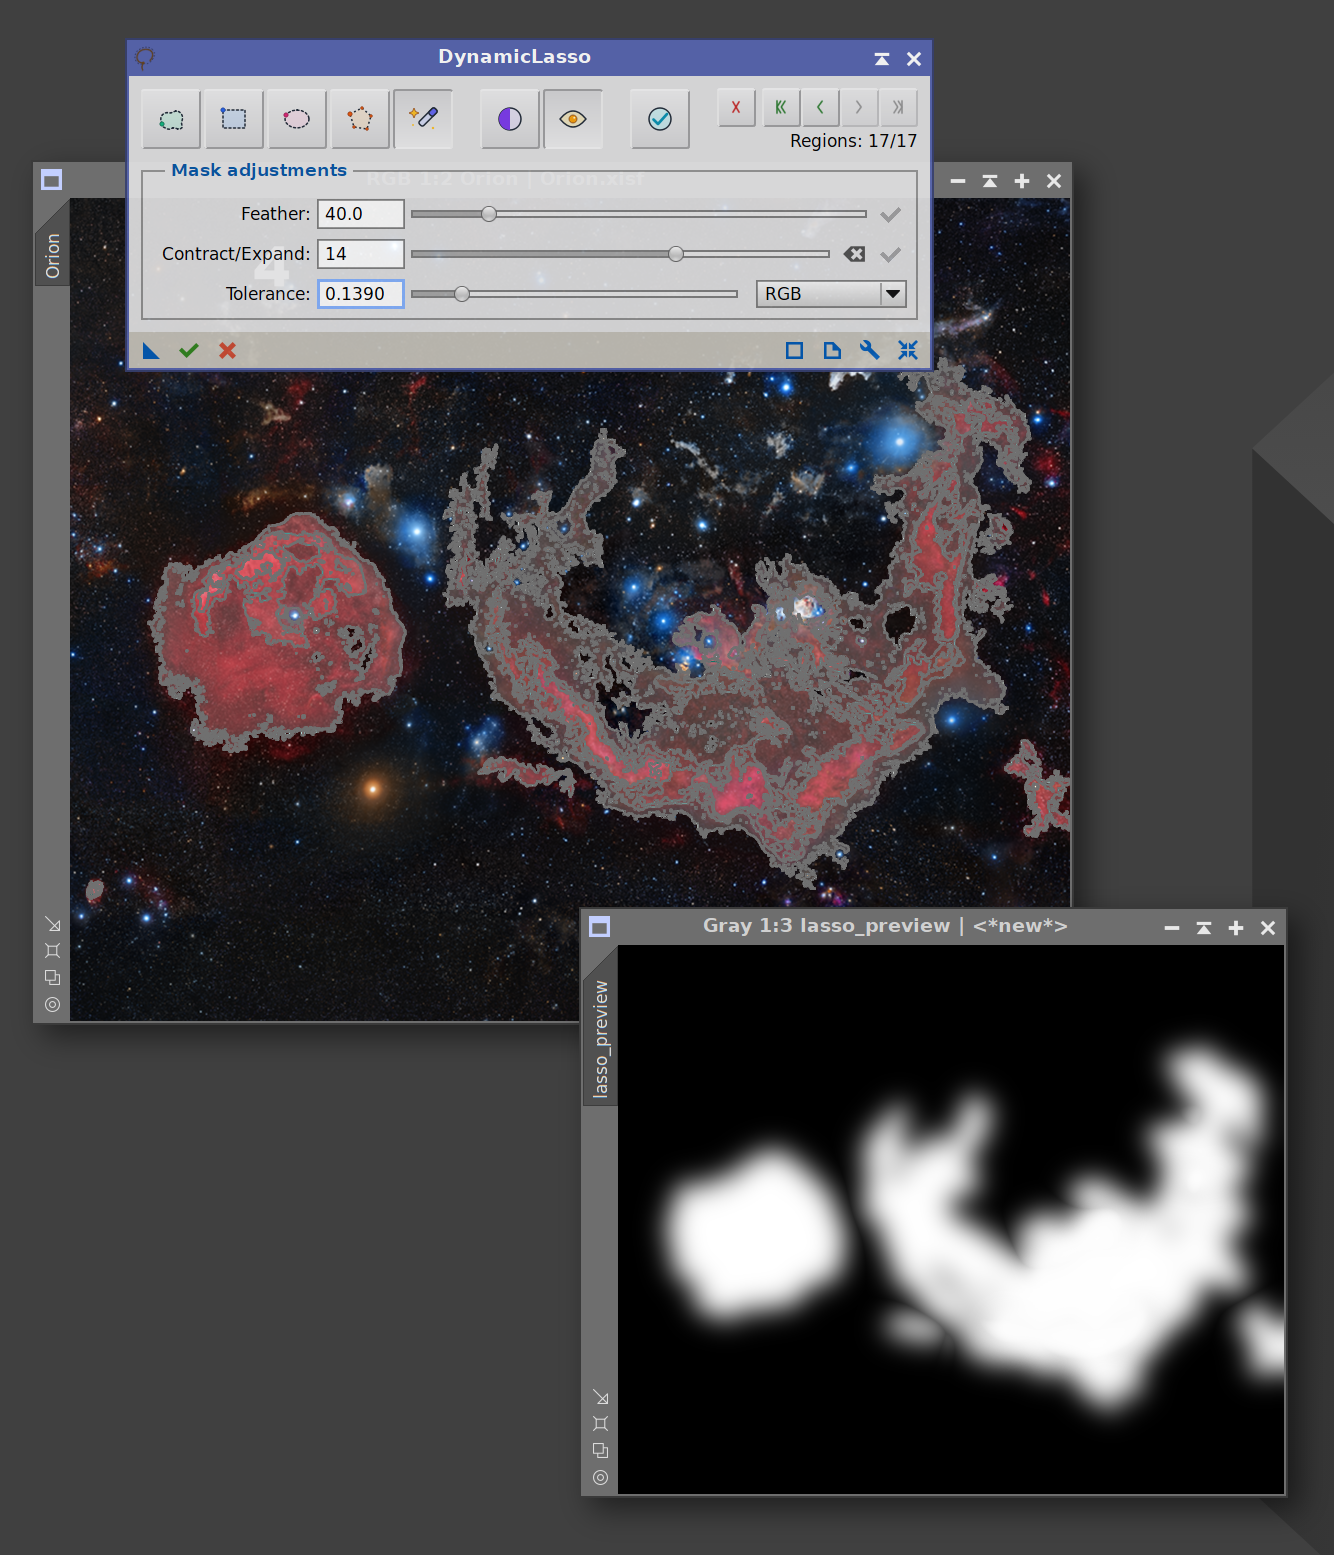
The toolbar's Dynamic Live Preview (DLP) button opens the Dynamic Preview, a real-time preview window shared across all Deep Sky Colors modules. It is our own live-preview engine replacement for PixInsight's built-in Real-Time Preview, rebuilt from the ground up to be far more capable. Where the native RTP is a single fixed panel that can only show one rendition of the result, the Dynamic Preview is a true, freely resizable window that can show the image, the mask, or the mask laid over the image, and adds its own zoom, pan, pixel readout, screen-stretch toggle, a pixel grid, render-quality control and one-click extraction to a new image. Everything updates live as we work.
For DynamicLasso, the Dynamic Preview shows the target image together with the mask we are building, refreshed after every stroke, undo/redo, invert, feather or contract/expand change. It renders the actual final mask, with feathered edges, contract/expand morphology and inversion all included, so it is exact, not the fast visual approximation drawn as the on-image overlay. It opens in Overlay mode by default, the image with the masked-out areas tinted red, so we immediately see how the mask will protect the image.
The Dynamic Preview window —
The Dynamic Preview can show in real time the mask being created (top left), the mask being applied (top right), and more. We can also zoom in/out with great precission, activate a pixel grid, and pan around the image. The buttons left to the Quality setting let us switch what is shown and how, all updating live as we refine the selection.
Three buttons choose what the preview shows (one active at a time):
- Image only: the target image by itself, with no mask.
- Mask only: the mask alone, as a grayscale image.
- Overlay: the image with the masked-out (unselected) pixels tinted red, the way a mask protects an image in PixInsight. This is the default.
If we select one mode, then another, and at that point we continue clicking on button for the selected mode, that will flip between the current view mode and the previous mode we selected: much more useful than having to click a different button every time when we want quick back-and-forth view flips.
Beside them, an independent Invert toggle shows the mask inverted in the preview only. It flips what the preview displays (and which pixels the red overlay covers) without touching the actual selection, which is handy for checking the complementary region without adding a real Invert step to the mask.
The rest of the toolbar is what we expect from a capable viewer:
- Zoom: buttons to zoom out, zoom in, fit to window, and 1:1, plus a Scale field to type an exact zoom. Pan with the middle mouse button, the scrollbars, or the arrow keys. We can also zoom in and out by using the mouse wheel or the + and - keys.
- Linked STF: toggles a screen global auto-stretch on the preview, so linear data is viewable. It opens matching the target view's current stretch state.
- Unlinked STF: same as Linked STF but doing a per-channel auto-stretch on the preview. We choose the STF mode by clickign on one button or the other. When clicking on the button that is currently active, STF is switched off.
- Pause: freezes updates so the preview stops recomputing until we resume, useful during a long burst of edits.
- Readout: switches left-click from panning to reading the pixel value under the cursor, shown in the status bar with a color swatch.
- Grid: overlays a pixel grid at high zoom.
- Extract: creates a new image window from the current preview, when we want to keep a snapshot of it.
- Quality: Smooth (bilinear) for natural viewing, or Precise for crisp pixel boundaries when zoomed in.
The Dynamic Preview is a normal floating window: we resize it, move it, and leave it open wherever it is convenient while we keep working on the image. Click the DLP button again, or close the window, to dismiss it; clicking once more brings it back where we left it.
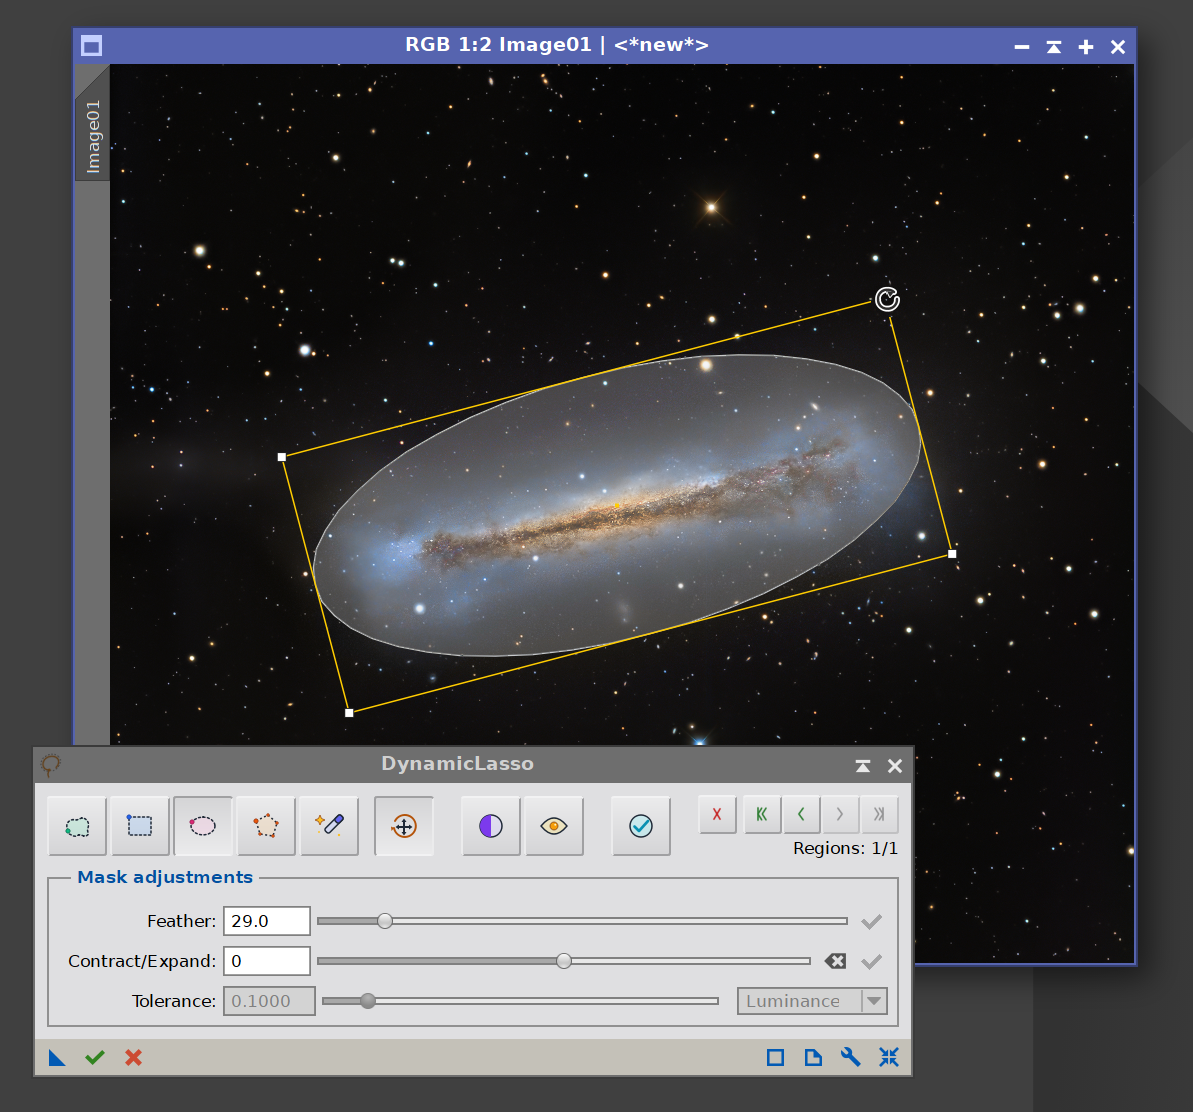
3.7 Moving, rotating and resizing regions
The Move / Rotate button on the toolbar (to the right of the Magic Wand) is an edit toggle rather than a drawing tool. While it is active, drawing is suspended and an oriented bounding box with handles is shown around the current region (the most recent one in the history).
- Move: Drag anywhere inside the box to slide the region to a new position.
- Rotate: Drag one of the four corner handles to turn the region about its centre. The box stays glued to the region, so it keeps hugging it at any angle.
- Resize: Drag one of the four mid-side handles to stretch or shrink the region along that one axis, with the opposite edge held in place. This works at any rotation: a handle pulls along the box's own (tilted) edge, not the screen axes.
The cursor shows what a drag will do: a four-way arrow over the body (move), a rotate cursor over a corner, and a double-headed arrow over a side handle (resize). To transform an earlier region, step back through the history until it becomes the current region, then grab its box. Both added and subtracted regions can be moved and rotated; Invert steps (which carry no geometry) and Magic-Wand fills (whose shape is tied to the image pixels they were grown from) cannot, so the gizmo is not shown for them.
A move, rotation or resize is applied to the current region in place: it is part of that region rather than a separate history step, and it is saved with the instance, so a repositioned, rotated or resized region survives Execute, save-to-icon and reload. Navigating the history (undo / redo / delete, by button or keyboard) automatically leaves Move/Rotate mode.
3.8 Registration and licensing
The Preferences button (the wrench icon on the process interface bar) opens the DynamicLasso license information dialog. This dialog reports the current license state:
- Licensed: Shows the email the module is licensed to.
- Trial: Shows the number of trial days remaining.
- Expired: Prompts us to register to keep using the tool.
When the module is not yet licensed, the dialog shows a “Click here to register” link. Clicking it opens the registration dialog, where we enter our email and license key. The fields are validated as we type, and the Register button enables only once a valid email/key pair is entered. After a successful registration the info dialog refreshes in place to the “licensed to” state, no need to reopen it.
4 Creating masks with DynamicLasso
[hide]
A typical mask-building workflow:
Launch DynamicLasso and move the cursor over the target image. The first stroke locks that view as the target.
Choose a drawing mode (Freehand, Rectangle, Ellipse, Polygon, or Magic Wand) from the toolbar. For the Magic Wand, set the Tolerance and metric first (see Magic Wand options).
Set a Feather value if we want soft edges. (We can change feather between regions; each region keeps its own value.)
Draw our first region. It is added to the mask and appears in the overlay.
Add more regions as needed. Hold Alt while drawing to subtract a region (cut a hole) instead of adding. (In Polygon mode, hold Alt on the first click; in Magic Wand mode, hold Alt as you click.)
Use Contract/Expand to tighten or grow the selection, and Invert to flip it if we want to mask everything except what we drew.
Reposition, rotate or resize any region with the Move / Rotate toggle (see Moving, rotating and resizing regions): drag the box to move it, a corner to rotate it, a side handle to resize it.
Turn on Dynamic Live preview at any point to open the Dynamic Preview and see the exact rendered mask over the image (Overlay), the mask on its own, or the image alone, including soft edges and morphology.
Use the history controls (or Ctrl+Z / Ctrl+Y) to step back and forth as we refine the selection.
When satisfied, Execute the process (apply it to the view). DynamicLasso generates a grayscale mask image. If Apply mask is enabled, the mask is assigned to the target image and the target window is brought to front; otherwise the mask is produced as its own image window for us to use as we like.
How the mask is built (overview). Regions are processed in the order they were drawn. Added regions are filled and unioned into the mask; subtracted regions remove their overlap from the accumulated mask globally; invert steps complement the whole mask. Both feathering (a Gaussian blur of the region’s coverage) and contract/expand (which resizes coverage before that blur) are applied per region, using the value each region was drawn with. The result is a standard single-channel grayscale image suitable for use anywhere PixInsight accepts a mask.
5 Usage tips and tricks
[hide]
Keep the Dynamic Preview on while fine-tuning feather and contract/expand: the on-image overlay is an approximation, but the Dynamic Preview shows the true rendered edges.
Use Overlay mode to judge the protection, Mask only to inspect the mask itself. Overlay (the default) tints the masked-out pixels red right over the image, so we see exactly what the mask will guard; the Invert toggle previews the complementary region without changing the selection.
Build complex selections incrementally. Many small added regions plus a few Alt-drag subtracts are often faster and more controllable than one perfect freehand trace.
Use Rectangle/Ellipse with Shift for clean squares and circles when masking regular structures or framing.
Reach for the Polygon tool for straight edges. When a boundary is better described by a few straight segments than by a shaky freehand trace, click the corners. And remember that Backspace can undo the last vertex before closing.
Let the Magic Wand do the tracing when a region is defined by tone or color (a bright core, a uniform background). Start with a low Tolerance and raise it until the selection just covers what we want; switch the metric to RGB when color, not brightness, separates the area from its surroundings.
Set Feather and Contract/Expand before drawing each region. Because these attributes are stored per region, we can mix crisp and soft regions in one mask, e.g., a hard core plus a soft halo.
Reach for Contract/Expand instead of redrawing. If a freehand trace is close but slightly too tight or too loose, we nudge the whole selection in or out with one control.
Move, rotate or resize instead of redrawing. If a region is in the right shape but the wrong place, angle or size, turn on Move / Rotate and drag its box (move), a corner (rotate), or a side handle (resize). No need to trace it again. Step back in the history first to grab an earlier region.
Fix a region's feather or contract/expand after the fact. We don't have to get softness or size right the first time. Step back through the history to the region, change the slider, and click its Apply (checkmark) button. The slider always shows the current region's own values as we travel the history.
Invert is reversible and free. Draw the easier shape (often the object) and invert when we actually want to protect it. Click Invert again to flip back.
Use the keyboard while drawing: Ctrl+Z / Ctrl+Y (and the Shift variants for all-the-way) let us experiment without leaving the image.
Save our work as a process icon. Because the full set of regions and actions is serialized into the instance, we can drag the instance to a process icon and re-apply or tweak the exact same selection later.