1 Introduction
[hide]
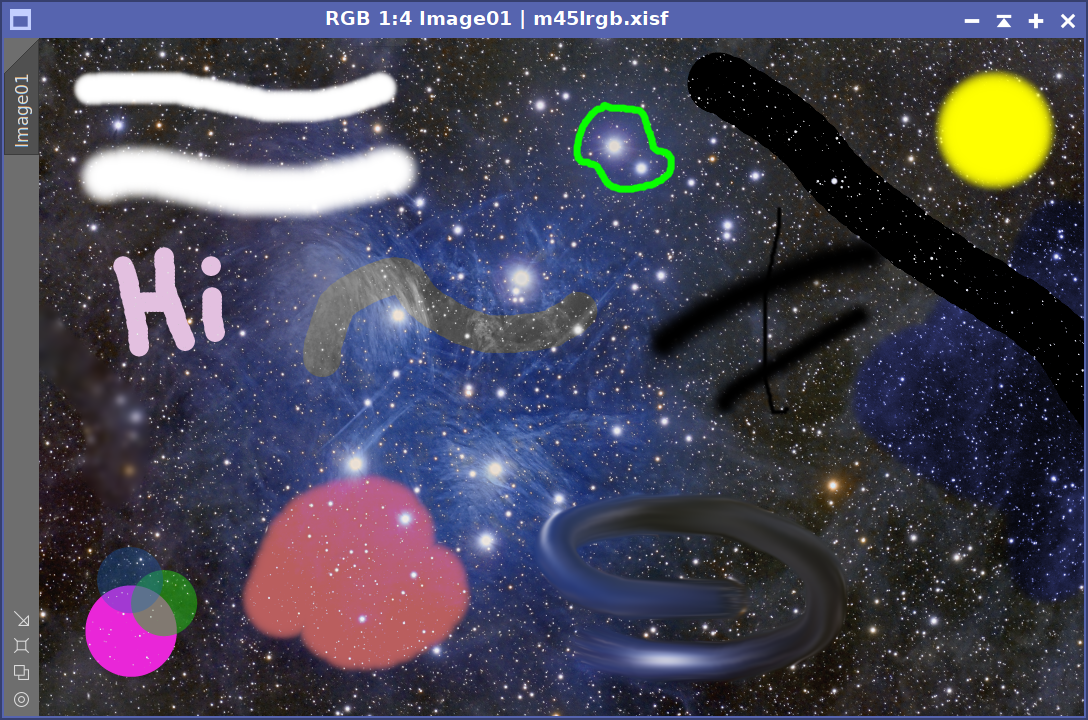
DynamicPaintbrush is a PixInsight process module for painting directly on an image with a freehand brush. Rather than adjusting parameters and then applying a global operation, we pick a brush, set its size, softness and opacity, choose what the brush should do, and then paint, stroke by stroke, right on the view, seeing the result live.
The brush is not limited to painting a flat color. Through a compact toolbar we choose a mode (a normal color paint-over, hue/saturation-only recoloring, selective saturation, local contrast, lighten or darken, or neutralizing a color cast) or a pixel action such as Blur (a true Gaussian softening), Sharpen (its unsharp-mask counterpart), Smudge (a finger-paint smear that drags color along the stroke) and Dodge / Burn (brushed-on brightening or darkening). Several of these brushes are two-way: holding Ctrl while painting reverses their effect. A Protect highlights toggle keeps bright stars and highlights largely untouched while we work on the darker background.
Opacity is handled the right way for retouching, and the brush honors the target view's active mask. Every stroke is a discrete, undoable step recorded in a history, and the whole sequence is serialized into the process instance, so it can be saved to a process icon and replayed later.
DynamicPaintbrush is most useful for either creating freehand painted masks, or for the small, local, by-hand touches that are tedious to express as a global process: nudging a color, knocking down a gradient corner, softening a halo or a mosaic seam, neutralizing a cast in the background, or painting density onto a mask.
2 Setup and Installation
[hide]
The only official distribution of DynamicPaintbrush is via a PixInsight repository. This is the safest way to install a module or script, as the installation is handled by PixInsight itself, which will fetch the module directly and safely from our PixInsight repository at:
https://repo.deepskycolors.com/DynamicPaintbrush/
Make sure the trailing / is part of the URL. Also, be sure to keep our repository URL in your list of PixInsight repositories to receive timely updates.
By distributing DynamicPaintbrush only via our PixInsight repository, installation comes with the guarantee of our Developer and Repository certificates, verified by PixInsight itself from the moment it connects to our repository, until it validates and completes installation of the DynamicPaintbrush module.
If we ever want to be sure that we have the latest version available to us, we go to PixInsight’s RESOURCES menu, select Updates, then Manage Repositories to make sure our repository is still there, then RESOURCES > Updates > Check for Updates.
2.1 Launching DynamicPaintbrush
DynamicPaintbrush is a dynamic process, so it operates on whichever view we point it at first, and then we work with the brush directly on the image, rather than adjusting parameters on the process dialog and selecting a target only when we are ready to apply.
To launch it:
- Open the image or mask we want to work on.
- In Process Explorer or via the PROCESS menu, locate DynamicPaintbrush under the DeepSkyColors, Painting or MaskGeneration categories.
- The DynamicPaintbrush interface opens and PixInsight enters dynamic mode.
- Move the cursor over the target image (a brush-sized circle follows the cursor) and begin painting. The first stroke locks that view as the target.
2.2 Licensing
DynamicPaintbrush runs on a trial-then-registered lifetime licensing model. During the trial period the tool is fully functional with no feature restrictions. When the trial expires, DynamicPaintbrush will display a notice at startup and will not open until a valid registration key is entered (see 3.9 Registration and licensing). No internet connection is needed: keys are validated offline.
DynamicPaintbrush v1.x has been available since 2020. Users who registered a previous version can install DynamicPaintbrush 2.0 and will remain registered, with nothing to do on their part. Remember, DynamicPaintbrush's license is for life, and all updates, present and future, are free.
3 The DynamicPaintbrush Interface
[hide]
The DynamicPaintbrush panel is organized top to bottom into: a mode & action toolbar, a Current Brush Settings group (size, softness, opacity, the optional blur strength, and the color row with a live brush preview), a history bar with a stroke counter, and the classic PixInsight interface bar at the very bottom. The rest of the interaction happens on the image, where we paint and see the result live.
The DynamicPaintbrush Interface:
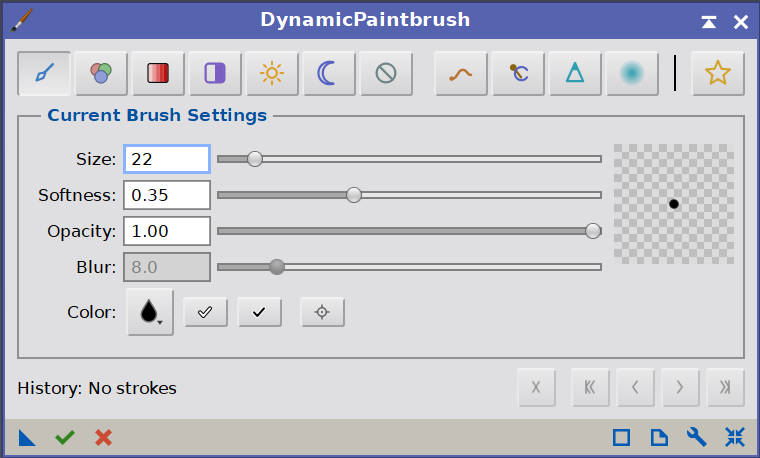
The DynamicPaintbrush tool the moment we open it for the first time in a PixInsight session.
3.1 The mode & action toolbar
The toolbar at the top of the panel decides what the brush does. It is a row of toggle buttons grouped as: the seven blend modes (Normal, Color, Saturation, Contrast, Lighten, Darken, Neutralize), then the pixel actions (Smudge, Dodge/Burn, Sharpen, Blur), and finally, on the far right, the independent Protect highlights toggle.
The blend modes and the actions are mutually exclusive: only one can be active at a time (clicking one releases the others). Protect highlights is independent: it stays on or off regardless of the active mode, and modifies whatever the brush is doing. The blend modes are described in 3.4 Blend modes, the actions in 3.5 Blur, Sharpen, Smudge and Dodge/Burn, and the protect toggle in 3.6 Protect highlights.
Three of these brushes are two-way: Saturation, Contrast and Dodge / Burn apply their effect in one direction as we paint, and the opposite direction when we hold Ctrl while painting (more or less saturation, more or less contrast, brighten or darken). Because they manipulate color, the Color, Saturation and Neutralize modes are disabled (grayed out) when the target view is a grayscale image; the tonal and structural brushes remain available on mono images.

3.2 Current Brush Settings
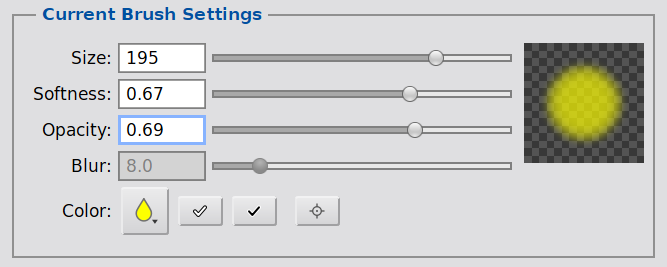
This group holds the core brush parameters, with a live preview thumbnail on the right that always reflects the current brush:
Size: the brush radius in pixels. The on-image cursor circle shows the exact footprint.
Softness: how the brush fades from its solid core to its edge. 0 is a hard-edged brush; higher values feather the edge progressively, up to a very soft falloff.
Opacity: the strength of the brush. Opacity is maintained as we drag the paintbrush - it does not accumulate. To build up further, we release and paint again. For the pixel actions (Blur, Sharpen, Smudge and Dodge / Burn), opacity acts as the action's strength.
Blur / Detail: a radius in pixels. This single control is shared by two actions and relabels itself to match: it reads Blur for the Blur action, where it is the Gaussian radius (the higher the value, the greater the blur), and Detail for the Sharpen action, where it is the detail radius (the scale of the structures the sharpening emphasizes). It is enabled only while Blur or Sharpen is the active action.
The preview thumbnail shows the brush footprint (color, size, softness and opacity together) painted over a checkerboard that signals transparency. The checkerboard automatically adjusts its darkness depending on the brightness of the selected color, so the brush is always clearly visible.
3.3 Color, presets and the eyedropper
The color row (in the Current Brush Settings group) is where we choose the paint color. From left to right it holds:
- The color button: a droplet filled with the current color. Clicking it (or the preview thumbnail) opens the color picker.
- Two quick White and Black shortcuts: one click sets the brush to pure white or pure black, the two colors we reach for most often.
- The eyedropper: a one-shot color picker (see below).
The color picker
A compact dialog with a 2D saturation/value square and a hue strip alongside it, a live preview swatch and an editable hex field. We pick a hue on the strip and drag inside the square to set how vivid and bright the color is. A Pick from image button closes the dialog and arms the eyedropper for the next click.
The color picker:
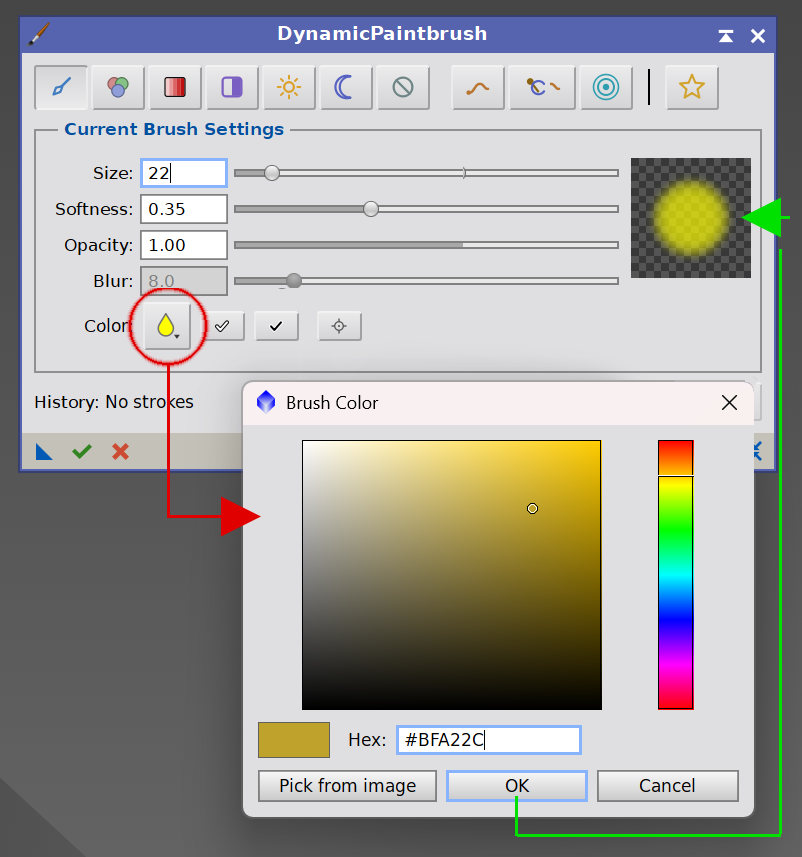
Pick a hue on the strip, then drag in the square toward the gray/white corner for subtle tints. The hex field and a live swatch keep us oriented.
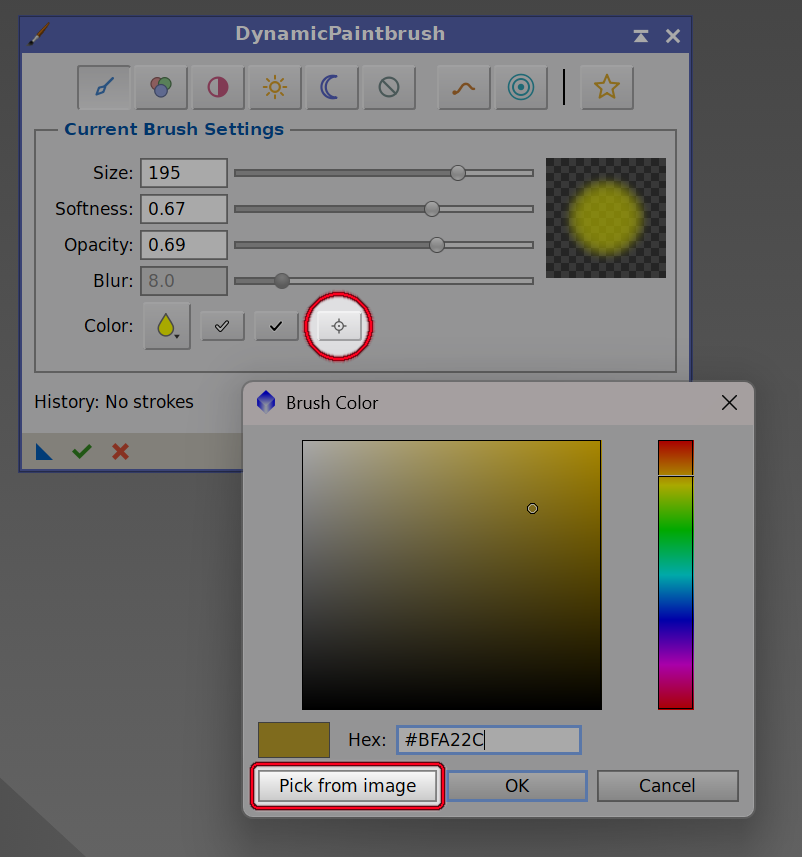
The eyedropper
To sample a color straight from the image, we have a few options.
We can click the eyedropper button (small circle in the image below), and the next click on the image will sample the color, then the brush returns automatically so we can continue painting.
If we have the Color Picker open, we can click on the "Pick from image" button. The Color Picker dialog will close, and we'll be able to pick the color from the image, just as if we had clicked the eyedropper button.
We can simply press Alt-click (or Alt-drag) anywhere on the image at any time.
Sampling reads a small 3×3 average, so we get the local color rather than a single pixel in a noisy field; while sampling, the cursor becomes a small crosshair.
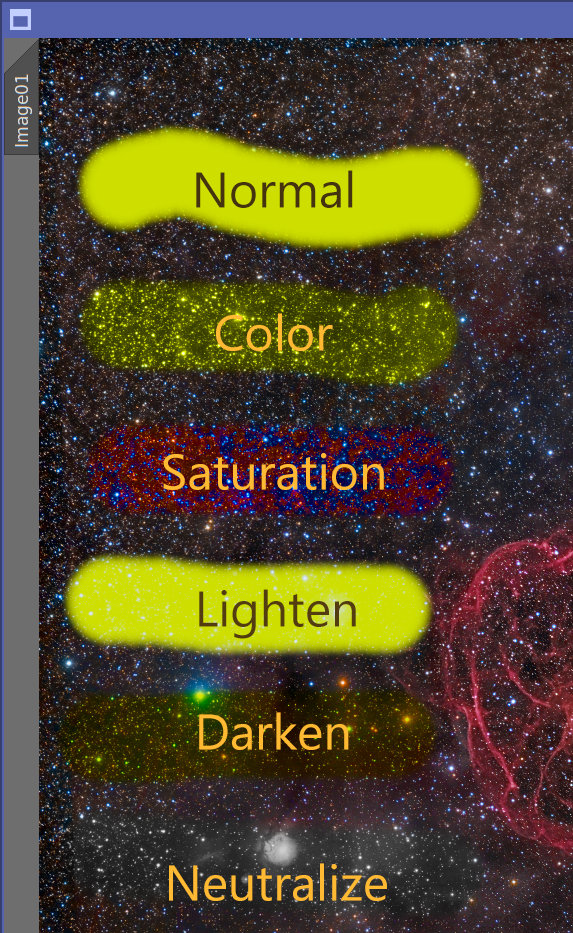
3.4 Blend modes
The first seven toolbar buttons set how the brush combines with the image. All of them paint according to the current opacity and softness settings, and they respect the active mask, if any:
- Normal: paints the image with the selected color (a standard paint operation).
- Color: apply the color's hue and saturation while keeping the image's original brightness. This recolors a region without altering its detail or structure: this could be used for correcting the color of certain nebulosity areas, or stars.
- Saturation: boosts color saturation as we paint, intensifying the existing colors while preserving their hue and brightness. Hold Ctrl while painting to desaturate instead, easing the area toward neutral gray. The chosen brush color is not used in this mode.
- Contrast: increases local contrast, pushing tones away from mid-gray so the painted area gains punch. Hold Ctrl while painting to reduce contrast, easing tones toward mid-gray. Works on color and grayscale images alike; the chosen color is not used.
- Lighten: affect a pixel only where the result would be brighter than the original.
- Darken: affect a pixel only where the result would be darker. Handy for gently knocking down a bright gradient corner.
- Neutralize: push pixels toward neutral gray of the same brightness, removing color. With the right amount of opacity and softness, this could be used to aid in the correcttion of a difficult and localized color cast, de-coloring star halos, or flattening a light-pollution tint. (In this mode the chosen color is irrelevant.)
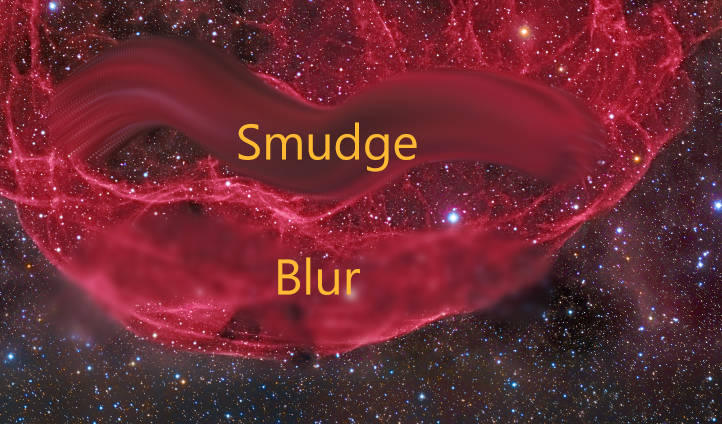
3.5 Blur, Sharpen, Smudge and Dodge/Burn
These action buttons transform the pixels under the brush instead of painting a color (the brush color is ignored; opacity acts as strength):
- Blur: a true Gaussian softening. The amount is set by the Blur slider (a Gaussian radius in pixels), while the brush size controls where we apply it. Within a single stroke the blur is capped at full strength; releasing and painting again compounds it. Perfect for smoothing a noisy background patch or softening a hard edge.
- Sharpen: an unsharp-mask sharpening, the structural counterpart to Blur. It enhances detail and edges under the brush. The shared radius slider (labeled Detail while Sharpen is active) sets the detail radius (the scale of the structures emphasized), while the brush size controls where we apply it. Like Blur, it is capped within a single stroke and compounds when we release and paint again. Good for crisping a soft galaxy core or restoring bite in a region that was over-smoothed.
- Smudge: a real finger-paint smear. The brush picks up color under it and drags it along the direction of the stroke, the way a finger drags wet paint. With care, this can be used to improve mosaic seams, melting a foreground-to-sky transition, or pulling a halo into its surroundings.
- Dodge / Burn: brushed-on exposure. Painting brightens the pixels under the brush (dodge); holding Ctrl while painting darkens them (burn). Unlike Lighten and Darken, this is a smooth exposure change rather than a hard clamp, the way a darkroom print is dodged or burned. Useful for lifting a dim dust lane or gently deepening a background corner.
All of these actions honor softness and the active mask, and they work together with Protect highlights, for example blurring or sharpening a background without turning the stars into blobs.
3.6 Protect highlights
The Protect highlights toggle (the star button on the far right of the toolbar) is an independent on/off switch that works with every mode and action. When it is on, the brush effect is attenuated where the underlying pixel is bright, fading out smoothly toward the brightest tones, so the stroke mostly affects the darker background and leaves stars and highlights largely intact.
This is exactly what we want for the common “work on the background, not the stars” situations: painting color across a star field without recoloring the stars, blurring or smoothing the background without melting point sources, or neutralizing a cast only in the dim areas. Because it is a brightness gate (not a star detector), very bright nebula cores are also partly protected; for surgical star isolation, combine the brush with a star mask on the view (see 3.7 Working with masks).
3.7 Working with masks
DynamicPaintbrush honors the target view's active mask in all the available painting modes. If the image has a mask enabled, every stroke (color paint, blur, sharpen, smudge or dodge/burn) is limited to the masked-in areas, with the mask's soft edges feathering the effect naturally. Mask inversion is respected as well.
This pairs naturally with our other tools: build a precise selection with DynamicLasso or a star mask with StarMask, apply it to the view, and then paint freely knowing the brush only touches where the mask allows.
3.8 History bar

Each stroke is one step in a history we can navigate. DynamicPaintbrush v2.0 uses a brand new cached history engine that can navigate through the entire history much faster than previous versions. The bar below the brush settings holds, with a stroke counter:
- Delete: remove the most recent stroke.
- Undo All: revert to the unpainted state.
- Undo: step back one stroke.
- Redo: step forward one stroke.
- Redo All: jump forward to the most recent stroke.
Keyboard shortcuts work while the cursor is over the image (dynamic mode):
-
Ctrl+Z Undo Ctrl+Shift+Z Undo All Ctrl+Y Redo Ctrl+Shift+Y Redo All Delete Delete last stroke
Because the whole sequence of strokes is serialized into the process instance, we can drag the instance to a process icon and re-apply the exact same painting later.
3.9 Registration and licensing
The Preferences button (the wrench icon on the process interface bar) opens the DynamicPaintbrush license information dialog. This dialog shows the module version and reports the current license state:
- Licensed: shows the email the module is licensed to.
- Trial: shows the number of trial days remaining.
- Expired: prompts us to register to keep using the tool.
When the module is not yet licensed, the dialog shows a “Click here to register” link. Clicking it opens the registration dialog, where we enter our email and license key. The fields are validated as we type, and the Register button enables only once a valid email/key pair is entered. After a successful registration the info dialog refreshes in place to the “licensed to” state.
4 Painting with DynamicPaintbrush
[hide]
A typical painting workflow:
Launch DynamicPaintbrush and move the cursor over the target image. The first stroke locks that view as the target.
Pick a mode or action from the toolbar: a blend mode to paint color or contrast, or Blur, Sharpen, Smudge or Dodge / Burn to transform pixels.
Set the brush Size, Softness and Opacity. For Blur or Sharpen, set the radius slider as well (labeled Blur or Detail respectively). For the two-way brushes (Saturation, Contrast, Dodge / Burn), hold Ctrl while painting to reverse the effect.
Choose a color if the mode uses one: open the picker, use the White/Black presets, or Alt-click the image to sample a color.
If we want to confine the work, enable a mask on the view; turn on Protect highlights to spare stars and bright areas.
Paint on the image. Each stroke is applied live and added to the history.
Use the history controls (or Ctrl+Z / Ctrl+Y) to step back and forth as we refine.
Optionally save the instance to a process icon to replay the same painting later.
Because DynamicPaintbrush writes directly to the target view as we paint, the image itself is the result. As with any dynamic process, we must click Execute (the green checkmark in the bottom interface bar) to tell DynamicPaintbrush that we're done. We can, however, at any time, create a duplicate of the view being painted, and the duplicate will reflect all the painting done up to that point.
5 Usage tips and tricks
[hide]
Recolor without flattening detail. Use Color mode to correct the hue of nebulosity or fix star colors: brightness and structure are preserved, only the color changes.
Sample, then nudge. Alt-click a color straight from the image, then open the picker and ease it toward the gray corner of the square for a subtle, matching tint.
Let opacity build naturally. Depending on the goals, keep opacity low and paint repeated strokes for gentle, controllable buildup.
Protect highlights for background work. Turn it on before blurring, neutralizing, or recoloring a star field, so the stars stay put while the background changes. As mentioned before, Protect highlights is no replacement for a good star mask when star protection is required.
Blur in passes. For stronger softening, lift and paint again, or raise the Blur radius.
One button, both directions. Saturation, Contrast and Dodge / Burn paint one way and reverse when Ctrl is held (boost or cut saturation, add or remove contrast, dodge or burn), so a single brush covers both directions without switching tools.
Sharpen what you over-smoothed. If a region was blurred or denoised too far, switch to Sharpen and bring back local detail; raise the Detail radius to target larger structures, lower it for fine texture. A low opacity keeps the sharpening subtle and noise-free.
Smudge along the feature. Drag in the direction you want color to travel (across a seam, along a halo) using a soft, low-opacity brush for the most natural smear.
Mask first for precision. When an edit must stay strictly inside a region, build a mask (e.g. with DynamicLasso) and apply it to the view before painting.
Neutralize local casts. A low-opacity Neutralize brush is a quick way to calm a green or magenta cast in a specific area without touching the rest of the image.
Use the keyboard while painting: Ctrl+Z / Ctrl+Y (and the Shift variants) let us experiment without leaving the image.
Save our work as a process icon. The full sequence of strokes is serialized, so we can drag the instance to a process icon and re-apply or tweak the same painting later.
PAINT MASKS! DynamicPaintbrush was originally conceived as an aid to create freehand masks. The new 2.0 brush engine brought a much larger set of features that are more fit for a "standard" photo editing app than deep-sky image processing. For that reason, when DynamicPaintbrush launches, it's ready for this task. By using the shortcut black and white color pickers, and the standard brush knobs (size, opacity, and softness), if our workflow only uses DynamicPaintbrush for building masks, none of the new features gets in the way.