
Autocrop
Registered masters cropped to the one rectangle they all cover well
Autocrop crops a set of masters, registered onto one reference, to the one rectangle they all cover well, so the ragged edges that dithering and registration leave are gone and the masters stay aligned with each other. It works on files: each cropped master is written next to the original, which is kept. A pre-processing session does it on its own; the process does it for masters we already have.
1Introduction
After registration and integration, the edges of a master are made of fewer frames than its center: each frame was shifted a little by the dithering and the registration, so near the edges only some of them cover each pixel. Those edges are noisier, may hold a frame's border, and get in the way of every later step, from gradient removal to the color calibration. Autocrop finds the largest rectangle the masters all cover well and crops each of them to it.
Because every master of the set is cropped to the same rectangle, masters that were registered onto one reference stay aligned, and can be combined into a color image afterward with no further registration. The rectangle is found in one of three ways:
- From the frames' coverage: DSPX's masters record where each of their frames lies, so Autocrop counts how many frames cover each pixel and keeps the largest rectangle where every master has at least three quarters of its frames, as a pre-processing session does.
- From its low rejection map, the map Integration writes beside the master with Rejection maps on: the fraction of the frames rejected low, or left out because they did not cover the pixel. The rule: pixels where more than a quarter of the frames are missing are outside.
- From its data: the largest rectangle where the master has data in every channel, for masters without a map.
With the maps or the data, the set's rectangle is where all the masters' rectangles overlap. Each cropped master
keeps the original's keywords and properties, its astrometric solution recomputed for the cropped image, with the rectangle in a DSCCROP keyword and history lines, and a second
image, crop_mask, of the original's size, with the outline of the rectangle. Autocrop has no PixInsight
process of its own.
2Quick Start
- Choose .
- Add Files..., and choose the masters registered onto one reference: the R, G and B masters of a night, or its narrowband masters.
- Leave Method on Auto and Output folder empty: the cropped masters are written next to
the originals, with
_autocropat the end of their names. - Click Run. The cropped masters open when it is done.
3Interface & Parameters
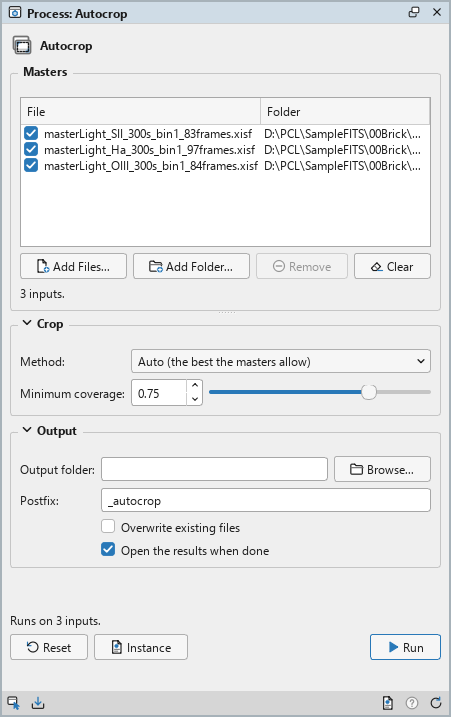
Autocrop is a process that works on files: its panel lists the masters at the top, under Masters, and has two sections of settings, Crop and Output, each of which folds away with the arrow beside its title. Under them are the buttons and the system bar along the bottom. It works on no open image, so it has no Applies to and no live preview.
3.1Masters
Masters: The masters to crop, registered onto one reference, so they all have the same size. Each row shows a file and its folder, with a check box that keeps it in the run or leaves it out. Add Files... and Add Folder... add masters; Remove takes the selected rows away; Clear empties the list. The line under the list says how many masters there are.
3.2Crop
Method: How the rectangle is found:
- Auto (the best the masters allow): the default. The frames' coverage when every master records its frames, else the low rejection maps when every master has one beside it, else the data.
- Frame coverage: always the coverage; a master that does not record its frames (one made by another program, or by DSPX before it recorded them) stops the run, which says which.
- Low rejection maps: always the maps; a master without one stops the run, which says which and how to make it.
- Where every master has data: always the largest rectangle where each master has data in every channel.
Minimum coverage: With Frame coverage, and Auto when it uses the coverage: the share of a master's frames a pixel needs to be kept, from 0.05 to 1; 0.75, three quarters, by default.
3.3Output
Output folder: Where the cropped masters are written. Empty, the default: next to each master. Browse... chooses a folder.
Postfix: The text put after each cropped master's name, before its extension:
_autocrop by default.
Overwrite existing files: Off by default: a file of the same name is kept, and the new one gets
a new name, with _1, _2... at the end. On, it is replaced.
Open the results when done: On by default: the cropped masters open as images when the run ends.
3.4Run and Instance
Run: Crops the masters checked in the list. The Log gives each master's rectangle (with the coverage, how many frames each has), the set's rectangle with the share of the area it keeps, each file written, and how each solution was carried. The masters themselves are only read. The line above the buttons says how many masters the run will work on, or why it cannot start.
Instance: Shows the process as the panel has it now, as text: the settings as a DSPX
process (.dsproc), the list of masters included. PixInsight has no Autocrop process, so there is no icon to
write. Copy puts the text on the clipboard; Save... saves it as a file and puts it on the Process
Shelf.
Reset: Puts every setting back to its default.
The system bar along the bottom of the panel has the same commands as small icons: at the left, drag and Run; at the right, Instance, Help (this page) and Reset. Dropped on the Process Shelf, the first icon keeps the process there as a row of its own. With , the bar alone has them.
4Autocrop in a Pre-processing Session and as a Process
A pre-processing session crops its masters itself, as one of its last steps, when its autocrop is on, as it is by default. There it knows each frame's registration: in DSPX's own mode it measures exactly how many frames cover each pixel and keeps the largest rectangle where every master has at least three quarters of its frames; with PixInsight compatibility mode on, in , it applies the low rejection map rule to the rejection maps it makes along the way. The process works on masters alone, without their frames, but DSPX's masters (from a pre-processing session, or from Integration of frames DSPX registered) record where each frame lies, so the process measures the same coverage.
The astrometric solution of a solved master is recomputed for the cropped master, as Crop does, so it stays solved; the Log says how it was carried.
5Usage Tips and Tricks
Crop all the filters together. Run Autocrop once on every master of a night, all filters at once: they then share one rectangle and combine directly.
Keep the rejection maps for other programs' masters. A master made elsewhere does not record its frames: integrate it with the rejection maps on, and the maps method reads them.
Look at the Log. The share of the area each crop keeps tells how much the frames moved: a few percent is normal; much more points to a frame that registered badly.
6Related Tools
Crop: crops one open image, by margins or to a rectangle, carrying its solution.
Integration: makes the masters, and their rejection maps.
RGB Combination: combines the cropped masters into one color image.
Channel Combination: the same with open images.