
Crop
Crop to a rectangle, turned or not, or by margins; the astrometric solution recomputed
Crop cuts the image to a rectangle, upright or turned by any angle, or takes away or adds margins at its edges. The image's astrometric solution is recomputed for the new image, so a plate solved image stays solved. It is the Crop tool's operation as a process: settings we type, which a process icon, a container or a workflow can repeat on other images.
1Introduction
Crop works in one of two ways. Margins take away pixels at each edge (a negative margin) or add them (a positive one, filled with a color), as PixInsight's Crop does: the pixels that stay are copied as they are. A rectangle, given by its center, its size and an angle, is what the Crop tool draws: upright, its pixels are copied as they are; turned, the new image is upright and its pixels are interpolated from the old ones.
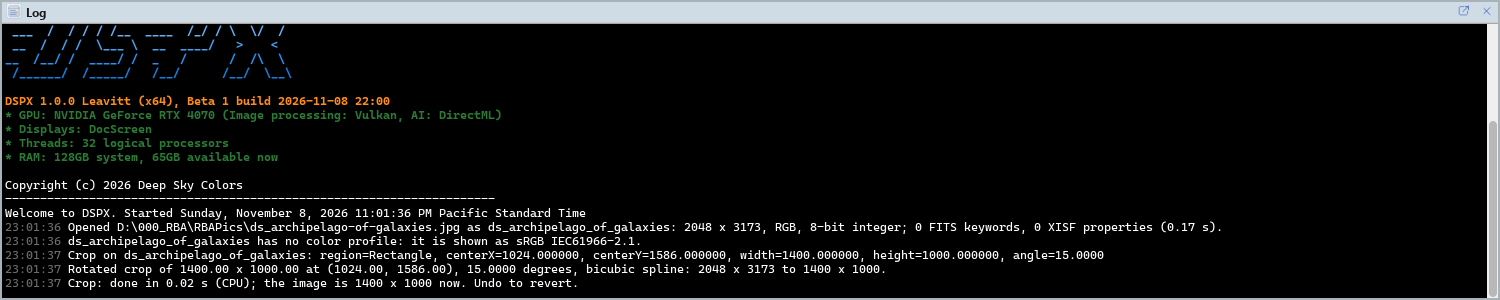
Every crop moves the pixels, and the image's astrometric solution moves with them: its linear part and its distortion model are recomputed exactly for the new grid, so each pixel keeps its place on the sky and every process that needs the solution keeps working without a new plate solve. The Log says how the solution was carried.
Crop is our own engine. It reads PixInsight's Crop icons by their parameters and DynamicCrop icons converted, and the panel saves a Crop by margins as a PixInsight Crop icon, a rectangle in fractions of the image as a DynamicCrop icon, and a rectangle in pixels as a DynamicAstroCrop icon.
2Quick Start
- Open the image and choose .
- For margins, leave Crop by on Margins and type them:
-100takes 100 pixels away from that edge. For a rectangle, choose Rectangle and type its center, its size and its angle. - Click Apply.
To draw the rectangle with the mouse instead, use the Crop tool; its panel shows the numbers to type here.
3Interface & Parameters
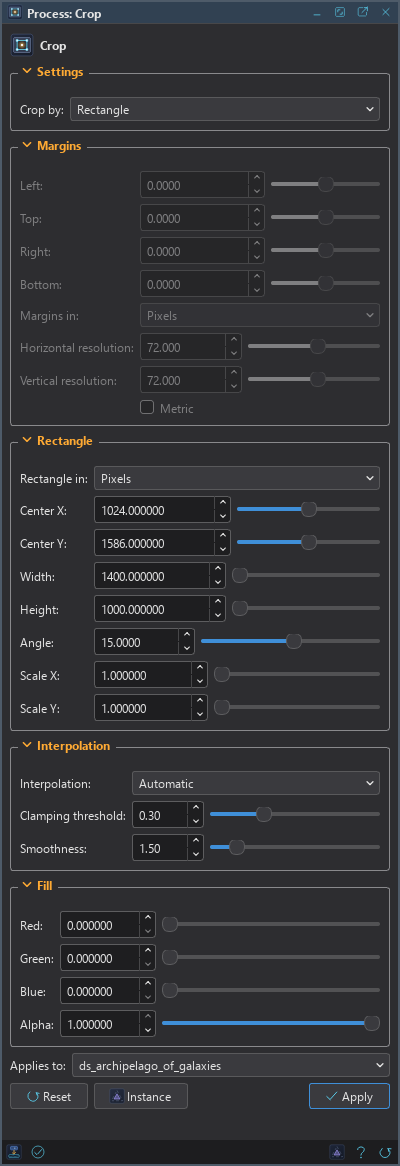
The panel has five sections, Settings, Margins, Rectangle, Interpolation and Canvas color, each of which folds away with the arrow beside its title. Settings that do not apply to the choice of Crop by are grayed out. Under the sections are the image the process applies to, the buttons and the system bar along the bottom. Crop changes the image's size, so it has no live preview.
3.1Settings
Crop by: How the new image is given:
- Margins: the default. Pixels taken away or added at each edge, as PixInsight's Crop.
- Rectangle: the image cropped to a rectangle given by its center and size, turned by an angle, as the Crop tool draws it.
3.2Margins
Left: The margin at the left edge, in the units of Margins in: negative takes that much away, positive adds that much, filled with the canvas color. 0 by default.
Top: The margin at the top edge, the same way.
Right: The margin at the right edge, the same way.
Bottom: The margin at the bottom edge, the same way.
Margins in: The margins' units: Fractions of the image, of its width and height, so the same margins fit any image; Pixels, the default; or Centimeters and Inches at the resolution below. Each margin is rounded to whole pixels.
Horizontal resolution: For margins in centimeters or inches: pixels per inch, or per centimeter with Metric. 72 by default.
Vertical resolution: The same, vertically.
Metric: The resolutions are per centimeter, not per inch. Off by default.
3.3Rectangle
Rectangle in: The units of the rectangle: Pixels, the default, a rectangle of this image, as the Crop tool gives it; or Fractions of the image, of its width and height, so the same crop fits any image, as PixInsight's DynamicCrop gives it.
Center X: The rectangle's center, horizontally, from the image's left edge.
Center Y: The rectangle's center, vertically, from the image's top edge.
Width: The rectangle's width. The new image's width is this, rounded.
Height: The rectangle's height, the same way.
Angle: The rectangle's rotation about its center in degrees, from −360 to 360, as the Crop tool draws it: positive turns the rectangle clockwise on the screen, so the image inside it comes out turned counterclockwise. 0, the default, is an upright rectangle, whose pixels are copied exactly.
Scale X: The rectangle's contents scaled horizontally into the new image. 1 by default.
Scale Y: The rectangle's contents scaled vertically into the new image. 1 by default.
3.4Interpolation
For a turned or scaled rectangle only: how each new pixel's value is computed from the old pixels around it. The same settings serve Rotate and Resample.
Interpolation: The interpolation: Nearest neighbor, Bilinear, Bicubic spline, Bicubic B-spline, Lanczos-3, Lanczos-4, the Mitchell-Netravali filter, the Catmull-Rom spline filter, the Cubic B-spline filter, or Automatic, the default: the bicubic spline, or the Mitchell-Netravali filter for a strong reduction, as PixInsight chooses. Lanczos is the sharpest; the filters smooth what is reduced, so it does not alias.
Clamping threshold: The bicubic spline and Lanczos: where neighboring pixels differ by more than this, the interpolation is clamped so it does not ring around sharp edges, stars above all. From 0, clamped everywhere, to 1, never; 0.30 by default.
Smoothness: The cubic filters: how wide they are, times the reduction, from 1 to 5. Larger is smoother; 1.50 by default.
GPU. In DSPX mode the interpolation runs on the graphics card when it has much more to compute than to move: a turned rectangle or an enlargement with Lanczos, a reduction with one of the cubic filters, and the bicubic spline or the B-spline on a large image. A 24 MP color image turned with Lanczos-3 or Lanczos-4 runs about 2.5 to 5 times faster than on the processor. Nearest neighbor, bilinear, the area average, a gentle reduction and any image under a quarter of a megapixel stay on the processor, which is as fast there. The result agrees with the processor's to a few millionths of the range (one step for an 8- or 16-bit image). Where a pixel's center falls exactly on the edge of the image or half way between two pixels, as in a rotation by exactly 90 degrees, the processor and the card can choose differently at that pixel. An image with a NaN or an infinity stays on the processor. Choose CPU only in to keep it there, and see The Processor and the GPU.
3.5Canvas color
What fills the new image where the old one does not reach: the corners of a turned rectangle that go past the image's edges, and added margins. From 0 to 1; a gray image takes Red.
The shared canvas color. DSPX keeps one canvas color, black by default, for Canvas Size, Crop and Rotate and for the canvas of a layered image (Layers). A panel of these processes opens with it, and Reset shows it again. Changing it in one of them, in Layers' canvas dialog, or with the Canvas Color or Colors control of a LaunchPad changes it everywhere. A saved process, a process icon, a script and a history step keep their own color, and an image keeps its base color once it has one.
Red: The fill of the red channel, or of a gray image. 0 by default.
Green: The fill of the green channel. 0 by default.
Blue: The fill of the blue channel. 0 by default.
Alpha: The fill of the alpha channels, 1 opaque. 1 by default.
3.6Apply and Instance
Applies to: The image Crop works on, chosen in a list of the open images. It shows the image in front, and follows it as we bring other images to the front. Picking another image in the list makes the panel work on that one without bringing it to the front; the pick stays while we work on other images, and Follow Active, the small button that appears beside the list, makes the panel follow the image in front again. An image that a tool or a run is working on is listed, but cannot be picked.
Apply: Crops the image named in Applies to, in one history step that Undo takes back with the image whole, its solution included. With no margin and no rectangle there is nothing to do, and nothing is recorded. The Log gives the new size and how the solution was carried.
Instance: Shows the process as the panel has it now, as text: the settings as a DSPX
process (.dsproc) or as a PixInsight process icon (.xpsm) of Crop, DynamicCrop or
DynamicAstroCrop, chosen under Format. Copy puts the text on the clipboard; Save... saves it as a
file and puts it on the Process Shelf.
Reset: Puts every setting back to its default.
The system bar along the bottom of the panel has the same commands as small icons: at the left, drag to apply and Apply; at the right, Instance, Help (this page) and Reset. Drag to apply, the first icon, carries the process with its settings: dropped on an image's window, it crops that image, whatever image the panel works on; dropped on the Process Shelf, it is kept there as a row of its own. With , the bar alone has them.
4The Astrometric Solution
When the image is plate solved, Crop recomputes the solution from the solution itself, not by fitting it again:
- The linear part is composed with the crop's mapping, so each point keeps its place on the sky; the projection and its reference point stay.
- The distortion model's control points are moved to the new grid, all of them, also those outside the crop, and the model is made again from them: the model of the whole field, unchanged inside the crop.
- The solution is written as Plate Solve writes one, keeping its creation time, its catalog and its creator: it is the same solution, on the new grid.
A solution DSPX cannot read is dropped, and the Log says why. Undo brings the old solution back with the pixels. An image without a solution is cropped the same way: there is nothing to carry.
5Masks, Selections and Layers
- The image's mask is detached: a mask of the old grid does not fit the new one. A crop applies to the whole image, never through a mask.
- A selection moves with a crop that is not turned, and is cleared by a turned one; Undo brings it back.
- A layered image, or one layer alone, cannot be cropped yet, and Crop cannot be a process layer.
- A process container may hold a Crop: the steps after it work on the cropped image.
6Usage Tips and Tricks
The same crop on several images. Save the panel as an icon, or put it on the Process Shelf, and drop it on each image. With the rectangle in Fractions of the image, the same crop fits images of different sizes.
Stacking edges. A margin of −20 to −50 pixels on each side takes away the ragged edges a stack leaves, before gradients are removed.
A canvas around the image. Positive margins with a black or white fill add a border, for a mosaic or a frame.
Draw, then repeat. Draw the rectangle with the Crop tool on one image, read its center, size and angle from the tool's panel, and type them here for a process to repeat.
7Related Tools
Crop tool: the same rectangle, drawn and turned with the mouse.
Rotate: turns the whole image, keeping all of it.
Resample: changes the image's size in pixels.
Autocrop: crops a set of registered masters to the area they all cover.