
Binarize
Every pixel to black or white at a threshold
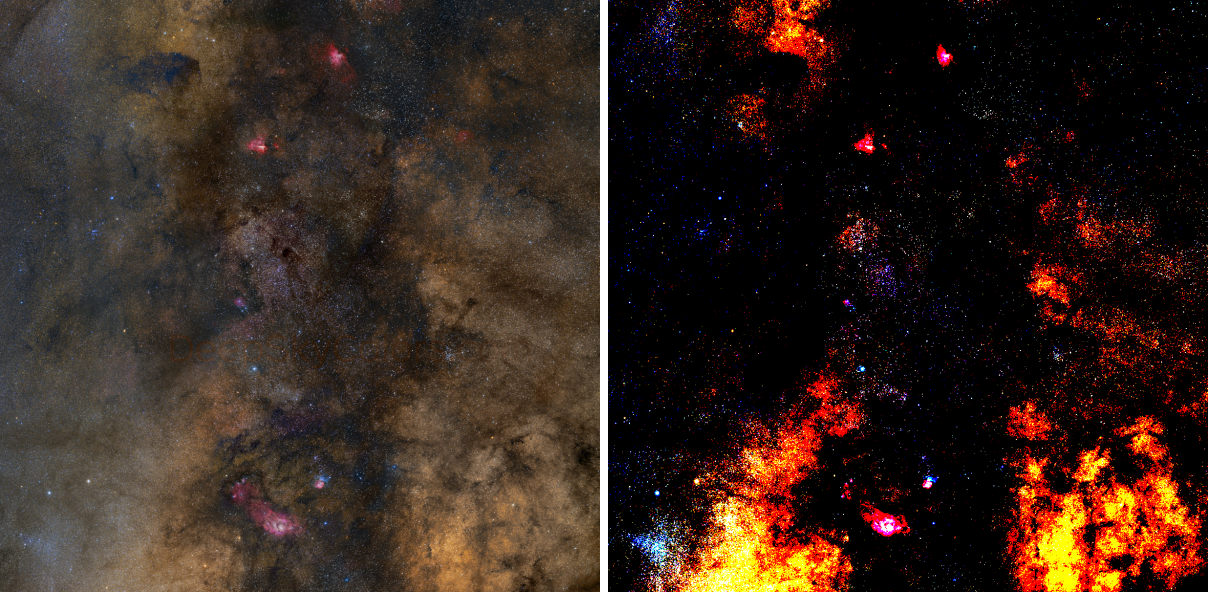
Binarize turns every pixel into black or white: a pixel at or above the threshold becomes white and every other pixel black. We use it to make a hard-edged mask from an image, to see which pixels pass a level, and to cut a clean shape out of a smooth one.
1Introduction
The process compares each sample with a threshold from 0 to 1. At or above it, the sample becomes 1; below it, 0. For a color image the threshold can be the same for the three channels, or one per channel, so the result may have pure red, green or blue parts. Alpha channels are not touched.
The threshold can be typed, as in PixInsight's Binarize, or taken from the image itself, which is DSPX's own addition: the median (half of the pixels turn white), the mean, or Otsu's threshold, the level that best separates the dark pixels from the bright ones. With the last, we get the cleanest split of an image into object and background without choosing a number.
Binarize is our own engine, with the parameters of PixInsight's Binarize: a PixInsight icon of that process opens here, and the panel saves one that PixInsight opens.
2Quick Start
- Open the image and choose . The live preview (the eye) shows the result on the part in view.
- Set Level to the value that separates what we want in white from the rest, or choose Otsu under From to let the image decide.
- Click Apply. To keep the original, duplicate the image first and apply Binarize to the copy.
3Interface & Parameters
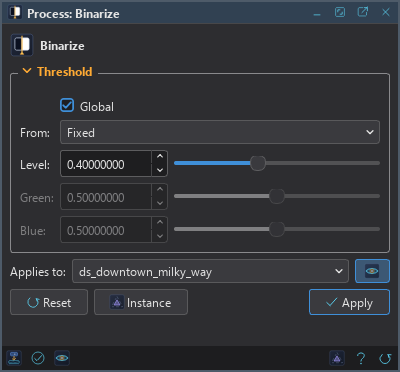
The panel has one section, Threshold, then the image the process applies to with the live preview's eye, the buttons and the system bar along the bottom.
3.1Threshold
Global: One threshold for all channels. On by default. Off, a color image has a threshold for each channel: Level for red, then Green and Blue. A gray image uses Level either way.
From: Where the threshold comes from. It is a setting of DSPX and is ignored with the PixInsight compatibility mode on, in .
- Fixed: the values typed below. The default.
- Median: the median of the image; the pixels above it become white.
- Mean: the mean of the image.
- Otsu: the threshold that best separates the dark pixels from the bright ones.
With any of the last three, the threshold is measured on each channel, or on all channels together with Global on, and the values below are not used.
Level: With From on Fixed: pixels at or above this value become white, the others black. From 0 to 1, 0.5 by default. With Global off it is the threshold of the red channel (of a gray image).
Green: With From on Fixed and Global off: the threshold of the green channel.
Blue: With From on Fixed and Global off: the threshold of the blue channel.
3.2Apply, Preview and Instance
Live preview (the eye): At the end of the Applies to row; Preview in the system bar is the same switch. A threshold taken from the image is measured once on the whole image, so the preview matches what Apply gives. The banner says "PREVIEW only, nothing applied"; the image does not change until Apply. Before, in the banner, or the backslash key held, shows the image as it is.
Applies to: The image the process works on, chosen in a list of the open images. It shows the image in front, and follows it as we bring other images to the front. Picking another image in the list makes the panel work on that one without bringing it to the front, and Follow Active, the small button that appears beside the list, makes the panel follow the image in front again.
Apply: Binarizes the image named in Applies to, in one history step that Undo takes back, through the image's mask if it has one. Integer images are compared as numbers between 0 and 1 and written as 0 or the maximum.
Instance: Shows the process as the panel has it now, as text: a DSPX process
(.dsproc) or a PixInsight process icon (.xpsm), chosen under Format. Copy puts
the text on the clipboard; Save... saves it as a file and puts it on the Process Shelf.
Reset: Puts every setting back to its default.
The system bar along the bottom has the same commands as small icons: at the left, drag to apply and Apply; at the right, Instance, Help (this page) and Reset.
4Making a Mask With Binarize
A binarized copy of an image is a hard-edged mask. To make one, we duplicate the image, binarize the copy, and soften its edges with Blur if the mask should fade at its borders. The mask is then attached to the original with .
5Usage Tips and Tricks
Look first at the histogram. A level in the valley between the background and the object separates them best; Otsu finds that valley by itself.
Work on a copy. Binarize keeps nothing but the split, so Undo is the only way back.
One threshold per channel. With Global off, the three channels of a color image are cut at their own levels, which shows where each color passes its own threshold.
6Related Tools
Range Mask: a mask from a range of brightness, when a hard split is too harsh.
Blur: softens the edges of a binarized mask.
Histogram: shows the levels the image has, and clips them by hand.