
Range Mask
A mask of the pixels within a range of brightness
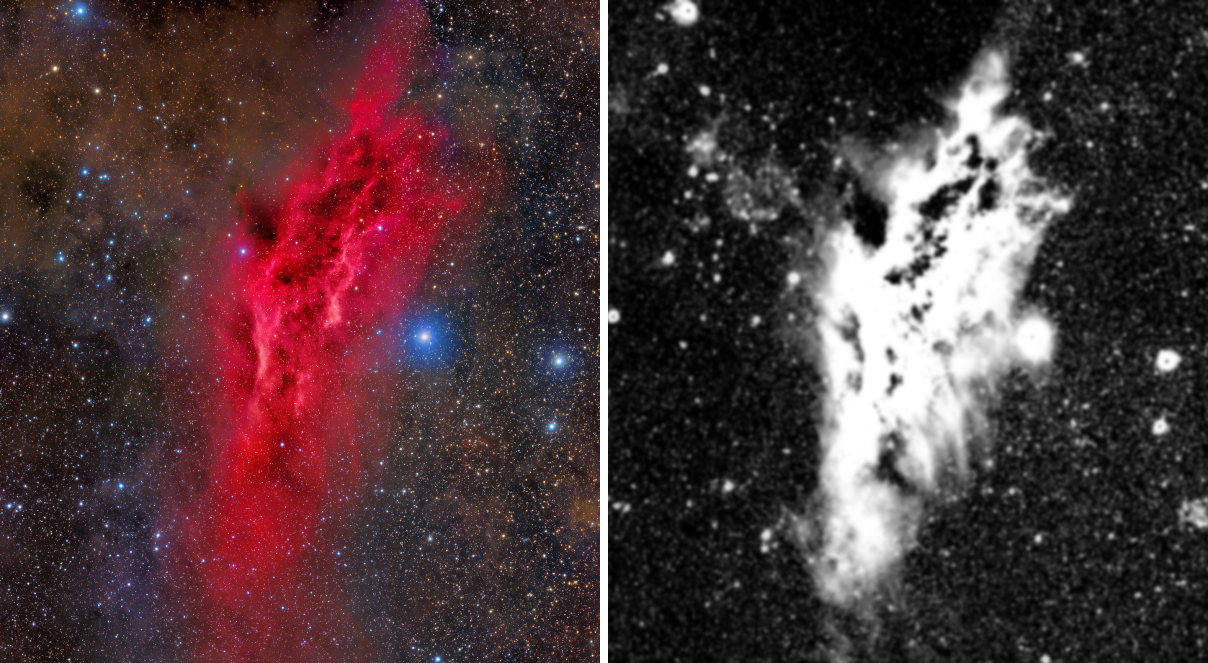
Range Mask makes a mask from the brightness of an image: white where the values are within a range, black where they are not, with soft edges, smoothing and inversion. It is the quickest way to a mask that protects the background while we work on a nebula, or the bright parts while we work on the faint ones.
1Introduction
Range Mask reads the image and makes a new one, the mask, of the same size: each pixel is white when the image's value there is between the Lower limit and the Upper limit, and black when it is outside. Fuzziness softens the two edges, so the mask rises gradually from black at a limit to white inside the range; Smoothness blurs the mask; Screening multiplies it by the image's values, so the image shows through it; and Invert turns it around at the end.
For a color image the mask is made from its lightness, CIE L*, as one gray mask, or from each channel, as a color
mask. The image itself is only read: nothing in it changes. The mask arrives as a new 32-bit floating point image named
after the image with _range_mask at the end, with the image's metadata, ready to be attached as its
mask.
Range Mask is our own engine, with the parameters of PixInsight's RangeSelection: a PixInsight icon of RangeSelection opens here, and the panel saves one that PixInsight opens.
2Quick Start
- Open the image and choose . With the live preview (the eye) on, the image shows the mask that will be made.
- Raise Lower limit until the background turns black and the object stays white.
- Give it some Fuzziness and Smoothness, so the mask has no hard edges.
- Click Apply. The mask arrives in a new tab; with it in front, choose to use it.
3Interface & Parameters
The panel has two sections, Range and Mask, each of which folds away with the arrow beside its title. Under them are the image the process applies to with the live preview's eye, the buttons and the system bar along the bottom.
3.1Range
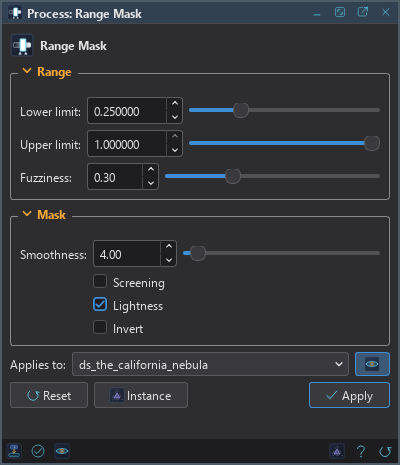
Lower limit: Values below it are black in the mask. From 0, the default, to 1.
Upper limit: Values above it are black in the mask. From 0 to 1, the default. Lower it to leave the brightest parts, the stars' cores, out of the mask. A lower limit above the upper one is taken the other way around, and the Log says so.
Fuzziness: Soft edges inside the limits: the mask rises from black at each limit to white over this share of half the range. 0, the default, is a hard edge; 1 makes the whole range a ramp, from black at the limits to white in the middle.
3.2Mask
Smoothness: The mask is blurred by a Gaussian of this standard deviation, in pixels, from 0, the default, to 100. A few pixels remove the ragged outline around noise and stars.
Screening: Off by default. On, the mask is multiplied by the image's values: inside the range the image shows through, brighter parts more selected than fainter ones.
Lightness: On by default. A color image's CIE L* gives one gray mask; off, each color channel gives its own, and the mask is a color image. Gray images ignore it.
Invert: Off by default. On, the mask is inverted as the last step: what was white is black.
3.3Apply, Preview and Instance
Live preview (the eye): At the end of the Applies to row; Preview in the system bar is the same switch. On by default. The image shows the mask that will be made, over the part in view, as the settings change, with the banner "PREVIEW only, nothing applied"; the image itself does not change. Before, in the banner, or the backslash key held, shows the image as it is. At a reduced zoom the smoothness is scaled with the view, so the preview looks as the mask will at 1:1.
Applies to: The image Range Mask reads, chosen in a list of the open images. It shows the image in front, and follows it as we bring other images to the front. Picking another image in the list makes the panel work on that one, its live preview included, without bringing it to the front; the pick stays while we work on other images, and Follow Active, the small button that appears beside the list, makes the panel follow the image in front again. An image that a tool or a run is working on is listed, but cannot be picked.
Apply: Makes the mask as a new image in its own tab, <image>_range_mask,
offered as a mask of the image. The image is only read: no history step.
Instance: Shows the process as the panel has it now, as text: the settings as a DSPX
process (.dsproc) or as a PixInsight process icon (.xpsm) of RangeSelection, chosen under
Format. Copy puts the text on the clipboard; Save... saves it as a file and puts it on the Process
Shelf.
Reset: Puts every setting back to its default.
The system bar along the bottom of the panel has the same commands as small icons: at the left, drag to apply and Apply; at the right, Instance, Help (this page) and Reset. Drag to apply, the first icon, carries the process with its settings: dropped on an image's window, it makes that image's mask, whatever image the panel works on; dropped on the Process Shelf, it is kept there as a row of its own. With , the bar alone has them.
4How the Mask Is Made
The steps, in order, for each pixel of the lightness or of each channel:
- Membership. 1 inside the limits, 0 outside. With fuzziness, a ramp of width z, the range times the fuzziness divided by 2, inside each limit: the mask is 0 at the lower limit and reaches 1 a width z above it, and comes down to 0 at the upper limit the same way.
- Screening. The membership multiplied by the pixel's value.
- Smoothing. A Gaussian blur of the given standard deviation.
- Inversion. 1 minus the mask.
5Usage Tips and Tricks
Protect the background. A range mask with the lower limit just above the sky, some fuzziness and a few pixels of smoothness lets a stretch, a saturation or a sharpening work on the object and leave the sky's noise alone.
Protect the highlights. Lower the upper limit to keep the stars' cores and a galaxy's center out of the mask, or invert a mask of the bright parts.
Work on a stretched image. Range Mask reads the image's values, not what the screen shows: on a linear image everything is near black. Make the mask from a stretched copy, or after the stretch.
Combine with a star mask. A range mask selects nebulosity and stars alike. To leave the stars out, subtract a star mask from it with Pixel Math.
6Related Tools
Deep Star Mask: a mask of the stars, star by star.
Invert: turns any mask around.
Blur: softens a mask further.
Pixel Math: any mask written as an expression, or masks combined.