Clone Stamp
Paint with pixels copied from another part of the image
The Clone Stamp paints with pixels copied from another part of the same image. We set the source with a Ctrl+click and paint where the pixels should go: each pixel under the brush takes the pixel at the same offset from the source. We use it to cover a defect, a satellite trail or a stray reflection with a clean patch of the sky around it.
1Introduction
Healing a flaw by hand starts with a clean source: a part of the image that looks like what should be under the flaw. The Clone Stamp copies it. After a Ctrl+click on the source, a drag with the brush paints a copy of the pixels at the same distance and direction from the pointer, blended by the brush's profile, its opacity and the image's mask. The overlay shows the brush and, beside it, a second circle where the pixels are coming from.
A stroke reads the image as it was when the stroke began, so it never copies what it has just painted, and a pixel under several dabs of one stroke gets the strongest of them, not their sum. With Aligned on, the offset of the first stroke is kept for the strokes after it, so the repair goes on consistently; off, each stroke starts again from the source point.
The Clone Stamp follows PixInsight's CloneStamp in what it does. It is a tool of DSPX's drawing family, with the same session, strokes and undo as the Paintbrush. A PixInsight CloneStamp icon is not read.

2Quick Start
- Open the image and click Clone Stamp on the toolbar. The Tool panel shows the Clone Stamp.
- Set the Radius and the Softness of the brush. A circle the size of the brush follows the pointer over the image.
- Ctrl+click on the clean part of the image to set the source. The panel shows its position.
- Paint over the flaw: each drag is a stroke. Ctrl+Z takes the last stroke back, Ctrl+Y paints it again.
- Click Apply. The strokes become one history step of the image.
3Interface & Parameters
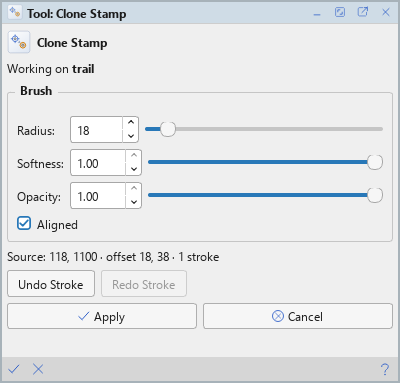
The Tool panel shows the tool's name and icon on its first row, with a hint, then the brush, the strokes, a line that says where the source is and what the offset is, and Apply and Cancel. The bar along the bottom of the panel has Apply (a check mark) and Cancel (a cross) on the left, and Help on the right.
3.1The Brush
Radius: The brush's radius, in pixels of the image, from 1 to 256. Ctrl and the mouse wheel over the image change it.
Softness: How the brush fades from its center: 0 is a hard edge, 1 a brush that fades from the center.
Opacity: How much of the source a stroke puts down: 1 is all of it.
Aligned: Keeps the first stroke's offset for every stroke after it. Off, each stroke copies from the source point again.
3.2The Strokes
A line says where the session is: before the source is set, "Ctrl+click to set the source."; then the source's position, the offset and the number of strokes.
Undo Stroke: Takes back the last stroke (Ctrl+Z over the image).
Redo Stroke: Paints the stroke taken back again (Ctrl+Y).
3.3Apply and Cancel
Apply: Ends the session with its strokes in the image: one history step, holding only the parts of the image the strokes changed. then takes all of them back at once.
Cancel: Ends the session with the image as it was when it began: every stroke is gone, to the last bit.
4Cloning
4.1The Session
The first stroke on an image starts the Clone Stamp's session on it. While the session is open the tool holds the image: it cannot be closed, processed, saved or undone from the History panel, and DSPX says so. Over that image, Ctrl+Z and Ctrl+Y are the tool's, one stroke at a time.
4.2The Mask
Where the image's mask is black, nothing is painted; where it is gray, the stroke is blended in proportion. A mask over the area to repair keeps the clone from touching what is next to it.
5Usage Tips and Tricks
A source with the same texture. A clean patch with the same sky and the same noise as the flaw's surroundings repairs best. A source from a different level of brightness shows as a patch.
Aligned for long repairs. A trail or a scratch is covered by many strokes along it. With Aligned on, they all copy from the same relative place.
A soft brush for the edge. A hard brush leaves a visible edge on a smooth sky. A softness of 0.5 or more blends the patch in.
Low opacity for subtle repairs. Several strokes at a low opacity, each lifted before the next, build up a repair without the flat look of a single stroke.
6Related Tools
Paintbrush: paints, blends, blurs and smudges with a brush, with the same session and undo.
Selection: selects an area by hand, to keep a repair inside it.
Clipboard: copies a part of an image and pastes it elsewhere.