
Dark Structures
Dust lanes and dark nebulae made darker and more contrasted
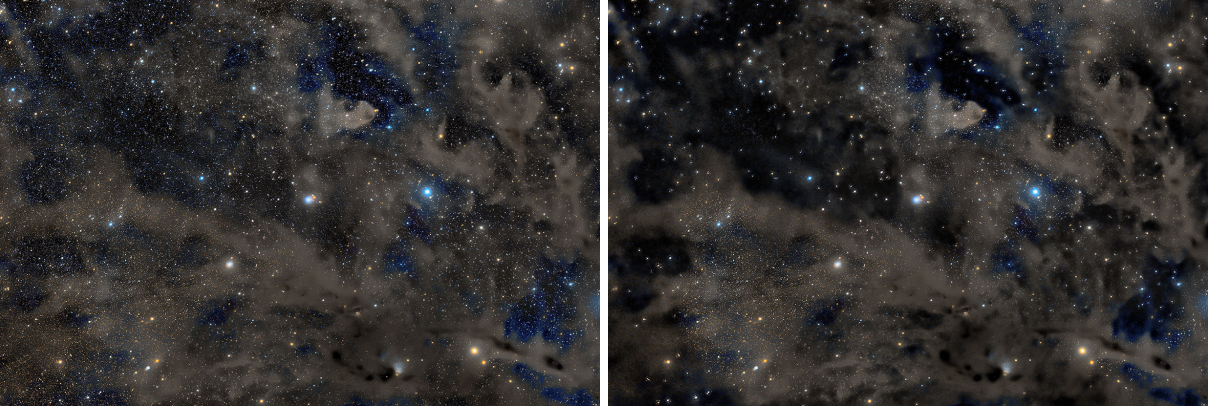
Dark Structures darkens dust lanes, dark nebulae and globules so they read as darker and better defined against the glow around them. It acts on the mid-dark part of the image only, never brightens a pixel, and leaves the stars, the darkest sky and the color alone.
1Introduction
A dust lane is a structure darker than its surroundings, and a stretched image tends to lose it in the lift of the background. Dark Structures measures how much darker each pixel is than the average around it, at several scales, and darkens the pixel in proportion to that depth. A large structure is judged against a large surroundings and a small one against a small, with an edge-preserving average, so there are no halos around the lanes.
Where the effect acts is decided from the image itself. A smoothed copy of the luminance is measured at four percentiles of the whole image, and the effect is strongest in the mid-dark band between the Darkest and the Brightest percentile, fades out in brighter regions and does not touch the near-black floor. Because the band is set by percentiles, the same settings fit a linear image and a stretched one.
The change is made on the lightness: the luminance gets a gain, and red, green and blue are multiplied by it alike, so
hue and saturation stay. It is held back around the stars and next to much brighter features. Dark Structures is our own
design and has no equivalent in PixInsight, so it saves as a DSPX process (.dsproc) only.
2Quick Start
- Open the image, stretched or linear, and choose . The live preview (the eye) shows the result on the part in view.
- Turn on Show mask to see where the process acts: white is where it acts. Move Darkest and Brightest until the band covers the lanes and not the sky or the bright nebula. Turn it off again.
- Raise Strength to darken the lanes more.
- Click Apply.
3Interface & Parameters
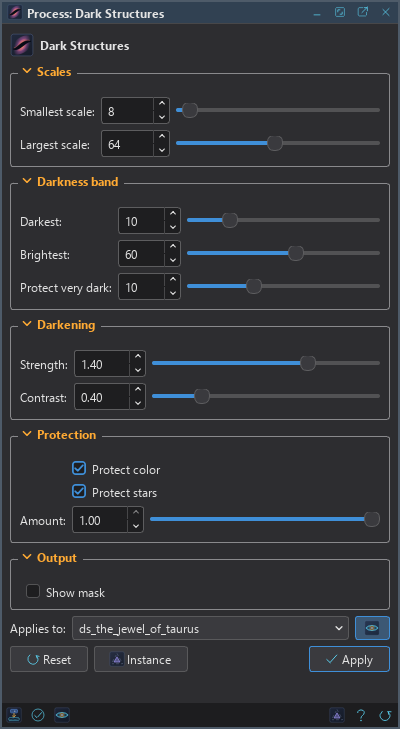
The panel has five sections, Scales, Darkness band, Darkening, Protection and Output, each of which folds away with the arrow beside its title, then the image the process applies to with the live preview's eye, the buttons and the system bar along the bottom.
3.1Scales
Smallest scale: The smallest structures darkened, in pixels, from 4 to 128. 8 by default.
Largest scale: The largest structures darkened, in pixels, from 4 to 128. 64 by default. It also sets how smooth the darkness map is.
3.2Darkness Band
Darkest: The darkest part of the image to leave alone, as a percentile of its smoothed brightness, from 0 to 50. At the default, 10, the darkest 10 percent is left as it is.
Brightest: Where the effect starts to fade out toward the brighter regions, as a percentile, from 20 to 90. At the default, 60, it acts up to the 60th percentile.
Protect very dark: How gradually the effect rises toward the darkest limit, in percentiles, from 0 to 30. 10 by default. At 0 the edge is hard.
3.3Darkening
Strength: How much a dark structure is darkened, in proportion to how much darker it is than its surroundings. From 0 to 2, 0.6 by default.
Contrast: Pushes the dark structures further below their local mean, for more contrast with their surroundings. From 0 to 2, 0.4 by default.
3.4Protection
Protect color: Changes the lightness only, scaling red, green and blue alike so hue and saturation stay. On by default. Off, each channel is darkened by its own depth.
Protect stars: Leaves the stars the program finds in the image, and the surroundings of bright features, alone. On by default.
Amount: The share of the change that is kept, from 0 to 1. At 0 the image is as it was; at the default, 1, the whole change.
3.5Output
Show mask: Shows where the process acts, in white, instead of applying it. The live preview shows it, and Apply makes a new mask image and leaves the image as it is. Off by default.
3.6Apply, Preview and Instance
Live preview (the eye): At the end of the Applies to row; Preview in the system bar is the same switch. The band is measured on the whole image, so the preview of a part shows what Apply gives there. The banner says "PREVIEW only, nothing applied"; the image does not change until Apply. Before, in the banner, or the backslash key held, shows the image as it is.
Applies to: The image the process works on, chosen in a list of the open images. It shows the image in front, and follows it as we bring other images to the front. Picking another image in the list makes the panel work on that one without bringing it to the front, and Follow Active, the small button that appears beside the list, makes the panel follow the image in front again.
Apply: Darkens the image named in Applies to, in one history step that Undo takes back, through the image's mask if it has one. With Show mask on, it makes a new mask image and leaves the image alone.
Instance: Shows the process as the panel has it now, as text, a DSPX process
(.dsproc). Copy puts the text on the clipboard; Save... saves it as a file and puts it on the
Process Shelf.
Reset: Puts every setting back to its default.
The system bar along the bottom has the same commands as small icons: at the left, drag to apply and Apply; at the right, Instance, Help (this page) and Reset.
4What Dark Structures Does
- The luminance smoothed at the largest scale is measured at four percentiles of the whole image: Darkest less Protect very dark, Darkest, Brightest and Brightest plus 15. The weight of the band is 0 at the near-black floor, 1 in the mid-dark band and 0 in the brighter regions.
- The depth of a pixel is how far it is below its surroundings: one minus its luminance over the local mean. The mean is an edge-preserving mean at each scale from the Smallest to the Largest, and the deepest depth counts.
- The luminance L becomes L times one minus Strength times the weight times the depth. Contrast times the weight times the distance below the local mean is then taken off where L is below that mean.
- The change is held back around the stars and next to much brighter features, kept so that the multiplier stays between 0.15 and 1, and blended by Amount.
5Usage Tips and Tricks
Start from the mask. Show mask turns the band into an image. The lanes should be white in it, and the sky and the bright cores black.
Scale to the lanes. Raise the Largest scale for broad dust, lower the Smallest scale for fine filaments and globules.
Amount for a gentle touch. Instead of lowering Strength until the effect disappears, lower Amount: the shape of the effect stays and its share decreases.
Use the mask elsewhere. The mask Show mask makes with Apply is a mask of the dark structures. Attached to the image, it lets other processes act on the lanes alone.
6Related Tools
Wavelets: works the image layer by layer, when we want to shape the scales ourselves.
Curves: darkens a range of tones everywhere, without the local measure.
Deep Morphology: works on the stars and the structures of an image by shape.
Range Mask: a mask from a range of brightness, to protect or to select.