
Defect Map
Defective pixels replaced by what their good neighbors say
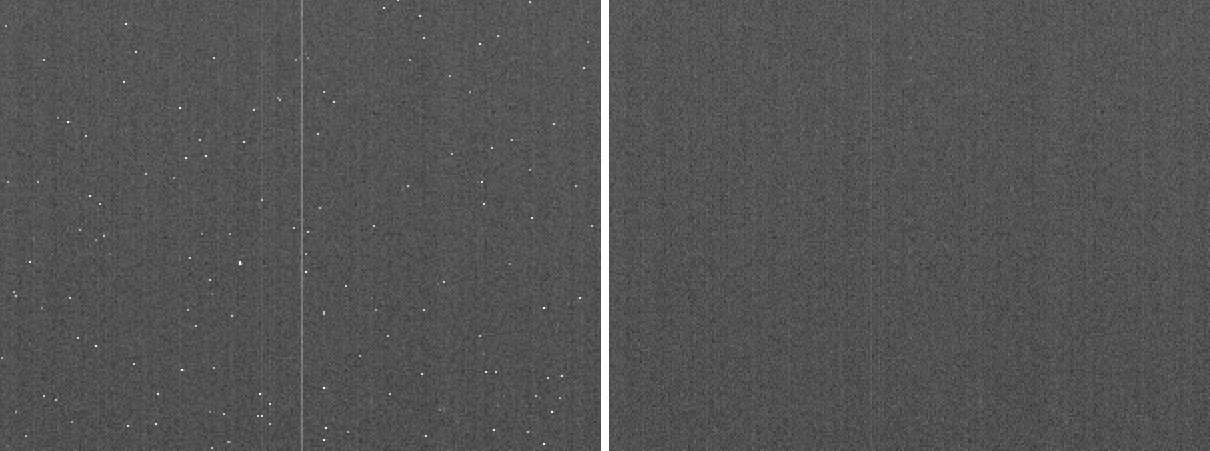
Defect Map replaces the defective pixels of an image, the ones a defect map image marks with zero, with a value computed from their good neighbors. The map can come from a master dark or any image we made, and DSPX can also find hot and cold pixels in the image itself, so a map is not always needed. It is the tool to clean a few known pixels or columns of a sensor.
1Introduction
Every sensor has pixels that do not behave: hot ones that glow, cold or dead ones that stay dark. A defect map is an image of the same size that is zero where a pixel is defective and nonzero elsewhere. Defect Map reads the map and, for every defective pixel, grows a neighborhood around it until it holds enough good pixels, then gives the pixel the median, the mean, the Gaussian-weighted mean, the minimum or the maximum of the good ones. The pixels that the map does not mark are not touched, and a defective pixel is never used to repair another.
The shape of the neighborhood can be a square, a circle, or a horizontal or a vertical line, which repairs a defective column from the pixels of its own row. For a raw frame that is not debayered, only the neighbors of the same color are used.
Defect Map follows PixInsight's DefectMap by its parameters, and a PixInsight icon of that process opens here. DSPX has two additions of its own that are not written to a PixInsight icon: for a raw frame the neighbors of a green pixel are always green ones, and the option Detect hot and cold finds the defects in the image itself.
2Quick Start
- Open the image to repair and the defect map, which marks the defects with zero, and choose .
- Choose the map under Defect map.
- Leave Operation on Median and Structure on Square. Turn on CFA image if the image is a raw frame that is not debayered.
- Click Apply.
Without a map, set Detect hot and cold to a number of sigma, such as 5, and apply: the pixels that stand out of their neighbors by more than that are found and repaired.
3Interface & Parameters
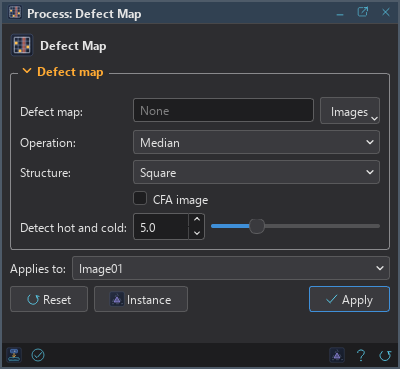
The panel has one section, Defect map, then the image the process applies to, the buttons and the system bar along the bottom.
3.1Defect Map
Defect map: The open image that marks the defective pixels with zero, of the image's size, chosen in a list of the open images. A gray map serves every channel of a color image; a color map needs a color image. None by default; with Detect hot and cold above 0, the map is optional.
Operation: How the neighbors give the new value:
- Mean: the mean of the good neighbors, weighted by the map.
- Gaussian: their Gaussian-weighted mean, weighted by the map.
- Minimum: the lowest of them.
- Maximum: the highest of them.
- Median: their median. The default.
Structure: The shape of the neighborhood: Square (the default), Circular, Horizontal or Vertical.
CFA image: The image is not debayered: only neighbors of the defect's color are used. Off by default. In DSPX's own mode the neighbors of a green pixel are green ones; with the PixInsight compatibility mode on, in , a green defect takes its neighbors of any color, as PixInsight's process does.
Detect hot and cold: Also repairs the pixels that stand out of the median of their neighbors of the same color by more than this many sigma, found in the image itself, together with the map's. From 0 to 20, 0 by default, which means the map's pixels only. It is a setting of DSPX and is ignored with the PixInsight compatibility mode on.
3.2Apply and Instance
Applies to: The image to repair, chosen in a list of the open images. It shows the image in front, and follows it as we bring other images to the front. Picking another image in the list makes the panel work on that one without bringing it to the front, and Follow Active, the small button that appears beside the list, makes the panel follow the image in front again.
Apply: Repairs the image named in Applies to, in one history step that Undo takes back, through the image's mask if it has one. The result is cut to the range 0 to 1.
Instance: Shows the process as the panel has it now, as text: a DSPX process
(.dsproc) or a PixInsight process icon (.xpsm), chosen under Format. Copy puts
the text on the clipboard; Save... saves it as a file and puts it on the Process Shelf.
Reset: Puts every setting back to its default.
The system bar along the bottom has the same commands as small icons: at the left, drag to apply and Apply; at the right, Instance, Help (this page) and Reset.
4How a Defect Is Repaired
For a defective pixel the neighborhood grows from a radius of 1, in pixels, until the mean of the map over its square is 0.35, so that enough good pixels are in it. For a CFA image the neighborhood counts only the pixels of the same color, and the mean needed is three times that. The radius is at most 100. The structure picks the pixels of the neighborhood, and the operation gives the value from the good ones among them.
5Usage Tips and Tricks
A map from a master dark. A hot pixel is easy to find in a master dark. Binarize the pixels above a level to get a map, inverted so that the defects are zero, and use it on the light frames.
A defective column. A Horizontal structure repairs a bad column from the pixels on its own row on either side, since the neighbors in the column are defective too.
Detect hot and cold for a quick clean. With no map at hand, 5 sigma on a calibrated frame finds the isolated hot and cold pixels. A lower value starts to take stars for defects.
6Related Tools
Cosmetic Correction: finds and repairs hot and cold pixels of the frames in a pre-processing run.
Binarize: turns an image into a map of black and white pixels.
Calibration: calibrates the frames, before the cosmetic repair.