Draw
Shapes drawn into the image: filled, outlined, soft or hard
Draw paints shapes into an image: freehand strokes, lines, rectangles, ellipses, polygons and magic wand fills, each filled, outlined or both, in a color of our choice or one picked from the image, with its own opacity, thickness and soft edge. The shapes stay editable until we apply them, and Apply writes them all into the pixels as one history step. We use it to annotate an image, to cover an area with a flat tone or a gentle gradient of color, or to paint a quick mask by hand.
1Introduction
Draw is the interactive side of DynamicDraw, with the module's own engine. Every shape we draw is a step in the tool's history and carries its own style: color, fill or outline, opacity, thickness and softness, as they were when we drew it. Until we apply, the shapes live in the tool, drawn over the image exactly as Apply will write them; we can undo them, move them, turn and resize them, change the style of any one of them, or drop it.
Later shapes are painted over earlier ones, each through its opacity. There is no adding or subtracting as in the Selection tool: each shape simply paints. The image's mask is not used, as in PixInsight, where the module is not maskable, and the image's selection does not limit the shapes either: what we draw is where it goes.
2Quick Start
- Open the image and click Draw on the tools toolbar (or ).
- Choose the shape under Draw, the Style (Fill, Outline or Fill and outline) and the color: click the swatch to choose one, or Pick and then click the image to take a color from it.
- Set Opacity, Thickness for outlines, and Softness for a soft edge.
- Drag on the image to draw. Each shape is a step; Ctrl+Z takes back the last one.
- Click Apply. The shapes are written into the image as one history step.
3Interface & Parameters
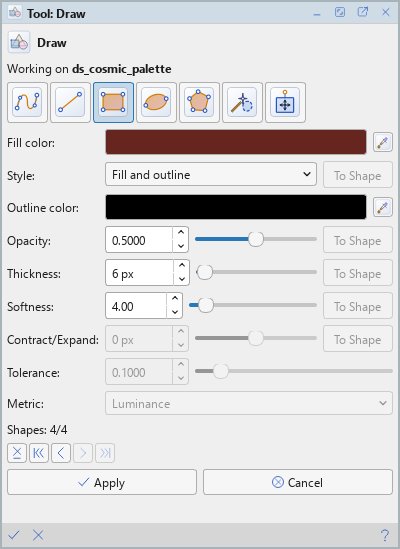
The panel starts with the tool's name, whose tooltip says what Draw does and how to use it, and the image the session is on. Each setting applies to the shapes we draw next; the To Shape button at the end of its row gives the setting to a shape already drawn.
3.1The Shape and Its Style
Draw: The shape the next drag or click makes. Pointing at the list shows how to draw the one chosen:
- Freehand: we drag any path. In the Fill styles it closes into a region; in Outline it is an open stroke of the thickness, ending where we let go.
- Line: we drag from start to end, a straight line of the thickness (a hairline in the Fill style); Shift snaps it to 0, 45 and 90 degrees.
- Rectangle: we drag from corner to corner; Shift makes a square.
- Ellipse: we drag its box; Shift makes a circle.
- Polygon: we click each vertex; a click on the first vertex, a double click or Return closes it, Backspace removes the last vertex and Esc gives it up.
- Magic wand: a click fills the connected area of pixels similar to the one clicked, as Tolerance and its metric say.
Color: The color shapes are painted in; a click on the swatch opens the color dialog. In the Fill and outline style it reads Fill color. On a gray image the color is written as its luminance. Pick beside it arms the eyedropper: the next click on an image, any image, sets the color from the pixels there.
Style: What a shape paints:
- Fill: its interior, in the color.
- Outline: its edge only, to the Thickness, in the color.
- Fill and outline: both, the edge in the outline color.
Outline color: The edge's color in the Fill and outline style, with its own Pick. Disabled in the other styles.
Opacity: How opaque new shapes are, from 0 to 1 (fully opaque).
Thickness: The width of outlines, lines and open strokes, in pixels, from 1 to 500. Not used in the Fill style.
Softness: A soft edge for new shapes, as the radius (sigma) of a Gaussian in pixels, from 0 (a hard edge) to 50. The soft transition is added outward: a soft shape covers all of the area a hard one would, plus a fading margin, so it never creeps inside the line we drew.
Contract/Expand: For magic wand fills only: grows or shrinks the region found by this many pixels before it is filled, negative values contracting, positive expanding, from −50 to 50.
Tolerance: For the magic wand: how far a pixel may differ from the one clicked and still be filled, from 0 to 1. The list beside it is the metric: Luminance compares brightness, RGB the largest difference of the three channels.
To Shape: On the Style, Opacity, Thickness, Softness and Contract/Expand rows: gives the value in the row to the current shape, the most recent one in the history (Style's gives the color, the style and the outline color together). It is enabled only while the row differs from that shape. It is not a step of its own: undoing the shape undoes the change with it.
Move / Rotate / Resize: Puts a frame with handles on the current shape: drag inside it to move the shape, a corner handle to turn it about its center, a side handle to resize it. Drawing is off meanwhile. A magic wand fill cannot be moved.
3.2The Shapes
A line counts the shapes: "Shapes: 4/4" is four in force out of four drawn. The buttons below travel the history, and traveling sets the style controls to the shape it lands on:
Delete: Drops the current shape for good (Delete over the image).
|<: Undoes every shape.
<: Undoes the last shape, or the last move of it (Ctrl+Z).
>: Redoes the last shape or move undone (Ctrl+Y).
>|: Redoes every shape undone.
3.3Apply and Cancel
Apply: Draws every shape in force into the image, in the order drawn, and ends the session: one history step.
Cancel: Drops the shapes and ends the session; the image is as it was.
The bar along the bottom of the Tool panel has Apply (the check mark) and Cancel (the cross) on the left and Help on the right.
4Working With Shapes
4.1Changing a Shape Already Drawn
Every shape remembers its style. To change one drawn earlier we travel back to it with <, set the color, opacity, thickness or softness we want, click that row's To Shape, and travel forward again with >|. To move it, we travel to it and turn on Move / Rotate / Resize.
4.2The Session
Until Apply the shapes are the tool's, not the image's: the pixels do not change, and the image can even be saved as it is. The session holds the image all the same: it cannot be closed or processed until we apply or cancel. With another image in front, Ctrl+Z is that image's own undo; with ours, it is the tool's. Choosing another tool, or quitting, with shapes drawn asks whether to apply them, discard them or keep working.
5Usage Tips and Tricks
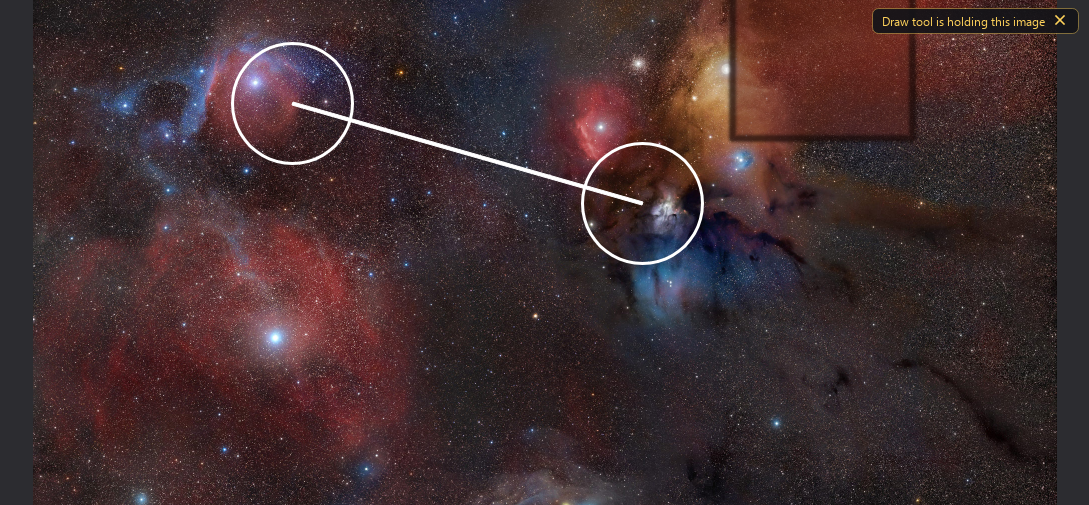
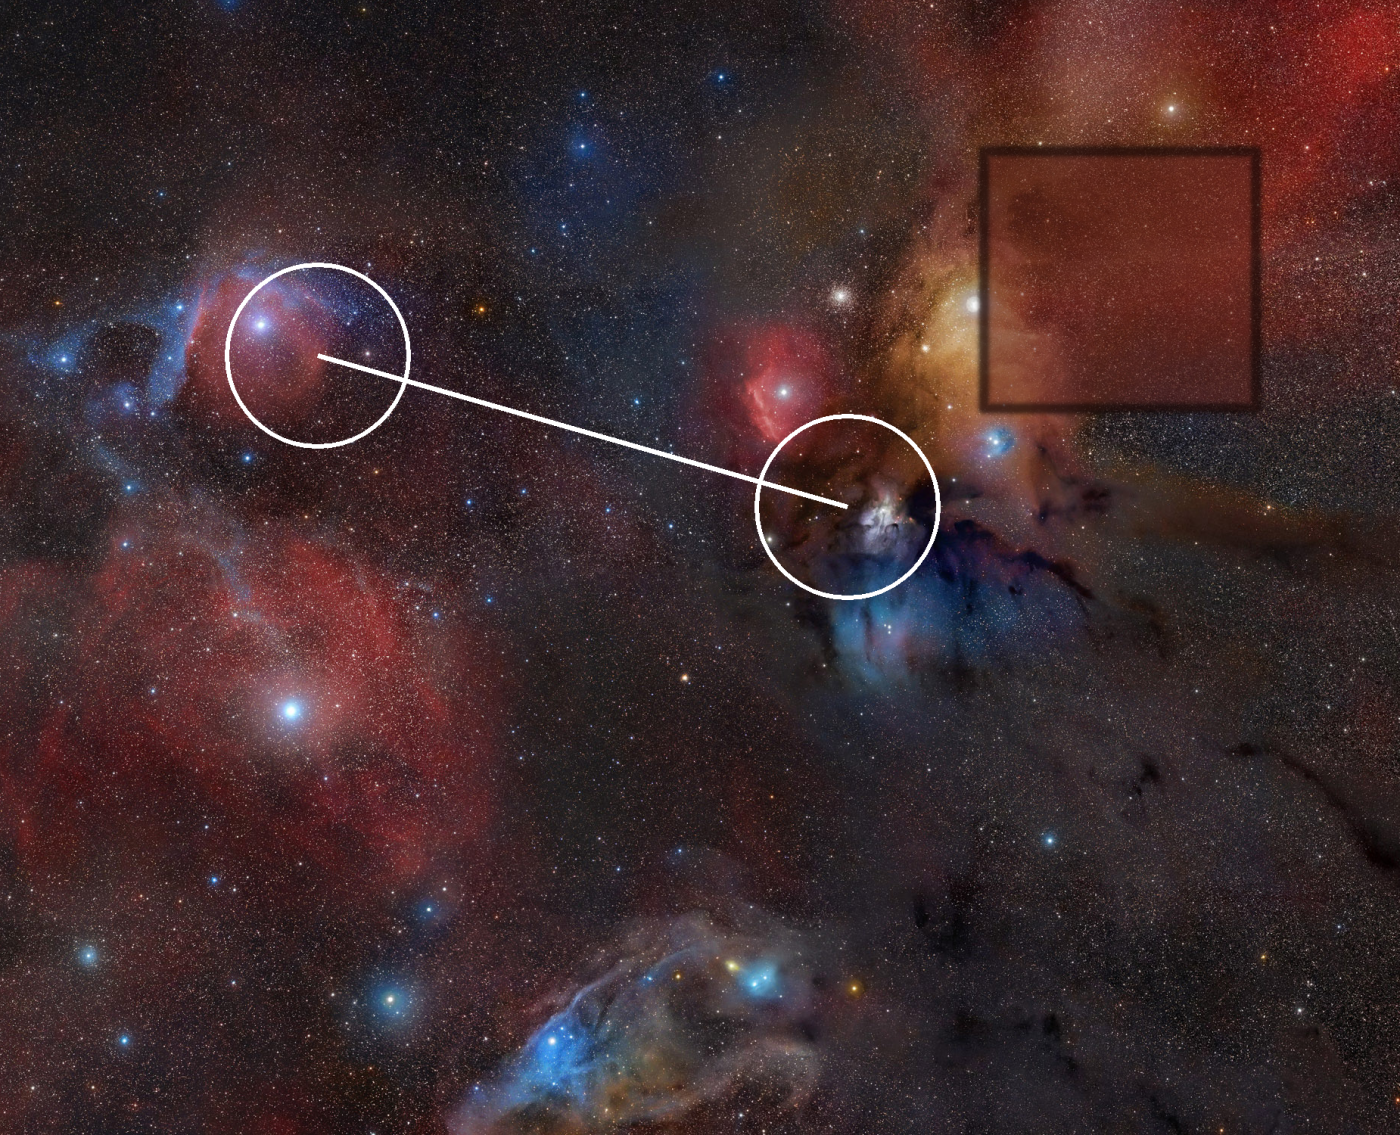
Annotations in Outline. Circles around objects and lines between them read best in Outline with a thickness of a few pixels; a little Softness takes the hard edge off at any zoom.
Pick colors from the image. The eyedropper takes a small average around the click, so a shape painted over a defect matches the sky around it.
Soft fills for gentle corrections. A large ellipse filled at low opacity with a high softness tints an area without any visible edge.
A hand-made mask. Drawn in white on a black image of the same size, shapes make a mask we can attach to the image with .
Keep a copy before annotating. Annotations are pixels after Apply. Drawing on a duplicate keeps the clean image for processing.
6Related Tools
Selection: the same shapes, drawn as a selection that limits processes instead of as paint.
Paintbrush: painting with a brush, with color, contrast, dodge and burn and other actions, through the image's mask.
Clipboard: copies pixels from one place to another, where a flat color would not do.