
HDR Compression
The large structures flattened, so the details of the bright parts show
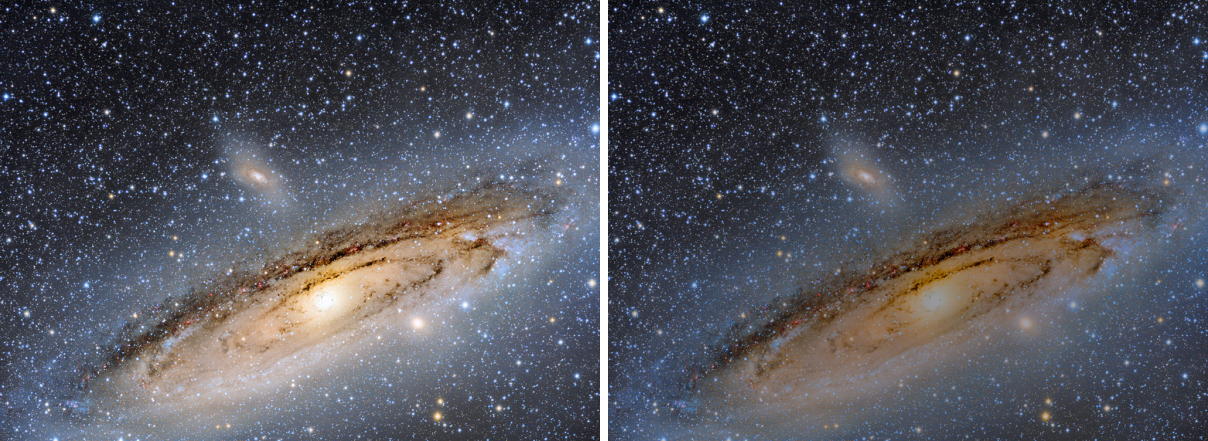
HDR Compression compresses an image's dynamic range: the structures larger than a chosen size are flattened, so the details inside a bright core, the Trapezium of the Orion Nebula or a galaxy's center, show again while the faint parts stay as they were. We use it on a stretched image whose brightest parts have lost their contrast.
1Introduction
A stretch that shows the faint outskirts of an object leaves its bright parts nearly white: the details are still in the pixels, but they sit on top of a large, bright glow that uses most of the range. HDR Compression separates the image into its small structures, the layers up to a given size, and the large ones, the residual. It flattens the residual to its mean, keeps the small structures, and rescales the result: the glow is gone, the details inside it have room again.
By default it works on the lightness, so the colors stay, and through the image's own lightness as a mask, so the dark parts are left alone. An automatic midtones balance then brings the result's median back to the image's, so the image keeps its overall brightness.
HDR Compression is our own engine, with the parameters of PixInsight's HDRMultiscaleTransform: a PixInsight icon of it opens here, and the panel saves one that PixInsight opens.
2Quick Start
- Open the stretched image and choose . With the live preview (the eye) on, the result shows on the image as the settings change.
- Set Layers to the size of the details to keep: the structures up to 2 to the power of the layers, in pixels, are kept. 8, the default, keeps those up to 256 pixels.
- If the effect is too weak, raise Iterations or Overdrive.
- Click Apply.
3Interface & Parameters
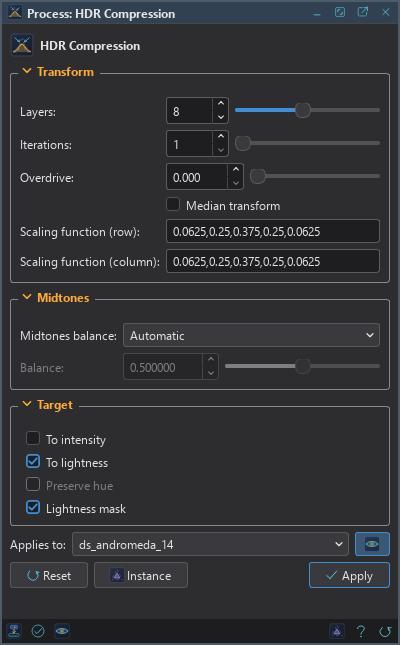
The panel has three sections, Transform, Midtones and Target, each of which folds away with the arrow beside its title. Under them are the image the process applies to with the live preview's eye, the buttons and the system bar along the bottom.
3.1Transform
Layers: The structures up to 2 to this power, in pixels, are kept; what is larger is compressed. From 1 to 16; 8 by default (PixInsight's is 6, which on images of a few thousand pixels flattens the nebula's own shapes too). More layers compress only larger structures; fewer reach into smaller ones.
Iterations: The compression applied again to its own result, from 1 to 16; 1 by default. Each iteration compresses more.
Overdrive: Beyond flattening, from 0 to 1: the large structures are taken away more than they are, for a stronger compression. 0, the default, flattens them.
Median transform: Off by default. On, the structures are separated by medians instead of the starlet: no dark rings around bright stars, at the cost of some speed.
Scaling function (row): The starlet's scaling function, as PixInsight writes it: the B3 spline,
0.0625,0.25,0.375,0.25,0.0625, by default; 0.5,1,0.5 is the linear interpolation. Not used
with the median transform.
Scaling function (column): The scaling function's column filter: the row filter's when empty.
3.2Midtones
Midtones balance: What is done to the result's brightness after the compression:
- None: the result as the compression leaves it, rescaled into the range from 0 to 1.
- Automatic: the default. A midtones transfer that brings the result's median, over the whole image, back to the image's, so it keeps its brightness.
- Manual: the midtones transfer given in Balance.
Balance: With Manual, a midtones transfer of the result, from 0 to 1: below 0.5 brighter, above darker; 0.5, the default, changes nothing.
3.3Target
To intensity: Off by default. Compress a color image's intensity, as HSI defines it, only.
To lightness: On by default. Compress a color image's lightness, CIE L*, only, which keeps its colors. When both are on, the lightness is used.
Preserve hue: When neither is on, each channel is compressed on its own; on, each pixel's hue is put back afterward. Off by default.
Lightness mask: On by default. Compress through the image's own lightness, so the dark parts are left as they are and the bright ones get the whole effect.
3.4Apply, Preview and Instance
Live preview (the eye): At the end of the Applies to row; Preview in the system bar is the same switch. On by default. The image shows HDR Compression applied to the part in view, as the settings change, with the banner "PREVIEW only, nothing applied"; the image itself does not change until Apply. Before, in the banner, or the backslash key held, shows the image as it is. The means, the range and the midtones balance are always those of the whole image. At a reduced zoom the layers are reduced by the zoom's octaves, so the preview compresses the same structures as Apply; it is close to Apply, not the same.
Applies to: The image HDR Compression works on, chosen in a list of the open images. It shows the image in front, and follows it as we bring other images to the front. Picking another image in the list makes the panel work on that one, its live preview included, without bringing it to the front; the pick stays while we work on other images, and Follow Active, the small button that appears beside the list, makes the panel follow the image in front again. An image that a tool or a run is working on is listed, but cannot be picked.
Apply: Compresses the image named in Applies to, in one history step that Undo takes back, through the image's mask if it has one. The size, the sample format, the metadata and the astrometric solution stay as they are.
Instance: Shows the process as the panel has it now, as text: the settings as a DSPX
process (.dsproc) or as a PixInsight process icon (.xpsm) of HDRMultiscaleTransform, chosen
under Format. Copy puts the text on the clipboard; Save... saves it as a file and puts it on the
Process Shelf.
Reset: Puts every setting back to its default.
The system bar along the bottom of the panel has the same commands as small icons: at the left, drag to apply and Apply; at the right, Instance, Help (this page) and Reset. Drag to apply, the first icon, carries the process with its settings: dropped on an image's window, it applies them to that image, whatever image the panel works on; dropped on the Process Shelf, it is kept there as a row of its own. With , the bar alone has them.
4How It Works
For each iteration, on each plane, the lightness, the intensity or each channel:
- The residual r after the detail layers is computed, with the starlet or the median transform.
- The plane x becomes y = x − (1 + overdrive)(r − mean r): the large structures are flattened to their mean, and beyond it with overdrive.
- With the lightness mask, the change is weighted by the plane itself: x + x(y − x), so the dark parts keep their values.
- Every plane is rescaled together, from the extremes of the whole image, into the range from 0 to 1.
Last, the midtones balance. Because the means, the rescaling and the balance use the whole image's values, the live preview at 1:1 of a part of the image gives the result the whole image's Apply gives there.
5HDR Compression and PixInsight
PixInsight's algorithm is not published in full, so ours follows its documentation: results are close to PixInsight's in kind, not the same, in either of DSPX's modes. Two defaults are ours: To lightness and Lightness mask are on here and off in PixInsight, since a compression of the lightness through itself is what most images need. A PixInsight icon states every value, so it opens as it was saved.
Some of PixInsight's options are not done yet: inverted iterations, the deringing and its maps, the multiscale linear transform instead of the starlet, and the intensity of PixInsight 1.9.5. An icon keeps their values, and a run with one of them away from its default says it was left out.
6Usage Tips and Tricks
Through a mask. HDR Compression flattens the whole image a little. A Range Mask of the bright core, attached before Apply, limits the effect to where it is needed.
Choose the layers by the core's size. Look at the bright region at 1:1: its details are a few pixels to a few tens of pixels across. Layers 5 to 7 suit most nebula cores and galaxy centers; fewer layers reach into the details and flatten them too.
Give the contrast back. After a strong compression, a gentle S curve with Curves restores the overall contrast without bringing back the glow.
Stars with dark rings. When bright stars sit in the compressed region, turn Median transform on.
GPU. In DSPX mode, with the starlet transform, every iteration (the layers, the mean of the residual, the compression, the rescale) and the midtones balance run on the graphics card when the image is a quarter of a megapixel or more. A 24 MP color image with the RGB/K target runs about nine times faster than on the processor; with the Lightness, Luminance or Intensity target the conversion of the colors runs on the card too and the gain is about the same, up to fifteen times. The median transform runs on the processor. The result agrees with the processor's to a few millionths of the range. Choose CPU only in to keep it on the processor, and see The Processor and the GPU.
7Related Tools
Wavelets: the same layers, each worked on alone.
Curves: the overall contrast after the compression.
Clarity: local contrast at a chosen scale, without ringing.
Range Mask: a mask of the bright parts to compress.