
Processes
Finding, setting, applying, saving and sharing processes
A process changes an image, makes new ones, or works on a list of files. This chapter explains how we find a process, how its panel works, what happens when we apply it, how a process and its settings are kept in a file, how PixInsight's process icons are opened and written, what PixInsight compatibility mode changes, how the AI processes find their files and choose between the graphics card and the processor, which other processes use the graphics card, and how the processes that work on files differ. The page of each process, with every one of its settings, is linked from the Process Reference.
6.1Finding and Opening a Process
Every process of DSPX is in the menu. The first entry, , is a submenu with every process in one alphabetical list. Below it, one submenu per category holds the same processes: Astrometry, Background, Channel Management, Color, Color Management, Convolution, Geometry, Image, Intensity, Masks, Morphology, Multiscale, Noise Reduction, PixelMath, Pre-processing, Sharpening and Stars. The categories and the processes in them are sorted by the names we read, in the language in use. is the exception: its steps keep the order of a night's work, from Calibration to RGB Combination, because that order says which step comes after which.
Choosing a process opens its panel. A process whose entry is not in the menu has its tool as its interface: the Crop tool is the interface of Dynamic Astro Crop (see Crop). Hovering over a menu entry shows what the process does. Below the categories the menu has the commands that work with saved processes (Saved Processes and the Process Shelf), the Process Shelf, and the commands for workflows and blueprints (Workflows and Blueprints).
A panel opens in the Process panel, or in a window of its own when Each process and tool in its own window is on in . How panels dock, float and share places is in Panels. Opening a process that already has a window brings that window to the front. Every panel has the same bar of buttons along its bottom, described next.
The categories and what they hold:
| Menu command | What it does |
|---|---|
| The processes you applied last, the latest first, each once. Choosing one opens it as the Process menu does, with its default settings. The number kept is set in . | |
| Every process in one list. | |
Puts the processes of .dsproc and .xpsm files on the shelf (Ctrl+Shift+O). | |
| Puts the processes of those files on the workspace as process icons. | |
Saves the settings of the panel in front as a .dsproc file, or as a PixInsight icon. | |
Saves the same as a PixInsight process icon (.xpsm). | |
Saves every row of the shelf in one .xpsm file. | |
| Applies the process of a file to the image in front, without opening anything. | |
| Shows or hides the Process Shelf panel. |
6.2The Process Panel
All process panels share one layout. From the top: the row Applies to: that names the image the process works on, the settings in sections, and along the bottom the buttons and the progress of a running process.
6.2.1Applies to
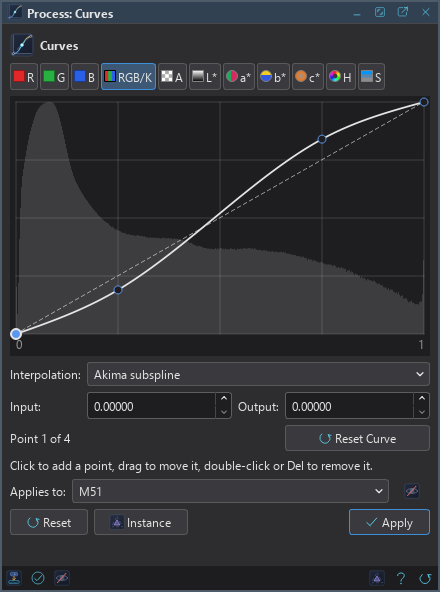
The list at the top shows the open images, with the image in front chosen. The process works on the image it shows: its
live preview, its snapshots and Apply all go to that image. If we pick another image in the list, the
panel stays on that image even when a different one comes to the front, and a small button, Follow
Active, appears beside the list. Clicking it, or picking the image in front, makes the panel follow the image in front
again; closing the picked image does the same. A layered image is listed with its target, for example M42 › Ha,
which is its active layer, chosen in the Layers panel (Working on a Layer). Under it
the list offers each of its image layers, indented, top layer first. Picking a layer keeps the panel on that layer, whichever
layer is active: its preview and Apply go there, and the active layer in the Layers panel does not change. With Layer alone on, the preview is drawn only over the
layer it was made for.
Follow Active goes back to the active layer; deleting the layer does the same. An image
that is held by a tool session, a run or a script is listed grayed, and the tooltip of the row says why; we have to finish
that work first.
At the end of the row, for processes that can be previewed live, an eye turns the live preview on and off. It is on by default and remembered for each process. What the preview shows, and how a process that cannot be previewed live is previewed, is the subject of Previewing a Process. Which processes have which preview is in Which processes preview live, below.
6.2.2Settings, sections and tooltips
The settings are grouped in sections. A click on the title bar of a section folds it away or opens it again, and so do Space and Enter on the focused title. The state we leave a section in is remembered for that process. A few panels with many expert settings start with some sections folded: all of the sections of Calibration, all but the first of Integration, and others. A setting that a guided run asks us to check opens its section by itself.
Each control has a tooltip, and every setting is explained on the process's page. The kinds of control are:
- sliders with a number field, for values in a range; a slider that offers a fine adjustment comes back to the middle when let go;
- check boxes and lists of choices;
- a size in pixels that follows the image, with a tooltip that gives the range for the image in front;
- a list of the open images, to pick a mask, a luminance or another image the process reads, with an Images button;
- a text field with Browse... for a folder or a file, where the process needs one;
- a List button that offers named values, and, for color settings, Filters for narrowband filters and From selection to take the hue of the average color of the image's selection;
- tables, with their own buttons, and the editors some processes have: curves, histograms, sample boxes, regions.
Numbers follow the language chosen in Preferences (Localization); the files we save always use a point.
6.2.3The system bar
The thin bar along the bottom of the Process and Tool panels carries the buttons we use most. From the left:
Drag handle: Drag it to apply. Dropped on an image, it applies the process with the panel's settings to that image. Dropped on the Process Shelf, it keeps the process there; dropped on the workspace it becomes a process icon (Process Icons on the Workspace).
Apply: Applies the process to the image the panel works on. While a process runs, Apply is not available, and the panel shows a progress bar and Cancel.
Live preview: Turns the live preview on or off; for a process that has snapshots it is a plain Preview button that computes the preview again. When a preview we asked for is on the image, Hide preview next to it takes it off; Esc on the image does the same.
Instance: Opens a window with the source of the panel's settings, as a .dsproc or a PixInsight
.xpsm text, to copy or save (Saved Processes and the Process
Shelf).
Help: Opens the process's page of this documentation.
Reset: Puts every setting back to its default.
A tool's panel has Apply and Cancel in its place: the session of a tool ends with one of them (Tool Sessions). In , Display process system toolbar shows or hides the bar, and Hide classic buttons hides the panel's own Reset, Instance and Apply buttons when the bar is shown, since the bar has them all. Without the bar the panel's own buttons do the same.
6.2.4Applying and canceling
Apply runs the process on a separate thread, so the program stays usable. While it runs the panel shows its progress and Cancel, and the Log records what it ran with and how it ended (The Log). An image under a run, a tool session or a script cannot be changed by anything else until it ends. Cancel stops the run and leaves the image as it was.
A finished run blends its result into the image through the image's mask and selection, if it has them, and enters one step in the image's history, titled with the process, with a line of details that lists the settings that are not at their defaults. Undo and Redo go back and forward through those steps.
6.2.5Which processes preview live
More than half of the processes show their result on the image while we move a setting, before anything is applied. The first table lists them by category; the second lists the processes previewed on request, and the rest have no preview. A preview never changes the image (Previewing a Process). A preview runs the same code as Apply, so a process that uses the graphics card can use it for its preview too, when the part in view is large enough to gain from it; a small part stays on the processor (GPU Acceleration).
- Live: updates as we move a setting, at the zoom we are viewing.
- Live (scaled): live, computed for the zoom shown, with sizes in pixels scaled to it; Exact or Apply gives full resolution.
- On request: shown when we press Preview.
- None: the process runs when we click Apply or Run.
The kind is the one at the default settings. The Notes column says when a setting changes it.
| Process | Category | Preview | Notes |
|---|---|---|---|
| Background Extraction | Background | Live | |
| Channel Combination | Channel Management | Live | Only with Create a new image off; it is on by default. |
| LRGB Combination | Channel Management | Live | Live (scaled) with Chrominance noise reduction on. |
| Background Neutralization | Color | Live | |
| Brightness-Aware Palette | Color | Live | |
| Color Calibration | Color | Live | |
| Color Mask | Color | Live (scaled) | |
| Convert Color | Color | Live | |
| Line Colorizer | Color | Live | |
| Linear Fit | Color | Live | |
| Saturation | Color | Live | |
| SCNR | Color | Live | |
| Assign Profile | Color Management | Live | |
| Convert to Profile | Color Management | Live | |
| Blur | Convolution | Live (scaled) | No preview with the Image filter (a kernel image). |
| Sample Format | Image | Live | |
| Dark Room (All) | Image Adjustments | Live | |
| Color Grading | Image Adjustments | Live | |
| Color Light | Image Adjustments | Live | |
| Color Mixer | Image Adjustments | Live | |
| Grain | Image Adjustments | Live | |
| Local Contrast | Image Adjustments | Live | |
| Manual Color Calibration | Image Adjustments | Live | |
| Optics | Image Adjustments | Live | |
| Point Color | Image Adjustments | Live | |
| Vignette | Image Adjustments | Live | |
| White Balance | Image Adjustments | Live | |
| Adaptive Stretch | Intensity | Live | |
| Arcsinh Stretch | Intensity | Live | |
| Binarize | Intensity | Live | |
| Curves | Intensity | Live | |
| Exponential Transformation | Intensity | Live (scaled) | |
| Faint Signal Lift | Intensity | Live | |
| Histogram | Intensity | Live | |
| Hyperbolic Stretch | Intensity | Live | |
| Invert | Intensity | Live | |
| Masked Stretch | Intensity | Live | On request with more than 100 iterations. |
| Range Mask | Masks | Live (scaled) | |
| Deep Morphology | Morphology | Live (scaled) | |
| Dark Structures | Multiscale | Live (scaled) | |
| HDR Compression | Multiscale | Live (scaled) | |
| Wavelets | Multiscale | Live (scaled) | |
| Canon Banding Reduction | Noise Reduction | Live | |
| Multiscale TGV Denoise | Noise Reduction | Live | On request with more than 3 scales. |
| Noise Generator | Noise Reduction | Live | |
| Noise Reduction | Noise Reduction | Live | |
| Pixel Math | PixelMath | Live | Once the expressions are valid. On request with Rescale the result on or with pixel(); no preview with Create a new image on. |
| Clarity | Sharpening | Live (scaled) | |
| Flow Sharpen | Sharpening | Live (scaled) | |
| Unsharp Mask | Sharpening | Live (scaled) | |
| Star Recombination | Stars | Live | No preview with Result set to Layers, or Target set to New image. |
| Process | Category | Preview | Notes |
|---|---|---|---|
| Catalog Star Color | Astrometry | On request | On a part of the image, the colors are fitted to the stars of that part. |
| Photometric Glow Subtraction | Astrometry | On request | |
| Survey Overlay | Astrometry | On request | |
| Deep Star Mask | Masks | On request | With hand edits, of the whole image only. |
| Deep Sharpen | Sharpening | On request | |
| Deconvolution | Sharpening | On request | |
| Filament Sharpen | Sharpening | On request | |
| Multiscale Sharpen | Sharpening | On request | |
| Texture Sharpen | Sharpening | On request | |
| Deep Star Removal | Stars | On request |
No preview: the processes that change the image's size or shape (Canvas Size, Crop, Dynamic Astro Crop, Integer Resample, Resample, Rotate), those that make other images or work on files (Channel Extraction, Create Alpha Channels, Extract Alpha Channels, Merge CFA, Split CFA, Mosaic, Surface Align and every Pre-processing process), the ones that read or write information rather than pixels (FITS Header, Statistics, Plate Solve, Finding Chart), Text, Spectrophotometric Color Calibration, Spectrophotometric Flux Calibration, and the processes that run another program (GraXpert's three and StarNet2).
6.3Processes That Make New Images
Some processes make images instead of, or besides, changing the one they are applied to: the star image of
Deep Star Removal, the mask of Deep Star Mask, the filament mask of
Filament Sharpen, the images of Channel Extraction, and any
process that offers a new image as its output. A new image arrives in a tab of its own, named after the image it was made from
and a suffix that says what it is: M31_stars, M31_starless, M31_sharp. It has 32-bit floating-point samples, and it
carries over the FITS keywords and XISF properties of the image it came from.
A run that only makes new images leaves its target untouched: it adds no history step, and the target's mask plays no part. A new image is a document like any other: we can save it, rename it, or process it (New Images and Names).
A mask that a process made can be attached to the image it was made from in one action: bring the mask to the front and choose (Ctrl+Shift+M). The image gets the mask, and the mask is shown as in Masks.
6.4Saved Processes and the Process Shelf
A saved process is one process with the values of all its settings, kept in a file of its own. It is what PixInsight
calls a process icon, in the file format of DSPX: a .dsproc file. Applying a saved process gives exactly
what the panel gives with the same settings, bit for bit.
6.4.1Saving a process
- Set the panel as we want it.
- Choose , or click Instance in the system bar and then Save....
- Give the file a name. Its name is the name of the saved process, so renaming the file renames the process.
The file type list of the dialog offers .dsproc (a name typed with another extension is kept as typed) and, for a process PixInsight has, .xpsm. The saved process goes
on the shelf. The Instance window shows the text of the settings, with a Format: choice between
.dsproc (DSPX) and .xpsm (PixInsight), Copy to put the text on the clipboard, and
Save.... For a process PixInsight does not have, the window says so.
6.4.2Opening saved processes
(Ctrl+Shift+O) puts the processes of the chosen
.dsproc or .xpsm files on the shelf. A file with one process also opens it in its panel, with its settings. The same
happens with , with a file dropped on a panel, and with a file given on the command line. The
Log says, for each process, what the reading reported: a setting the process does not have, a value out of range that was brought
into it, a setting the file did not give and that keeps its default.
applies the process of a file to the image in front without opening anything; a file with several icons asks which one.
6.4.3The Process Shelf
The Process Shelf is a panel (, or in the Window menu) that lists the saved processes we opened or saved in this session and remembers them for the next. A tooltip on a row says where the process came from and what the reading of its file reported.
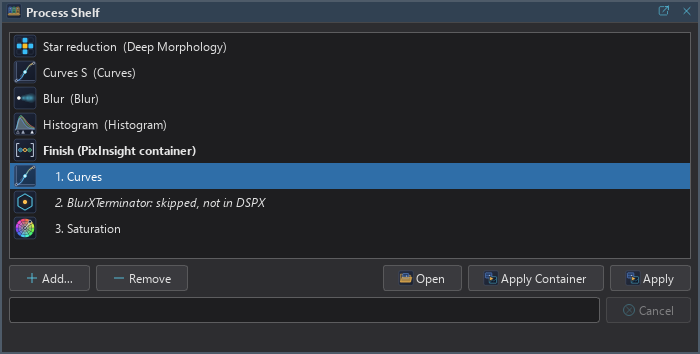
Apply: Applies the selected process to the image in front. A run started from the shelf shows its progress and Cancel on the shelf and leaves the process's own panel as it was. A file process on the shelf (Processes on Files) runs on its own files; no image is needed.
Open: Shows the selected process in its panel, with its settings. A double click does the same.
Remove: Takes the selected process off the shelf. The file stays where it is.
Add...: Opens files to put on the shelf.
Apply Container: For a row of a PixInsight container: applies the container's processes to the image in front (below).
6.4.4Drag and drop
- A shelf row, a panel's drag handle, or a
.dsprocor.xpsmfile from the file manager dropped on an image applies the process to that image (a file's first process; the file's processes also go on the shelf). The image comes to the front. - Dropped on the workspace's background or on the icon strip, they become process icons.
- Dropped on a panel, the file's processes go on the shelf.
- Dropped anywhere else, such as the image tabs or the status bar, a process is refused; files are taken anywhere.
The Log line of an applied saved process says which one it was, for example DeepMorphology (saved process Star reduction) on M31.
6.4.5The .dsproc file
A .dsproc file is plain UTF-8 text of name=value lines, so it can be read, compared and kept with any text tool. A short
header names the process (process.id, the process's id in DSPX), optionally its name, and the versions that wrote it; the settings
follow, by the same ids PixInsight uses where the meaning is the same.
process.format=1
process.id=DeepMorphology
process.name=Star reduction
operator=Erosion
amount=0.35
Tables are rows of numbered names with a count (images.count=3, images.0.path=...), so the file process
that lists its files keeps them in the file. Reading is forgiving: a setting the process does not have is reported and dropped, a missing
one keeps its default, an out-of-range one is brought into range and reported. A file from a newer DSPX with a format this one does not
know is refused with a sentence that says so.
6.5PixInsight Process Icons
DSPX's processes mirror PixInsight's processes of the same name, with the same parameter ids and values. That makes a process icon
written by PixInsight (.xpsm) open here, and an icon written here open in PixInsight. The table in the
Process Reference lists the PixInsight process behind each of ours.
6.5.1Opening icons
An .xpsm file is opened as any saved process (, dropping it, or from
). Each icon of a process DSPX has becomes a saved process, named after the icon, with its description.
The Log, and the tooltip of the shelf row, report what could not be mapped:
- parameters the process no longer has are ignored, as PixInsight ignores them;
- settings an older icon lacks keep their defaults;
- settings that only PixInsight's interface used, with values other than their defaults, are kept and reported as doing nothing here;
- values out of range or of the wrong kind are reported;
- icons of processes DSPX does not have (other developers' processes, scripts) are listed as skipped. A file that holds nothing DSPX has is refused with the list of what it holds.
The positions of the icons in the file are used when the file is opened as process icons, and the results a process icon carries from a past run (for example the statistics ImageIntegration stored) are not settings and are not read.
6.5.2Saving PixInsight icons
writes the settings of the panel in front as an icon that PixInsight loads. writes every row of the shelf in one file. In the file:
- each icon is named after what we called it, as a PixInsight identifier (letters, digits and underscores: "Reduce stars" becomes
Reduce_stars), once in the file; - values are written the way PixInsight writes them, with the precision of the parameter;
- settings that are DSPX's own, which PixInsight's process does not have, are left out, and the Log names those that were not at their defaults, since PixInsight will not do what they do here;
- a process PixInsight does not have, such as Autocrop or RGB Combination, is refused, with the reason.
When the instance was made in DSPX's own mode and holds a setting that depends on the mode, the Log warns that PixInsight will give its own result (PixInsight Compatibility Mode).
6.5.3Containers
A PixInsight ProcessContainer is a list of processes applied in order. DSPX opens one as its processes on the shelf: a heading with the container's name, and under it its processes, numbered in order. A process DSPX does not have keeps its place as a line that is not a row ("skipped, not in DSPX"), and a process switched off in the container is marked as such. Each row is a saved process like any other: it can be applied, opened, dragged and removed on its own.
Apply Container applies the processes to the image in front, or to its active layer, in order. A dialog lists them, with the ones left out and the reason (not a process DSPX has; switched off in the container; taken off the shelf; works on files, not on an image), and asks how to record them:
- a history step for each process: each runs as from the shelf, one after another. Cancel stops the container where it is, and a failure stops it with the steps before kept;
- one history step for all: the processes run one after another in one run, titled with the container's name, and one Undo takes it all back.
The two give the same pixels, bit for bit: with a mask, each process is blended through the mask with the image as the process before left it, as PixInsight does for a container, and each process sees the metadata the ones before it left. The choice is remembered. A process that needs an astrometric solution does not offer to solve the image inside a container; it says the solution is missing, so a plate solve must come before it in the container.
writes the rows of a container as a container again, with their
switches; the processes DSPX did not read are not in it, and the Log says which. DSPX's own .dsproc file holds one process; a
container of several is an .xpsm file.
6.6PixInsight Compatibility Mode
A few processes can follow PixInsight's way of computing exactly, or take DSPX's own way where it is better. One setting chooses for the whole program: PixInsight compatibility mode in . Off, which is the default, the processes take DSPX's own ways. On, they work as PixInsight's do, so that a result can be compared with one made there. No panel has a method setting of its own. While the mode is on, a PI mode button shows at the right of the status bar; a click opens the setting.
6.6.1What changes
Most processes do the same in both modes. Those that differ are the following.
| Process | With the mode on (PixInsight's way) | With the mode off (DSPX's way) |
|---|---|---|
| Background Neutralization, and the background of Color Calibration | The median of each channel over the pixels whose every channel is within the limits. | A robust level: the samples within the limits, iterated around the median, so a contaminant above the noise does not pull the background. |
| Calibration | Every sample is truncated to the range 0 to 1 after the output pedestal. | Signed samples are kept in memory, and the noise estimate takes the ones below zero; a file of integers is still truncated as written. |
| Integration | The first frame of the list is the reference of the normalization. | The frame of the highest weight is the reference. |
| Drizzle | The output range is taken over every output pixel. | The range is taken over the pixels that have 1 percent of the largest weight or more; those of less weight are truncated. |
| HDR Composition | PixInsight's method. | The radiance method. |
| Comet Alignment | The positions in the table, interpolated by the frames' start times between the first and last marked frame. | Every frame not marked is interpolated by the middle of its exposure, and the motion continues beyond the marked frames. |
| Registration, Local Normalization, Debayer | The parity engine. | The fast engine. |
A few more processes have a version of the computation for each mode in their arithmetic: Arcsinh Stretch and Masked Stretch, Saturation, Channel Extraction and Channel Combination, LRGB Combination, Convert Color, Curves (the overshoot of Akima's interpolation), and the screen's Auto Stretch. The mode also decides how a FITS file with no ROWORDER card is read: with it on, top row first, as PixInsight does; with it off, bottom row first, as the FITS standard says (Images and Files). A ProcessContainer is mode-sensitive when one of its steps is. The Processing page of Preferences shows this as a table that can be hidden and shown (Processing), and says which parts give the same result in both modes: the composite of layers, Statistics, Linear Fit and the color, stretch and intensity processes. The multiscale processes are close to PixInsight's in either mode, but not the same.
6.6.2Where the mode is kept
The mode is a property of the settings of an instance, so it goes wherever the settings are copied: a panel, a run, a history step, the
shelf, a container's steps, a process layer, a workflow step. Settings of no mode (a fresh panel, a Reset) follow the program's mode. A
.dsproc file records its mode only when the rest of the file would not tell it; a file with no mode, and PixInsight's icons, are
read as PixInsight's. A project records the program's mode at the time it was saved; a pre-processing session records the engine mode of its
first run. A saved instance keeps its mode when saved again.
6.6.3The notice
When we open something made in the other mode and it holds a process that depends on the mode, DSPX asks once, in one line: "Made with PixInsight compatibility mode on: Background Neutralization, Calibration." We choose Run as Made, the default, which keeps the mode the processes were made in so they give the results they gave, or Use Current Mode, which takes the mode of Preferences. The question is asked when a process file is opened, a project is opened, a pre-processing session is opened or a workflow is run. It is not asked for the shelf restored at start, a process layer, Undo and Redo, or runs without a window.
6.6.4What we see
- In Preferences: has the check box and a line under it: "Off: DSPX's own ways where they are better." or "On: as PixInsight does it." Reset Page turns it off.
- In the Log: a run of a mode-sensitive process names its mode, and Background Neutralization and Color Calibration say whether they used a robust or a mean background. Switching the mode is logged.
- In the History panel: the details of such a step end with "Mode: PixInsight compatible" or "Mode: DSPX"; a step made in the mode that is not the current one is marked, for example "Background Neutralization (PI)" or "(DSC)".
To compare a result with one made in PixInsight, we turn the mode on before we run the process.
6.7The AI Processes
Three kinds of work run a neural network: Deep Star Removal, the AI detection of Deep Star Mask, and Deep Sharpen. Their parametric or classical siblings, such as Deep Star Mask's parametric detection and the other six sharpening methods, need no AI file.
6.7.1The files
The AI processes need two kinds of files: ONNX Runtime, the library that runs a network, and the model of each process. Both ship with the program,
in its own folder. Started with --ai-folder <folder> (Command Line), the program
looks in that folder first, then in its own. Each model is taken from the first folder that has it, module by module, so a folder that has only
some of the models still works. Nothing is downloaded: the program does not fetch models.
6.7.2Edit > Preferences > Performance / AI
The Performance / AI page shows what the AI processes found and what the networks last ran on. It is also where we choose between the graphics card and the processor for everything that can use the card, not only for the AI processes, and where the cache folder is set.
Processor: Chooses the processor that runs a network. The same choice holds for every other process that can use the graphics card (The Processor and the GPU):
- Automatic: the graphics card when there is one the networks can use, else the processor.
- CPU only: always the processor. It is slower, and the results can differ slightly from the graphics card's.
Next to the choice a line says what the program found: for example "GPU: NVIDIA GeForce RTX 4070 (DirectML), in use" once a network has run there, "CPU only: the GPU is not used", or "CPU: no GPU the AI can use".
AI models Info: Lists the AI folders, and for each AI process: Model: Found or Not found, ONNX Runtime: Loaded, Not run during this session or Not found, what the network Ran on, and a "Last run" line with the process's name. If a process cannot run, a line says why. The paths are in the tooltips. The (?) beside the title lists what Automatic tries, in order.
Check Now: Asks each AI process whether it can run. This loads ONNX Runtime, which otherwise happens when a network is first run.
6.7.3The graphics card or the processor
With Automatic, the ONNX Runtime that loaded tries its providers in order and uses the first that works: CUDA (only for a CUDA build of the runtime, on an NVIDIA card), DirectML on Windows, on the graphics card Windows ranks as high performance, rather than the integrated one of a laptop, Core ML on a Mac with Apple silicon, and then the processor. The done line of a run says which ran ("(GPU)" or "(CPU)"), the status line of the run says it while the network runs, and the page above keeps a "Ran on" line for each process. A graphics card that is lost in the middle of a run, for example after a driver reset, makes the process run the whole network again on the processor, once, and the Log says so. The next run tries the graphics card again. Tiles from the card and from the processor are never mixed in one result.
6.7.4When a file is missing
A process that cannot find its model or ONNX Runtime does not start. It says which file is missing, where it was looked for, and what to do: put the file in the folder named, or choose another folder in Preferences. An AI File Is Missing has the steps.
6.8The Processor and the GPU
Besides the AI processes (which reach the card through DirectML, Core ML or CUDA), many processes can do their arithmetic on the graphics card through Vulkan: sharpening, noise reduction, stretching and color, geometry, layers and the heaviest steps of pre-processing. GPU Acceleration lists them with a typical gain. This section says how the choice is made and when a process goes to the card. The graphics card does the same arithmetic, with a result that agrees with the processor's to within a few millionths of the range (one step for an 8- or 16-bit image; about one ten-millionth for each iteration of a deconvolution), and it is faster on a large image. We start with Blur (the Gaussian, the library filters and kernels, small or large), Curves (the red, green, blue, RGB/K and alpha curves) and Deconvolution (every iteration): a Gaussian with a large radius on a 24 MP image runs several times faster, and a deconvolution of a 24 MP color image at the default 30 iterations runs from minutes to seconds.
The multiscale family uses the card too: Wavelets (the starlet transform), HDR Compression (the starlet transform), Unsharp Mask, and the sharpening methods Multiscale Sharpen, Clarity, Texture Sharpen and Flow Sharpen. They keep each plane on the card through all their steps, so a 24 MP color image runs from about 8 to 40 times faster (Unsharp Mask less, because it is quick on the processor too). The conversion of the colors for the Lightness, Luminance and Intensity targets runs on the card too, so those targets gain as much as the RGB one.
Noise Reduction uses the card for the reduction itself, the wavelet bands and the non-local means of Quality included, and the finding of the stars: the whole process, on a 24 MP color image or a 60 MP mono one, runs about four times faster. The measuring of the noise stays on the processor.
Multiscale TGV Denoise runs its solver on the card: the iteration of every 128 pixel tile of the image, the resampling of its coarser scales and the model of the stars. A 24 MP gray image at full resolution takes about 11 seconds on a card against 46 seconds on 16 threads of the processor, and the result agrees with the processor's to within 5 thousandths of a noise sigma. It uses the card in DSPX mode only, when the image has at least 262,144 pixels and the card is a discrete one; the measuring of the noise, the stars and the local support mask stay on the processor.
The interpolation of Resample, Rotate, a turned rectangle of Crop and Dynamic Astro Crop runs on the card too, but only where it has much more to compute than to move: Lanczos, the cubic filters of a reduction, and the bicubic spline of a large image. A color 24 MP image turned with Lanczos-3 or Lanczos-4 runs about 2.5 to 4 times faster; Nearest neighbor, Bilinear and a gentle reduction stay on the processor, which is as fast there.
Several steps in one container keep the image on the card from one step to the next, and the Layers panel uses the card for the live opacity and blending of a stack.
Processor: The choice is in . It is one choice for the AI processes and for every process that uses the graphics card.
- Automatic: the best graphics card there is: a separate card, or the chip of a Mac with Apple silicon. The graphics chip built into a laptop's processor is used only after Test the GPU found it faster than the processor.
- CPU only: always the processor, for the AI processes and for every other process.
- A graphics card by name: every process that uses the card, except the AI processes, uses that one, even a built-in chip chosen on purpose. The AI processes keep Automatic.
A process goes to the graphics card only when all of these hold:
- the Processor is not CPU only, and there is a card to use;
- the process runs in DSPX mode. In PixInsight compatibility mode the processor does the work, and its result is the one PixInsight gives, sample for sample;
- the image is large enough for the graphics card to pay: a quarter of a megapixel for Curves, for the multiscale family (a few megapixels for some of them on a Mac or a built-in chip, where the card has no bus to cross but the processor is quick), and for Blur with a large filter. A Blur with a small filter (a standard deviation under about 4) needs 8 megapixels, because most of its time is the image's trip to the card. Blur with such a small or medium filter never runs on a Mac or on a built-in chip, where the processor is as fast. A large kernel (above 15 by 15) and a Deconvolution need much less: 65,000 pixels (256 by 256) for the kernel (a quarter of a megapixel on a Mac or a built-in chip), and 8,000 pixels for a Deconvolution of 30 iterations (fewer iterations need a proportionally larger image), on a Mac and on a built-in chip as well.
The GPU Acceleration chapter lists every process that gains from the graphics card, with a typical speed-up. The page of each such process says its own limits.
A run says where it ran in its done line: "Blur: done in 8.66 s (GPU). Undo to revert." or "(CPU)". The History panel step of a run that used the card ends in (GPU), and the tooltip of a step that stayed on the processor for a reason you did not choose (an image or a filter beyond what the card takes, no card) says why. A card that is lost in the middle of a run, or has no memory left, makes the process run again on the processor, once, and the Log says so in one line. The result is then the processor's, and the next run tries the card again.
A live preview and Apply give the same pixels when both ran on the processor. When one ran on the card they can differ by the few millionths above (a preview of the part in view is usually small enough to run on the processor, while Apply on the whole image runs on the card). Two runs on the same card give the same pixels.
6.9Processes on Files
Most processes change the image in front. A file process reads a list of files and writes its results to files. They are the steps of pre-processing (Calibration, Cosmetic Correction, Debayer, Registration, Local Normalization, Integration, Drizzle, Autocrop, RGB Combination), and also HDR Composition, Comet Alignment, Star Trails Blending and Mosaic. How a night is processed with them is in The Pre-processing Processes; this section describes the panel they share.
6.9.1The panel
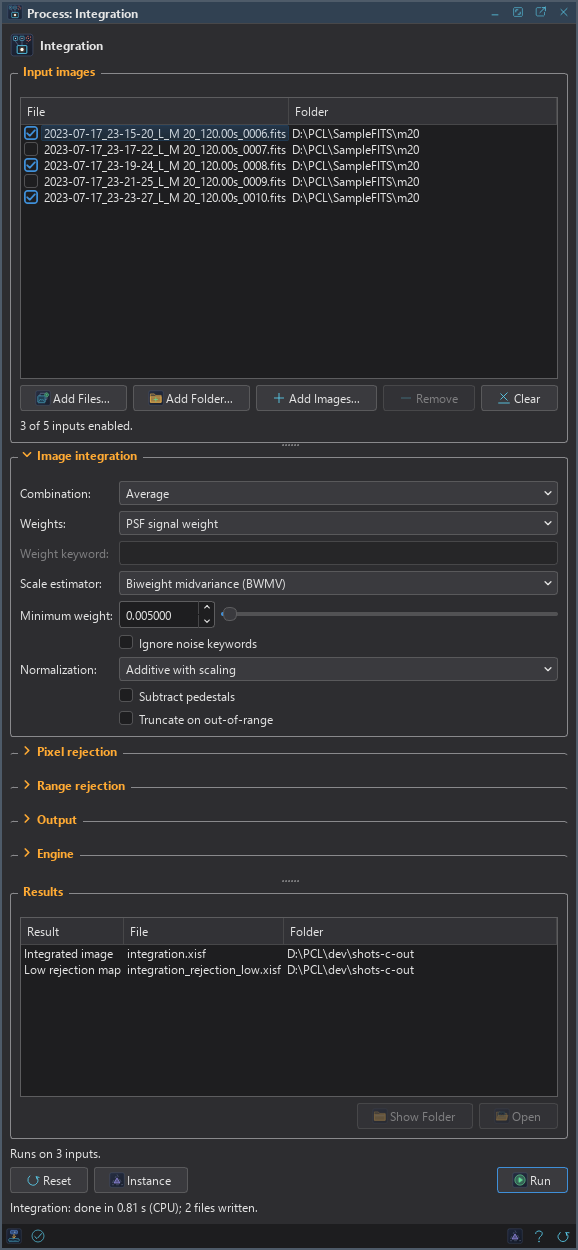
The input list is above the settings. It has a row for each file, with its name and folder and a check box to leave it out without removing it, and a count such as "3 of 5 inputs enabled".
Add Files...: Adds files to the list. A file that is listed already is not added again.
Add Folder...: Adds the FITS, XISF and camera raw files of a folder; the subfolders are not searched. Drizzle takes its own data files.
Drop files: Files and folders can be dropped on the list from the file manager. The list takes what Add Files... and Add Folder... take, and the list lights up only when the drop has something it reads; a file in a format the list does not read is refused with a line under the list, and a mixed drop adds the files it reads and says how many it did not.
Add Images...: For Integration: adds open images, chosen in a small list. An image that is its file as it is, saved and unchanged, is read from the file; any other is written to a temporary file for the run, which is removed when the run ends. An image that is closed leaves the list.
Remove: Removes the selected rows.
Clear: Removes every row.
The settings follow, generated like those of any panel, with Browse... beside a folder or a file. A folder setting that is empty means the folder of the first input, or each frame's own folder for the processes that write a file per frame; a folder that does not exist is made. The image in front plays no part.
Run: Runs the process on its enabled inputs. It is available while nothing else runs and enough inputs are enabled; the panel says "Runs on 3 inputs." or "it needs at least 3".
Cancel: While it runs, a progress bar shows the phases of the process, and Cancel ends the run. A canceled or failed run leaves none of its results: whatever it wrote is removed. Only one process runs at a time, of either kind, and closing the program asks before it cancels a run.
6.9.2The results
When a run wrote files, the Results list under the settings names each one, what it is and its folder. A master and its rejection maps are opened as
images when the process's option to open the result is on (for Integration, Open the result when done); calibrated frames and other
files are listed, not opened. A double click or Open opens a result as an image. Files that are not images (a drizzle data file, a
normalization file, a report) are listed and cannot be opened; Show Folder opens their folder. The Log has the run's settings, the
engine's lines, a summary such as "Integration of 3 frames", and each file written. An existing file is not replaced unless the process is asked to: the new
file gets a number (integration_1).
6.9.3Saved file processes
A saved file process keeps its list of files, as PixInsight's icons for these processes do, and a PixInsight icon brings its files with it. A row on the shelf runs the process on its own files, with no image needed; dropped on an image, it still runs on its files, not on that image. The results appear in its panel when the panel is open.
Sessions of the Pre-processing window (The Pre-processing Window) run the same steps in one pass with nothing written in between, unless we ask to keep the intermediate files.
6.10GraXpert
GraXpert is a separate program, made and distributed by its own authors, that removes gradients, reduces noise and, in newer releases, deconvolves astronomical images with AI models. DSPX has three processes that run it: GraXpert Background Extraction, GraXpert Denoise and GraXpert Deconvolution. They are DSPX's own: PixInsight has no process like them, so they cannot be saved as PixInsight icons. Each is an ordinary process with a panel, a history step, a mask and a Log; what is different is that the work is done by the GraXpert we installed, not by DSPX.
6.10.1GraXpert is not part of DSPX
DSPX contains no part of GraXpert and never downloads GraXpert or its models. GraXpert's program is free software under the GPL-3.0; the AI models it uses are under the Creative Commons BY-NC-SA 4.0 license, which is for non-commercial use. We install GraXpert ourselves, from its own download page, and use it under its own licenses. The button Get GraXpert... opens that page in our browser and does nothing more. The credits say the same.
6.10.2Telling DSPX where GraXpert is
The page has one group, GraXpert:
- The path: the program we installed: GraXpert-win64.exe on Windows, GraXpert-linux on Linux, GraXpert.app on a Mac. Browse... chooses it. Empty, DSPX looks in the usual install places and in the PATH when a GraXpert process runs; Find puts the first one it finds in the field. Looking only checks that a file is there, and nothing is run.
- Check runs the program once, with its version option and the help of its commands, and shows its version and the commands it has: background extraction and denoising in the stable release, deconvolution of objects and of stars in newer ones. The answer is kept with the path it came from. A process whose command the checked program does not have says so and does not run; a program that was never checked is tried.
- Get GraXpert... opens GraXpert's download page, and Website... its website.
- GPU: Automatic leaves the choice to GraXpert; On and Off pass its
-gpuoption for every run.
The same page says that GraXpert and its models are separate software under their own licenses and not part of DSPX.
6.10.3What a run does
- DSPX makes a private temporary folder in the system's temporary folder (named
dspx-graxpert) and writes the image there as a 32-bit floating point FITS file. The alpha channels and the metadata stay in DSPX. - It runs the GraXpert program with an argument list (never through a shell), in that folder: the command line is the first line DSPX writes to the Log, with the file's name abbreviated.
- Everything GraXpert prints goes into the Log as it comes. A percentage moves the progress bar. When GraXpert says that it is downloading its AI model (it does so itself, from its own server, the first time a model is used), the status line says so; DSPX does nothing else about it.
- Cancel stops GraXpert and everything it started. A run that lasts longer than four hours is stopped as well.
- DSPX reads the file GraXpert wrote, checks that it has the image's size and channels, and stores it in the image's own samples. An integer image gets the result clipped to its range, so nothing wraps around. The host does the rest, as for any process: the mask and the selection, one history step, Undo.
- The temporary folder is removed, whether the run succeeded, failed or was canceled. Folders of runs that a crash left behind are removed by the next run, once they are a day old.
Nothing is written to disk but that folder, and the only program DSPX launches for these processes is the GraXpert we named. DSPX makes no network connection of its own for them. GraXpert makes its own, to list and download its models.
There is no live preview for these processes: GraXpert takes seconds to minutes for an image. They run when we click Apply.
6.10.4When GraXpert fails
DSPX leaves the image as it was and says why in the process panel and the Log: GraXpert was not found; the path is a folder or is not there; GraXpert stopped with an exit code, followed by its last words; it could not download its model; it wrote no image or one of another size; or the installed GraXpert does not have the command (for deconvolution, a release that has it is needed).
6.11StarNet2
StarNet2 is a separate program, made and distributed by its author, Mikita Misiura, that removes the stars from an astronomical image with a neural network. DSPX has one process that runs it, StarNet2 in the category Stars. It is DSPX's own entry: the process of the same name in PixInsight has other parameters, so this one cannot be saved as a PixInsight icon, and a PixInsight icon of StarNet2 is still one of the processes that this program does not have. Like the GraXpert processes, it is an ordinary process with a panel, a history step, a mask and a Log, and the work is done by the StarNet2 program, not by DSPX.
6.11.1StarNet2 is not part of DSPX
StarNet2 is made by someone else and is downloaded from its author's site (starnetastro.com). DSC does not make, check or endorse it. DSPX only checks that the download is complete and was not changed on the way. Use it at your own risk.
DSPX contains no part of StarNet2 and does not redistribute it. It is another author's program, under its own terms, which are StarNet's to state. We either install it ourselves, as StarNet describes, or ask DSPX to download it for us (below); in both cases we use it under StarNet's terms. The credits say the same.
What DSPX checks, and what it does not:
- It checks that the file comes from StarNet's own site over https, and that its size and SHA-256 are the ones StarNet's list gives. This catches a download that was cut short or changed on the way. It is not an endorsement: DSC keeps no list of StarNet2 releases and does not say which ones are good.
- It checks, before each run, that the copy it downloaded was not changed after we accepted it (below).
- It does not check what StarNet2 does, whether it is safe, or whether StarNet's site was changed by someone else. Whoever controls that site chooses what is downloaded. To compare the SHA-256 with another source, the window links to the author's page.
6.11.2Telling DSPX where StarNet2 is
The page has a group for StarNet2, under GraXpert and RC Astro's command-line tool:
- The path: the program, starnet2.exe on Windows and starnet2 on Linux and a Mac. Browse... chooses it; a folder we choose stands for the program inside it. Empty, DSPX looks in the usual install places and the PATH when the process runs; Find puts the first one it finds in the field. Looking only checks that a file is there, and nothing is run.
- Check runs the program a few times, with its version option, its machine-information option and its help, and shows its version, build and backend, and which options it has. Nothing is processed. The answer is kept with the path it came from. A process that uses an option the checked program does not have says so and does not run; a program that was never checked is tried.
- Get StarNet2... downloads StarNet2 for us, after asking (next section).
- Check for Update asks StarNet's server which version is the latest, says whether it is newer than ours, and offers a button to StarNet's download page. It never downloads anything.
- Remove Downloaded Copy, shown when DSPX has downloaded a copy, removes that copy from DSPX's own folder. A StarNet2 we installed ourselves is never touched.
- Website... opens StarNet's website.
6.11.3Getting StarNet2 from DSPX
This is optional: a StarNet2 we installed ourselves works just as well. Get StarNet2... does this, and nothing happens before we click it:
- DSPX asks StarNet's server for the list of the latest versions it publishes for other programs (one small file over https). If the server cannot be reached, or the list is not one DSPX understands, nothing else happens and the window offers StarNet's download page.
- The window first gives the statement above, with the host the file comes from. Then it shows the version, the file's name and size, the host and the full address, the SHA-256 that DSPX will check, and the folder it will be unpacked into. A link opens the author's page, with the line "Compare the hash with the one on the author's page if it publishes one." Nothing is downloaded until we press Download.
- The file, a zip archive, is downloaded straight from StarNet's site to this computer, with a progress bar and Cancel. Only https is used, and only starnetastro.com and its subdomains: a list that names another host has no package DSPX downloads, and a redirect to another host, or to http, stops the download. The download stops as soon as more arrives than the list announced. DSPX never uses a copy of the file from anywhere else, and never takes the installer, only the archive.
- Before anything is unpacked, DSPX checks the file's size and its SHA-256 against the ones in StarNet's list. If either differs, the file is deleted and nothing is kept. This check finds a damaged or changed download; it says nothing about the program itself.
- The archive is unpacked by DSPX's own reader into a folder of DSPX's own for this program, one folder for each version. Nothing is
written into any program's installation folder, and no administrator rights are used. The reader refuses the whole archive, and keeps
nothing of it, when a name leaves the folder; when two names could be one on disk (they differ only in case or in the way an accented
letter is written); when an entry is inside a file or a link; when a link points out of the folder, at its own folder or a folder that
holds it, passes through another link, or has a character other than plain ASCII, a backslash or a colon; on Windows, when a name is
one Windows reserves (CON, NUL, COM1 and the like) or ends in a dot or a space; and when the archive has its own
dspx-download.txtordspx-files.txt, the files DSPX adds to the folder to record where the copy came from and what its program files were. - The license of the download (its LICENSE.txt) is shown, under the statement. Accept and Use keeps the copy, sets it as
the path, and records the SHA-256 of its program files (
dspx-files.txt, besidedspx-download.txt); Decline and Remove removes it and keeps nothing.
Besides this list and this one file, DSPX makes no network connection for StarNet2. The program itself may do what StarNet describes in its documentation; DSPX never passes it the option that makes it check for updates.
6.11.4The release we accepted
When we accept a release, DSPX remembers its version, its SHA-256 and the host it came from, on this computer only. Nothing is sent anywhere. At a later Get StarNet2...:
- The same release (the same SHA-256 from the same host): the window says that we accepted it, with the date, and the copy is kept after the download without a new question.
- This release is different from the one you accepted: another SHA-256 or another host. The window says so before anything is downloaded, with the version, the hash and the host, old and new. After the download its license is shown again, and the copy is kept only if we press Accept and Use. Until then the record of the release we accepted before stays. A new version always has another SHA-256, so this is the usual sight at an update. If the version is the same but the hash changed, StarNet's file changed: we may want to compare the hash with the one on the author's page before we accept it.
6.11.5The process
The panel has three sections, then the image the process applies to, the buttons and the system bar. There is no live preview: StarNet2 takes a while, so the process runs when we click Apply.
6.11.6Star Removal
Stride: The step between the tiles StarNet2 works on, an even number from 2 to 512. 256 by default. A smaller stride overlaps the tiles more: it is slower and can hide seams.
Upsample: Works on the image enlarged twice and gives the original size back. For tight stars and difficult structures; it is slower and needs more memory.
Highlight protection: On by default. StarNet2 protects the highlights of the starless image. Turn it off only to compare.
6.11.7Linear Data
Linear data: The image is linear, not stretched. StarNet2 brightens it with a temporary stretch, removes the stars, and reverses the stretch. Shadows clipping (a negative number, in deviations from the median) and Target background (between 0 and 1) set that stretch; they are used only while Linear data is on.
6.11.8Output
The starless image replaces the image, through its mask if it has one, in one history step.
Star mask: Also makes the stars StarNet2 removed (the difference between the image and the starless result) as a new image.
Star layer (unscreen): Also makes StarNet2's unscreen star layer, for putting the stars back with a screen blend, as a new image.
6.11.9What a run does
- If the program is the copy DSPX downloaded, DSPX computes the SHA-256 of its program files again (the program and its libraries, not the network's weights) and compares them with what it recorded when we accepted it. If one was changed, removed or added, the run stops with "StarNet2 was changed after you installed it. Install it again or choose another copy." and the Log names the file. This check runs before every run and every Check; nothing is taken from an earlier check. On Windows the files stay open while the program runs, so they cannot be changed during the run. A StarNet2 we installed ourselves is not checked.
- DSPX makes a private temporary folder in the system's temporary folder (named
dspx-starnet) and writes the image there as a 32-bit floating point FITS file. StarNet2 takes values from 0 to 1 and refuses anything that is not a number, so DSPX limits the samples to that range first (a linear image keeps its negative values), and the Log says how many it had to change. The alpha channels and the metadata stay in DSPX. - It runs the StarNet2 program with an argument list (never through a shell), in that folder. The command line is the first line DSPX writes to the Log, with the files' names abbreviated. The program gets only what it needs: that folder as its working folder and its temporary folder, a short environment (the system's own variables and our user folders; no PATH, no proxy settings, none of DSPX's variables), and no open file of DSPX's. On Windows it runs in a job: closing DSPX or Cancel ends it and everything it started, its memory is limited to three quarters of the computer's, and it may not use the desktop, the clipboard or other programs' windows. This applies to every StarNet2, the one DSPX downloaded and our own.
- StarNet2 reports its progress as lines of JSON on its standard error; they move the progress bar, and what they say goes into the Log.
- Cancel stops StarNet2 and everything it started. A run that lasts longer than four hours is stopped as well.
- DSPX reads the starless file, checks that it has the image's size and channels, and stores it in the image's own samples. The star mask and the star layer, if asked for, become new images. The host does the rest, as for any process: the mask and the selection, one history step, Undo.
- The temporary folder is removed, whether the run succeeded, failed or was canceled.
6.11.10When StarNet2 fails
DSPX leaves the image as it was and says why in the process panel and the Log: StarNet2 was not found (the message says to use Get StarNet2... or to set the path); the path is a folder or is not there; StarNet2 stopped with an exit code, followed by its last words (for example, that the image is smaller than 512 x 512 pixels, or 256 x 256 with Upsample); it wrote no image or one of another size; the checked program does not have an option the run uses (a StarNet2 without a star layer or linear mode); the copy DSPX downloaded was changed after we installed it.
6.11.11Using our own copy
We can install StarNet2 ourselves, as StarNet describes, and set its path with Browse... or Find. DSPX then runs that program as it is: it does not check its files, and nothing is downloaded. It still runs it with the limits above. To stop using the copy DSPX downloaded, set another path, or press Remove Downloaded Copy.