
Background Neutralization
A neutral gray sky, measured on the background itself
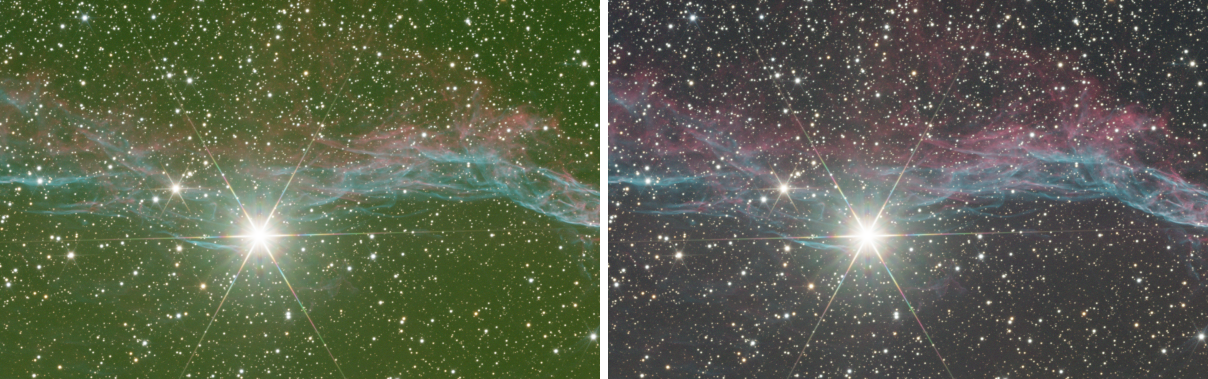
Background Neutralization makes the sky background of a color image neutral gray. It measures the mean background of each channel on a reference, the image itself, a region of it or another image, and takes it away, so that a color cast left by light pollution, the Moon or the camera disappears from the sky. It works on linear images, and it is usually the first color step after the gradients are removed.
1Introduction
The sky between the stars should be gray: no real color reaches us from it, and what we record there is the glow of our own atmosphere, the light of the Moon and the response of the camera. Each of those adds a different amount to each channel, so the background of a raw color image is tinted, green or brown or magenta. Background Neutralization measures how much each channel has in the background and takes exactly that away, so the three come out equal.
The background is measured as a mean, channel by channel, over the samples of a reference that fall between a lower and an upper limit. The upper limit is what keeps stars and nebulae out of the measurement: on a linear image the sky is far darker than anything we want to keep, so a limit of 0.1, the default, leaves only the background. The reference can be the whole image, a rectangle of it where there is only sky, or another open image.
Background Neutralization is our own engine, written from PixInsight's published description of its process of the same name, with the same parameters: a PixInsight icon of BackgroundNeutralization opens here, and the panel saves one that PixInsight opens.
2Quick Start
- Open the linear color image, with its gradients already removed by Background Extraction if it has any.
- Choose . With the live preview (the eye) on, the result shows on the image at once.
- For most images the defaults are right: the image is its own reference and everything above 0.1 is left out.
- Click Apply. The Log says the mean background it found in each channel.
3Interface & Parameters
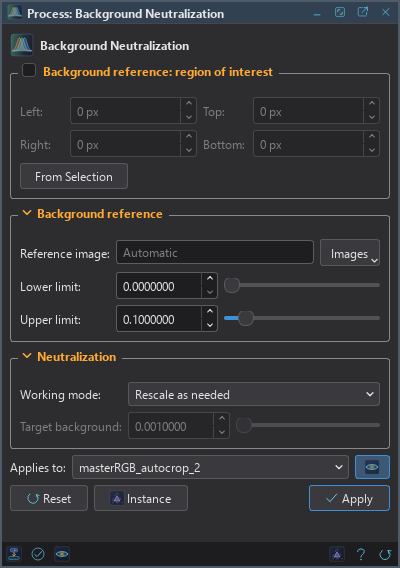
At the top of the panel is the region of interest, a rectangle of the reference to measure, with its own check box. Under it are two sections, Background reference and Neutralization, each of which folds away with the arrow beside its title, then the image the process applies to with the live preview's eye, the buttons and the system bar along the bottom.
3.1Region of Interest
Region of interest: The box in the title of the group. Checked, only this rectangle of the reference image is measured; unchecked, or with an empty rectangle, the whole reference. We use it to measure a patch of clean sky when the image is full of nebulosity.
Left: The left edge of the rectangle, in pixels of the reference image.
Top: Its top edge.
Right: Its right edge; the column at this value is not included.
Bottom: Its bottom edge; the row at this value is not included.
From Selection takes the rectangle from the selection we drew on the image with the Selection tool (its bounds), turns the region on, and clears the selection, so that it does not limit where the process is applied. Undo gives the selection back.
3.2Background Reference
Reference image: The image whose pixels give the background levels, chosen with Images among the open images, or typed. Empty, shown as Automatic, it is the image itself. Another image must be a color image and be open while we apply; it can be of any size.
Lower limit: Reference samples at or below this value are not background. At 0, the default, only black pixels are left out, such as the empty edges of a registered image.
Upper limit: Reference samples above this value are not background: stars and nebulae. 0.1 by default, which suits linear data. On a brighter image, or one already stretched, we lower or raise it until it sits above the sky and below what is not sky.
3.3Neutralization
Working mode: What happens once each channel's background is taken away:
- Target background: every channel's background becomes Target background, and what leaves the range from 0 to 1 is truncated.
- Rescale: the backgrounds are taken away, then the whole result is fitted to the range from 0 to 1.
- Rescale as needed: the default. The same, but only when something leaves the range; otherwise the result is kept as it is.
- Truncate: the backgrounds are taken away and what goes below 0 or above 1 is truncated: a background subtraction.
Target background: The mean background every channel gets in the Target background mode, 0.001 by default. Grayed out in the other modes.
3.4Apply, Preview and Instance
Live preview (the eye): At the end of the Applies to row; Preview in the system bar is the same switch. On by default. The image shows Background Neutralization applied to the part in view, as the settings change, with the banner "PREVIEW only, nothing applied"; the image itself does not change until Apply. Before, in the banner, or the backslash key held, shows the image as it is. The backgrounds are measured once on the whole image (the Log says how long that took), so at 1:1 the preview is exactly what Apply gives there; at a reduced zoom it is computed on the reduced view and is very close. When a preview takes long, it updates when we release the mouse.
Applies to: The image Background Neutralization works on, chosen in a list of the open images. It shows the image in front, and follows it as we bring other images to the front. Picking another image in the list makes the panel work on that one, its live preview included, without bringing it to the front; the pick stays while we work on other images, and Follow Active, the small button that appears beside the list, makes the panel follow the image in front again. An image that a tool or a run is working on is listed, but cannot be picked.
Apply: Neutralizes the background of the image named in Applies to, in one history step that Undo takes back, through the image's mask if it has one. The size, the sample format and the metadata, the astrometric solution included, stay as they are. A gray image is refused: there is no color to neutralize.
Instance: Shows the process as the panel has it now, as text: the settings as a DSPX
process (.dsproc) or as a PixInsight process icon (.xpsm) of BackgroundNeutralization, chosen
under Format. Copy puts the text on the clipboard; Save... saves it as a file and puts it on the
Process Shelf.
Reset: Puts every setting back to its default.
The system bar along the bottom of the panel has the same commands as small icons: at the left, drag to apply and Apply; at the right, Instance, Help (this page) and Reset. Drag to apply, the first icon, carries the process with its settings: dropped on an image's window, it applies them to that image, whatever image the panel works on; dropped on the Process Shelf, it is kept there as a row of its own. With , the bar alone has them.
4What Background Neutralization Does
The process works in two steps. First it measures: for each channel, the mean of the reference's samples that are above the lower limit and at or below the upper one, inside the region if there is one. A sample is left out in its own channel only, so a star that is bright in blue but faint in red is still out of the blue measurement. Then it changes every pixel: each channel's background is subtracted from it, and the working mode decides what is done with the range.
The Log says what was measured: the reference, the mean background of each channel with the number of samples it came from, and, when the result was rescaled, the range it was rescaled from.

5Usage Tips and Tricks
Gradients first. A mean over the whole sky is only right when the sky is the same everywhere. When it is not, Background Extraction goes first, and Background Neutralization after it.
A patch of sky for a crowded field. When nebulosity fills the frame, a small region of interest over the darkest sky, drawn with the Selection tool and taken with From Selection, gives a cleaner measurement than any upper limit.
Watch the sample counts. If the Log reports few samples in a channel, the upper limit is too low for the image; if a nebula is being measured as sky, it is too high.
Linear data. The process subtracts a level, which is right for linear data. On a stretched image the background is no longer a simple offset, and a curve such as Curves on each channel suits it better.
GPU. In DSPX mode an image of about 10 MP or more is processed on the graphics card, about 2 times faster than on the processor. A smaller image stays on the processor, where it is quicker. Choose CPU only in to keep it on the processor, and see GPU Acceleration for what else runs on the card.
6Related Tools
Color Calibration: balances the colors of the whole image against a white reference, after the background is neutral.
Background Extraction: removes gradients and vignetting, which a single level per channel cannot.
SCNR: removes a green cast that is in the signal, not only in the sky.
Catalog Star Color: gives the stars the colors the Gaia catalog measured.