
SCNR
Takes a green, or any other color cast, away
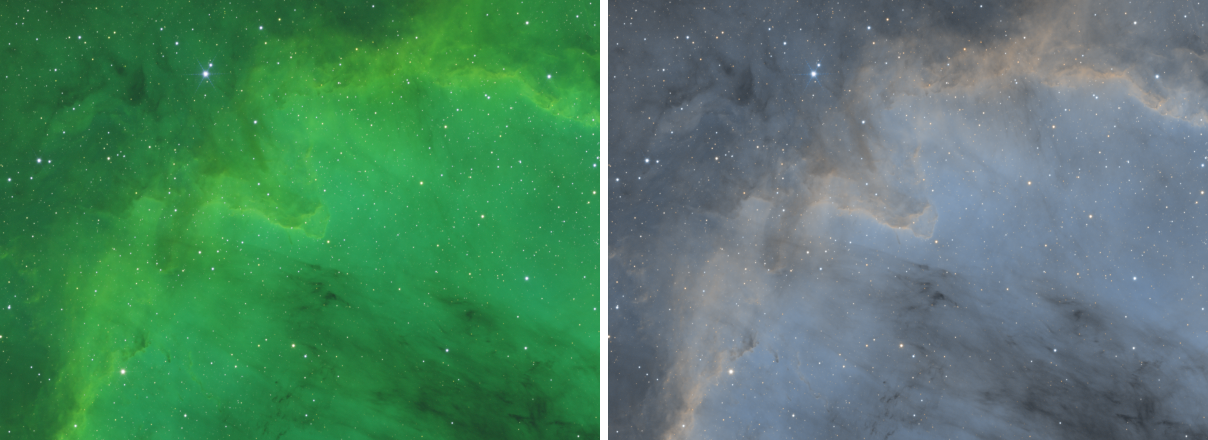
SCNR, subtractive chromatic noise reduction, removes a color cast by limiting one channel, green most often, to the level of the other two. It is the classic way to remove the green of a narrowband image in the Hubble palette, and the green noise and tint that one-shot color cameras leave, since in a natural color astronomical image almost nothing is truly green.
1Introduction
Very few objects in the deep sky are green: stars are not, and nebulae and galaxies seldom are. Green in an image is therefore almost always a cast, from the camera's color matrix, from the many green pixels of a color sensor, or from a narrowband palette in which the strongest line, hydrogen alpha, was mapped to green. SCNR takes it away without touching the rest: wherever the green channel is above a neutral level computed from red and blue, it is brought down to that level; where it is not, nothing changes.
The neutral level is the mean of the other two channels (average neutral) or the larger of them (maximum neutral, which removes less). The amount mixes the result with the original, and the lightness of each pixel can be put back, so that the image does not darken where the green was.
SCNR is our own engine, with the parameters of PixInsight's SCNR: a PixInsight icon of SCNR opens here, and the panel saves one that PixInsight opens.
2Quick Start
- Open the color image and choose . With the live preview (the eye) on, the result shows on the image at once.
- The defaults remove green completely, average neutral, with the lightness kept.
- Lower Amount if some green should stay.
- Click Apply.
3Interface & Parameters
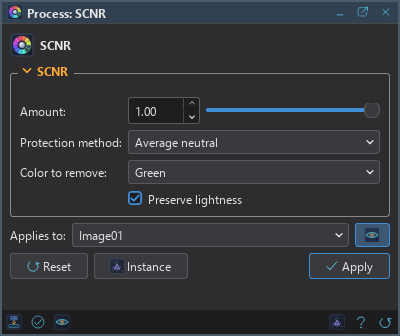
The panel has one section, SCNR, which folds away with the arrow beside its title. Under it are the image the process applies to with the live preview's eye, the buttons and the system bar along the bottom.
3.1SCNR
Amount: How much of the change is applied, from 0 to 1: 1, the default, all of it; 0 none. In between, each pixel is a mix of the original and the corrected one.
Protection method: The neutral level the color is limited to:
- Average neutral: the default. The mean of the other two channels: a pixel can be no greener than the average of its red and blue.
- Maximum neutral: the larger of the other two, which removes less: a pixel can be as green as its strongest other channel.
Color to remove: The color whose excess is removed: Red, Green, the default, or Blue.
Preserve lightness: On, the default, each pixel's CIE L* is put back after the color is limited: the color changes, the lightness does not. Off, the pixels that lose their green also get darker.
3.2Apply, Preview and Instance
Live preview (the eye): At the end of the Applies to row; Preview in the system bar is the same switch. On by default. The image shows SCNR applied to the part in view, as the settings change, with the banner "PREVIEW only, nothing applied"; the image itself does not change until Apply. Before, in the banner, or the backslash key held, shows the image as it is. At 1:1 the preview is exactly what Apply gives there; at a reduced zoom it is computed on the reduced view and is very close.
Applies to: The image SCNR works on, chosen in a list of the open images. It shows the image in front, and follows it as we bring other images to the front. Picking another image in the list makes the panel work on that one, its live preview included, without bringing it to the front; the pick stays while we work on other images, and Follow Active, the small button that appears beside the list, makes the panel follow the image in front again. An image that a tool or a run is working on is listed, but cannot be picked.
Apply: Removes the color from the image named in Applies to, in one history step that Undo takes back, through the image's mask if it has one. A gray image is refused: it has no color to remove.
Instance: Shows the process as the panel has it now, as text: the settings as a DSPX
process (.dsproc) or as a PixInsight process icon (.xpsm) of SCNR, chosen under Format.
Copy puts the text on the clipboard; Save... saves it as a file and puts it on the Process Shelf.
Reset: Puts every setting back to its default.
The system bar along the bottom of the panel has the same commands as small icons: at the left, drag to apply and Apply; at the right, Instance, Help (this page) and Reset. Drag to apply, the first icon, carries the process with its settings: dropped on an image's window, it applies them to that image, whatever image the panel works on; dropped on the Process Shelf, it is kept there as a row of its own. With , the bar alone has them.
4SCNR and PixInsight's Icons
DSPX's SCNR offers the two neutral methods, and it applies Amount to both: the result is the original mixed with the corrected pixel by the amount. Two things are worth knowing about icons from PixInsight:
- PixInsight's SCNR also has two mask methods. An icon with one of them opens with the average neutral method instead, and the note shown when it is read says so.
- PixInsight may apply the amount to its mask methods only. If so, an icon with a neutral method and an amount below 1 removes less here than in PixInsight.
5Usage Tips and Tricks
Hubble palette. After the SHO channels are combined and stretched, SCNR on green at full amount is the first step to the familiar gold and blue; Curves and Saturation then refine the colors.
One-shot color cameras. A gentle amount, 0.5 to 0.8, removes the green tint of the background without graying the few things that are green.
Maximum neutral for a lighter touch. When average neutral turns cyan or yellow areas gray, maximum neutral keeps more of them.
Not a white balance. SCNR removes the excess of one color; a cast in every channel is Background Neutralization's and Color Calibration's job, before the stretch.
GPU. In DSPX mode a large image is processed on the graphics card, about 3 to 5 times faster than on the processor, and the live preview updates faster too. A small image stays on the processor, where it is quicker. Choose CPU only in to keep it on the processor, and see GPU Acceleration for what else runs on the card.
6Related Tools
Saturation: lowers the saturation of the greens without removing them.
Channel Combination: makes the color image from the narrowband masters.
Pixel Math: any other mixture of the channels, written as an expression.
Color Calibration: balances the colors of a linear image.