
Canon Banding Reduction
Row and column banding removed from Canon and other CMOS cameras
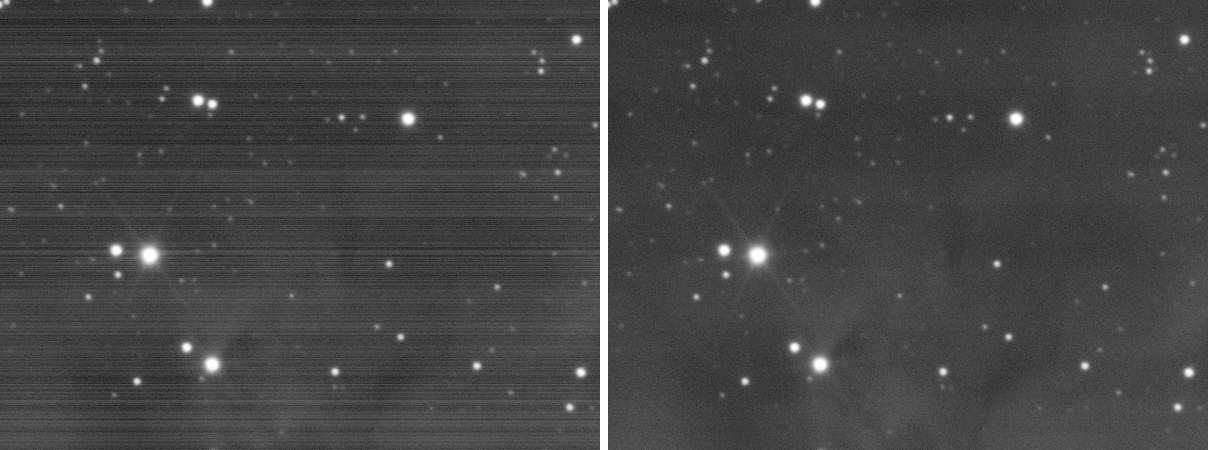
Canon Banding Reduction removes the horizontal and vertical banding of Canon DSLRs and other CMOS cameras: the stripes, a row or a column wide, that the sensor's readout leaves in the faint areas of an image. It works on a linear or a stretched image, mono or color, and leaves stars, nebulosity and a sky gradient alone.
1Introduction
Many CMOS sensors add a small offset to every row, and sometimes every column, of an exposure. The offsets are invisible in a single frame, but after a stack and a stretch they show as stripes across the background. Averaging more frames does not remove them when the pattern is the same in each one.
The process measures the level of each row, with the stars and the brightest pixels left out, and subtracts what each row's level is above or below the trend of the rows around it. Columns are done the same way, from the image with its rows already corrected. The trend is what keeps a gradient of the sky from being taken for banding.
Canon Banding Reduction is our own code, described from a script's behavior and not copied from it. It has no
PixInsight equivalent, so it saves as a DSPX process (.dsproc) only.
2Quick Start
- Open the image and choose . The live preview (the eye) shows the result on the part in view.
- The default removes the horizontal bands. Turn on Vertical if the image has vertical ones too.
- If the bands are still there, raise Amount; if the correction shows traces of the stars, lower Highlight threshold.
- Click Apply.
3Interface & Parameters
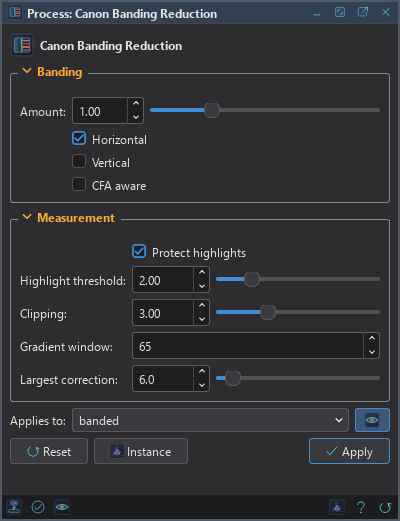
The panel has two sections, Banding and Measurement, each of which folds away with the arrow beside its title, then the image the process applies to with the live preview's eye, the buttons and the system bar along the bottom.
3.1Banding
Amount: How much of the measured banding is removed, from 0 to 4. 1, the default, removes all of it; less leaves part of it, more overcorrects.
Horizontal: Removes the banding of the rows, the horizontal bands. On by default.
Vertical: Removes the banding of the columns, the vertical bands, measured after the rows are corrected. Off by default.
CFA aware: For frames that are not debayered: each color of the Bayer pattern is measured and corrected on its own, since the colors of a raw frame differ in level from line to line. Off by default.
3.2Measurement
Protect highlights: Leaves stars and bright signal out of the measure of a line's level. On by default.
Highlight threshold: With Protect highlights on: pixels brighter than the image's median plus this many sigma are highlights. From 0.1 to 10, 2 by default.
Clipping: Pixels of a line farther than this many sigma from the line's median are left out of its level. From 0 to 10, 3 by default; 0 leaves none out.
Gradient window: The number of lines over which the sky level is followed, so that a gradient is not taken for banding. From 0 to 4001, 65 by default. At 0 the level of the whole image is used, which flattens the gradient too.
Largest correction: No line is moved by more than this many sigma of the image's noise. From 0 to 100, 6 by default; 0 means no limit.
3.3Apply, Preview and Instance
Live preview (the eye): At the end of the Applies to row; Preview in the system bar is the same switch. The offsets are measured on the whole image, so a part in view shows what Apply gives there. The banner says "PREVIEW only, nothing applied"; the image does not change until Apply. Before, in the banner, or the backslash key held, shows the image as it is.
Applies to: The image the process works on, chosen in a list of the open images. It shows the image in front, and follows it as we bring other images to the front. Picking another image in the list makes the panel work on that one without bringing it to the front, and Follow Active, the small button that appears beside the list, makes the panel follow the image in front again.
Apply: Corrects the image named in Applies to, in one history step that Undo takes back, through the image's mask if it has one.
Instance: Shows the process as the panel has it now, as text, a DSPX process
(.dsproc). Copy puts the text on the clipboard; Save... saves it as a file and puts it on the
Process Shelf.
Reset: Puts every setting back to its default.
The system bar along the bottom has the same commands as small icons: at the left, drag to apply and Apply; at the right, Instance, Help (this page) and Reset.
4What Canon Banding Reduction Does
For each channel (each Bayer sub-plane with CFA aware):
- The plane's median and sigma are measured.
- Each row's level is the median of its pixels, leaving out the highlights, when Protect highlights is on, and the pixels more than Clipping sigma from the row's first median.
- The row's offset is its level less the trend of the levels (their median over the Gradient window), limited to plus or minus the Largest correction.
- The columns are done the same way, from the plane after its rows are corrected.
- Amount times the sum of the row and column offsets is subtracted, and the result is cut to the range.
5Usage Tips and Tricks
Correct before stretching harder. Banding shows in the faint background, so the stretch that reveals it is the one to check with. Look at the result at 100 percent with a strong temporary stretch.
Raw frames. A raw frame that is open and not debayered can be corrected with CFA aware on, before the debayer, so each color is measured on its own.
A gradient that flattens. If the sky gradient disappears, the Gradient window is too large or set to 0. Lower it until the gradient stays.
A bright nebula in the rows. If a wide nebula crosses many rows, the rows take its light for banding. A lower Largest correction, or a lower Highlight threshold, protects it.
6Related Tools
Noise Reduction: removes the grain once the stripes are gone.
Cosmetic Correction: removes hot and cold pixels of the frames.
Debayer: turns the raw frames into color, after the banding is removed with CFA aware.
Background Extraction: removes the gradient that banding correction leaves in place.