
Noise Reduction
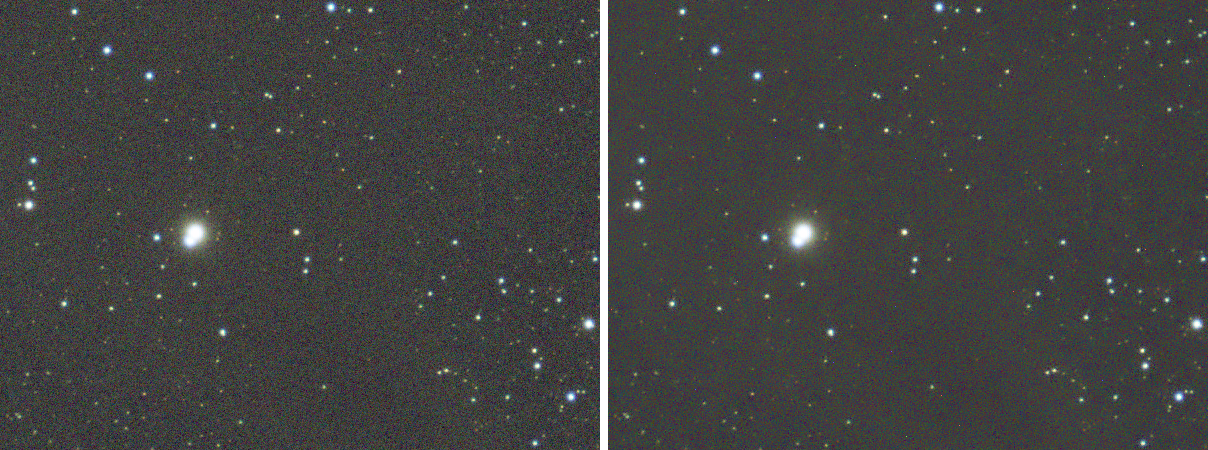
Noise removed from linear and stretched images, stars and detail protected
Noise Reduction removes the noise of a linear or a stretched image, mono or color, without a neural network. It measures the noise on the image itself, removes it at several scales with thresholds that follow the local detail, and leaves the stars and the fine structure as they are. By default it cleans the brightness and leaves the colors untouched; one slider lets the color noise go as well.
1Introduction
The noise of an astronomical image is not the same everywhere: it grows with the signal, and it differs between a linear image and a stretched one. Noise Reduction measures that relation on the image, from the finest wavelet band of its flat blocks, and turns it into a transform that makes the noise equal at every level. Afterwards one method serves a linear image and a stretched image alike, and the Log says which one the image looks like.
The image is then split into wavelet scales. On each scale, a soft threshold removes the part of the signal that looks like noise, with a strength that follows the local detail: where there is structure the threshold is lower, so the detail and the noise left in it stay. The Quality mode adds non-local means, which averages patches of the image that resemble each other, and blends it with the wavelet result where there is structure. Fast is the wavelets alone.
The stars are found on the whole image and keep their signal in proportion to Star protection. Pixels that are saturated and their surroundings are left as they are. A noise map, an image that says how noisy each pixel is, tells the process to remove more where a stack is shallower.
Noise Reduction is our own method and has no equivalent in PixInsight, so there is no PixInsight icon for it. The
process saves as a DSPX process (.dsproc).
2Quick Start
- Open the image, linear or stretched, and choose .
- Leave the settings as they are for a first try: Amount 0.6, Mode Quality.
- To see the result before applying, turn on the live preview (the eye): it shows the Fast mode on the part in view.
- Raise Amount to remove more noise, and Detail protection to keep more of the fine structure.
- On a color image, raise Chrominance if color noise remains.
- Click Apply.
3Interface & Parameters
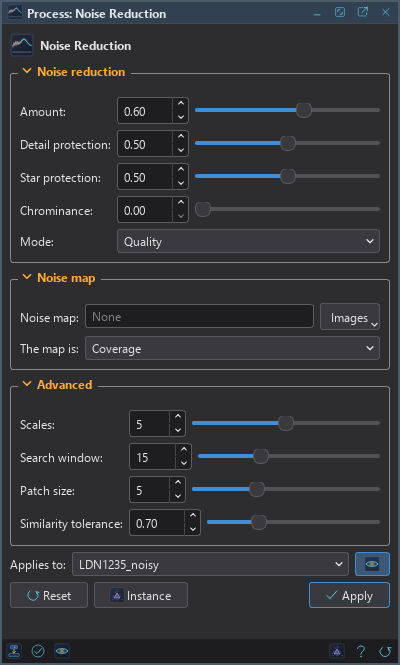
The panel has three sections, Noise reduction, Noise map and Advanced, which is collapsed, each of which folds away with the arrow beside its title, then the image the process applies to with the live preview's eye, the buttons and the system bar along the bottom.
3.1Noise Reduction
Amount: How much of the noise is removed, from 0 to 1, 0.6 by default. At 1 the shrinkage works at its full strength.
Detail protection: Reduces the smoothing where there is fine structure, so the detail is kept and the noise left in it is a little more. From 0 to 1, 0.5 by default.
Star protection: How much the stars are left as they are, from 0 to 1, 0.5 by default. At 0 the stars are treated as any other signal. The stars are found on the whole image, so a preview of a part protects the same stars as Apply.
Chrominance: For color images. At 0, the default, only the brightness is cleaned and the colors are left exactly as they are: the change made to the brightness is the same for the three channels. Above 0 the color noise is cleaned too; at 1 each channel is cleaned on its own, with extra smoothing of the color away from the stars.
Mode: The method:
- Fast: wavelets only.
- Quality: wavelets and non-local means, slower and better at keeping structure. The default. The live preview always shows Fast.
3.2Noise Map
A noise map is an open image of the image's size that says how noisy each pixel is. Only its relative values matter. For a stack, the natural map is the number of frames that contribute to each pixel.
Noise map: The open image to use, chosen in a list of the open images that have the image's size. Empty, the default, uses none. Where the map says there is more noise, more is removed.
The map is: What the values mean:
- Coverage: a count of frames, where more means cleaner: the noise is taken to follow one over the square root of it. The default.
- Noise scale: where more means noisier.
3.3Advanced
Scales: The number of wavelet scales, from 3 to 7, 5 by default. More scales remove larger blotches and need more memory for each tile.
Search window: The side, in pixels, of the area where non-local means looks for similar patches, from 7 to 31, 15 by default. It applies to Quality mode.
Patch size: The side, in pixels, of the patches that non-local means compares, from 3 to 9, 5 by default. It applies to Quality mode.
Similarity tolerance: How different two patches may be and still be averaged, from 0.2 to 2, 0.7 by default. Larger smooths more and can smear faint structure. It applies to Quality mode.
3.4Apply, Preview and Instance
Live preview (the eye): At the end of the Applies to row; Preview in the system bar is the same switch. The image shows the Fast mode applied to the part in view, with the banner "PREVIEW only, nothing applied"; the noise is measured once on the whole image. The image does not change until Apply. Before, in the banner, or the backslash key held, shows the image as it is.
Applies to: The image the process works on, chosen in a list of the open images. It shows the image in front, and follows it as we bring other images to the front. Picking another image in the list makes the panel work on that one without bringing it to the front, and Follow Active, the small button that appears beside the list, makes the panel follow the image in front again.
Apply: Reduces the noise of the image named in Applies to, in one history step that Undo takes back, through the image's mask if it has one. Integer images are written back inside their range.
Instance: Shows the process as the panel has it now, as text, a DSPX process
(.dsproc). Copy puts the text on the clipboard; Save... saves it as a file and puts it on the
Process Shelf.
Reset: Puts every setting back to its default.
The system bar along the bottom has the same commands as small icons: at the left, drag to apply and Apply; at the right, Instance, Help (this page) and Reset.
4What Noise Reduction Does
For each channel, in floating point:
- The noise model: the standard deviation of the noise against the signal level. Its integral is a transform that makes the noise equal to 1 at every level. The curve tells a linear image from a stretched one, and the Log reports it: "linear data detected" for the first.
- An undecimated decomposition into the number of Scales. The noise of each band is measured in flat blocks.
- A soft threshold on each band, proportional to Amount and to the band's noise, and lower where Detail protection finds structure.
- In Quality mode, non-local means on the stabilized signal, blended with the wavelet result, more where there is structure.
- For a color image with Chrominance above 0, the differences of the channels from their mean are smoothed, away from the stars.
- The stars keep their signal in proportion to Star protection, with a soft edge, and the inverse transform follows.
The Log reports the noise of each channel, the ratios of the band noise and the number of stars protected.
4.1Speed and Memory
The image is processed in tiles of up to 512 pixels with overlapping margins as large as the filters reach, so the result does not depend on the tile size. The work runs on every core. A color image takes about three times as long as a mono one, and Quality is slower than Fast.
GPU. In DSPX mode the reduction itself runs on the graphics card when the image is 65 thousand pixels (256 by 256) or more: the stabilizing transform, the wavelet bands with their thresholds, the non-local means of Quality, the color smoothing of Chrominance, the protection of the stars and of the saturated pixels. The finding of the stars runs on the card too; the measuring of the noise stays on the processor. A 24 MP color image or a 60 MP mono one is reduced several times faster than on the processor, in Fast and in Quality, and the whole process, measuring and finding the stars included, about four times faster. The image goes to the card in bands of rows, with the same margins as the tiles, when it is larger than the card's memory. The result agrees with the processor's to a few millionths of the range (one step for an 8- or 16-bit image). An image with a NaN or an infinite value, or with two channels, stays on the processor. Choose CPU only in to keep it there, and see The Processor and the GPU.
5Usage Tips and Tricks
Linear or stretched. The same settings serve both. On a linear image, the noise is removed before it is stretched into view, which is where it does the most good.
Detail protection against Amount. When the result looks plastic, we lower Amount before anything else. When the noise left in the structure bothers us, we lower Detail protection instead.
Color noise. Chrominance starts at 0 so the colors are never touched without a reason. A value of 0.5 to 1 cleans the mottled color of a deep sky background.
A noise map for a mosaic or a drizzle. Where frames are few, the stack is noisier. A coverage map, made with Pixel Math from the rejection maps or the frames' masks, tells Noise Reduction to work harder there.
Check at 100 percent. Noise and its removal are judged at full resolution, not at the size of the window.
6Related Tools
Wavelets: a noise reduction we tune layer by layer, when we want control of each scale.
Canon Banding Reduction: removes the row and column banding of a sensor, which noise reduction does not.
Noise Generator: adds noise of a known size, to test a reduction.
Deep Sharpen: sharpening after the noise is down.