1 Introduction
[hide]
DeepParallax is a sophisticated, highly customizable tool that turns a single 2D image into a variety of 3D representations and animations: an interactive depth map, a stereoscopic side-by-side pair, a red/cyan anaglyph, separate left/right views, and a looping wigglegram, all from one input frame. A floating Dynamic Preview window follows every adjustment we make, showing the current result live and looping the wiggle animation as we tune.
The tool is general-purpose: it works on everyday photographs, landscapes, portraits, and any subject where a single image is all we have. On top of that, DeepParallax includes specific tools designed to deal with the particular and complex case of astroimages: where a flat 2D nebula or galaxy hides a rich structure that the eye reads as depth, where stars (being point sources at infinity) need to be treated specially, and where channel balance in narrowband palettes carries depth information of its own. A narrowband cue uses the Ha/OIII channel balance to push emission features forward and ionized regions back, an external star mask can float stars onto a clean, consistent plane instead of letting them spike the depth map, and a depth painting input lets us import a hand-corrected or AI-generated depth map to override the computed one in regions where we know better than the algorithm.
Everything is parameter-driven and instance-serializable, so a recipe that works on one frame can be reused on others; ready-made Presets for Nebula, Narrowband, and Galaxy targets give us sensible starting points. The depth pipeline is cached behind the scenes, so adjusting stereo or animation controls re-renders without recomputing the depth, keeping previews responsive even on large frames.

2 Setup and Installation
[hide]
The only official distribution of DeepParallax is via a PixInsight repository. This is the safest way to install a module or script, as the installation is handled by PixInsight itself, which will fetch the module directly and safely from our PixInsight repository at
https://repo.deepskycolors.com/DeepParallax/
Make sure the trailing / is part of the URL. Also, be sure to keep our repository URL in our list of PixInsight repositories to receive timely updates.
By distributing DeepParallax only via our PixInsight repository, installation comes with the guarantee of our Developer and Repository certificates, verified by PixInsight itself from the moment it connects to our repository, until it validates and completes installation of the DeepParallax module.
If we ever want to be sure that we have the latest version available to us, we go to PixInsight's RESOURCES menu, select Updates, then Manage Repositories to make sure our repository is still there, then RESOURCES > Updates > Check for Updates.
2.1 Launching DeepParallax
DeepParallax is a standard PixInsight process: we set its parameters on the process dialog and apply it to a view. To launch it:
- Open the image we want a 3D version of. Stretched (non-linear) images give the best results, because all depth cues read perceptual brightness; a linear image is mostly black and produces a flat depth map.
- In Process Explorer or via the PROCESS menu, locate DeepParallax under any of the DeepSkyColors or Render categories.
- The DeepParallax interface opens.
- Tune the parameters with the Dynamic Preview on so we see the depth and stereo update as we go, then apply the process to the target view (drag the triangle onto the image, or drag the instance onto the view).
Applying the process never modifies the target image; instead it creates new windows with the result: a <view>_depth grayscale image in depth-map mode, a <view>_sbs in side-by-side mode, a <view>_anaglyph in anaglyph mode, or a pair of <view>_left and <view>_right windows in two-views mode. The animation toolbar (see 3.8) writes an animated video file directly to disk.
2.2 Licensing
DeepParallax runs on a trial-then-registered licensing model with two features reserved for registered users. During the 30-day trial the tool is fully usable for exploring and creating depth maps, stereo output, and animations, with the following two restrictions:
- GIF export carries a small, semi-transparent “Made with DeepParallax” watermark in the corner of the animation. The GIF is otherwise unrestricted.
- AVI, animated PNG (APNG), and MP4 export are reserved for registered users. Clicking any of these buttons during the trial opens an information dialog offering access to the registration window. The VR 180 export is unrestricted in its JPEG form; its MP4 form follows the MP4 button's licensing.
Registering the module removes the GIF watermark and unlocks AVI, APNG, and MP4 export. When the 30-day trial expires, DeepParallax will display a notice at startup and will not open until a valid registration key is entered (see 3.9 Registration and licensing). No internet connection is needed: keys are validated offline.
3 The DeepParallax Interface
[hide]
The panel is organized as a series of collapsible groups that follow the natural order of building a 3D scene: Presets for a quick start, then Depth cues and Depth shaping (which decide what the depth map looks like), Stereo output (which decides how that depth is turned into a 3D view), the optional Narrowband, Star layer, and Depth painting refinements (collapsed at startup), and finally Animation with the previews and export buttons.
A note on responsiveness. Adjusting any parameter does not immediately recompute the previews; instead a short debounce collapses a burst of slider movements into a single re-render about 150 milliseconds after we settle. While we drag a slider, the numeric edit field updates live so we see the value we are about to set; the heavy depth/stereo work fires once when we pause or release.
The depth pipeline is cached behind the scenes: as long as no depth-affecting parameter changes (Depth cues, Narrowband, Depth shaping, Star layer, Depth painting), the depth map is reused. Stereo and animation controls (Parallax amount, Convergence, Max disparity, Anaglyph color, Swap eyes, Frames, Frame rate, Amplitude) only re-render the stereo from the cached depth, so they feel instant even on large images.
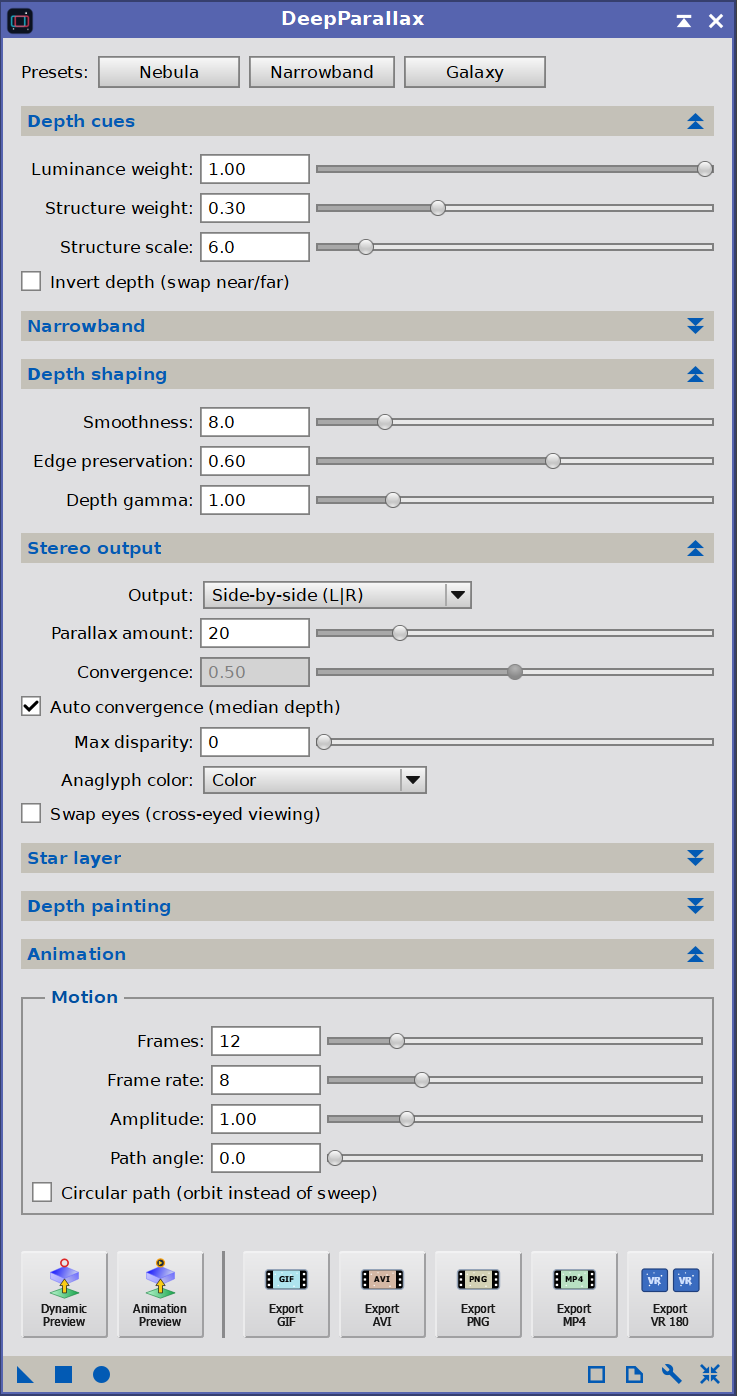
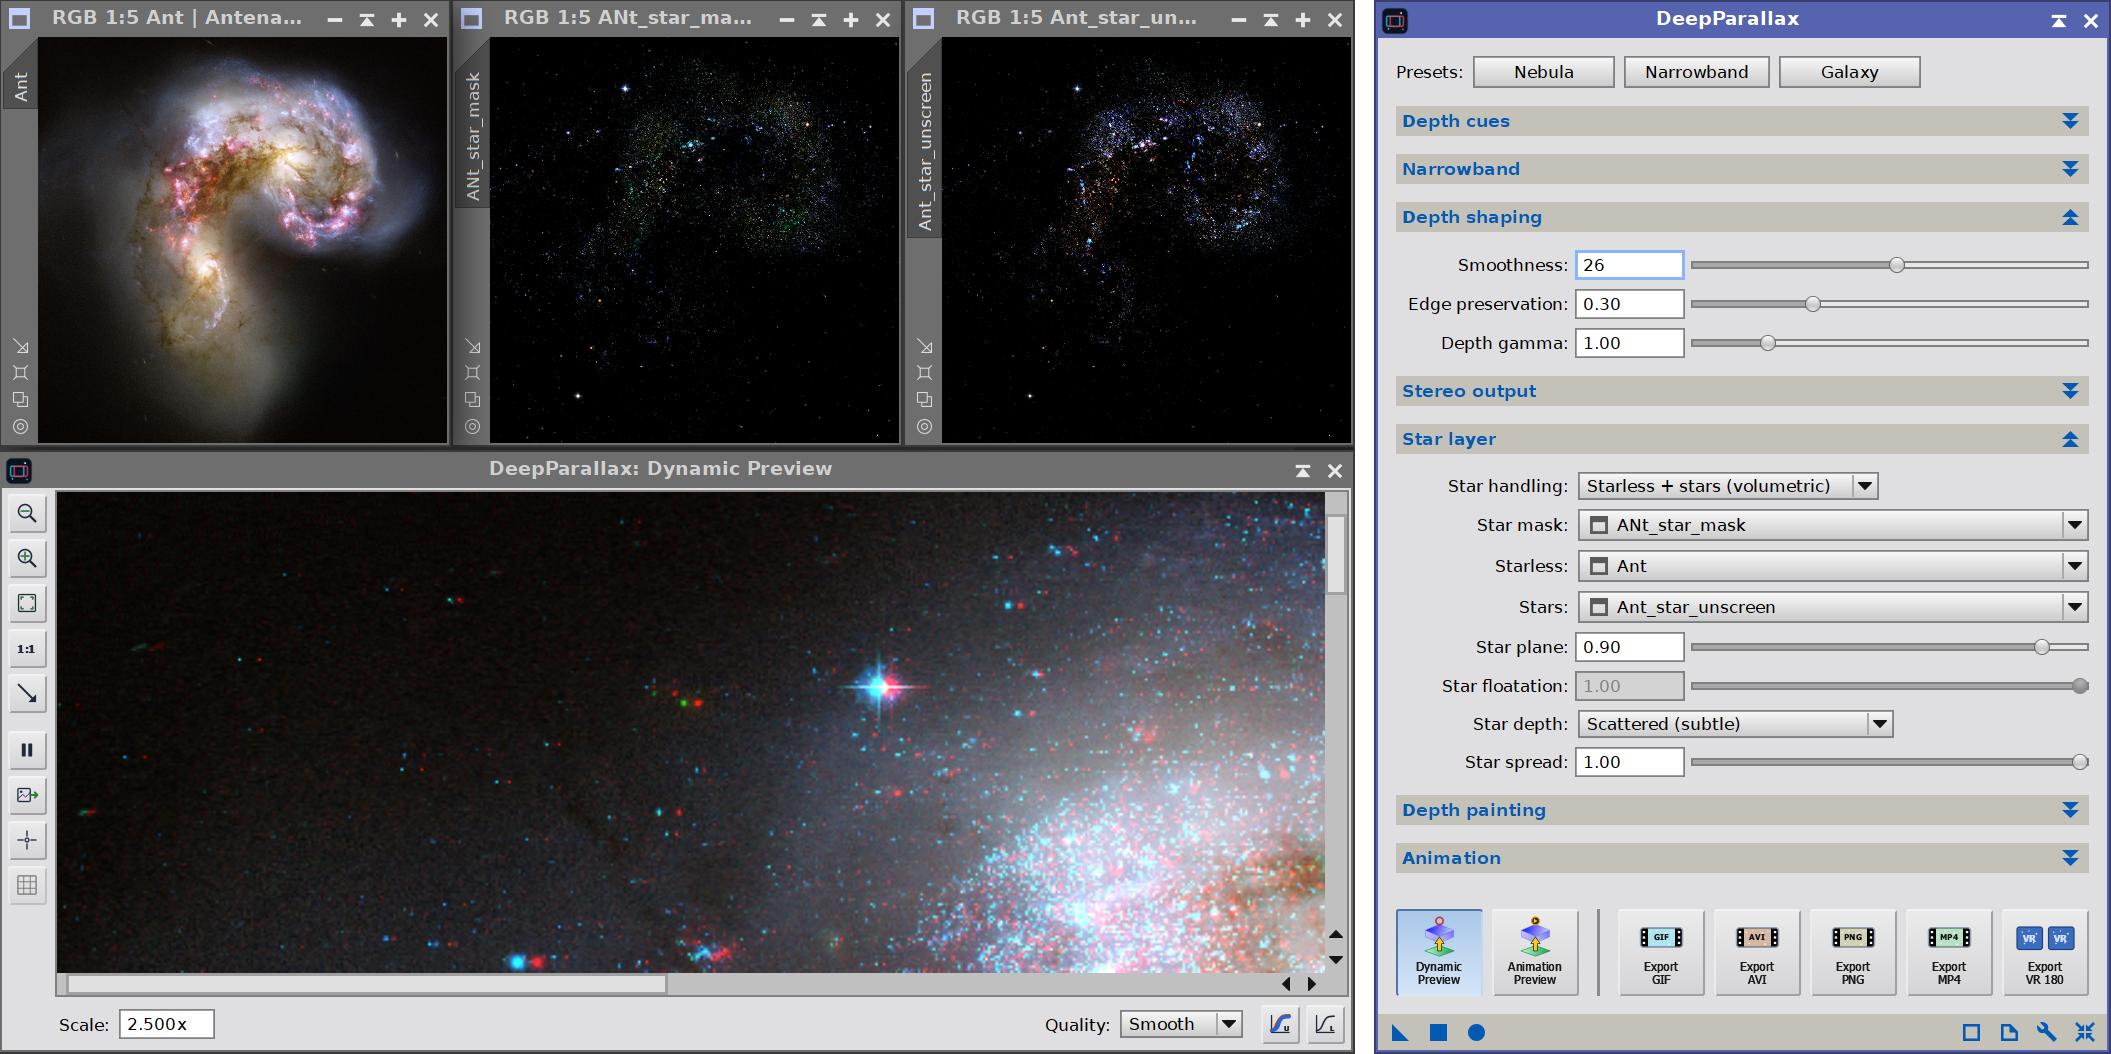
The complete DeepParallax Interface:

Top to bottom: Presets, Depth cues, Narrowband, Depth shaping, Stereo output, Star layer, Depth painting, and Animation, with the preview/export toolbar at the bottom.
3.1 Presets
The Presets row at the top of the panel is the fastest way to get to a reasonable starting point. Three buttons load workflow-tested values for the most common target types: we pick one, then refine from there using the controls below.
- Nebula: broadband nebula targets. Sets Luminance and Structure weights for a clear, soft depth map, modest smoothing with good edge preservation, and stereo settings that suit large diffuse subjects.
- Narrowband: HOO/SHO and similar palettes. In addition to the broadband cues, it enables the narrowband channel-balance cue with Ha mapped to Red and OIII mapped to Blue.
- Galaxy: galaxies and other compact subjects. Stronger smoothing, slightly heavier shaping, and stereo settings tuned for the more sharply defined structures these images carry.
Applying a preset leaves the output mode, the animation controls, and the optional Star mask and Depth map view selections unchanged: we can stamp a preset over an in-progress scene without losing those choices. From any preset we then adjust the panel below to taste.
3.2 Depth cues
This group decides what the algorithm sees as depth in our image. There is no actual depth information in a single 2D frame, so DeepParallax estimates it from visual cues: how bright a region is, how much local detail it carries, and (in the optional Narrowband group, see 3.3) which emission lines dominate it. We weight these cues against each other to get the depth assignment we want.
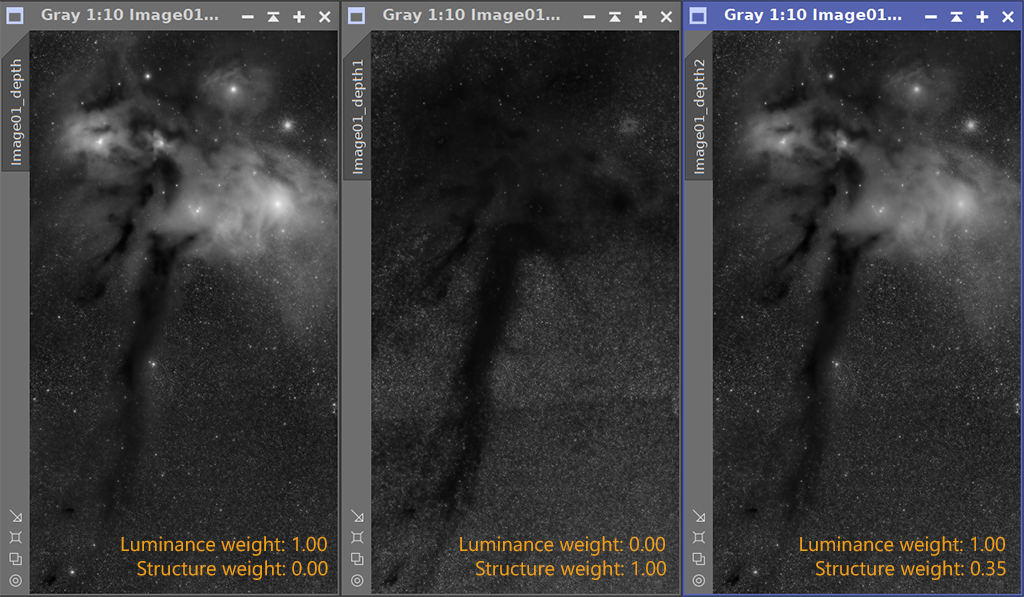
- Luminance weight: how much the brightness of a region pulls it toward the foreground (or, with Invert depth on, the background). This is the simplest and usually most useful cue: bright features (nebula cores, galaxy bulges, illuminated areas) read as closer, dim sky reads as further. Higher values make brightness the dominant cue; lower values let the other cues lead.
- Structure weight: how much local contrast pulls a region toward the foreground. Detailed regions (filaments, dust lanes, knots, fine texture) get pushed forward; smooth regions sit back. The cue is normalized by a high percentile of its own values, so a handful of bright stars no longer flatten the rest of the relief; raise this to bring fine structure forward.
- Structure scale: the pixel scale at which the structure cue is measured (Gaussian sigma in pixels). Small values respond to fine filament detail; larger values respond to broad regional contrast. Match it roughly to the dominant scale of the features we want to emphasize.
- Invert depth: swaps near and far. When the brightest region should recede rather than come forward (some galaxy cores, certain backlit subjects), tick this and the whole depth map is mirrored before the stereo pass.
3.3 Narrowband
This optional group adds a depth cue specific to narrowband astroimages. In palettes such as HOO or SHO, channel balance carries information that the luminance and structure cues alone cannot reach: Ha-dominant regions (typically denser, hotter ionization fronts) read closer; OIII-dominant regions (often more diffuse, cooler ionized gas) read farther away. With this cue active we get depth assignments that follow the physics of the target, not just its brightness.
- Narrowband weight: how much the channel balance pulls a region toward the foreground or background. Higher values let the Ha/OIII ratio dominate over Luminance and Structure; 0 turns the cue off, which is the right choice for broadband images. For a narrowband target a value of 0.3 to 0.6 typically gives a balanced result.
- Foreground (Ha): the channel that, where it dominates, reads as closer. For HOO and HOS palettes this is Red; for SHO it is Green.
- Background (OIII): the channel that, where it dominates, reads as farther away. For HOO, HOS, and SHO this is Blue.
The group is collapsed at startup since broadband targets do not need it; expand it for narrowband work. The cue is mathematically a per-pixel ratio of the chosen near and far channels, so it is robust to the absolute level of those channels and reads the relative balance instead.

3.4 Depth shaping
The raw depth map produced by the cues is correct in spirit but rough on the surface: noisy in the dim sky, full of small variations that would translate into visible jitter in the stereo pass. This group cleans it up while keeping the edges that matter, and lets us redistribute the available depth where we want it.
- Smoothness: the spatial scale (in pixels) of an edge-aware smoothing pass applied to the depth map. Higher values remove more noise and reduce the cardboarding artifacts that show up on flat regions; 0 disables smoothing. A value between 8 and 15 suits most targets.
- Edge preservation: how strictly the smoothing pass preserves edges in the source. With this at 0 the smoothing is uniform (blurry across object boundaries); raise it toward 1 to keep the depth aligned with visible edges in the image. Values around 0.6 to 0.9 give a clean depth map without losing the relief on real structure.
- Depth gamma: a gamma curve applied to the normalized depth map. Above 1 pushes mid-depths back, increasing the relative separation between near and far while keeping the extremes; below 1 pulls them forward, compressing the back of the scene. A useful tuning knob when a depth map looks correct but too shallow or too aggressive.
Like all other parameters in the depth pipeline, these are debounced and cached: dragging Smoothness up does not rebuild the depth on every tick.
3.5 Stereo output
Once we have a depth map, this group decides what kind of 3D output we produce from it and how strong the 3D effect should be. The stereo pass is fast and does not touch the depth map, so we can experiment with these settings freely: changing the output type or strength does not trigger a depth rebuild.
Output selects the kind of result we want when we apply the process:
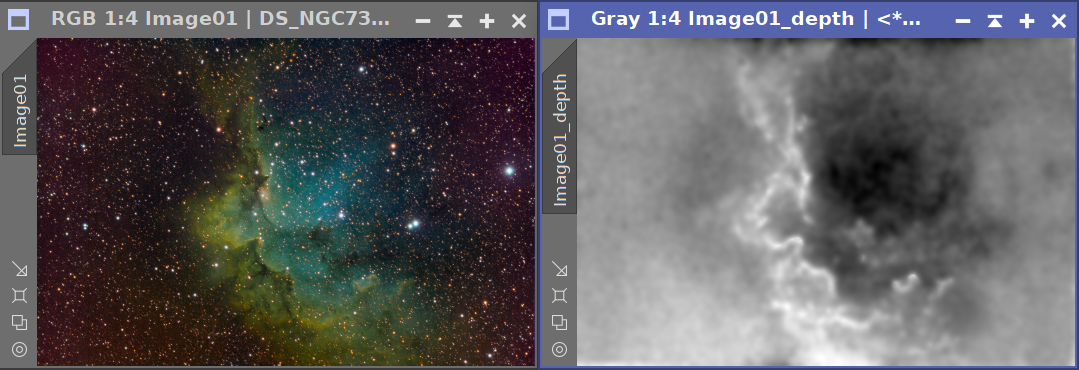
- Depth map: produces just the grayscale depth map (no stereo). This is the right mode to tune the depth cues and shaping in: depth is far easier to read as a grayscale image than as a 3D effect.
- Side-by-side (L|R): produces a single image with the left and right views packed horizontally. Suitable for stereoscopes, 3D displays, and the cross-eyed or parallel free-viewing techniques.
- Anaglyph (red/cyan): produces a single composite image meant to be viewed with red/cyan glasses.
- Two views (separate L/R): produces two separate image windows.
Parallax amount sets the maximum total horizontal disparity, in pixels: the overall strength of the 3D effect. Higher values give a stronger feeling of depth, but at the cost of more eye strain and more visible smearing in the disocclusion areas where the background was hidden behind the foreground in the original image. A value of 15 to 25 pixels is usually a good place to start; we raise it for shareable video animations where the effect needs to be obvious and lower it for comfortable still-image viewing.
Auto convergence (default on) places the screen plane, the depth at which there is no parallax, at the median depth of the scene, so most of the image sits comfortably at the screen and roughly half pops forward while the other half recedes. This is the right default for almost every scene. When it is on, the manual Convergence slider is disabled. When we want manual control, we untick it and:
- Convergence: the depth (between 0 and 1) that sits at the screen plane. Lower values push the whole scene forward (more pop-out, more strain); higher values push it back (more comfortable, less impressive). Useful values are around 0.4 to 0.6.
Max disparity caps the total separation that any pixel can have between the left and right views, regardless of how much the Parallax amount and depth would otherwise produce. This is the comfort dial: a deep scene with strong parallax can produce separations that are simply too wide to fuse, and this control caps the extremes without changing the overall feel. 0 disables the clamp.
Anaglyph color chooses how the red and cyan halves of the anaglyph are composited. The choice is visible immediately in the previews and in the anaglyph output:
- Color: full color, the most vivid choice. Saturated reds cause retinal rivalry under red/cyan glasses; some viewers find this distracting on emission nebulae.
- Half-color: the left eye's contribution is converted to luminance before it goes into the red channel, taming the red rivalry while keeping color in the cyan side.
- Grayscale: both eyes are converted to luminance. The flattest color, but also the least ghosting.
- Optimized (Dubois): the Dubois sRGB color matrix, which minimizes ghosting while keeping useful color. A solid compromise for color-rich subjects under colored glasses.
Swap eyes flips the left and right halves. Use this to switch between parallel and cross-eyed free-viewing techniques, or to correct a reversed-depth result.

3.6 Star layer
Stars are point sources at effectively infinite distance, but their high brightness fools the depth cues into placing them in the foreground. The result is a depth map peppered with per-star spikes and a stereo pass full of stars that visibly jump from frame to frame in animations. The Star layer group provides the fix, in two flavors selected by Star handling:
- Off: no star layer. The cues see the stars and may spike on them.
- Star mask: an external star mask tells DeepParallax which pixels are stars, and those pixels are floated onto one clean, consistent depth plane. Simple, and needs only a mask.
- Starless + stars: we feed the two images that a star-removal tool (StarXTerminator, StarNet2) produces. The depth is built from the starless image, so the depth model never see a single star and the relief of the nebula or galaxy is clean. The stars image is then composited back as points of light, each star placed at its own depth, so the starfield gains real volume: in the animation and in VR the near stars drift more than the far ones, instead of moving as one flat pane.
Star mask mode controls:
- Star mask: a single-channel grayscale view that marks where the stars are. DeepStarMask is the natural partner here, but any mask whose dimensions match the source view will work.
- Star plane: the depth plane (0 to 1) the masked stars are floated to. Higher values float stars forward (closer to the viewer); lower values sit them back into the scene. Around 0.85 to 0.95 is a good starting point: stars feel like a layer just in front of the nebula or galaxy, not lost in it.
- Star floatation: how strongly stars are pulled toward the Star plane. 0 disables the star layer entirely (the depth map keeps the stars where the cues placed them); 1 places masked stars exactly on the plane regardless of their cue-derived depth. Values between 0.8 and 1.0 give a clean, consistent star layer; lower values blend the masked pixels with the cue-derived depth.
Stars on their own plane:
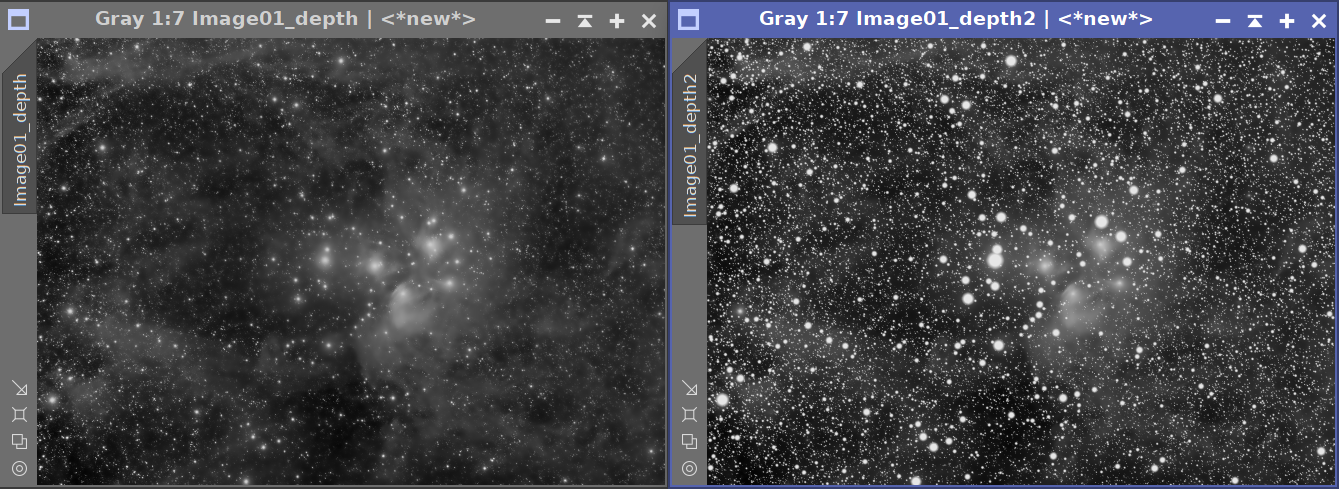
Left: depth map with stars spiking the foreground. Right: with a star mask and floatation, stars sit on one clean plane.
Starless + stars mode controls:
- Starless: the star-free image. Depth is built from this image.
- Stars: the stars-only companion image. Its light is composited back over the warped starless scene.
- Star mask (optional): if set, the mask is used to locate the individual stars; if left empty, the stars are detected from the stars image directly.
- Star plane: the center depth the stars sit around.
- Star depth: how each star's depth is chosen around the plane. Flat puts them all on the plane; Brightness places brighter stars nearer; Scattered gives each star a random depth, uncorrelated with brightness, for an even volume where no single star dominates.
- Star spread: how far the stars range around the plane in Brightness or Scattered mode. 0 collapses them onto the plane; higher values deepen the starfield (and increase how much the stars swing in the wiggle).
A starfield with real volume:
In Starless + stars mode the depth is built from the starless image while the stars are composited back at their own depths. As the viewpoint changes, the near stars parallax more than the far ones, giving a stronger impression of a 3D space rather than a flat pane. With the right masks, stars with spikes parallax nicely, leaving no trace.
Producing the inputs with StarNet2. StarNet2 generates all three images we need in a single run. We enable both its Create star mask and Unscreen stars options, run it on the source, and then feed the three results straight into the Star layer fields:
| StarNet2 output | DeepParallax field | Role |
|---|---|---|
| Starless image | Starless | Source of the (star-free) depth map. |
| Unscreen stars image | Stars | The star light composited back, each star at its own depth. |
| Create star mask image | Star mask | Locates the individual stars for depth assignment (optional but recommended). |
The Unscreen stars option matters: it gives a properly unscreened stars-only image, which composites back cleanly over the starless scene. The star mask is optional here (without it the stars are detected from the stars image directly), but providing StarNet2's mask gives the most reliable per-star detection. The same mapping applies to StarXTerminator's starless and stars outputs.
A note on realism: the per-star depths in Starless + stars mode are artistic, not measured. There is no real distance information in a star's brightness; the effect reads convincingly as space, but it is not astrometry. We use it because it looks good, not because it is physically true.
Applying in this mode: because the Starless and Stars views (and the optional Star mask) supply everything DeepParallax needs, there is no separate image to drag the instance onto. In Starless + stars mode we can therefore use the Apply Global button (the circle at the bottom of the process window) to run the process directly; the output windows are named after the starless view. In the other modes the source is whatever image we drag the instance onto, so Apply Global is disabled there.
The group is collapsed at startup. We expand it when we want to keep stars from spiking the depth, or to give them volume.
3.7 Depth painting
Even the best cue-driven depth map gets some regions wrong. Depth painting is the escape hatch: we import an external depth map and let it override the computed one, either partially or completely. This is how we hand-correct a specific region, how we use a depth map produced by another tool (for example an AI monocular depth estimator), and how we lock in a creative depth assignment that the cues cannot reach.
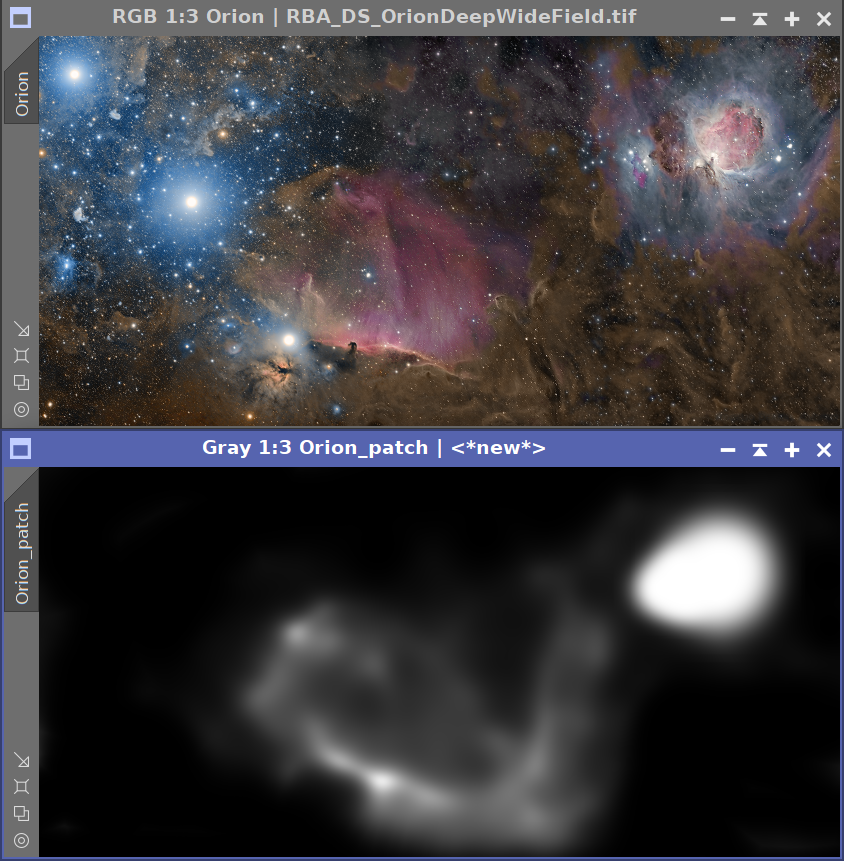
A typical hand-correction loop:
- Apply DeepParallax in Depth map mode to produce the
<view>_depthgrayscale image. - Open that image, paint corrections on it using any PixInsight tool (brighter areas read as closer, darker as farther).
- Back in DeepParallax, select the painted image in Depth map (the view selector in this group) and raise Blend.
- Depth map: the view that overrides the computed depth. Empty means no override.
- Blend: how strongly the external map replaces the computed depth. 0 ignores the external map entirely; 1 uses it fully; intermediate values blend the two linearly. Useful when we want to nudge a region toward an external opinion without losing the cue-driven detail elsewhere.
The external map is sampled at the resolution of the source view; if its dimensions differ, it is rescaled on the fly. The group is collapsed at startup; expand it only when we have an external map to import.
3.8 Animation
The Animation group produces a wigglegram: a small looping video that sweeps the viewpoint side to side. Because the eyes see successively different perspectives, the brain reconstructs depth from motion parallax alone, with no glasses, no stereoscope, no special display. Wigglegrams are the easiest 3D output to share: they play in any browser and on any social platform.
The group has three parts: the Motion frame with the animation parameters, the two preview buttons in the toolbar below it, and the five export buttons on the right side of that toolbar.
Motion parameters. These sliders and toggle define the sweep itself:
- Frames: the number of viewpoint frames in one full sweep. More frames produce smoother motion at the cost of larger files; 12 to 20 is the common range.
- Frame rate: playback frames per second for the live preview and the exported video. 8 to 12 fps produces gentle moves; higher rates feel more like a smooth turntable.
- Amplitude: how far the viewpoint swings, expressed as a multiple of the Parallax amount. 1.0 corresponds to the full left/right eye separation set by Parallax amount; higher values exaggerate the motion (at the cost of more visible smearing on revealed background) and lower values produce a subtler wobble. A value between 1.5 and 3 typically gives the most pleasing movement.
- Path angle: the direction of the camera sweep, in degrees. 0° is the classic horizontal left/right wiggle; 90° is a vertical up/down nod; 45° is a diagonal sweep. Useful for matching the motion to the dominant structure of the subject (a horizontally elongated nebula reads well with a vertical wiggle, for instance, and vice versa).
- Circular: when ticked, the linear back-and-forth swing becomes a smooth circular orbit around the scene, with the Wiggle path angle setting the orientation of the orbit's major axis. Reads as a continuous turntable rather than a wiggle and avoids the brief pause at the swing extremes; particularly effective on subjects with depth in more than one direction.
Previews. Two complementary preview options let us judge the result as we tune, both opened from the Animation toolbar:
- The Dynamic Preview button (the leftmost button of the toolbar) opens a floating preview window that shows the depth map (in Depth map mode) or the stereo result (in any other mode), downsampled for speed and updated as we adjust controls. The window has its own toolbar with zoom, screen transfer function, and standard display tools, and replaces PixInsight's native Real-Time Preview for this module: we get the same live feedback in a richer, more flexible window.
- The Animation Preview button (next to Dynamic Preview) loops the wiggle in that same floating window. It opens the window if it is not already open, builds the wiggle frames at preview resolution, and plays them at the chosen Frame rate. While the animation is running we can keep adjusting parameters: the loop continues with the old values during the slider drag, and when we settle on a new value the loop seamlessly picks up with the new parameters.
Both preview buttons are toggles: they highlight with a soft blue tint when active, and they reset themselves when we close the floating window from its own close button. The Dynamic Preview window opens in Smooth interpolation quality, which suits the continuous-tone depth and stereo previews; we can switch it to Precise from the window's own toolbar at any time.
Exporting the animation. The five buttons on the right side of the toolbar each write a complete file at full source resolution, in the chosen format:
- Export GIF: a self-contained animated GIF, 256-color quantized, with a NETSCAPE2.0 forever-loop block. Small, plays and loops everywhere, the classic wigglegram format. Smooth gradients may show a little banding due to the 256-color limit. During the trial, GIFs receive a small “Made with DeepParallax” watermark in one corner; registered users get the same GIF without the watermark.
- Export AVI: an uncompressed RIFF/AVI video, full color, no quality loss. The output is large (tens of megabytes for a short wiggle) but plays cleanly in desktop video players. Reserved for registered users.
- Export APNG: an animated PNG, full color and lossless, that loops in modern browsers. Larger files than GIF; some older viewers will not animate it. Reserved for registered users.
- Export MP4: an H.264 video, small files and excellent quality, plays in every modern browser and in mobile and desktop video players. The right choice for sharing on YouTube, Facebook, and similar platforms, and for embedding in web pages. Reserved for registered users; also requires a local ffmpeg executable (see Optional ffmpeg setup below). Until ffmpeg is configured, the button shows a disabled look; once configured it lights up.
- Export VR 180: a stereoscopic still side-by-side image at full source resolution, with the metadata that VR players and headset viewers need to recognize it as a 3D image. Without ffmpeg configured, this writes a side-by-side JPEG carrying VR 180 XMP tags and the
_VR180_SBSfilename hint that dedicated VR media players auto-detect. With ffmpeg configured, it writes a short MP4 with full VR 180 spatial-media metadata (the Spherical/Stereo tags and the stereoscopic and spherical-video boxes) baked into the container, which is what YouTube and dedicated VR players need to recognize an upload as 3D (these platforms accept video for VR 180, not still images). Facebook and Google Photos may not reliably auto-detect VR 180. The JPEG form is unrestricted; the MP4 form follows the same licensing as the Export MP4 button.
The GIF, AVI, and APNG encoders are self-contained in the module: no external dependencies, no tools to install. The MP4 export and the MP4 form of the VR 180 export use a local ffmpeg executable, configured once (see below).
Optional ffmpeg setup. The Export MP4 button and the MP4 form of the Export VR 180 button call a local copy of the open-source ffmpeg utility. DeepParallax does not bundle ffmpeg, so the path to the executable is configured once and remembered across sessions.
- Download an ffmpeg build for our platform from https://www.ffmpeg.org/download.html. Any reasonably recent build with libx264 enabled (the standard pre-built distributions all do) is sufficient.
- Extract or install it somewhere permanent: for example
C:\Tools\ffmpeg\bin\ffmpeg.exeon Windows,/usr/local/bin/ffmpegon Linux, or the path produced by a Homebrew install on macOS. - Right-click the Export MP4 or the Export VR 180 button to open the ffmpeg setup dialog. Browse to (or paste) the full path to the ffmpeg executable, click Test to confirm DeepParallax recognizes it (it runs
ffmpeg -versionand checks the output), then click Save.
The path is persisted in PixInsight's settings and re-read on every Launch of the process, so once it is set the MP4 outputs are simply available. Right-clicking either button at any time reopens the same dialog so we can change the path if ffmpeg moves. Without ffmpeg configured, GIF, AVI, APNG, and VR 180 (JPEG) all still work; only the MP4 outputs are unavailable.

3.9 The Dynamic Preview window
The Animation toolbar's Dynamic Preview button opens the Dynamic Preview, a real-time preview window shared across all Deep Sky Colors modules. It is our own live-preview engine, a replacement for PixInsight's built-in Real-Time Preview, rebuilt from the ground up to be far more capable. Where the native Real-Time Preview is a single fixed panel that can only show one rendition of the result, the Dynamic Preview is a true, freely resizable and movable window that adds its own zoom, pan, pixel readout, screen-stretch toggle, pixel grid, render-quality control and one-click extraction to a new image. Everything updates live as we work.
For DeepParallax, what the window shows follows the Output mode: in Depth map mode it shows the live grayscale depth map, and in any stereo mode it shows a live red/cyan anaglyph of the current result. An in-place preview can only show renditions that share the source geometry, so side-by-side and two-views outputs are previewed as an anaglyph; the actual side-by-side or two-views windows are produced when we apply the process. The preview refreshes after every parameter change (a short debounce collapses a burst of slider movements into one update), so we can judge the depth and the 3D effect as we tune. The companion Animation Preview button loops the wiggle animation in this same window.
The toolbar is what we expect from a capable viewer:
- Zoom: buttons to zoom out, zoom in, fit to window, and 1:1, plus a Scale field to type an exact zoom. Pan with the middle mouse button, the scrollbars, or the arrow keys. We can also zoom in and out with the mouse wheel or the + and - keys.
- Linked STF: toggles a screen global auto-stretch on the preview, so linear data is viewable. It opens matching the target view's current stretch state.
- Unlinked STF: same as Linked STF but with a per-channel auto-stretch on the preview. We choose the STF mode by clicking one button or the other; clicking the button that is currently active switches STF off.
- Pause: freezes updates so the preview stops recomputing until we resume, useful during a long burst of edits.
- Readout: switches left-click from panning to reading the pixel value under the cursor, shown in the status bar with a color swatch.
- Grid: overlays a pixel grid at high zoom.
- Extract: creates a new image window from the current preview, when we want to keep a snapshot of it.
- Quality: Smooth (bilinear) for natural viewing, or Precise for crisp pixel boundaries when zoomed in. DeepParallax opens the preview in Smooth, which suits the continuous-tone depth and stereo renditions.
The Dynamic Preview is a normal floating window: we resize it, move it, and leave it open wherever it is convenient while we keep working on the image. Click the Dynamic Preview button again, or close the window, to dismiss it; clicking once more brings it back where we left it. Closing the window also resets the two preview toggles in the Animation toolbar.
3.10 Registration and licensing
The Preferences button (the wrench icon on the process interface bar) opens the DeepParallax license information dialog. This dialog reports the current license state:
- Licensed: shows the email the module is licensed to.
- Trial: shows the number of trial days remaining and reminds us that GIF export is watermarked and AVI, APNG, and MP4 export are reserved for registered users.
- Expired: prompts us to register to keep using the tool.
When the module is not yet licensed, the dialog shows a “Click here to register” link. Clicking it opens the registration dialog, where we enter our email and license key. The fields are validated as we type, and the Register button enables only once a valid email/key pair is entered. After a successful registration the info dialog refreshes in place to the “licensed to” state: no need to reopen it. The same registration dialog is also offered from the AVI, APNG, and MP4 export buttons during the trial, so we can upgrade at the moment we need those formats without leaving our work.
4 Building a 3D scene
[hide]
A get-results-quick session looks like this:
Open a stretched image. A non-linear, well-stretched frame works best, because every depth cue reads perceptual brightness. A linear image is mostly black and gives a flat, uninteresting depth map.
Pick a preset. Click Nebula, Narrowband, or Galaxy at the top of the panel depending on the target.
Give each star their own depth. In the Star layer section, select Starless + stars (volumetric). Run a star removal tool, like StarNet2, instructing the tool to also create the stars-only image, and star mask, if possible.
Then, assign the three output images from StarNet2 according to the table in Section 3.6.
Done! Open the Dynamic or Animation Preview. Or directly export a video, a stereo pair, or the anaglyph.
A thorough session looks like this:
Open a stretched image. A non-linear, well-stretched frame works best, because every depth cue reads perceptual brightness. A linear image is mostly black and gives a flat, uninteresting depth map.
Pick a preset. Click Nebula, Narrowband, or Galaxy at the top of the panel depending on the target. These set sensible Depth cue, Shaping, Stereo, and Star plane values to start from, and (in Narrowband's case) enable the channel-balance cue with Ha/OIII roles assigned to Red/Blue.
Work in Depth map mode first. Set Output = Depth map and turn on the Dynamic Preview. Depth is much easier to judge as a grayscale image than as a 3D effect, and every cue/shaping control changes the depth directly, so this is where we do the tuning.
Refine the cues. Watch the depth map as we adjust Luminance weight, Structure weight, and Structure scale. For narrowband targets, expand the Narrowband section and tune the channel weight and roles. Tick Invert depth if the brightest regions of our particular target should recede instead of coming forward.
Shape the depth. Raise Smoothness until the dim background reads as cleanly continuous, raise Edge preservation until the depth follows the visible structure faithfully, and use Depth gamma to redistribute the depth range: values above 1 give more separation, values below 1 compress the back of the scene.
Tame the stars (astroimages). If the target has bright stars sitting on a soft nebula or galaxy, the depth map will show per-star spikes. Build a star mask with DeepStarMask (or any other tool), select it in the Star layer section, set a Star plane around 0.85 to 0.95, and raise Star floatation toward 1 for a single clean star plane.
Hand-correct anything wrong (optional). Apply DeepParallax in Depth map mode to get a paintable
<view>_depthimage, paint corrections on it (brighter = nearer), then bring that image back via the Depth painting section and raise Blend.Switch to a stereo Output mode. Now we look at the 3D itself. Anaglyph is the most convenient for tuning if we have red/cyan glasses; Side-by-side is the most flexible for downstream use. With Auto convergence on, the scene opens centered; raise or lower Parallax amount until the strength is right. Set Max disparity to a moderate value (around 20 pixels of total separation) if a deep scene is hard to fuse, otherwise leave it at 0.
Set up the wiggle. Open the Animation Preview from the toolbar. Tune Frames (12 to 20), Frame rate (8 to 12 fps), and Amplitude (1.5 to 3) until the motion reads as a clear depth cue without too much smearing in the revealed-background areas. The Amplitude multiplies Parallax amount, so we raise the latter too for a stronger swing. If the subject's depth runs along a particular direction (a horizontally elongated nebula, a vertically inclined galaxy), set Wiggle path angle across that direction; tick Circular for a continuous turntable-like motion instead of a back-and-forth swing.
Export. Click Export GIF for a small, universally compatible wigglegram. Registered users can also click Export AVI for an uncompressed video, Export APNG for a full-color animated PNG, or Export MP4 for an H.264 video suitable for YouTube, Facebook, and embedding in web pages. The Export VR 180 button writes a stereoscopic still for VR headset viewing (a side-by-side JPEG by default, or an MP4 with VR 180 metadata when ffmpeg is configured). The MP4 outputs require a local ffmpeg executable, configured once by right-clicking the MP4 or VR 180 button (see 3.8). The save dialog asks for a file name, and the encoder writes the file directly.
Saving the recipe. The full parameter set is serialized into the process instance, so we can drag the instance to a process icon and re-apply the same DeepParallax recipe to other frames of the same target series, or use it as a starting point for related targets.
Quick starting points
The Presets buttons load these starting values; the table is here so we can see them at a glance and tweak from there:
| Nebula (broadband) | Nebula (narrowband) | Galaxy | |
|---|---|---|---|
| Luminance / Structure | 1.0 / 0.35 | 0.6 / 0.25 | 1.0 / 0.30 |
| Narrowband weight | 0 | 0.5 (Ha/OIII) | 0 |
| Smoothness / Edge preservation | 10 / 0.7 | 10 / 0.7 | 12 / 0.8 |
| Parallax amount | 20 | 20 | 16 |
| Star plane / Star floatation | 0.9 / 1.0 | 0.9 / 1.0 | 0.85 / 0.8 |
Convergence is automatic by default in all three presets; we untick Auto convergence only when we want to set it by hand. Max disparity is left at 0 unless a particular scene is hard to fuse.
5 Usage tips and tricks
[hide]
Tune depth on grayscale, judge stereo in stereo. Stay in Depth map output mode while setting Depth cues and Depth shaping. The grayscale depth is much easier to read than a 3D effect, and we will spot wrong assignments (a brighter star reading as foreground, a galaxy core that should recede, a noisy sky) much faster.
Stretched images give the best depth. All cues read perceptual brightness. If we feed in a linear image the depth map is almost flat (most pixels are near zero) and no amount of tuning will recover relief. Stretch the image first; for narrowband, prefer a linked or permanent stretch so the Ha/OIII ratio is preserved.
Stereo controls are cache hits. Parallax amount, Convergence, Max disparity, Anaglyph color, Swap eyes, and all the Animation parameters re-render quickly because they reuse the cached depth map. Move them freely; only Depth cues, Narrowband, Depth shaping, Star layer, and Depth painting trigger a depth rebuild.
Use the star layer instead of fighting the stars. Bright stars are point sources at infinity but read as foreground to the cues, producing depth spikes. A star mask plus Star floatation around 1 floats them onto a clean plane that reads correctly in both still stereo and animation. Even better, use the starless + stars mode, so each star can be assigned its own depth, and they rarely leave any trails.
Auto convergence first, then Max disparity if needed. Auto convergence opens every scene centered on its median depth, which is comfortable for almost any subject. Reach for Max disparity only when a particular deep scene strains the eyes to fuse.
Anaglyph color modes matter on emission nebulae. Saturated reds cause noticeable red/cyan rivalry under colored glasses, especially on Ha-dominant nebulae. Switching from Color to Half-color or Optimized (Dubois) often makes the same scene fuse cleanly.
Strong wiggle amplitude reveals background. The hole-fill stretches the background flat across the disocclusion area, which is fine at moderate settings but reads as a soft smear at very strong Amplitude or Parallax amount. If a wiggle has visible smearing, lower Amplitude before raising it.
Pick the right export format for the destination. GIF is small and plays everywhere but is 256-color quantized: the default for casual sharing. AVI is full-color and lossless but very large: the choice for archival or color-critical output. APNG is a lossless middle path that browsers loop natively but older viewers do not. MP4 (registered users with ffmpeg configured) is the best choice for YouTube, Facebook, mobile, and web embedding: small files, modern H.264 quality, plays everywhere. For VR headset viewing, the Export VR 180 button writes a side-by-side stereoscopic still: a JPEG by default that works in dedicated VR media players, and an MP4 form (with ffmpeg configured) carrying the VR 180 metadata that YouTube and dedicated VR players recognize. Facebook and Google Photos may not reliably auto-detect VR 180.
Wiggle path angle and Circular open new motions. The classic horizontal wiggle is a great default, but a vertical (90°) wiggle reads beautifully on horizontally elongated nebulae, and a 45° diagonal sweep often gives the strongest depth cue for galaxies. Ticking Circular turns any path angle into a smooth orbit that avoids the brief pause at the swing extremes: particularly effective when sharing on social media, where the eye latches onto the continuous motion.
Save instances as process icons. The full parameter set is serialized in the instance, so a working recipe can be dragged to a process icon and applied to other frames of the same target later, or used as a starting point on related targets.