1 Introduction
[hide]
PixInsight can create a new image from a region of another one, but it cannot paste that region onto an existing image. Doing it by hand means writing a PixelMath expression with explicit geometry coordinates, recomputing them every time the destination changes, and having no way to see the result until the expression runs.
PixelClipboard gives PixInsight an image clipboard. We select a region of any open image, copy it, and then paste it anywhere on any other image, positioning it interactively and watching the result before we commit. The clipboard holds one block at a time and survives for the whole PixInsight session. On Windows and macOS it is also connected to the system clipboard, so blocks travel to and from other applications and other PixInsight instances; see section 6.
Two things make it more than a convenience. The first is that a selection does not have to be a rectangle: freehand, ellipse, polygon and magic wand regions all work, and several of them can be combined into one. The second is that a paste can be placed by sky coordinates rather than by pixel coordinates. When both images carry an astrometric solution, PixelClipboard reprojects the block from the source solution onto the target's, so it lands on the same stars whatever the two orientations, scales and projections happen to be.
Everything is applied through PixInsight's own process machinery, so a paste is a normal history step: it can be undone, it honors an active mask, and it can be saved as a process icon and replayed later.
2 Setup and Installation
[hide]
The only official distribution of PixelClipboard is via a PixInsight repository. This is the safest way to install a module, since the installation is handled by PixInsight itself, which fetches the module directly from our repository and verifies our Developer and Repository certificates before it completes the installation.
https://repo.deepskycolors.com/PixelClipboard/
Make sure the trailing / is part of the URL, and keep our repository in the list of PixInsight repositories to receive timely updates. To check for the latest version we go to PixInsight's RESOURCES > Updates > Check for Updates.
2.1 Launching PixelClipboard
Once installed, PixelClipboard appears under the PROCESS > DeepSkyColors, PROCESS > Geometry and PROCESS > Astrometry menus, and in the Process Explorer under the same categories. It is a dynamic process: we open its interface and then work directly on open images. There is no file list and no batch mode.
The copy and paste commands are also available from the main menu without opening the interface, under Image > Clipboard. See section 7.
2.2 Licensing
PixelClipboard runs for 30 days as a trial, counted from its first use. Every feature works during the trial, and the interface shows an advertisement banner. When the 30 days are over PixelClipboard stops working until it is registered: the process window does not open, and a process icon, a Process Container or a script that tries to run it is refused with an explanation.
The banner sits at the bottom of the interface and usually promotes other Deep Sky Colors tools for PixInsight. It is a single clickable image; it never interrupts our work and it makes no attempt to track us. If we click on the banner, PixelClipboard opens our default browser with the direct destination link, without saving nor tracking any information about the click at all.
Registering removes both the banner and the time limit. To register, we click the wrench (Preferences) button on the process panel, enter the e-mail and license key from our purchase confirmation, and click Register. The banner disappears immediately and stays gone. Licenses are available at https://www.deepskycolors.com/pixinsight/pixelclipboard/.
The Preferences dialog reports the state at any time: the days left in the trial, or the e-mail the license is registered to.
3 How PixelClipboard works
[hide]
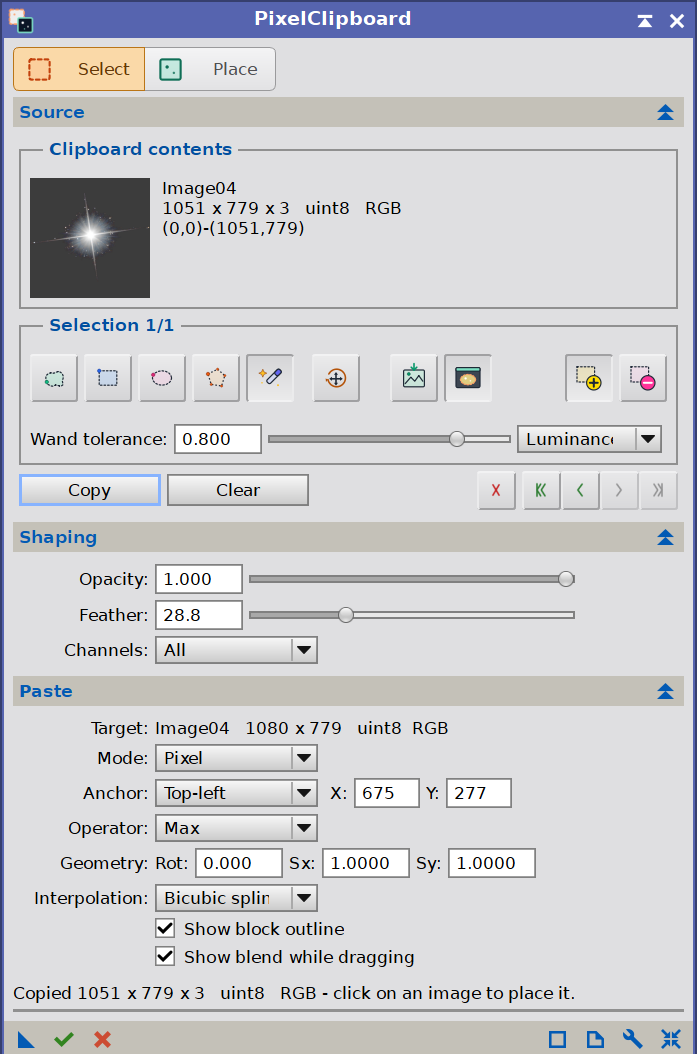
The tool has two modes, chosen with the Select and Place switch at the top of the panel:
Select: we draw on an image to choose what to copy.
Place: we position the copied block on a target image and paste it.
The working cycle is always the same:
In Select mode, draw one or more regions on the source image. The Add and Subtract buttons, or Alt, decide whether a shape joins the selection or cuts from it.
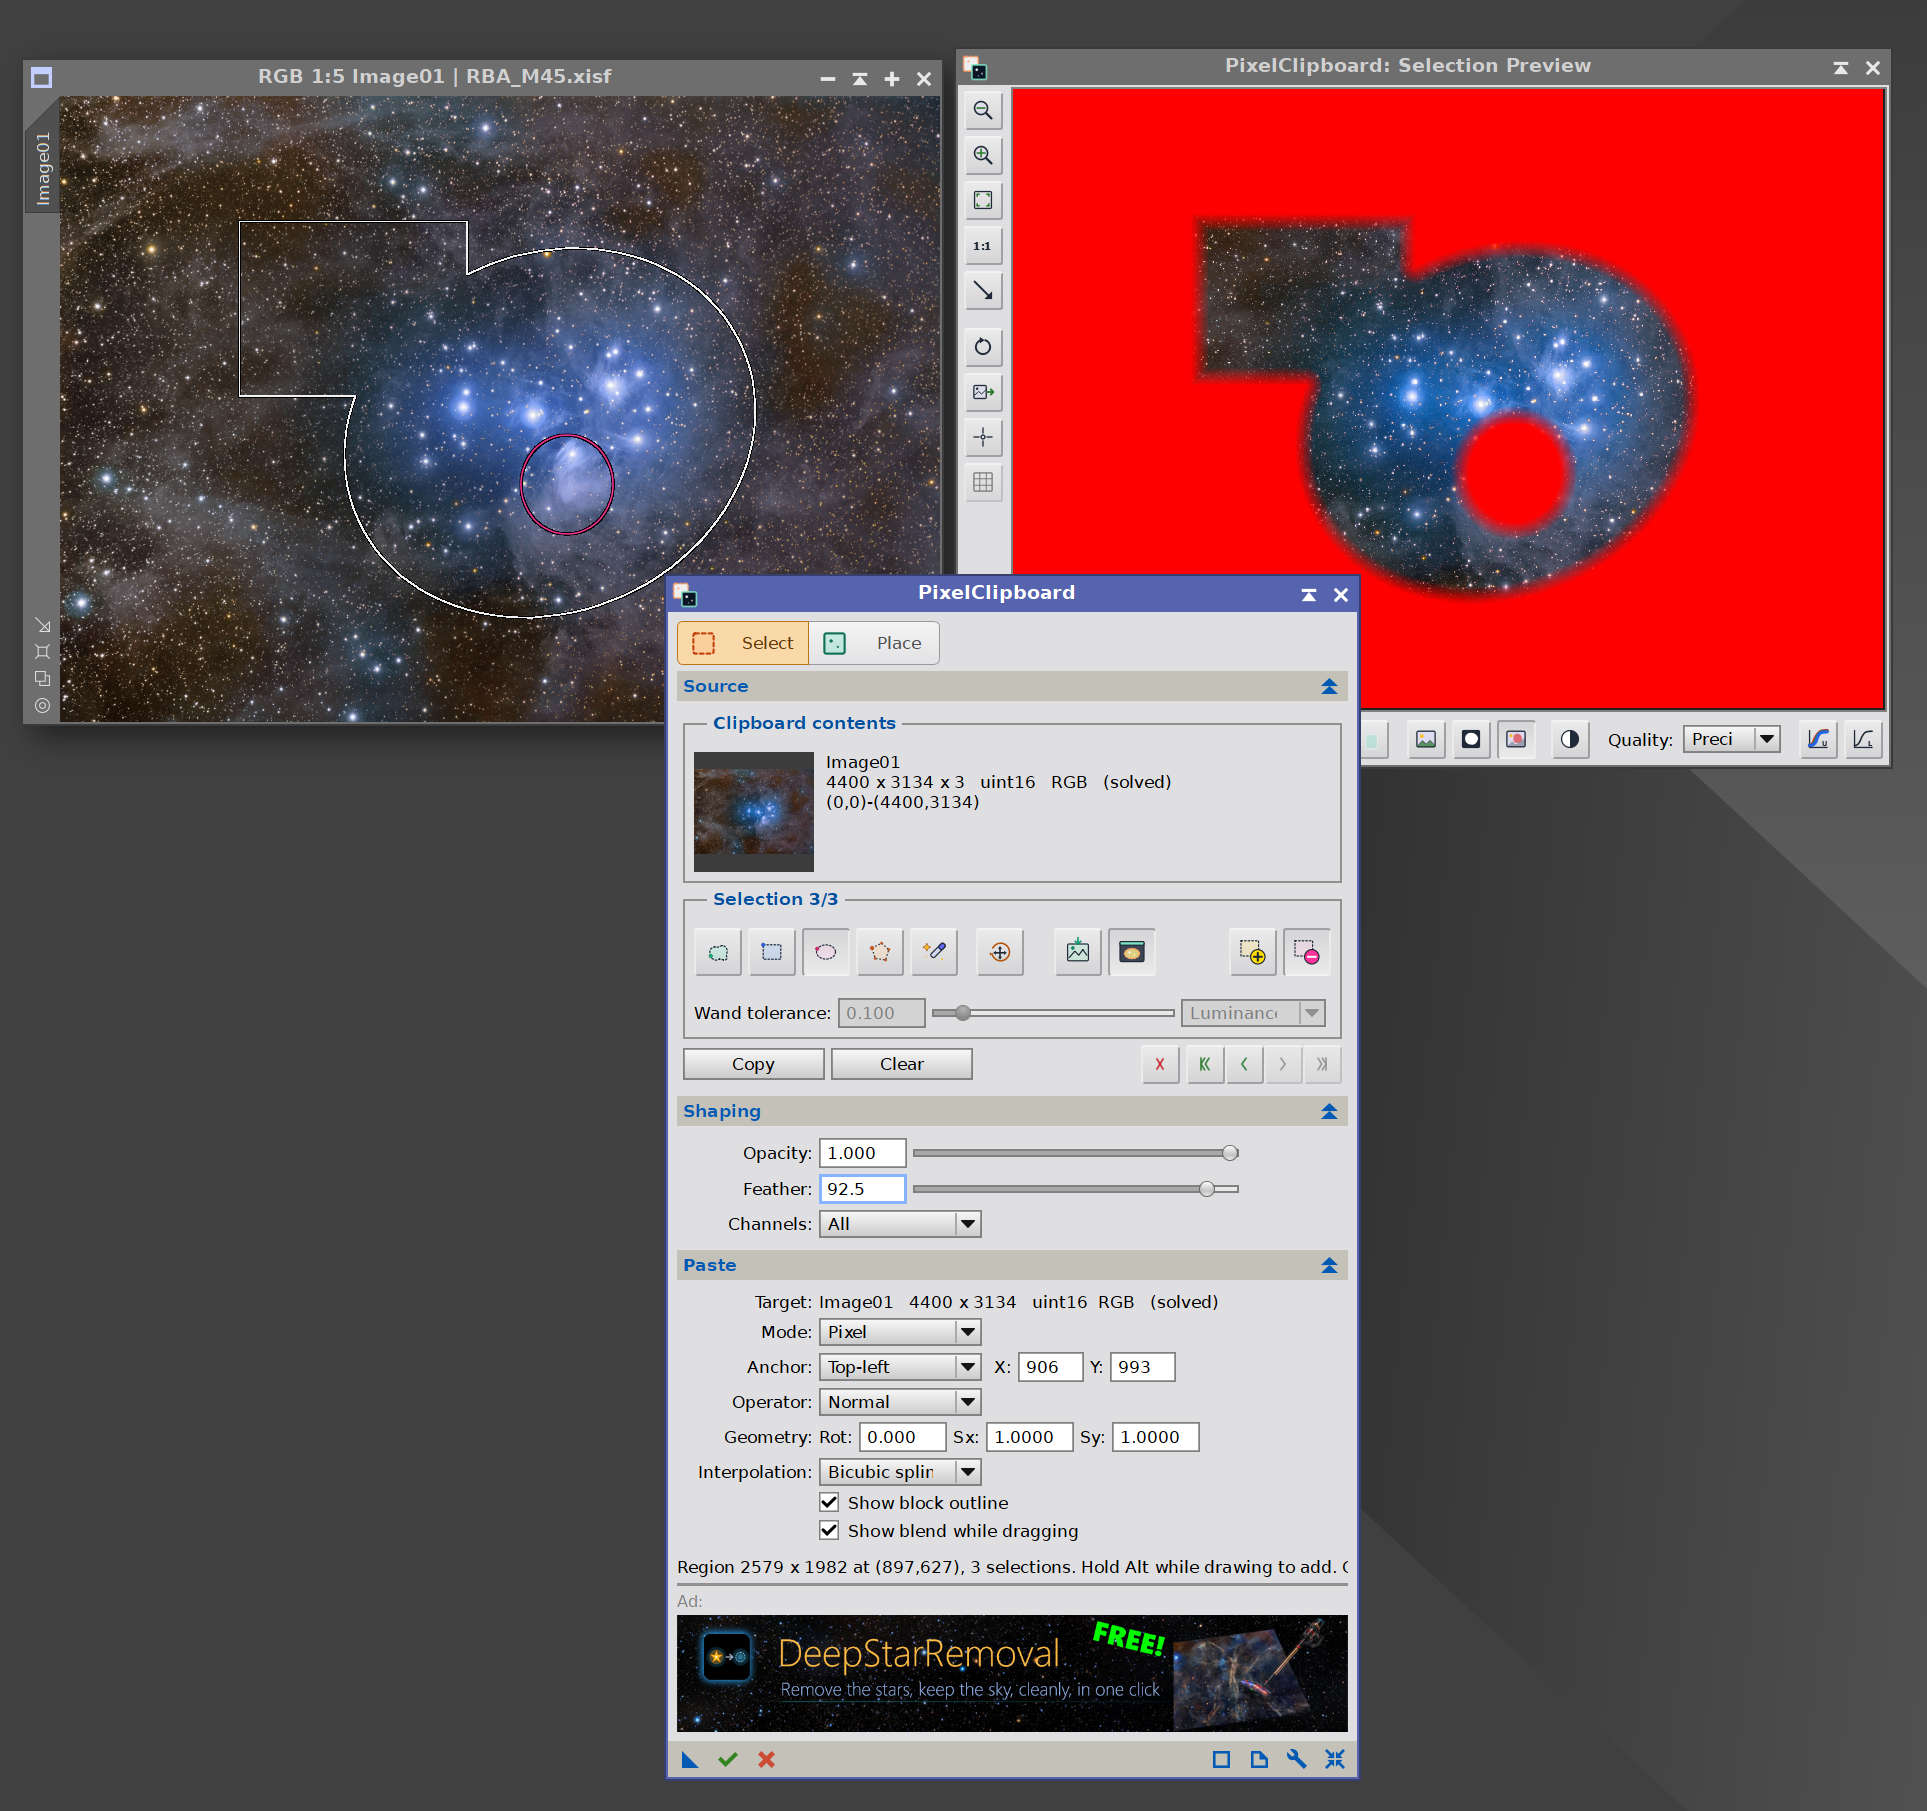
Optionally, open the Selection preview to see the whole source image with only the selection visible, and adjust Feather, Opacity and Channels in the Shaping section while watching it.
Click Copy. The region is stored on the clipboard and the tool switches to Place mode.
Click on the target image. A floating block appears, which we drag, rotate and resize.
Set the operator and any other options in the Paste section.
Press Execute (or Return over the image) to write the block into the image.
On Windows and macOS, the block can also come from another application: an image copied there, or in another PixInsight instance, takes the place of the clipboard contents, and the cycle starts at step 4. See section 6.
What the clipboard stores is a block of pixels, the shape of the selection as a per-pixel coverage mask, the identifier of the image it came from, and, when that image was plate-solved, its astrometric solution. It keeps the block in the source image's own pixel format: no conversion happens on copy.
Conversions happen on paste, and only as needed. A block copied from a 16-bit image pasted into a 32-bit float image is converted; a color block pasted into a grayscale image is converted to grayscale using its HSI intensity; a grayscale block pasted into a color image is replicated across the channels. The console reports any conversion that took place.
Because the paste runs as a regular process, it appears in the image's process history, Ctrl+Z undoes it, and an active mask on the target window is honored by PixInsight itself.
4 Selecting a region
[hide]
4.1 The drawing tools
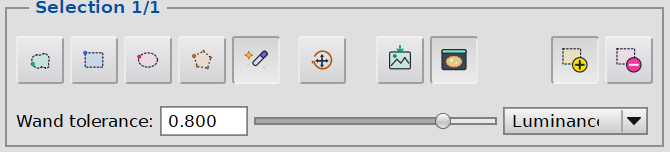
The toolbar at the top of the Selection frame, in the Source section, selects how a new region is drawn. Only one tool is active at a time.
Freehand: drag to trace an arbitrary outline. The shape closes automatically when we release.
Rectangle: drag from one corner to the opposite corner. Holding Shift constrains it to a square.
Ellipse: drag to define the bounding rectangle. Holding Shift constrains it to a circle.
Polygon: click to place straight-edged vertices. The shape closes by clicking the first point again or by pressing Enter. Backspace removes the last vertex and Escape cancels the polygon.
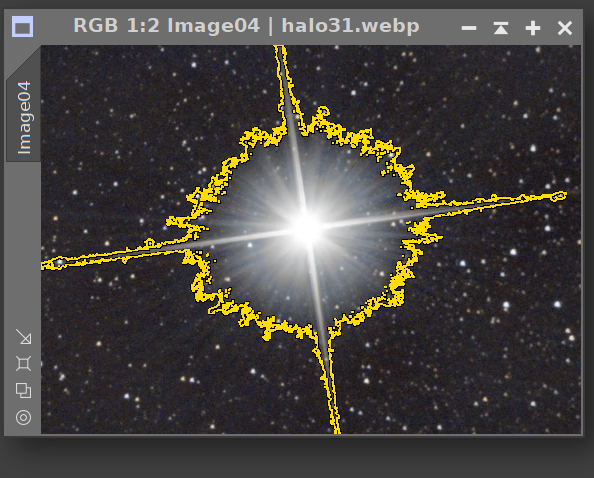
Magic Wand: click a pixel to select a contiguous region of similarly valued pixels.
The Magic Wand has two controls of its own, on the row below the toolbar, which are enabled only while the Wand tool is selected:
Wand tolerance: how far a pixel may differ from the one we clicked and still be included. The value is normalized to the range 0 to 1, and it is compared against the seed pixel rather than against each pixel's neighbor, so the tolerance means the same thing across the whole region.
Luminance / RGB: whether pixels are compared by Rec. 709 luminance or by per-channel difference.
A region is filled using the even-odd rule, so a freehand stroke that loops back across itself punches a hole rather than filling solid.
4.2 Several selections at once
Selections accumulate. Each shape we draw is added to the previous ones, and a copy extracts all of them together: the bounding rectangle of everything selected, with a coverage mask saying which pixels inside it actually belong.
The Add and Subtract buttons at the right end of the drawing toolbar decide what a new shape does. With Add, the default, it joins the selection; with Subtract, it cuts from it, which is how we make a hole in a region. Exactly one of the two is active at a time, and PixelClipboard returns to Add whenever it is closed.
Holding Alt (Option on macOS) as we begin a shape does the opposite of the active button for that shape only: with Add active it subtracts, and with Subtract active it adds. Both the button and the modifier are read when the shape starts, not when it is committed: the press for a dragged shape, the click for the Magic Wand, and the first click for a polygon.
A subtracting shape needs something to cut from. When there is no selection on that image, it is refused and the status line reads Nothing to subtract from: draw a selection first.
While a shape is being drawn, its outline is amber if it will add and magenta if it will subtract. Once shapes are committed, two outlines describe the selection, each over a dark underline so it reads on any background:
Near-white: the edge of the combined selection, exactly what Copy takes. Parts of an earlier shape that a later subtraction removed are not outlined. This outline follows pixel edges, so at high zoom curves and diagonals show as fine steps.
Gold or magenta: the most recent selection, drawn in full: gold if it added, magenta if it subtracted, the same colors it had while being drawn. It is the one that Move / Rotate and Delete act on.
During a Move / Rotate drag the near-white outline is hidden, and it is redrawn for the new shape on release.
The five buttons at the right end of the Copy and Clear row navigate the list of recorded selections. The title of the Selection frame shows the most recent selection in force out of all those recorded, undone ones included, as Selection N/M, or Selection: none when none have been recorded. Every shape counts as one step, subtracting ones included, so the count moves by one with each of the buttons below:
Delete: discards the most recent selection outright. Unlike Undo, it cannot be redone.
Undo all and Undo: take back every selection, or the most recent one.
Redo and Redo all: put back the next undone selection, or all of them.
Drawing a new shape after undoing discards the undone branch, exactly as a normal undo history behaves. Selections belong to the image they were drawn on. While a selection exists, Select is unavailable on every other image and PixelClipboard switches to Place there; closing the image clears its selections.
Outlines are shown in Select mode only. Switching to Place mode hides them so that the floating block is the only thing on screen; switching back shows them again.
They are also drawn over the image only. A shape may be started outside the image and dragged across it, and the outline then appears where it crosses the image and nowhere else. What is selected is unaffected: a shape that covers no pixel of the image is discarded, and one that covers some counts in full.
4.3 Moving and rotating a selection
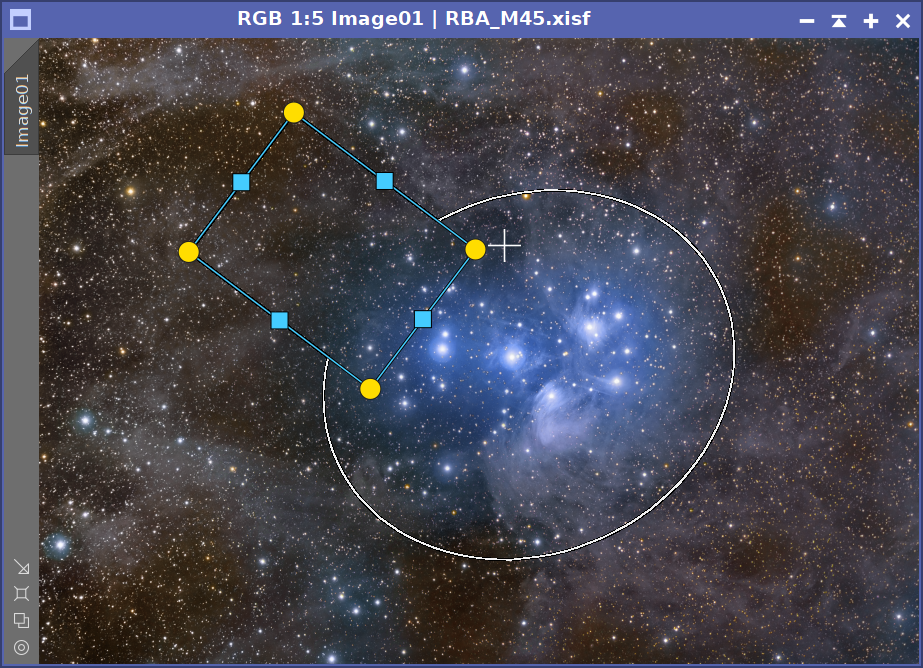
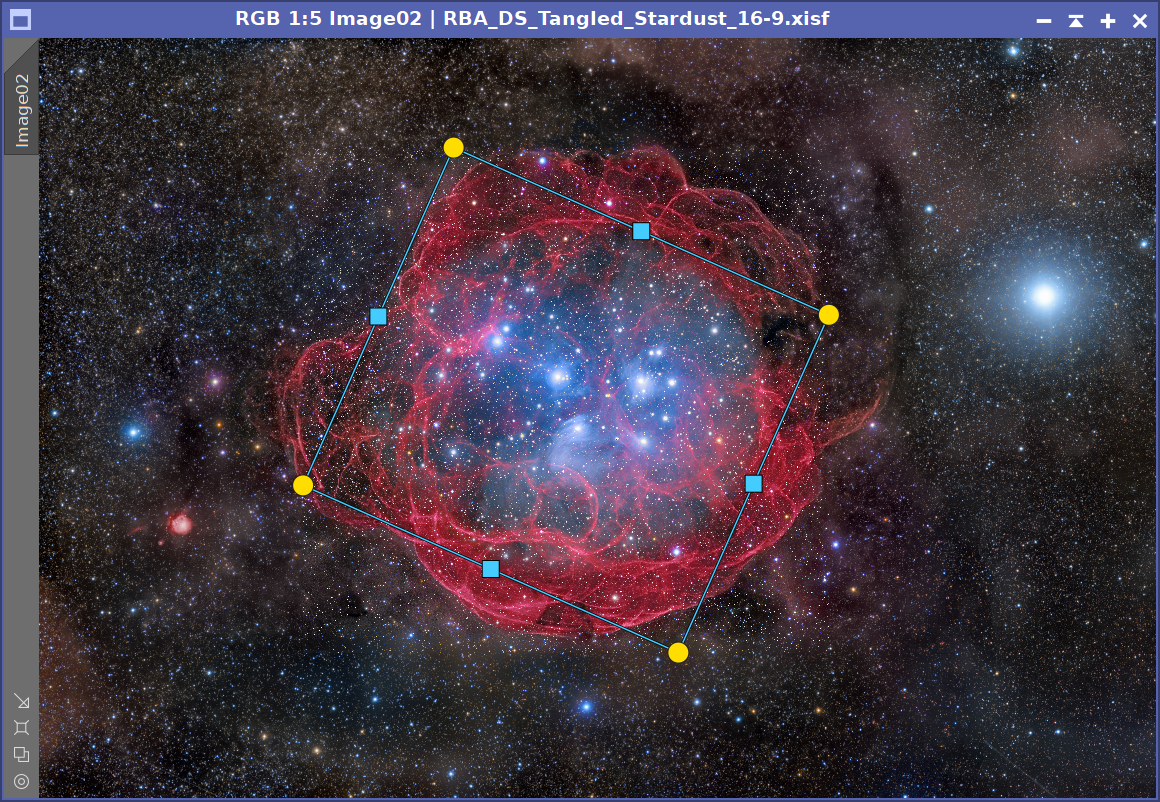
The Move / Rotate button on the toolbar switches from drawing to editing. With it enabled, the most recent selection shows eight handles: round handles at the corners rotate the shape about its center, and square handles at the middle of each side resize it along that side.
To edit an earlier selection, we Undo back to it, edit it, then Redo: editing a selection keeps the undone steps, so the later selections come back unchanged and the edit stays.
The gizmo works in the shape's own frame, so an edge handle scales along that edge whatever angle the shape currently sits at, and rotating never moves the shape.
Move / Rotate applies to polygon-based selections. It does not apply to a Magic Wand region, which is a set of pixels rather than a set of vertices; selecting Move / Rotate with a wand region in force reports this and turns itself off again.
4.4 The Source section
The Source section shows what is on the clipboard and controls what a copy takes. From top to bottom it holds two frames and the copy buttons.
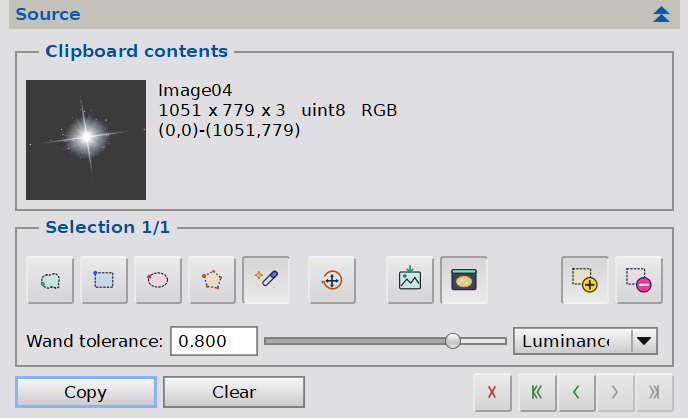
The Clipboard contents frame shows what the clipboard holds:
Thumbnail: the block currently on the clipboard, rendered through the screen transfer function of the image it came from, so a linear block does not appear black. Clicking the thumbnail cycles its size through Small, Medium and Large; the status line names the new size, and the choice is remembered across sessions.
Source: beside the thumbnail, the identifier of the source image, its dimensions and format, and the rectangle the block was taken from. If the source image has since been closed, the text says so; the block itself is unaffected.
The Selection frame holds the drawing toolbar and, below it, the Magic Wand controls, all described above. Its title shows the current selection out of the total.
Below the frames, one row holds the copy buttons on the left and the selection history buttons, described in Several selections at once, on the right:
Copy: stores the pixels on the clipboard and switches to Place mode. What is copied follows from what is on screen: when selections are recorded, Copy takes their bounding rectangle together with the coverage mask of their shapes, from the image the selections were drawn on, even when another image is active. Closing that image clears its selections. When there are no selections, it takes the whole active view, which for a preview is the preview itself.
Clear: empties the clipboard and returns to Select mode.
The New image button on the drawing toolbar creates a new image window holding exactly what the clipboard currently contains. It is the quickest way to inspect a block, or to keep one before copying something else. When the selection is shaped, or Feather is above zero, the new image carries an alpha channel with the same coverage a paste would use: every pixel of the bounding rectangle is kept, and the areas outside the selection are transparent.
4.5 Selection preview
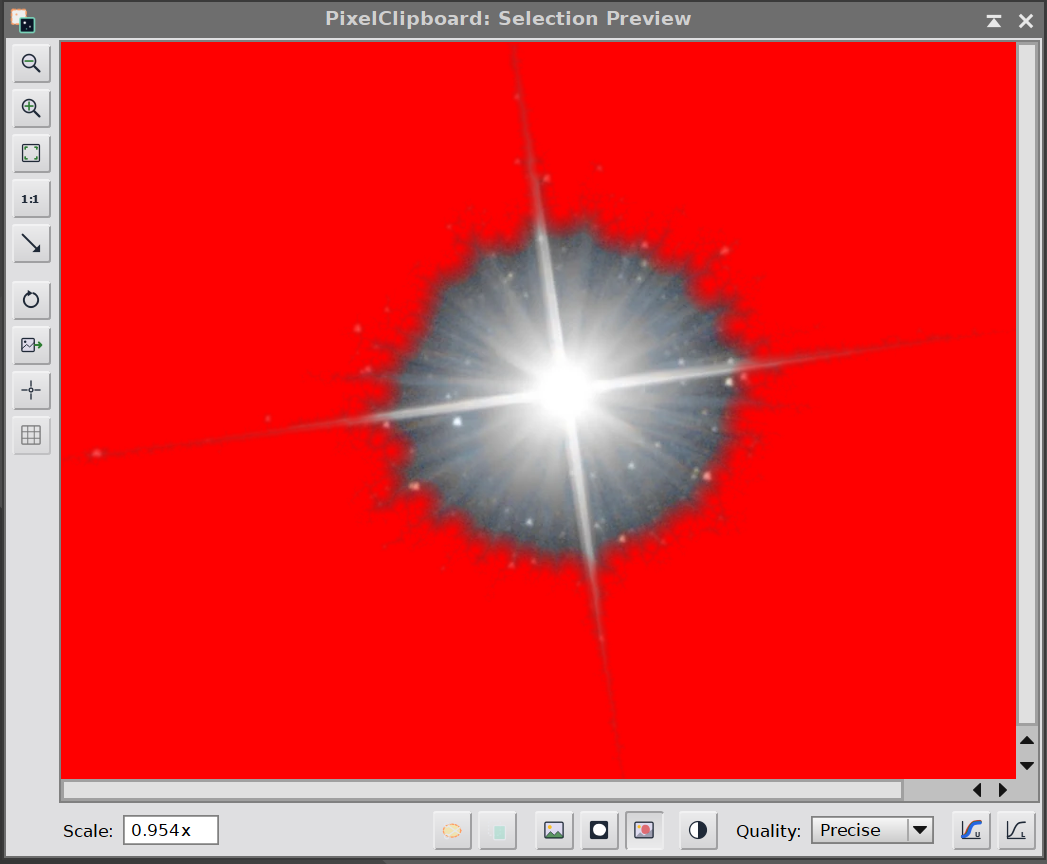
The Selection preview button, the last one on the drawing toolbar, opens a preview window showing the whole source image with only the current selection visible. It shows what is selected, not what is on the clipboard, so it works before anything has been copied. Clicking the button again, or closing the window, closes the preview.
The image shown is the one the selections were drawn on. With no selections, it is the whole active view, which is what Copy would take, and it follows as we switch between images.
The selection is shaped by Feather, Opacity and Channels from the Shaping section, exactly as a paste of that selection would be: the feather is computed at the image's full resolution, so it looks the same in the preview as in the result. Operator, geometry and interpolation need a target image and are not shown.
The preview updates when a selection is added, undone, redone or deleted, when a Move / Rotate drag is released, and when a Shaping control changes. If the source image itself is modified by another process, the window's Refresh button rebuilds the preview.
The window provides zoom controls, a pixel readout, an extract button, display quality and screen stretch. Its stretch starts from the source image's own, so linear data does not open black. Its mask display buttons choose how the selection is shown: Image only, Mask only (the coverage as grayscale) or the red overlay, the default, which tints everything outside the selection. The Invert mask toggle beside them inverts the mask in the preview only: it changes what the window shows, never the selection itself, which a copy takes exactly as before. PixelClipboard adds two buttons of its own, just left of the mask display buttons:
Cut-out: shows only the selected pixels. Everything outside the selection is filled with the image's median level rather than black, because the preview's automatic stretch is computed from the picture it shows, and a mostly black picture would push the stretch to zero. Turning Cut-out on switches the display to Image only; turning it off restores the previous display mode.
Copy: copies the selection, exactly as the Copy button in the Source section does.
Whenever the preview moves to an image of a different size, whether on opening or by following the active view, the window is rebuilt, which returns its stretch, display mode and Cut-out to their defaults. Closing the source image clears the preview, and closing PixelClipboard closes it.
4.6 The Shaping section
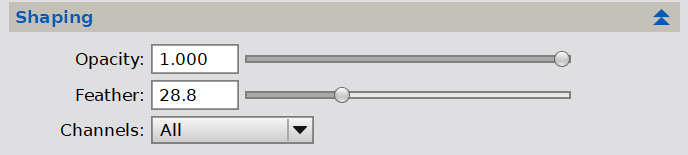
The Shaping section, between Source and Paste, holds the controls that shape the block wherever it is shown: in the paste, in New image and in the selection preview. It is always enabled, so a selection can be shaped in the preview before anything has been copied.
Opacity: the blend factor for the pasted block. 1 replaces, 0 leaves the target untouched. The selection preview shows it as partial coverage.
Feather: softens the edge of the block over this many pixels, fading inward from the boundary. It applies to whatever defines the edge: the shape of the selection, the slanted sides of a rotated block, and the border of a plain rectangular paste alike. 0 is a hard edge, exactly as if the control were not there.
Channels: paste into every channel, or into one channel only. A single channel is taken from the block's matching channel, so channel 1 of the block goes to channel 1 of the target. Choosing a channel the target does not have is refused with a message naming the channel count. The selection preview shows only the chosen channel of the source image, or every channel when the source does not have the one chosen.
5 Pasting
[hide]
5.1 Placing the block
In Place mode, clicking on an image puts the block down there. It does not appear merely by moving the pointer over an image: placing is always a deliberate click.
Once placed, the block can be dragged with the mouse, nudged with the arrow keys one pixel at a time, or ten pixels at a time with Shift held. It also carries the same eight handles as a selection: round corner handles rotate it about its center and square side handles resize it. Holding Shift while dragging a resize handle keeps the block's original width to height ratio.
Rotation and scaling are applied in a single interpolation pass, so a block that is both turned and resized is resampled once rather than twice.
Each image remembers its own placement, so we can stage a block on several images and paste them one at a time. Escape or Delete removes the block from the image under the pointer only; Cancel and Reset clear every staged block. Pressing Return over an image executes the paste on it.
Two checkboxes control what we see while placing:
Outline: draws a border around the floating block. We turn it off to judge the blend without a line over it.
Blend while dragging: computes the blend continuously as the block moves. Every operator except a plain replace is computed at each position, so that what is shown is what the paste writes. Turning this off gives a lighter drag on large blocks: the plain block follows the pointer and the blend appears as soon as we release.
5.2 The Paste section
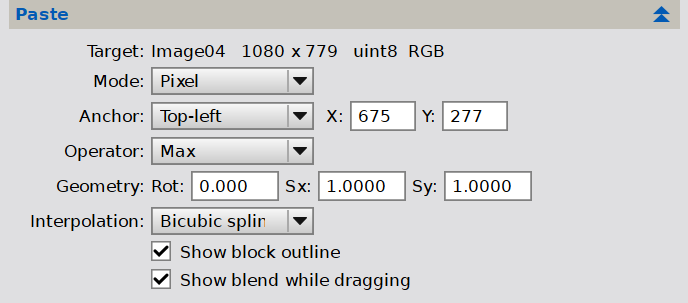
The Paste section is enabled only while the clipboard holds something. Opacity, Feather and Channels, which also shape the paste, are in the Shaping section because they apply before anything is copied too.
Target: the image the block will be pasted into, and whether a block is currently staged on it.
Mode: Pixel places the block by pixel position; Celestial places it by sky coordinates. See section 5.3.
Anchor: what the X and Y values refer to, either the block's Top-left corner or its Center. Switching anchors does not move a placed block: the stored position is converted so only its meaning changes.
X, Y: the position of the block in the target image, in image coordinates.
Operator: how the block combines with the pixels beneath it. Normal replaces them; Lighten and Darken keep the brighter and the darker of the two pixels, and follow Normal in the list because they are the ones a paste reaches for most; Add, Subtract, Multiply and Difference are the common arithmetic operators, and PixInsight's remaining pixel operators are offered under their own identifiers. Bitwise operators act on the bit patterns of integer samples, so they are refused on floating point images with an explanation rather than producing meaningless results.
Geometry (Rot, Sx, Sy): rotation in degrees counter-clockwise about the block's center, and the horizontal and vertical scale factors. Rotation does not move the block.
Interpolation: the resampling used when the block is rotated, scaled or reprojected: Nearest, Bilinear, Bicubic spline (the default) or Lanczos-3. Nearest neighbor is the right choice for masks and label images, which must not be interpolated.
After a paste, the console reports what was written: the block size and position, the operator, the opacity, the feather and the channel routing, together with verification lines confirming that nothing outside the pasted rectangle was modified.
A block that hangs over an edge is pasted as far as it reaches, and the part beyond the edge is dropped. A block lying entirely outside the image has nothing to write, so the paste is refused: the console gives the rectangle it would have landed on, the status line reads Pasted outside of the image, so nothing was done, and the block stays where it is, ready to be dragged onto the image.
5.3 Pasting by celestial coordinates
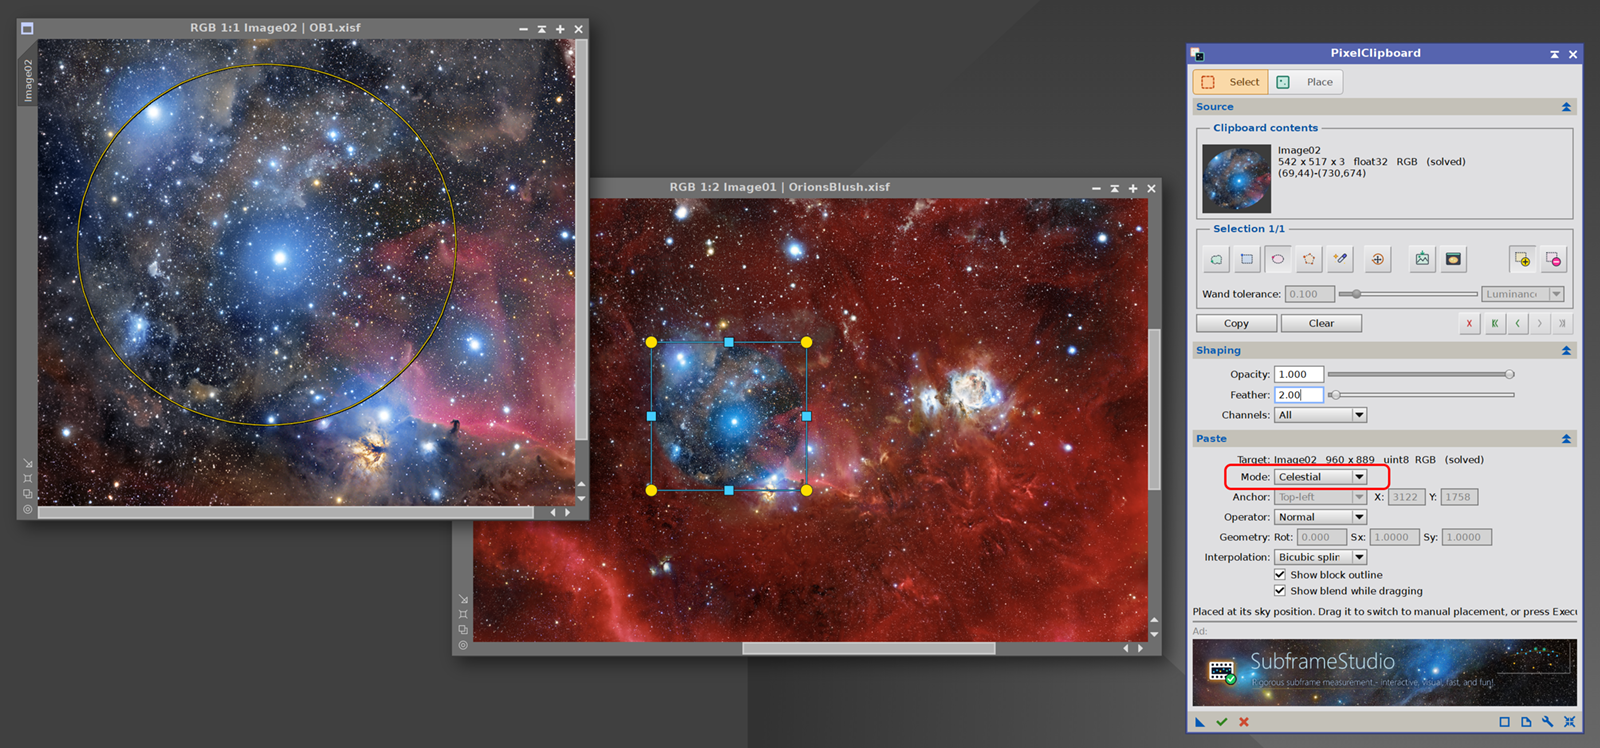
With Mode set to Celestial, the block is placed by where it belongs on the sky rather than by where we put it. PixelClipboard reprojects the block from the source image's astrometric solution onto the target's, so the pasted pixels land on the same stars even if the two frames differ in orientation, scale, projection or field.
Both images must be plate-solved. The source solution is captured when we press Copy, so the source image must already be solved at that point; solving it afterwards has no effect on a block that is already on the clipboard. The target is read when the paste runs, so solving it later is fine. If either side is missing a solution, the process refuses before running anything and says which one.
The two images do not have to come from the same session, instrument or scale. They only need to overlap on the sky. If the overlap is poor the paste still runs, and the console reports the percentage of the placement rectangle that actually received source data.
In Celestial mode the anchor, position, rotation and scale controls are supplied by the sky and are disabled. Choosing Celestial places the block on the active image at once, at its computed position, so the mode shows its result immediately. A click is what puts it on a different image, and there too it snaps to its computed position and stays there: the click chooses the image, not the position. If we then drag the block, PixelClipboard switches back to Pixel mode and hands over to the ordinary placement gizmo, keeping the reprojected pixels as they are, so that manual adjustment starts from the astrometrically correct result.
A reprojected block does not fill its bounding rectangle, so the parts of the rectangle that received no source data are left untouched rather than pasted as black.
When a celestial placement is not possible, PixelClipboard says so in a message box and returns the mode to Pixel, leaving the block where it was so it can be placed by hand. That happens when the copied region carries no astrometric solution, when the image has none, or when the two images share no sky. The check runs both when Celestial is chosen and when an image is clicked in that mode.
A block whose sky position falls entirely outside the image is a question rather than a refusal. PixelClipboard gives the rectangle it would land on and asks whether to place it there anyway, and the answer defaults to No, which leaves the block where it was. Answering yes places it out there, where it is not visible until it is dragged onto the image, which returns to Pixel mode.
6 The system clipboard
[hide]
On Windows and macOS, PixelClipboard is connected to the system clipboard in both directions: what we copy can be pasted in other applications, and an image copied elsewhere can be pasted into PixInsight. On Linux, PixelClipboard currently uses its own clipboard only.
6.1 Copying to other applications
Every copy, whether made from the interface, the Image > Clipboard menu, a process icon or a script, is also placed on the system clipboard in three forms. None of them is prepared until an application actually pastes, so Copy stays immediate; the first paste of a large block elsewhere can take a moment.
PixelClipboard's own format: the exact samples in their original format, the shape of the selection, the astrometric solution, the identifier of the source image and its screen stretch. Another PixInsight instance running PixelClipboard receives exactly what was copied, and can paste it by celestial coordinates.
PNG, 16 bits per sample, with transparency: the block as displayed, through the source image's screen transfer function, since linear data looks black in almost every other application. Outside the selection it is transparent, with the edge softened by the Feather value in the Shaping section.
Bitmap, 8 bits per sample (Windows), or TIFF (macOS), with transparency: the same picture in the form every application on that system understands.
Each application chooses the form it prefers. Those that read PNG from the clipboard, GIMP among them, receive the transparency and the feathered edge. On Windows, many others, Paint and Word for example, take the bitmap and ignore its transparency, and show the whole rectangle.
Photoshop on Windows does not keep transparency in either direction. It takes the bitmap rather than the PNG and ignores its transparency, and its own copies reach the clipboard already flattened. This is a limitation of Photoshop's clipboard handling on Windows, not something PixelClipboard can work around. To move a shaped or transparent block between Photoshop and PixInsight, we save it as a PNG file in one application and open it in the other.
A block in another application:
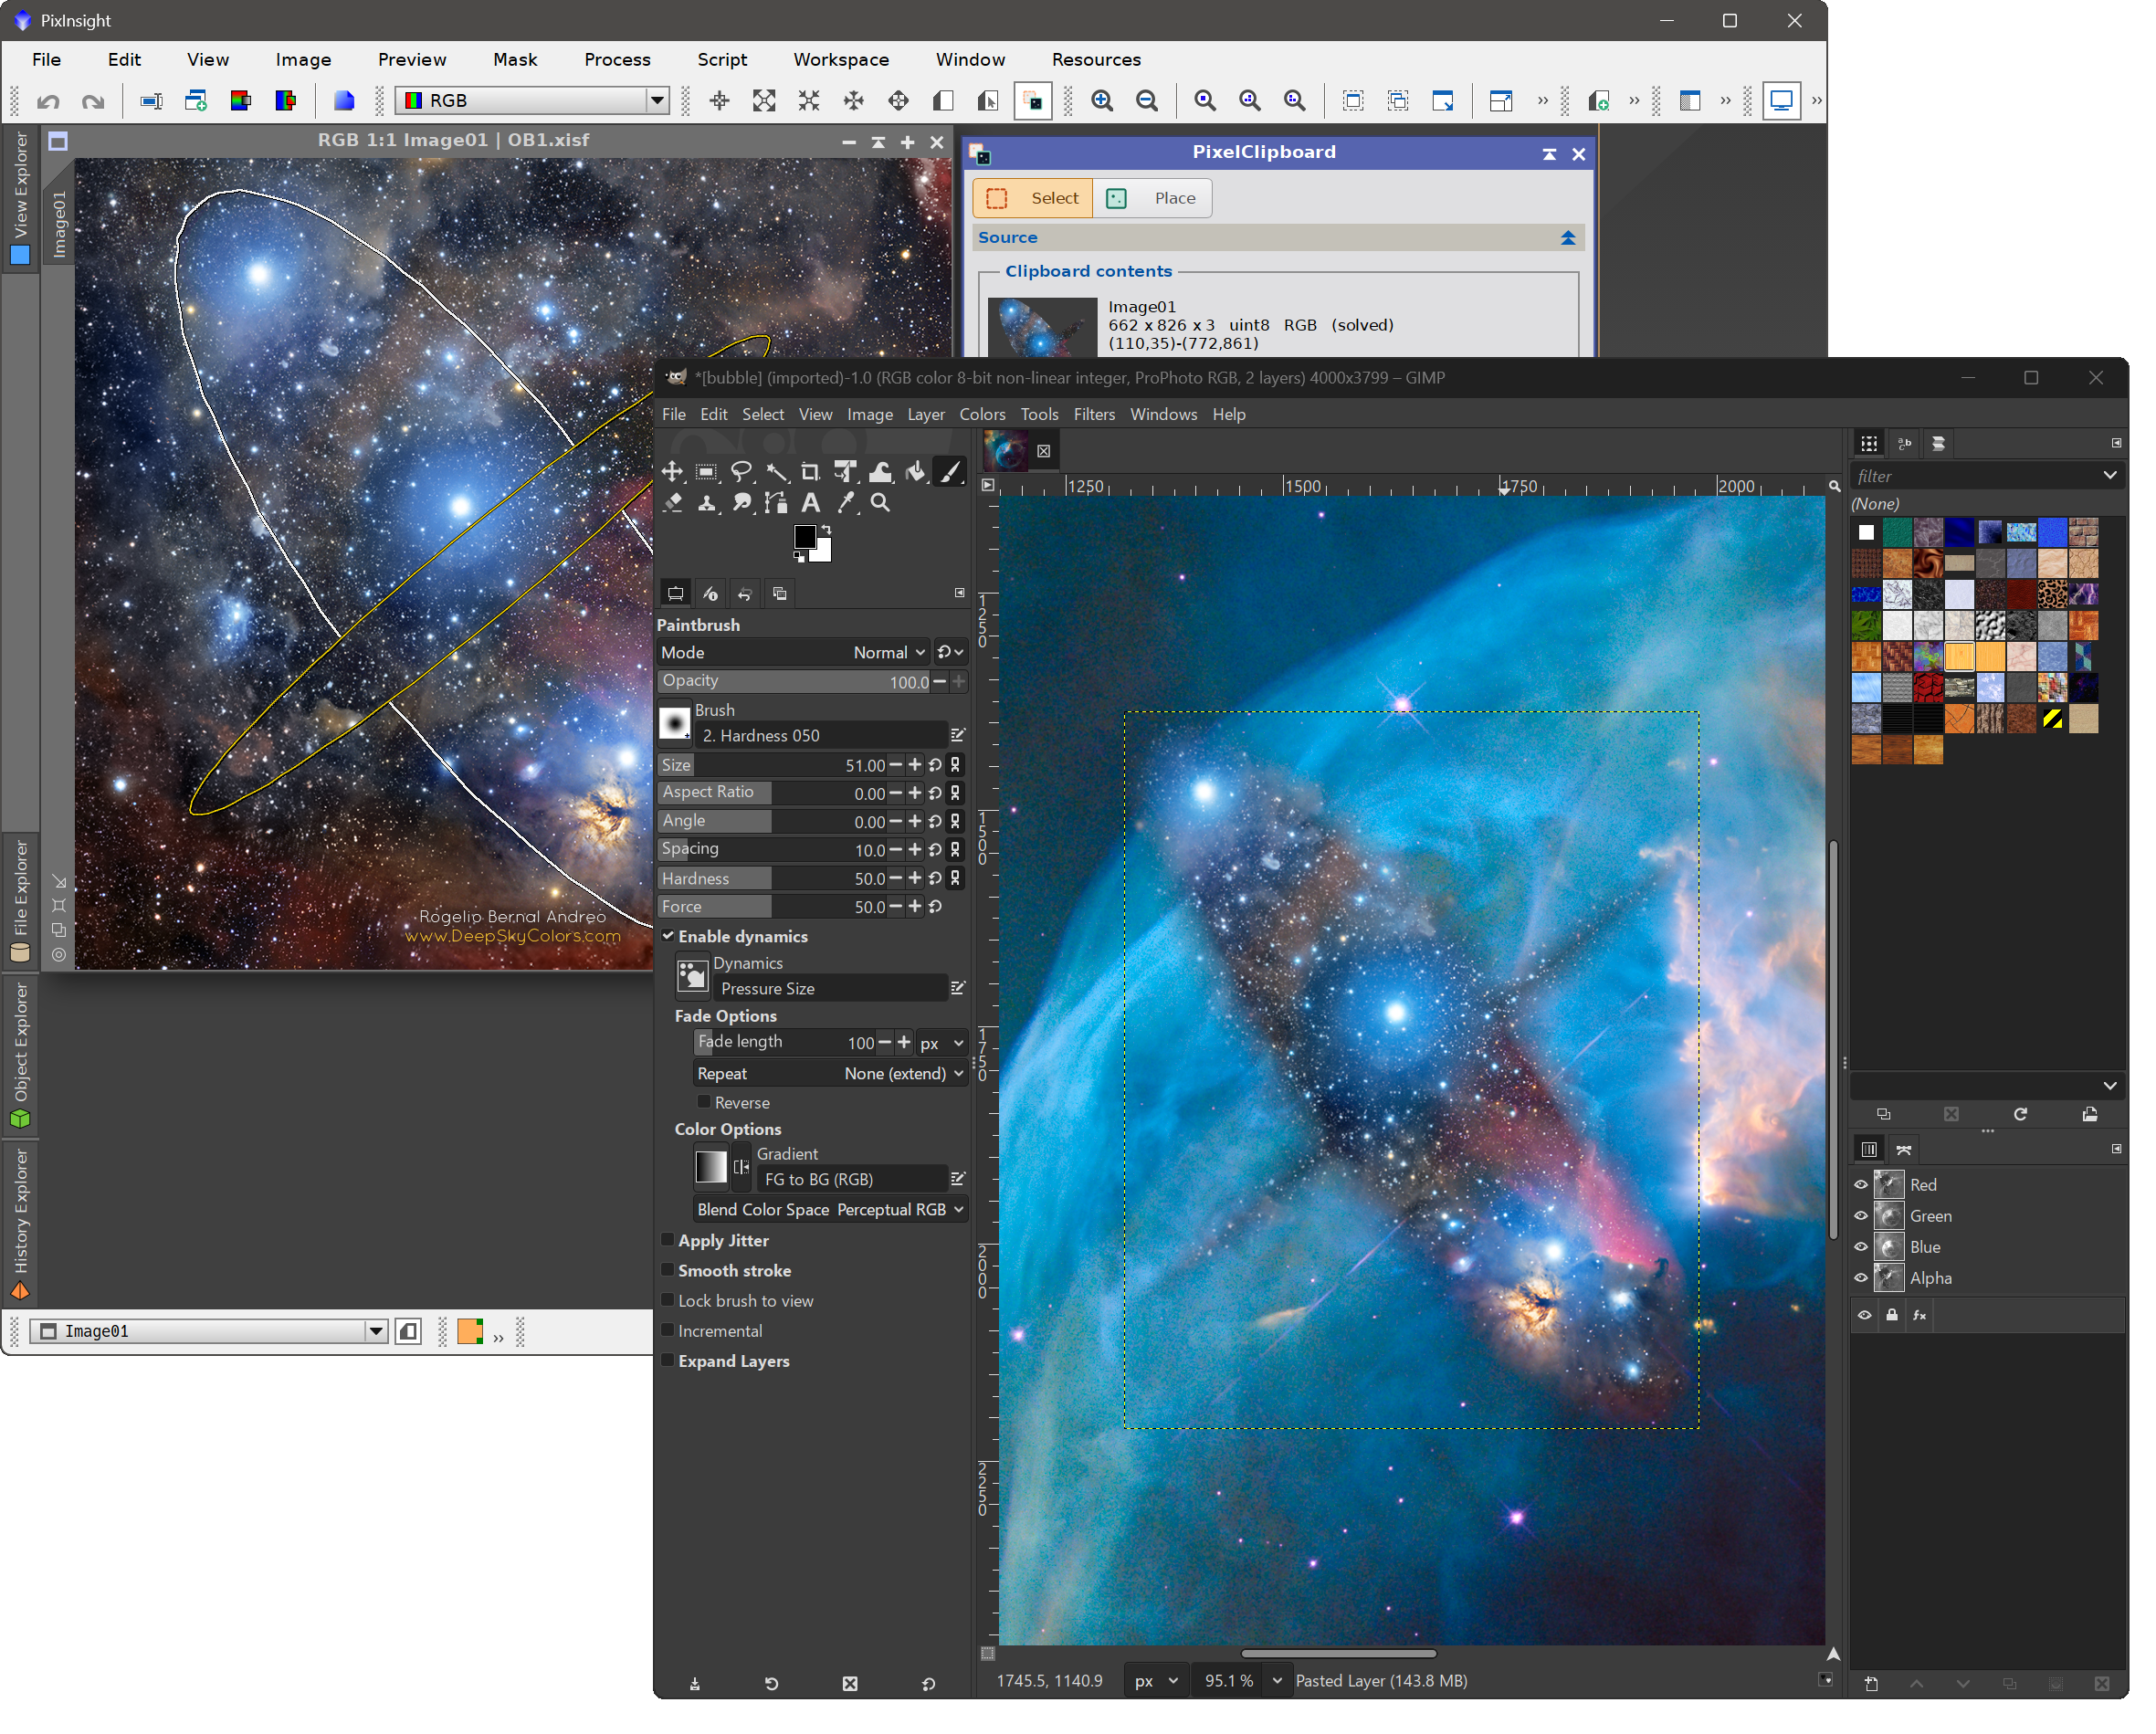
A shaped selection copied in PixelClipboard and pasted into another application, keeping its transparency and its feathered edge.
Clear also empties the system clipboard when it still holds PixelClipboard's copy. When PixInsight is closed, what remains on the clipboard for other applications to paste is the bitmap form on Windows, and the PNG and TIFF forms on macOS.
6.2 Pasting from other applications
While the interface is open, an image placed on the clipboard by another application, or by another PixInsight instance, becomes the clipboard contents as soon as it is copied: the thumbnail and the source details update immediately. If we are dragging a block at that moment, the new image takes over once we release it. Blocks staged on images are cleared, as they are after a new Copy. When the interface is closed, the image is taken the next time the interface opens or a Paste command is used from the menu. Copying text or files in other applications leaves the clipboard contents alone.
PixelClipboard reads its own format first, then PNG, then 24- and 32-bit bitmaps on Windows, or TIFF and the other image formats macOS reads, such as JPEG and HEIC, on macOS. That covers screenshots and most image editors and browsers. An image from another application is identified as System clipboard; a block from another PixInsight instance keeps the identifier of its source image, followed by (from the system clipboard).
Transparency becomes the selection shape. Transparent parts of a PNG or bitmap are left untouched by the paste, just like the outside of a shaped selection.
Bit depth is kept. A 16-bit PNG stays 16-bit; bitmaps are 8-bit.
No astrometric solution. Images from other applications carry none, so they can only be pasted by pixel coordinates. Blocks from another PixInsight instance keep theirs.
Unsupported data is reported. A compressed or palette bitmap is refused with a message on the status line rather than read incorrectly.
7 Menu commands and keyboard shortcuts
[hide]
Three commands are available from Image > Clipboard, and work without the interface being open:
| Command | Shortcut | Action |
|---|---|---|
| Copy | Ctrl+Shift+C | Copies the active view to the clipboard. |
| Paste | Ctrl+Shift+V | Pastes at the top left corner of the active image. |
| Paste in place | Ctrl+Shift+Insert | Pastes at the coordinates the block was copied from. |
On Windows and macOS, Copy also places the block on the system clipboard, and both Paste commands first take any image copied in another application since; see section 6.
PixInsight reserves Ctrl+C and Ctrl+V for its own use, which is why these commands use the Ctrl+Shift forms.
The following keys act on the image while the interface is open:
| Key | Action |
|---|---|
Arrow keys | Nudge the placed block by one pixel. |
Shift + arrows | Nudge the placed block by ten pixels. |
Return | Execute the paste on the image under the pointer, or close a polygon in progress. |
Backspace | Remove the last vertex of a polygon in progress. |
Escape | Cancel a polygon in progress, or remove the block from this image. With no block on this image, clears everything. |
Delete | Remove the block from this image only. |
Shift while drawing | Constrain a rectangle to a square, or an ellipse to a circle. |
Shift while resizing | Keep the block's width to height ratio. |
Alt while starting a shape | Subtract that shape from the selection instead of adding it. |
8 Process parameters
[hide]
PixelClipboard is a single process with an operation parameter selecting Copy or Paste, so one process icon can hold either. Parameters outside the selected operation's subset are ignored rather than validated: a copy instance carrying stale paste coordinates is harmless.
These are the identifiers used when scripting the process or editing an instance in the Process Explorer.
| Identifier | Type | Applies to | Description |
|---|---|---|---|
operation | Enumeration | both | Copy or Paste. Default Copy. |
sourceRegion | Enumeration | Copy | Selection, ActivePreview, WholeView or Automatic. Default Automatic. The interface sets it: Selection when selections are recorded, Automatic otherwise. In a script, ActivePreview refuses to run on a main view, while WholeView and Automatic both copy the whole of the view the instance runs on. |
sourceX0, sourceY0, sourceX1, sourceY1 | Int32 | Copy | The source rectangle, used when sourceRegion is Selection. |
vertices | Table | Copy | The vertices of every polygon-based selection. Columns: polygonIndex, x, y. |
regions | Table | Copy | The recorded selections. Columns: kind, source, seedX, seedY, tolerance, metric, rotation. |
mode | Enumeration | Paste | PixelCoordinates or CelestialCoordinates. Default PixelCoordinates. |
anchor | Enumeration | Paste | TopLeft or Center, deciding what x and y mean. Default TopLeft. |
x, y | Int32 | Paste | Anchor position in target coordinates. Pixel mode only. |
pixelOperator | Enumeration | Paste | The PixInsight pixel operator used to combine the block with the target. |
opacity | Float | Paste | 0 to 1. Default 1. |
feather | Float | Paste | Edge softening in pixels, 0 to 100. Default 0, a hard edge. |
channelRouting | Int32 | Paste | -1 for all channels, otherwise the target channel index. Default -1. |
rotation | Double | Paste | Degrees counter-clockwise about the block center. |
scaleX, scaleY | Double | Paste | Scale factors. Default 1. |
interpolation | Enumeration | Paste | NearestNeighbor, Bilinear, BicubicSpline or Lanczos3. Default BicubicSpline. |
slotSerial | UInt64 | Paste | Which clipboard contents the instance was built from. See below. |
The slotSerial parameter is a guard. The clipboard is a session-wide store rather than something carried inside the instance, so a paste icon saved today and applied tomorrow could otherwise paste whatever happens to be on the clipboard at that moment. Instead, the instance records which clipboard contents it was built from, and refuses to run if they no longer match, naming both serial numbers. A loud refusal is far better than a silent wrong paste.
A Copy instance, by contrast, is fully self-contained: the vertices and regions tables carry the whole selection set, so applying a saved copy icon reproduces the exact region. The one exception is a Magic Wand region, which stores its recipe (seed, tolerance and metric) rather than its pixels and is recomputed by flood filling the target image. A wand region therefore reproduces only where that seed still matches; when it cannot be rebuilt, the console reports how many regions were skipped rather than quietly copying less than the instance describes.
9 Usage tips and limitations
[hide]
The clipboard holds one block. Copying again replaces it, and on Windows and macOS so does copying an image in another application. To keep a block, we use New image to turn it into a window before copying something else.
The system clipboard connection is Windows and macOS only for now. On Linux the clipboard lives inside PixInsight and is not shared with other applications.
For transparency outside PixInsight, paste into an application that reads PNG. GIMP does; Paint, Word and Photoshop on Windows show the whole rectangle. See section 6.1.
Solve before copying, not after. For a celestial paste, the source image's astrometric solution is captured at the moment we press Copy.
Feathering fades inward. The pasted region never grows beyond its own edge, so a feathered paste covers slightly less than a hard one rather than spilling outside it.
Masks still apply. An active mask on the target window attenuates the paste exactly as it would any other process, which is why a masked paste never matches the block exactly.
Nearest neighbor for masks and labels. Any image whose values are categories rather than measurements must not be interpolated.
PixelClipboard does not photometrically match the two images. A block pasted from a different session will show a seam if the backgrounds differ in level or color. Matching them beforehand, or feathering the edge, hides most of it.
Ending the dynamic session clears the screen but not the clipboard. Closing the interface, or another dynamic tool taking over, discards the selections and staged blocks; what we copied remains available.