
Texture Sharpen
Sharpens and denoises in one pass, pixel by pixel
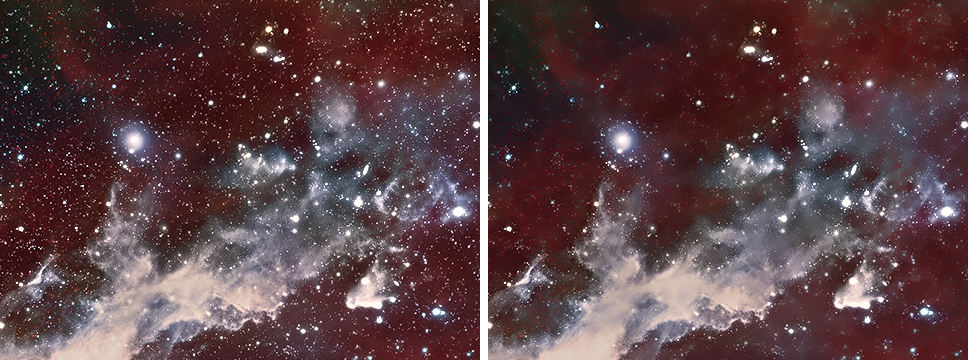
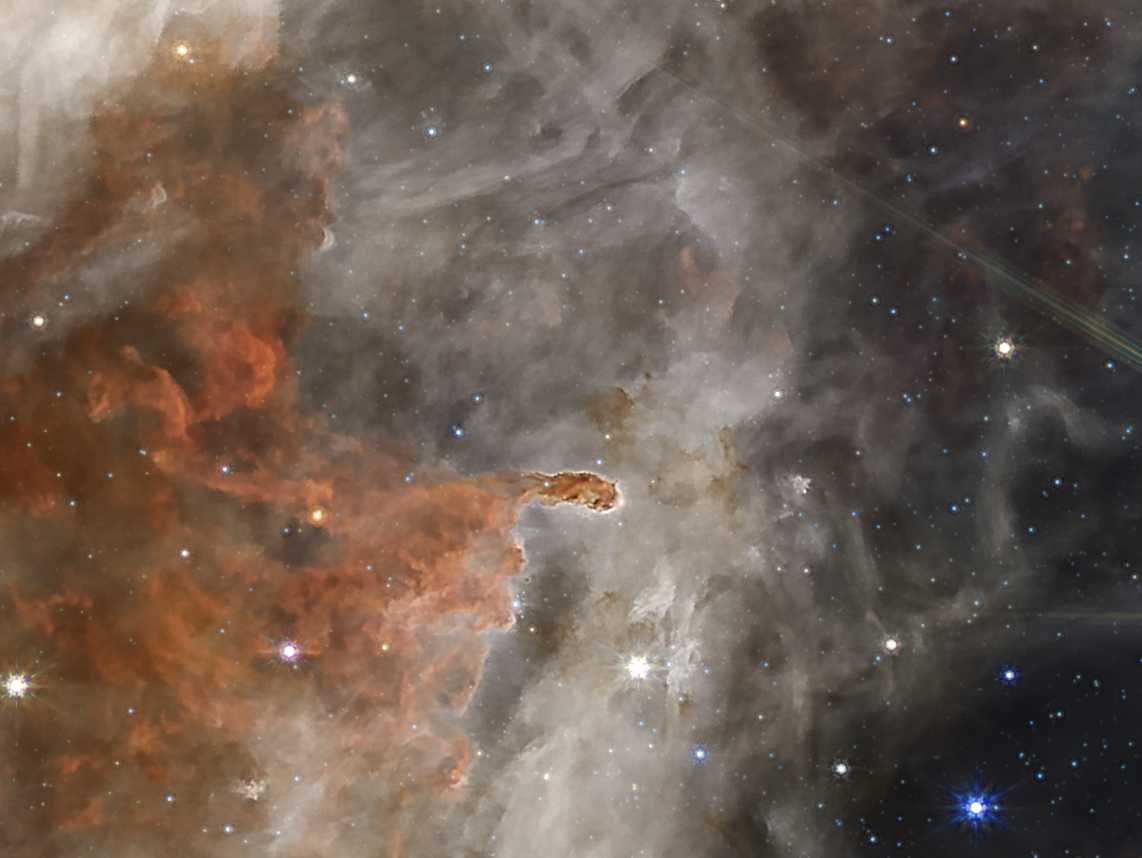
Texture Sharpen sharpens and denoises in the same pass, by deciding for each pixel which of the two its faint signal deserves. What a denoiser would throw away, the noise and the faint texture hidden with it, is lifted where the image has structure and reduced where it is flat, so the same pass adds texture to a filament and quiets the sky beside it. It works on linear and stretched images alike.
1Introduction
A copy of the image is denoised and subtracted from it. What is left, the residual, is what the denoiser was unsure about: the noise, and the faint texture that sits below the noise level with it. Every other sharpening method has to leave that texture alone, because lifting it lifts the grain too. Texture Sharpen puts it back amplified where the denoised copy shows real structure, and reduced where the denoised copy is flat. Because the weight between the two is continuous, there is no boundary between the smoothed sky and the sharpened structure.
The denoiser is a modified implementation of rolling guidance filtering, which smooths away small details and textures while keeping large structures and their edges sharp. It separates by size alone, it cannot ring, and when it errs, it removes too little rather than inventing anything.
Texture Sharpen is DeepSharp's Texture method. DeepSharp's PixInsight module puts its seven methods on seven tabs of one process; in DSPX each is a process of its own in , and they share DeepSharp's engine and its results.
2Quick Start
- Open the image and choose .
- Preview the visible area at 1:1 with the defaults.
- Raise Amount for more texture where there is structure, and Smoothing for a quieter sky.
- Click Apply.
3Interface & Parameters
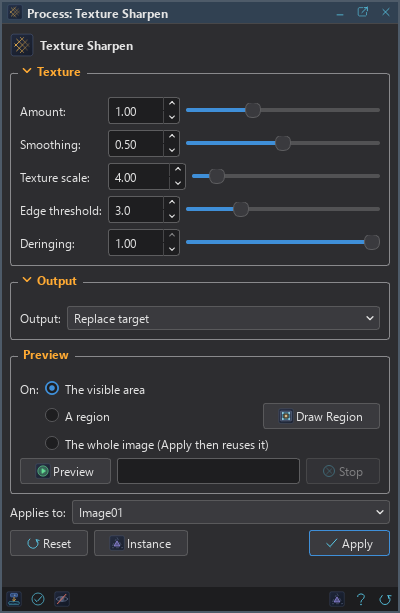
The panel has two sections, Texture and Output, each of which folds away with the arrow beside its title. Under them are the Preview box, the image the process applies to, the buttons and the system bar along the bottom.
3.1Texture
Amount: How much the residual is lifted where the image has structure, from 0 to 3; 1 by default. It is lifted only where the denoised copy shows a real gradient, where the faint signal is far more likely to be texture than grain.
Smoothing: How much the residual is reduced where there is no structure: the pass's own noise reduction, from 0 to 1; 0.50 by default. At 0 the sky is put back exactly as it was; at 1 it is replaced by the denoised copy.
Texture scale: The size, in pixels, below which something counts as texture rather than structure, from 1 to 32; 4 by default. Everything smaller goes into the residual; everything larger is left exactly where it is. Rolling guidance filters the image again and again against its own previous result: a structure larger than this pulls the guide back to itself and survives with its edges intact, while anything smaller never gets a guide to return to.
Edge threshold: How many noise sigmas of contrast an edge needs before the denoiser keeps it, rather than taking it for texture and putting it in the residual. From 0.5 to 10; 3 by default. Higher values put more into the residual, which makes Amount and Smoothing both stronger. It is counted in sigmas because the sky and the star cores of a linear frame are three decades apart, and no fixed number would transfer from one image to another.
Deringing: How much of the gain is withheld from whatever would go darker, from 0 to 1; 1 by default. Just outside a bright star the detail is negative, so a gain applied evenly deepens that ring as surely as it lifts the core, and the star ends up wearing a black collar. At 1 the gain may brighten but never deepen; at 0 it works both ways, and rings.
3.2Output
Output: Where the result goes.
- Replace target: the default. The image is changed in place, in one history step that Undo takes back, through the image's mask if it has one.
- New image: the image is left untouched and the result arrives as a new image named after it, with
_textureat the end.
3.3Apply, Preview and Instance
Preview: Shows the result on the image without changing it, computed at full resolution on The visible area, on A region we draw on the image with Draw Region, or on The whole image, which Apply then reuses instead of running again. A preview never starts by itself: it is computed when we click Preview, with its progress and Stop. On a part of the image it is close, not exact: the noise and the strength of the gradients are measured on the part. Before, in the image's banner, or the backslash key held, shows the image as it is.
Applies to: The image Texture Sharpen works on, chosen in a list of the open images. It shows the image in front, and follows it as we bring other images to the front. Picking another image in the list makes the panel work on that one, its preview included, without bringing it to the front; the pick stays while we work on other images, and Follow Active, the small button that appears beside the list, makes the panel follow the image in front again. An image that a tool or a run is working on is listed, but cannot be picked.
Apply: Applies Texture Sharpen to the image named in Applies to, as Output says, channel by channel for a color image.
Instance: Shows the process as the panel has it now, as text: the settings as a DSPX
process (.dsproc) or as a PixInsight process icon (.xpsm), chosen under Format. The icon is
a DeepSharp icon with its method set to Texture, which DeepSharp's PixInsight module opens on that tab. Copy puts
the text on the clipboard; Save... saves it as a file and puts it on the Process Shelf.
Reset: Puts every setting back to its default.
The system bar along the bottom of the panel has the same commands as small icons: at the left, drag to apply and Apply; at the right, Instance, Help (this page) and Reset. Drag to apply, the first icon, carries the process with its settings: dropped on an image's window, it applies them to that image, whatever image the panel works on; dropped on the Process Shelf, it is kept there as a row of its own. With , the bar alone has them.
4Sharpening and Smoothing Together
Amount and Smoothing act on the same residual, at the two ends of one continuous weight: where the denoised copy has a clear gradient, the residual is multiplied up by Amount; where it is flat, the residual is scaled down by Smoothing. Edge threshold and Texture scale decide how much goes into the residual in the first place, and so set how strong both ends can be.
5Example
6Usage Tips and Tricks
For noisy images. When we want both, more texture where there is structure and less grain where there is none, Texture Sharpen does it in one pass.
After the stretch. Texture Sharpen and Clarity are the two to reach for after a stretch. Texture puts back fine detail without touching the edges that frame it; Clarity works on the larger contrast a stretch flattens. In that order, fine first, each one's effect stays legible.
Raise Edge threshold for a stronger effect. It makes both controls act on more of the image. Lower it when real edges start to look grainy.
Texture scale follows the sampling. On a finely sampled image, where the texture is wider in pixels, raise it; on a binned or reduced image, lower it.
GPU. In DSPX mode the whole method runs on the graphics card when the image is a quarter of a megapixel or more: the rolling guidance, the gradient and its smoothing, the percentile that sets the structure weight, the residual put back, the level and the scaling of the channels. It is the slowest of the classical methods on the processor (about ten seconds for a 24 MP color image) and the one that gains most: about fifty times. An image with a NaN or an infinite sample stays on the processor. The result agrees with the processor's to a few millionths of the range. Choose CPU only in to keep it on the processor, and see The Processor and the GPU.
7Related Tools
Deep Sharpen: a trained network undoes the measured blur of a linear image.
Deconvolution: Richardson-Lucy against the measured blur of a linear image.
Multiscale Sharpen: a gain for each size of detail.
Flow Sharpen: sharpens across the structure, never along it; the gentlest on noise.
Clarity: local contrast that cannot form a rim along an edge.
Filament Sharpen: finds long thin structure, enhances it or makes a mask of it.