
Filament Sharpen
Finds long thin structure by its shape, and enhances it or makes a mask of it
Filament Sharpen finds the long thin structures of an image, filaments, dust lanes, nebular strands and tidal streams, by their shape rather than their brightness, at several widths at once. It enhances what it finds, or hands it over as a mask, or both. Because the mask selects by shape, a faint filament and a bright one are selected alike, which no mask made from brightness can do.
1Introduction
Filament Sharpen is a detector first. It uses a modified version of the Frangi vesselness filter, first built to find blood vessels in angiograms: at each width it tries, it compares how sharply the brightness curves across a structure with how sharply it curves along it. A filament curves one way only; a blob curves both ways. A response is kept only where it survives two consecutive widths, which leaves out the knots and the noise that look like filaments at one width alone.
What it found can then be used two ways. Amount adds contrast along the filaments, each at its own width. Create filament mask puts the response itself in a new image, ready to use as the image's mask, so any other process can be applied to the filaments alone.
Only images with well defined filaments respond well. Structures defined mostly by volume are either left untouched or masked with what may look like a tangle of worms; Texture Sharpen or the other sharpening processes suit them better. Stars can get in the way too, which is what Star suppression is for, and working on a starless image helps.
Filament Sharpen is DeepSharp's Filaments method. DeepSharp's PixInsight module puts its seven methods on seven tabs of one process; in DSPX each is a process of its own in , and they share DeepSharp's engine and its results.
2Quick Start
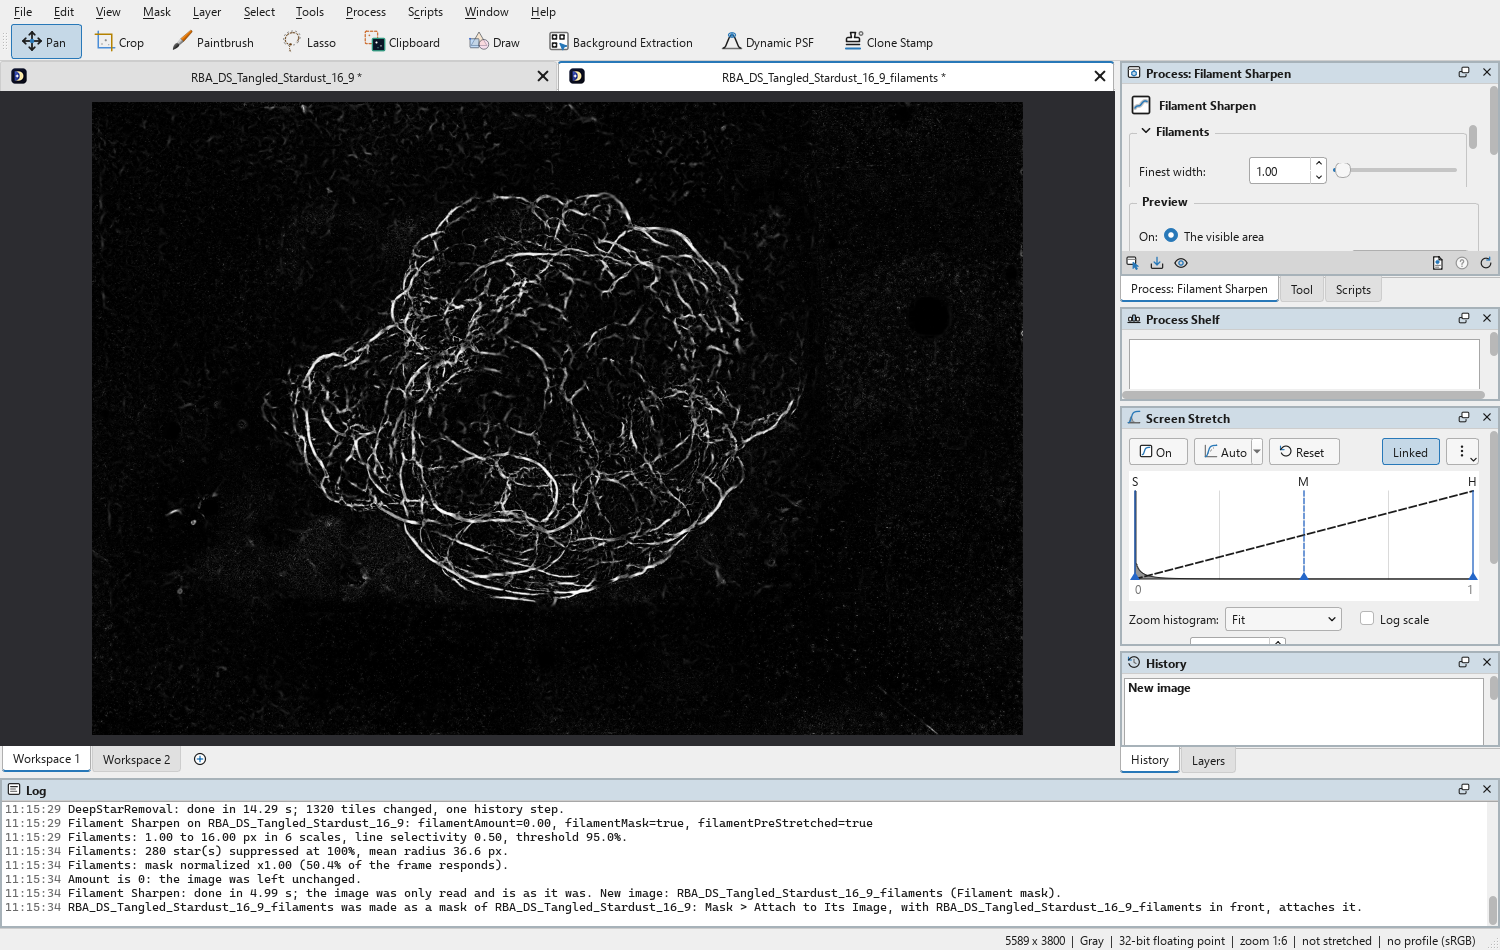
- Open the image and choose .
- If the image is stretched, turn on Image is already stretched. On stretched data it is not optional.
- Set Finest width and Coarsest width around the width, in pixels, of the filaments we are after.
- Turn on Create filament mask to see what was found, and preview a region.
- Click Apply. The enhanced image goes where Output says; the mask arrives as a new image named after the
image with
_filamentsat the end.
3Interface & Parameters
The panel has two sections, Filaments and Output, each of which folds away with the arrow beside its title. Under them are the Preview box, the image the process applies to, the buttons and the system bar along the bottom.
3.1Filaments
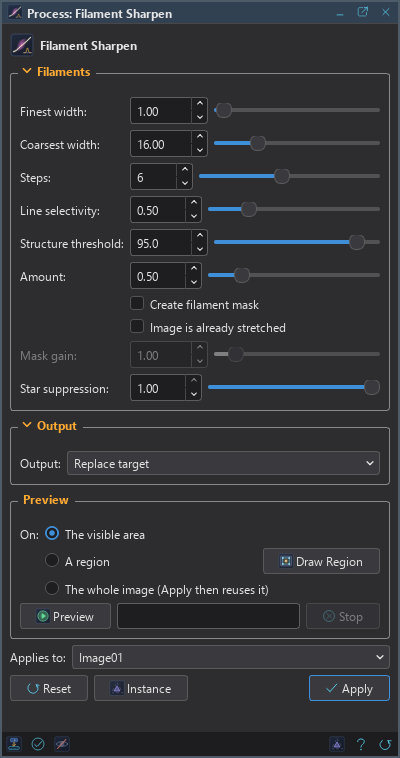
Finest width: The narrowest filament to look for, in pixels, from 0.5 to 32; 1 by default. Structures thinner than this are left to the noise they usually are.
Coarsest width: The widest filament to look for, in pixels, from 1 to 64; 16 by default. A dust lane is a few pixels across; a nebular strand or a tidal stream can be tens, which is what the coarsest width has to reach: set too low, the filter finds the edges of a structure rather than the structure. It must not be smaller than Finest width; the panel says so before Apply.
Steps: How many widths are tried between the finest and the coarsest, from 1 to 12; 6 by default. More steps find structures of the widths in between more exactly, and cost proportionally more time.
Line selectivity: How line-like a structure must be to count, from 0.1 to 2; 0.50 by default. Low values accept only clean filaments; high values let rounder things through, galaxy cores and clumps of stars included.
Structure threshold: The bar a structure has to clear to count at all, as a percentile of the curvature found in this image, from 50 to 100; 95 by default. It is measured on each image rather than set as an absolute, because images differ by many decades of surface brightness. Raise it if the blank sky responds; lower it if faint filaments are missed.
Amount: How much contrast is added along the filaments found, each at its own width, from 0 to 3; 0.50 by default. At 0 the image is left alone, which is how we ask for the mask alone; with 0 and no mask there is nothing to do, and the panel says so.
Create filament mask: Also makes a new image of the filter's response, named after the image
with _filaments at the end, and offered as its mask. Independent of Amount and of Output: the mask is
always a new image.
Image is already stretched: Must be on for stretched data. The filter stretches a working copy so that faint filaments can compete with bright cores; on an image that was stretched already, that second stretch crushes the brightest structures and lifts the faint sky instead, and the mask comes back blank exactly where the brightest nebulosity is.
Mask gain: Brightens the mask, from 0.1 to 10; 1 by default. The response is a number whose level means nothing from one image to the next, so the strongest filaments found are first brought to near white; Mask gain multiplies from there, and clips at white. It affects the mask only. Raising it lifts the sky faster than the nebula, so the widths and Structure threshold come first.
Star suppression: How firmly the structure that belongs to stars is kept out, from 0 (included) to 1 (removed); 1 by default. A star's core is a blob and is rejected already, but its halo is a genuine curved ridge and reads as a filament. The area cleared around each star is sized to that star, from where its profile falls to half its peak, with a feathered edge: a bright bloated star clears a wide region, a faint one almost none. We lower it where filaments run close to stars and we would rather keep them. On a field rich in stars it can remove a large part of the mask, so it is worth comparing 0 and 1.
3.2Output
Output: Where the enhanced image goes.
- Replace target: the default. The image is enhanced in place, in one history step that Undo takes back, through the image's mask if it has one.
- New image: the image is left untouched and the enhanced image arrives as a new image named after it, with
_filaments_enhancedat the end.
3.3Apply, Preview and Instance
Preview: Shows the enhanced image on the image without changing it, computed at full resolution on The visible area, on A region we draw on the image with Draw Region, or on The whole image, which Apply then reuses instead of running again. A preview never starts by itself: it is computed when we click Preview, with its progress and Stop. On a part of the image it is close, not exact: the structure threshold is a percentile of the part's curvature. Before, in the image's banner, or the backslash key held, shows the image as it is.
Applies to: The image Filament Sharpen works on, chosen in a list of the open images. It shows the image in front, and follows it as we bring other images to the front. Picking another image in the list makes the panel work on that one, its preview included, without bringing it to the front; the pick stays while we work on other images, and Follow Active, the small button that appears beside the list, makes the panel follow the image in front again. An image that a tool or a run is working on is listed, but cannot be picked.
Apply: Applies Filament Sharpen to the image named in Applies to, as Output says, and makes the mask when it is asked for. Both arrive in one run.
Instance: Shows the process as the panel has it now, as text: the settings as a DSPX
process (.dsproc) or as a PixInsight process icon (.xpsm), chosen under Format. The icon is
a DeepSharp icon with its method set to Filaments, which DeepSharp's PixInsight module opens on that tab. Copy
puts the text on the clipboard; Save... saves it as a file and puts it on the Process Shelf.
Reset: Puts every setting back to its default.
The system bar along the bottom of the panel has the same commands as small icons: at the left, drag to apply and Apply; at the right, Instance, Help (this page) and Reset. Drag to apply, the first icon, carries the process with its settings: dropped on an image's window, it applies them to that image, whatever image the panel works on; dropped on the Process Shelf, it is kept there as a row of its own. With , the bar alone has them.
4The Filament Mask
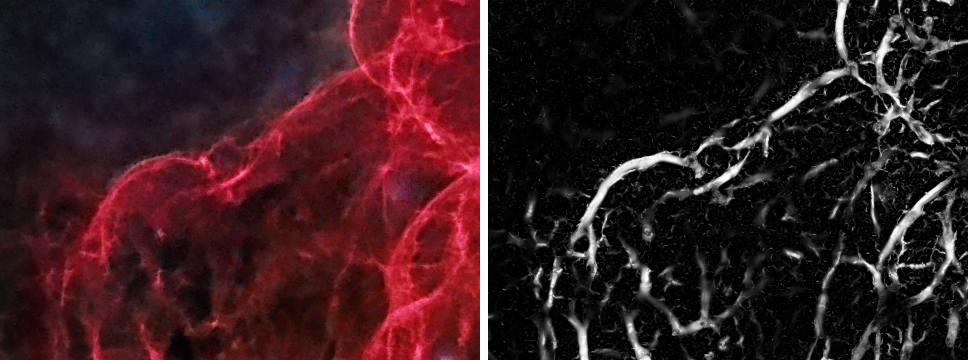
The mask is the part of Filament Sharpen no other process does: it selects structures by their shape, so a faint filament and a bright one are both in it while the smooth nebulosity between them is not. Attached to the image with (Ctrl+Shift+M, with the mask in front), it lets any other process act on the filaments alone: Texture Sharpen, Clarity, Multiscale Sharpen, or a color process.
5Example
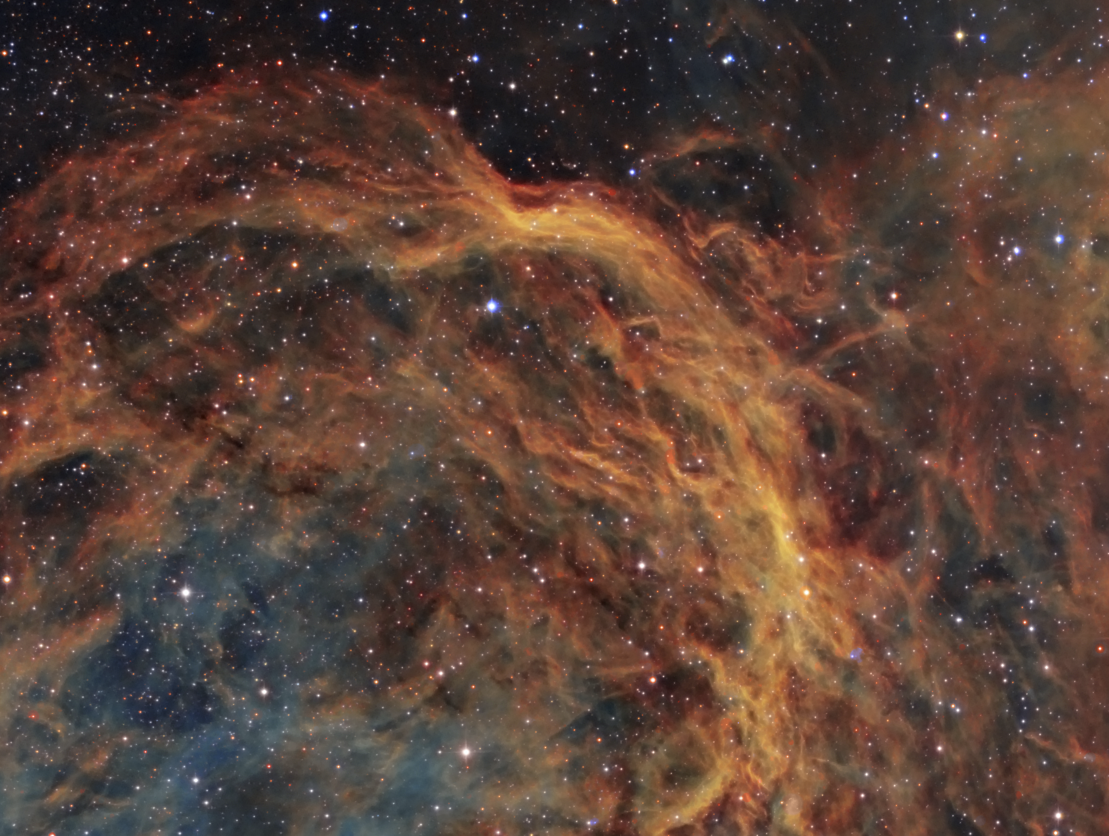
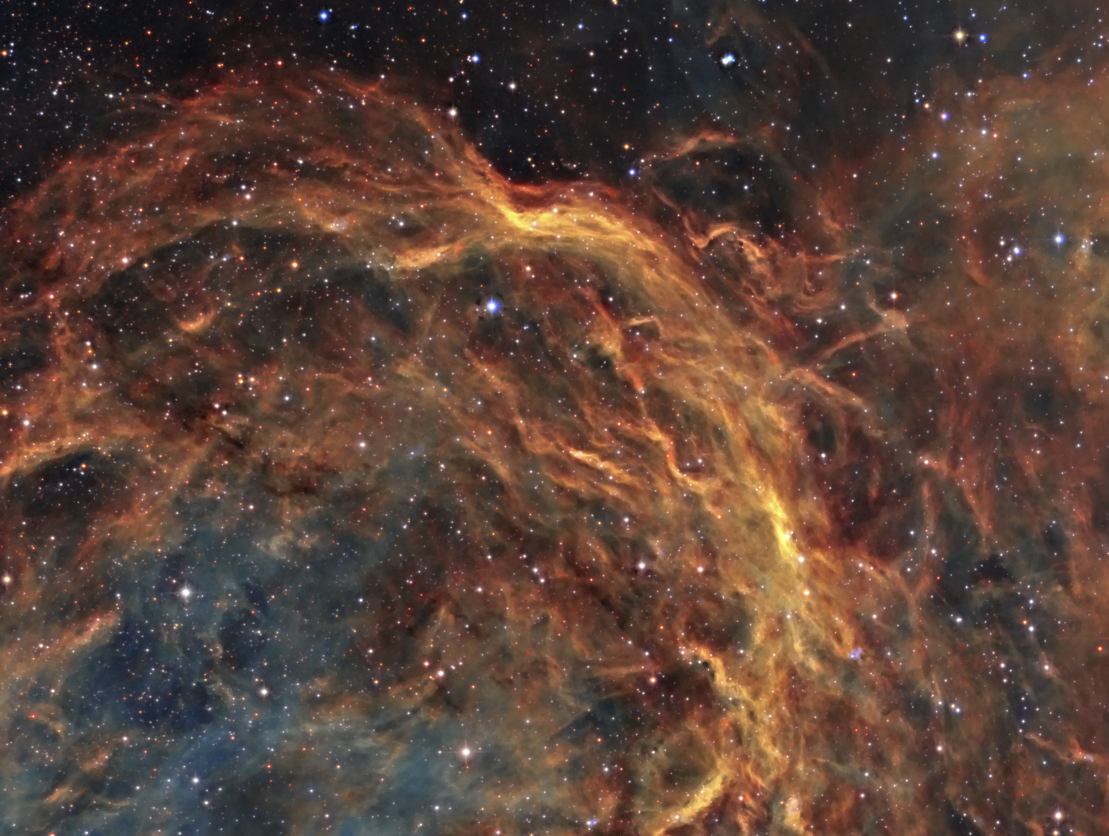
6Usage Tips and Tricks
A narrow band of widths finds more and invents less. Bringing Finest width close to Coarsest width, or setting both to the same number, holds the filter to one size of structure, which tends to bring out the real filaments and leave stars and debris in the sky mostly alone.
With the two widths equal, set Steps to 1. The ladder then has a single rung, and more steps would make the same mask, pixel for pixel, for several times the work.
The widths before the gain. If the mask is thin, the widths and Structure threshold are what to move; Mask gain lifts the sky faster than the nebula, and is for the last touch.
A mask from one process, a correction from another. Amount at 0 with Create filament mask on changes nothing and leaves the mask in a new image. Attach it, then run Texture Sharpen, Clarity or Multiscale Sharpen through it.
Starless first. On a starless image from Deep Star Removal, the stars cannot get in the way, and Star suppression can stay low.
GPU. In DSPX mode a large image is processed on the graphics card, 4 to 6 times faster than on the processor. A small image stays on the processor, where it is quicker. Choose CPU only in to keep it on the processor, and see GPU Acceleration for what else runs on the card.
7Related Tools
Deep Sharpen: a trained network undoes the measured blur of a linear image.
Deconvolution: Richardson-Lucy against the measured blur of a linear image.
Multiscale Sharpen: a gain for each size of detail.
Texture Sharpen: sharpens the faint texture and quiets the sky in one pass.
Flow Sharpen: sharpens filaments across their direction without needing a mask.
Clarity: local contrast that cannot form a rim along an edge.
Range Mask: a mask by brightness, when the area we want is defined by how bright it is rather than by its shape.