
Line Colorizer
Gives each narrowband line a color of its own and adds the lines as light
Line Colorizer gives each narrowband line (Ha, OIII and SII) a color of its own, a hue chosen on the color wheel, and adds the colored lines as light into a color image. It works on linear and on stretched images and keeps the color of a place where the lines overlap, instead of clipping it to white or gray.
1Introduction
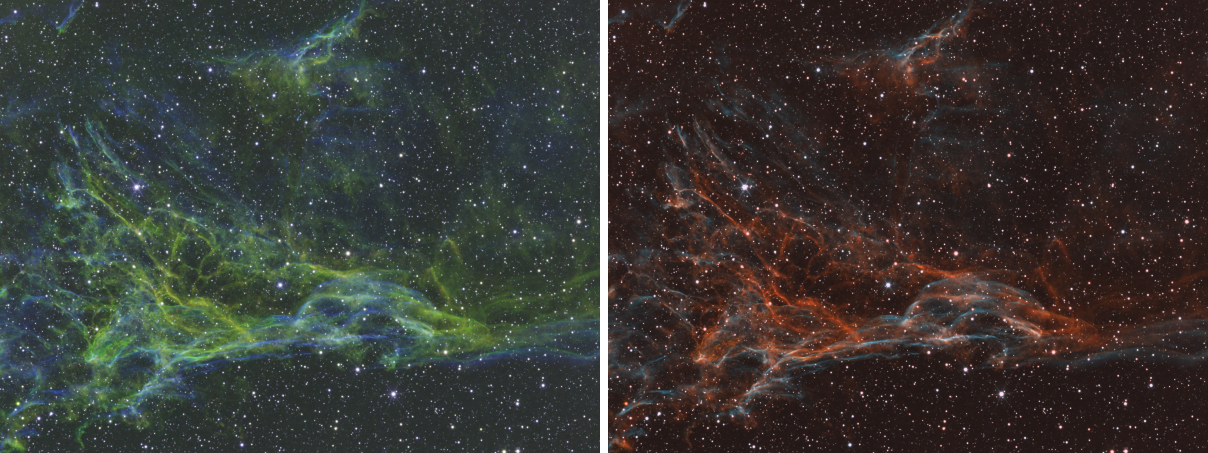
A narrowband set is three gray images, one per emission line. The usual way to make a color image of them is to send each line to a channel (Ha to red, OIII to green and blue, and so on). Line Colorizer works differently: a line is not sent to a channel, it is given a color. Ha at 30 degrees is orange light, OIII at 195 degrees is a cyan-blue, and the image of each line decides how much of its light there is at each pixel. The colored lines are then added together, the way colored lights add.
Each line has its own hue, saturation, brightness and midtone curve, and the lines are combined with a blend (Screen
or Add) and a white point. Stars are part of each line's image and are colored with it, so there is no need to remove
them first. The process is our own design and has no equivalent in PixInsight, so it saves as a DSPX process
(.dsproc) only. A saved process is also how a look is kept and shared (see Looks below).
The lines are open gray images of the same size. Registering them, and matching their background and signal, is done before: Line Colorizer refuses lines of different sizes and does not move or scale anything. The preview shows the result over the image in front, so bring one of the lines to the front.
2Quick Start
- Open the Ha and OIII images, and the SII image if there is one, and bring one of them to the front. Choose .
- In the Ha section pick the open Ha image with the Images button beside the Image field. Do the same in the OIII section and, if there is one, in the SII section. The live preview (the eye) shows the color result on the part in view.
- Move the Hue of each line until the colors are as wanted. The small square beside each hue shows the color of that line.
- Raise or lower Brightness to balance the lines, and use Midtone to lift the faint parts of one line.
- Click Apply. The result is a new image; the lines are not changed.
If the lines are linear, they look dark and the result will too. Stretch them first (Histogram, Arcsinh Stretch or Hyperbolic Stretch), or lift them here with Midtone near +1 and a lower White point.
3Interface & Parameters
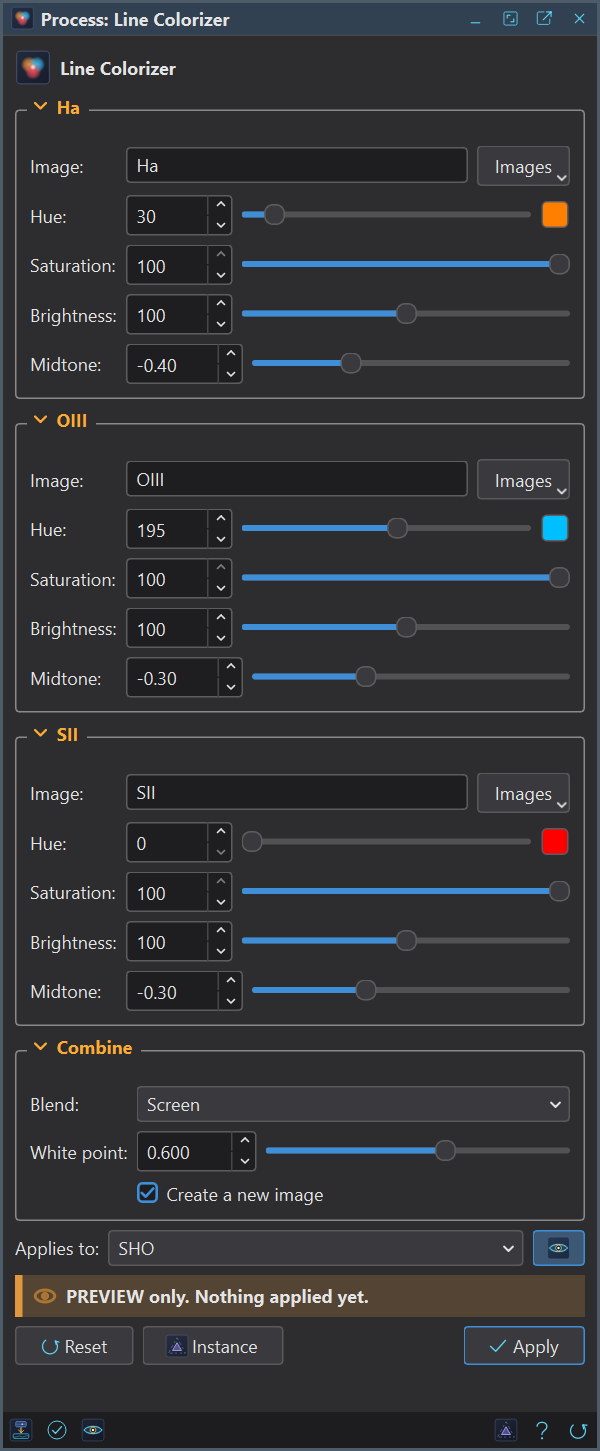
The panel has four sections, Ha, OIII, SII and Combine, each of which folds away with the arrow beside its title, then the image the process applies to with the live preview's eye, the buttons and the system bar along the bottom.
3.1Ha, OIII and SII
The three line sections have the same five settings. Only the defaults differ: Ha has Hue 30, OIII has Hue 195 and SII has Hue 0.
Image: The open gray image of the line. The Images button beside the field lists the open images. Empty, the line is left out, and at least one line must have an image. A color image is refused: each line is a gray image. The image the process is applied to may be one of the lines.
Hue: The color of the line, in degrees on the color wheel, from 0 to 360: 0 red, 60 yellow, 120 green, 180 cyan, 240 blue, 300 magenta. The small square beside it shows the color the Hue and Saturation make.
Saturation: From 0 to 100, 100 by default. At 100 the line has the full color of its hue. Lower values mix in white, and 0 adds the line as plain white light.
Brightness: How much of the line is added, in percent, from 0 to 200. At the default, 100, the line is added as the image is; 200 doubles it. Use it to balance a strong line against a weak one.
Midtone: Bends the line's brightness curve, from -1 to +1, 0 by default. A positive value lifts the faint parts of the line, a negative value lowers them, and 0 leaves the curve alone. It is a midtones transfer function, so black stays black and white stays white. On a linear image a value near +1 lifts the faint structure into view; a stretched image needs only a small value.
3.2Combine
Blend: How the colored lines are added. Screen, the default, adds the light of overlapping lines without passing white: two lines at half brightness make three quarters. Add sums the lines, and a soft shoulder (described below) keeps the brightest places from clipping.
White point: The level of the combined light that becomes white, from 0.001 to 1, 1 by default. The result is divided by it, so a lower value brightens the result. Use it to bring a faint linear result up; at 1 nothing is changed.
Create a new image: On by default: Apply makes a new color image named Line_colors and leaves the lines alone. Off, the image the process is applied to is replaced by the color result, in one history step that Undo takes back. That image must have the size of the lines. The result is a 32-bit floating point image.
3.3Apply, Preview and Instance
Live preview (the eye): At the end of the Applies to row; Preview in the system bar is the same switch. The preview shows the color result of the part in view, made from the same part of each line, so every control shows its effect as it moves. It needs the lines to have the size of the image in front; for lines of another size the preview says so and Apply still works. The banner says "PREVIEW only, nothing applied"; nothing changes until Apply.
Applies to: The image the process works on, chosen in a list of the open images. It shows the image in front, and follows it as other images are brought to the front. With Create a new image on, it is only the image the preview is shown on.
Apply: Makes the color image from the lines named in the sections. A line image that is not open, lines of different sizes and a color image used as a line are refused with a message, and nothing is made.
Instance: Shows the process as the panel has it now, as text, a DSPX process
(.dsproc). Copy puts the text on the clipboard; Save... saves it as a file and puts it on the
Process Shelf.
Reset: Puts every setting back to its default.
The system bar along the bottom has the same commands as small icons: at the left, drag to apply and Apply; at the right, Instance, Help (this page) and Reset.
4What Line Colorizer Does
For each pixel, and for each of the three channels of the result, in double precision:
- The value of a line is its sample in the range 0 to 1. Nothing is measured on the image, so linear and stretched images are treated alike.
- The Midtone curve is applied: the midtones transfer function with its midtone balance set to 1 over 1 plus 100 to the power of the setting. At 0 the curve is the identity, at +1 a value of 0.01 becomes 0.5.
- The line's light is its value times its Brightness, and its color is red, green and blue of its Hue and Saturation at full value. The light of the line is the color times that amount.
- The lights are combined. In Screen, a light whose brightest channel is above 1 is first divided by that channel, and the result is one minus the product of one minus each light, channel by channel. In Add, the lights are summed.
- The result is divided by the White point.
- The gamut guard scales the three channels of a pixel by one factor, chosen from its brightest channel, so the hue and saturation of the pixel hold. In Screen, a pixel above 1 is brought to 1. In Add, values up to 0.8 are kept, and above it the brightest channel follows a soft shoulder that approaches 1 and never reaches it.
The gamut guard is what keeps overlapping lines from clipping. Three lines at full strength add up to a pixel of 2, 1.25 and 1 in red, green and blue. Clipping each channel at 1 would make it white; the guard scales the pixel instead, and it stays an orange of the same hue, below white. The result does not depend on the number of threads, and the lines may be 8-bit, 16-bit, 32-bit or floating point images. A sample that is not a number is read as 0.
5Looks
A look is the colors, the blend and the white point, kept so it can be used again and shared. DSPX has no list of
looks inside the process; a saved process is the look. Set the controls, click Instance, then Save...: the
.dsproc file holds the settings (the image names too, so clear the three Image fields first for a look that
fits any set). Another user opens the file as a saved process, or applies it from the Process Shelf, and then picks
their own images. These four recipes are good starting points. Type them in, or build them and save them as files.
| Look | Ha | OIII | SII | Combine |
|---|---|---|---|---|
| Classic HOO | Hue 0 | Hue 180 | not used | Screen, White point 1 |
| Warm SII | Hue 40 | Hue 190 | Hue 355, Brightness 120 | Screen, White point 1 |
| Cold OIII | Hue 20 | Hue 215, Brightness 130 | Hue 0 | Screen, White point 1 |
| Neutral | Hue 30, Saturation 40 | Hue 195, Saturation 40 | Hue 0, Saturation 40 | Screen, White point 1 |
6Usage Tips and Tricks
Stretch first, or lift with Midtone. On linear lines the result is dark. The cleanest way is to stretch each line the same way before coloring. If the lines stay linear, set Midtone near +1 on each, lower the White point to brighten, and watch the preview.
Match the lines first. The weak line adds little light however its hue is set. Matching the background and the signal of the lines before coloring them gives Brightness an even start.
Hue changes the mood, Saturation the strength. Move Hue by a few degrees at a time: the preview shows the whole image changing. For a calmer look lower Saturation on all three lines, as in the Neutral look.
Screen or Add. Screen is gentle and never goes over white, so it suits most images. Add keeps the lines apart where they overlap and the guard stops the bright places from clipping; lower the White point or the Brightness if they look pale.
Stars come with the lines. They take the color of their line. A star that is bright in all three lines adds up to a nearly white pixel, as a star should; a star seen mostly in one line is tinted with that line's color.
7Related Tools
Channel Combination: puts gray images into the red, green and blue channels directly.
Saturation: raises or lowers the color of the result.
Curves: shapes the result's tones and colors.
Pixel Math: combines the lines with any formula.
SCNR: removes a green or other color cast from the result.