
Layers
Images stacked, masked and blended, and every layer still editable
A layered image keeps several images, its layers, in one window: each layer has a blend mode, an opacity and if we want a mask of its own, and the window shows their composite. Processes, tools and scripts work on any layer or on its mask, the Layers panel and the Layer menu edit the stack, and every change is a step of the image's history that can be undone. Layered images open and save in the file format of LayerBlender, so a stack can go on being worked on in either program.
8.1Layered Images
8.1.1What a Layered Image Is
A layered image is an image window like any other, with a difference in what it holds. Its pixels are the composite of its layers: the bottom layer, then each layer above it blended onto what is below, from the bottom up, by the layer's blend mode, opacity and mask. The layers are separate images that have no windows of their own and are not in the list of open images; processes, tools and scripts reach them through the layered image. The composite is 32-bit floating point RGB, as large as the canvas, the area the layers are placed on.
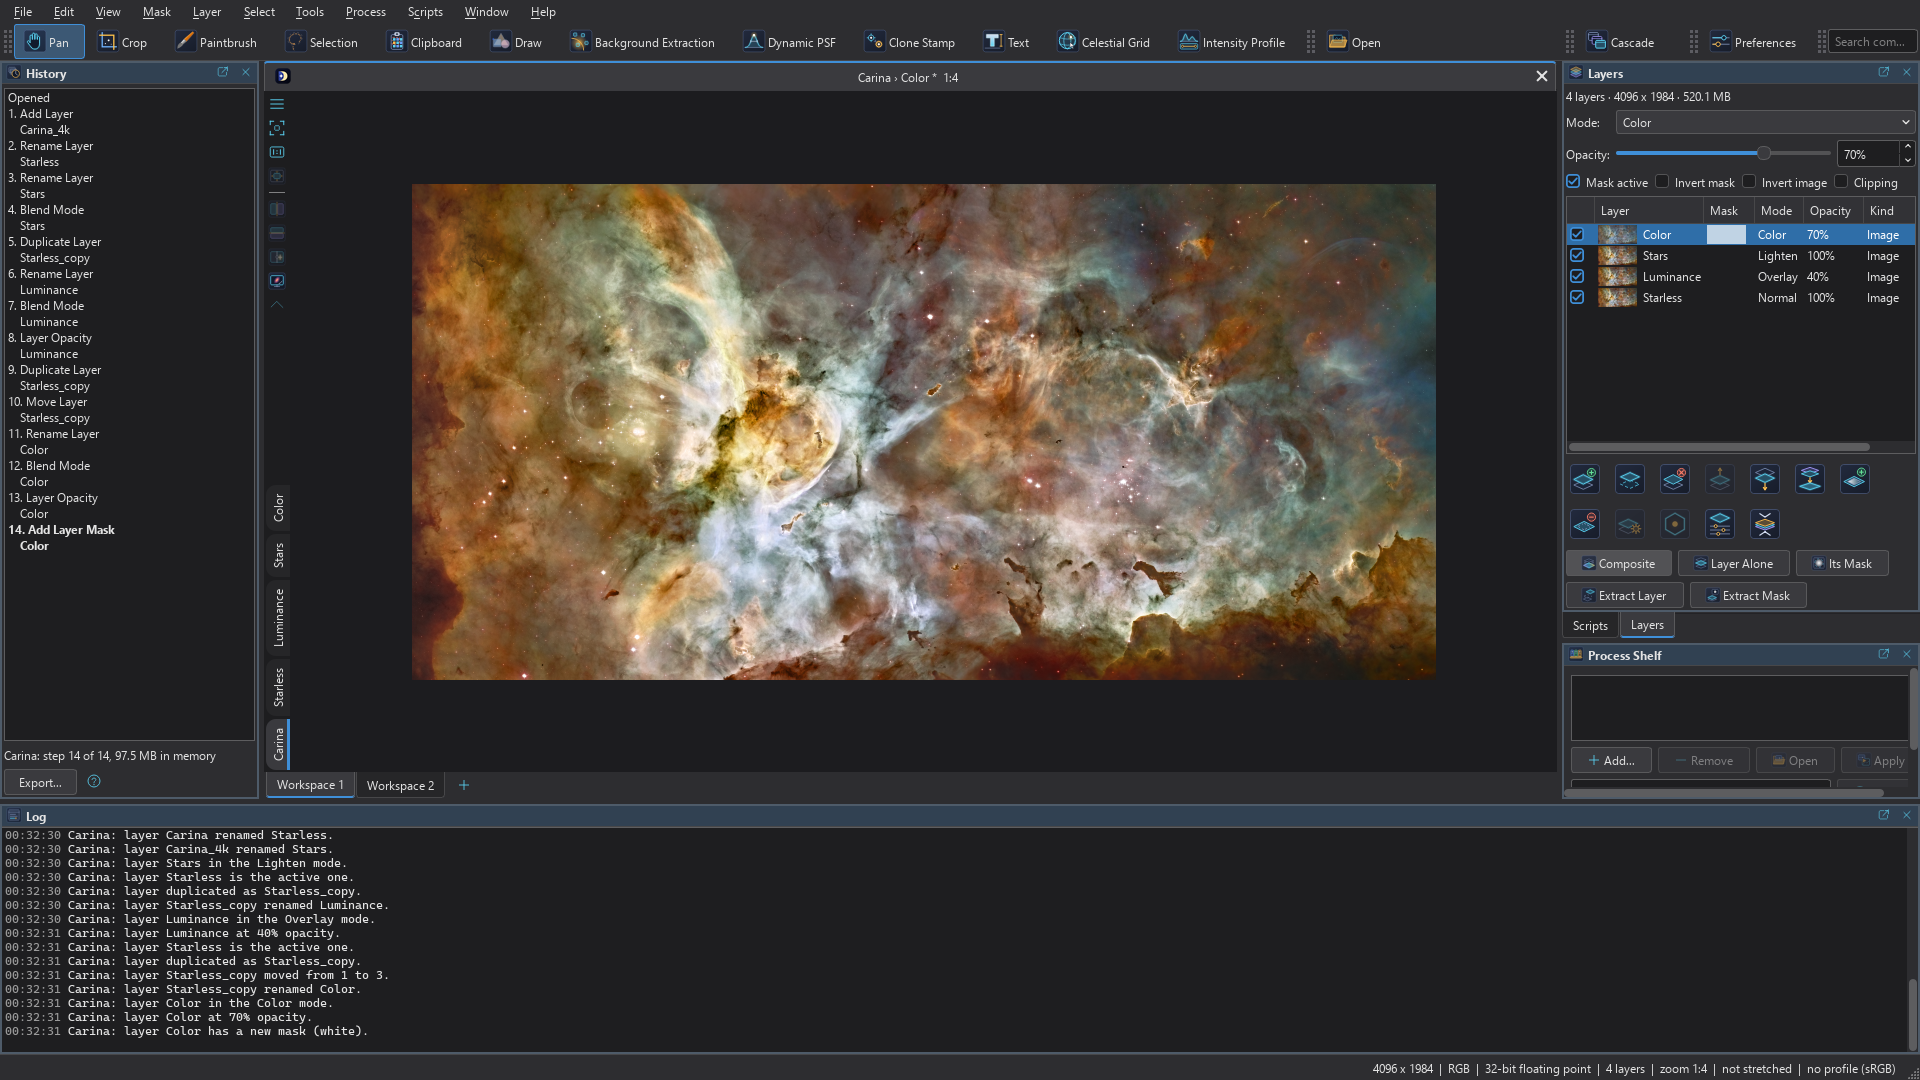
Layered images come from two places. Opening a file that LayerBlender saved opens it as one window that shows the composite, exactly as LayerBlender would blend it. And any plain image becomes layered in the step of its first layer operation, such as : it is not converted or changed, it simply becomes the bottom layer, in its own sample format. Undo brings the plain image back.
8.1.2Blend Modes, Opacity and Masks
Each layer blends with the composite below it by one of these modes: Normal, Multiply, Screen, Overlay, Darken, Lighten, Subtract, Color, Color Burn, Linear Burn, Darker Color, Color Dodge, Linear Dodge, Lighter Color, Soft Light, Hard Light, Vivid Light, Linear Light, Pin Light, Hard Mix, Difference, Exclusion, Divide, Dissolve, Hue, Saturation and Luminosity. A twenty-eighth mode, PixelMath, blends by an expression of our own (Process Layers). The results are those of LayerBlender's engine, bit for bit, in every mode but PixelMath, which is not computed here.
- Opacity says how much of the layer shows, from 0 to 100 percent. In Dissolve, opacity says how many pixels show instead: the pixels are made fully opaque or fully transparent at random, the same way in every channel.
- A mask is an image of its own, attached to the layer, that says where the layer shows: white shows it, black hides it, and grays blend. The layer's mask is separate from the mask of the image (the image's mask limits what processes do; a layer's mask limits what the layer shows).
- Transparency from a file: a layer of a layered TIFF that has an alpha channel opens with a mask made from it, named Alpha of and the layer's name (a layer that has a mask too gets the product of the two, as in Photoshop). The mask is an ordinary layer mask: it can be switched off, edited or deleted, and it is saved with the layers in XISF.
- Clipping makes the layer show only as much as the layer directly below it is bright, which keeps a texture or a color overlay inside a region another layer defines. The bottom layer has no clipping, and neither has a process layer.
- Invert image and Invert mask count the layer's pixels or its mask as inverted without changing them.
On a discrete graphics card, moving an opacity or blending slider on a large stack of layers is about 7 times faster, and the preview of a process on a layer is faster at the larger zoom reductions (GPU Acceleration).
8.1.3Canvas, Placement and Scale
The canvas is the area the composite covers, with a color under the bottom layer (its canvas color). Layers need not be as large as the canvas. Each layer has an offset from the canvas's corner and a size on the canvas, which may differ from its pixel size: a layer can be smaller or larger, shifted, partly or wholly outside the canvas, and scaled. A mask either spans its layer, or has a rectangle of its own on the canvas; outside that rectangle the mask is white, so the layer shows. Layers and masks are sampled at the nearest pixel when they are scaled. Layer Properties sets all of these (The Layers Panel and the Layer Menu).
8.1.4The Layers of One Window and Its History
A layered window has one history. A step on a layer's image or mask (a process, a tool session, a script) is recorded in the window's history and named after the layer; a layer operation records the stack as it was. Undo and Redo put back the layer's pixels or the stack, and the composite follows. The undo steps of all images share the same limits: the newest stay in memory, the older ones are in the cache folder (Undo Steps in the Cache Folder).
While a process is running on a layer, or a tool holds it, the whole image is busy: no undo, no close and no layer operation until it ends.
8.1.5Plain Images and Layered Images
turns a layered image back into a plain image of its composite; Undo brings the layers back. makes a plain image of the composite and keeps the layered one. The layers that are not computed in DSPX (Process Layers) are missing from the flattened image, and DSPX asks before it flattens such a stack.
8.2The Layers Panel and the Layer Menu
8.2.1The Layers Panel
The Layers panel is next to the History panel and follows the image in front. It has, from top to bottom:
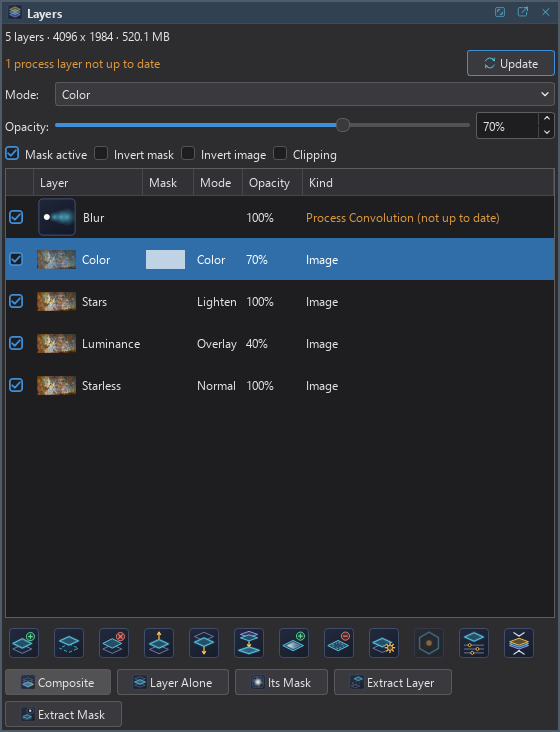
The line of facts: The number of layers, the canvas size and the memory they use, for example "8 layers · 480 x 320 · 19.0 MB", and "· 2 not computed" at the end when some layers are not computed. Its tooltip says which layers, and names the target: "Target: noise", or "Target: noise (mask)". A plain image says "Ha has no layers.", and its tooltip says how to make it layered.
The stale banner: "1 process layer not up to date", shown when a change below a process layer has made its result old, with the Update button, which runs the process layers that need it. While they run the banner says so.
Mode: How the active layer blends with what is below it. For a PixelMath layer the Expression... button beside it edits the expression. A process layer's mode cell is blank.
Opacity: The active layer's opacity, as a slider and a percentage. A whole drag is one history step. For a PixelMath layer the slider is off: the opacity is in the expression.
Mask active: The layer blends through its mask.
Invert mask: The mask counts inverted; the mask itself is not changed.
Invert image: The layer's image counts inverted; the image itself is not changed.
Clipping: The layer shows only as much as the layers below it are bright.
The list of layers: The layers, top first, with these columns. A click on a row makes its layer the active one; a drag reorders the layers.
- Shown: A check box, with no header text, that shows or hides the layer.
- Layer: A thumbnail of the layer's image, through the image's screen stretch as the canvas shows it.
- Mask: A thumbnail of the mask as it is, and "inactive" when Mask active is off, "(inverted)" when it is inverted, "missing" when the file names a mask it does not hold. A click on the mask's thumbnail makes the mask the target; the cell then says "target". Hover over the thumbnail for the mask's name. The column is hidden while no layer has a mask, and shows again when one does.
- Name: The layer's name. It is the one cell that can be edited in place (double-click).
- Mode: The blend mode.
- Opacity: The opacity.
- Kind: "Image", "Text", "PixelMath (not computed)", "Process Convolution", "Process Convolution (not up to date)", or the name of a process DSPX does not have followed by "(PixInsight only)". A tooltip explains each.
The command icons: One row of buttons for the commands used most: New layer, Duplicate current layer, Delete current layer, Raise current layer, Lower current layer, Merge down, Add a white mask, Remove the mask, New process layer, Edit process layer, Layer properties and Flatten. Their tooltips name the action.
The view buttons: Composite, Layer Alone, Its Mask, Extract Layer and Extract Mask. The first three change what the window shows; the last two make a new image.
8.2.2The Target
The target is the image that processes, tools and scripts work on: the active layer's image, or its mask when the mask is made the target by a click on its thumbnail or by Edit Mask in the layer's menu. The line of facts, the window's title ("M42 › Ha", "M42 › Ha (mask)") and the process panels ("Applies to: M42 › Ha") all name it. A process panel can also be kept on another layer of the image: its Applies to list offers the layers. A process layer and a text layer have no pixels to work on, and the panel says so.
8.2.3A Layer's Right-Click Menu
A right-click on a row makes its layer active and opens a menu of what can be done to it now:
- Edit Process Layer (a process layer of ours), Edit Expression... (a PixelMath layer) and Properties...;
- Hide or Show, and Show Alone;
- Duplicate, Delete, Raise, Lower and Merge Down;
- Add Mask or, for a layer that has one, Replace Mask, each with White, Black, From Selection and From Image;
- Edit Mask or Edit Layer, whichever the target is not; Mask Active, Invert Mask, Show Mask Alone and Remove Mask;
- Extract and Extract Mask.
8.2.4The Layer Menu
Every command is one step of the image's history. Commands that cannot be done now, because the image is busy or the active layer does not allow them, are grayed.
New Layer: A black layer of the canvas's size in the Screen mode, to paint on. The composite does not change. A plain image becomes a layered one.
New Layer from Image: A copy of another open image as a layer above the active one. The submenu lists the open images with their sizes.
New Process Layer: A process layer with the settings of the process panel in front. Only processes that change their image can be process layers.
Duplicate Layer: A copy of the active layer, and of its mask, above it.
Delete Layer: Deletes the active layer; Undo brings it back. A stack keeps at least one layer.
Raise Layer and Lower Layer: The active layer one place up or down.
Add Mask: Gives the active image layer a mask:
- White (Shows All): A white mask, so the layer shows everywhere.
- Black (Hides All): A black mask, so the layer shows nowhere until it is painted.
- From Selection: The image's selection, in the layer's pixels. Enabled when the image has a selection.
- From Image: An open image, such as a star mask a process made, chosen from a list with the sizes.
Remove Mask: The active layer without its mask.
Merge Down: The active layer blended onto the image layer below it. The lower layer's own pixels take the blend and its settings stay as they were. Both must be image layers, and the lower must not be scaled. The part of the active layer that is on the canvas must lie within the layer below; otherwise Merge Down says so and changes nothing (the part outside would be lost). A text layer merged down turns into pixels.
Flatten: The image becomes a plain image of its composite; Undo brings the layers back.
Flatten to New Image: A new plain image that is a copy of the composite.
Export Flattened...: The composite saved as a file in any format the program writes, TIFF, PNG and JPEG among them, with the format's options. The image stays layered. DSPX asks first when layers are not computed or process layers are not up to date.
Edit Process Layer: The active process layer's settings in its process's panel, where Save to Layer stores them in the layer and runs it.
Update Process Layers: Runs the process layers that are not up to date.
Layer Properties...: Opens the properties of the active layer and of the canvas:
- Offset X and Offset Y: The layer's place on the canvas.
- Width on the canvas and Height on the canvas: The size the layer is shown at; "its pixels'" means its own size.
- The mask has a rectangle of its own: Off, the mask spans the layer. On, the mask has its own rectangle: Mask offset X and Mask offset Y (from the layer), Mask width on the canvas and Mask height on the canvas.
- Canvas width, Canvas height and Canvas color: The canvas and the color under the bottom layer; a click on the swatch opens the color dialog.
A color chosen there is also the canvas color DSPX shares with Canvas Size, Crop and Rotate (see Crop: Canvas color). The dialog shows the image's own canvas color; an image made layered in DSPX whose color no one chose yet shows the shared one. OK changes the image's color only when a color was chosen here, and that color becomes the shared color too. The image keeps its color, and a project saves it: a later change of the shared color leaves it alone.
Show Composite: The window shows the composite of the layers.
Show Layer Alone: The window shows the active layer alone, where it is on the canvas, through the image's screen stretch.
Show Layer's Mask Alone: The window shows the active layer's mask, where it is on the canvas, as it is.
Extract Layer as Image: A new image that is a copy of the active layer's image.
Extract Mask as Image: A new image that is a copy of the active layer's mask.
Show Layer Alone and Show Layer's Mask Alone follow the active layer: choosing another layer shows that one. A layer that cannot be shown that way, a process layer or a layer without a mask, shows the composite. When some layers cannot be computed, the window says "Shown without N layer(s) not computed here", followed by their names.
8.3Working on a Layer
8.3.1Processes, Tools and Scripts on the Target
Every process, tool and script works on the target: the active layer's image, or its mask. Choose the layer in the panel (and click its mask's thumbnail for the mask), then use the process, the tool or the script as on any image. The composite is made again over the rectangle the change covers.
- Processes apply to the layer in its own pixels, whatever its size and place, through the image's mask when it has one; the mask is mapped onto the layer, and black outside the canvas. A process that makes new images, such as a star mask, makes them from the layered image; Add Mask > From Image turns such a mask into a layer's mask.
- Tools see the pointer where the layer is: a brush on a layer placed at 40, 30 paints the layer's pixels under the pointer, and the tool's overlay is drawn where the layer is. Painting a layer's mask with the Paintbrush is the way to edit a mask by hand.
- Scripts run on the active layer, or on its mask: its image is copied, the result goes through the image's mask, and the run is one history step. The live preview of a script shows the layer alone. A script that needs the composite works on Flatten to New Image.
Each of these is one step of the layered image's history, named after the layer. The History panel lists them, and undoing a step puts back the layer's pixels and recomposes the canvas. A selection works as it does everywhere: it limits processes, and its pixels map onto the layer.
8.3.2Layers and Selections
The selection of a layered image is the image's, not a layer's: the Selection tool draws it on the canvas, whichever layer is active, the outline stays drawn after Set Selection, and a process run on a layer is blended through it where the layer's pixels lie under it. Add Mask > From Selection turns the selection into a layer's mask, in the layer's own pixels. See Selections.
8.3.3A Few Common Jobs
- Stars over a starless image. Open both, make the starless image layered with on the star image (chosen from the list), and set the new layer's mode to Lighten or Screen.
- Keeping a region. Add a black mask to the layer, make the mask the target with a click on its thumbnail, and paint it white with the Paintbrush where the layer should show. A click on the layer's row returns to the layer.
- Trying a stretch on a copy. Duplicate the layer, process the copy, and use its opacity to blend the result in; hide it to compare.
- Finishing. Choose to continue as a plain image, or to publish a picture and keep the layers.
8.4Process Layers
8.4.1What a Process Layer Is
A process layer holds a process and its settings instead of an image. Its output is that process run on the composite of the layers below it, and it replaces the composite there: a process layer has no opacity or mask of its own. This makes a step of a workflow part of the stack: a Blur or a Deep Morphology layer on top of two image layers is evaluated every time what is below changes, without touching the layers.
Only DSPX's own processes can be process layers; no layer runs code. A process layer from a LayerBlender file runs when it names one of the program's processes by its PixInsight id and its settings read cleanly (a Convolution layer runs as Blur, for example). Otherwise the layer is kept as it is, with its source untouched, shown in the Kind column as "available in PixInsight only", and skipped in the composite.
8.4.2Making, Editing and Updating
- Open the panel of the process, set it up, and choose . The layer is added above the active one with the panel's settings.
- To change it, choose . The process's panel opens with the layer's settings and says "Applies to: the process layer". Its Apply button reads Save to Layer: it stores the settings in the layer (one history step) and runs the layer, so the composite shows the result. After you make another layer active, or while another image is in front, the panel does not edit the layer: its status line says so and the button reads Apply again.
- After a change below a process layer, the layer is not up to date: the composite keeps showing its last output, and the panel says "N process layer(s) not up to date". Click Update, or choose , to run the layers from the bottom up, off the main thread; the image is busy meanwhile.
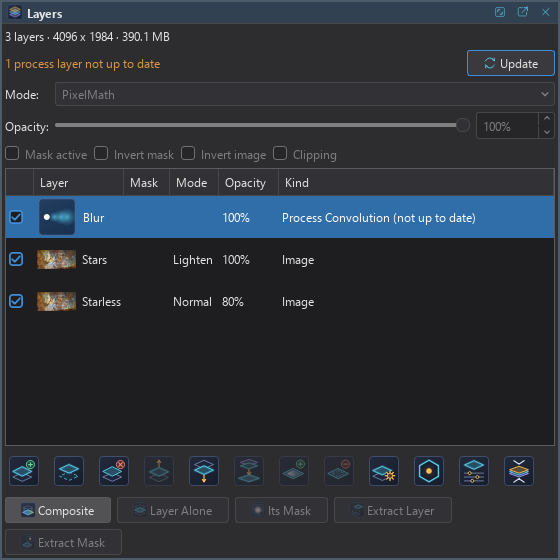
The results of process layers are not saved in the file: when the image is opened again, its process layers are not up to date until we update them. A layer that has never been run is skipped until it is.
8.4.3PixelMath Layers
A PixelMath layer blends by an expression instead of a mode. Choosing PixelMath in the Mode list of an image layer asks for the
expression, a single line, in which $T is the composite below, $A the layer and $M its mask;
the dialog starts from the expression of the layer's current mode, opacity, mask and clipping. The bottom layer cannot be
PixelMath. The expression is edited with Expression... or in the layer's menu; another mode makes the
layer an image layer again, keeping the expression. DSPX keeps and saves PixelMath layers as they are but does not compute them:
the Kind column says "PixelMath (not computed)" and the composite is shown without them.
8.4.4Text Layers
Each text made with the Text tool is a layer of its own. Its image is the text, its mask is the text's transparency, and it keeps the text and its style so it can be edited with the Text tool as long as it is a text layer. A text layer has no mask to add, remove or invert, is never scaled, and has no pixels for processes, tools or scripts: Merge Down or Flatten turns it into pixels. Its blend mode and opacity are set in the Layers panel. LayerBlender opens a file with text layers and shows the text, but does not know it as text; DSPX opening a layer whose text it cannot recover keeps it as an image layer and says so in the Log.
8.5Saving for LayerBlender
8.5.1Save and Save As
Saving a layered image as XISF writes a file that LayerBlender reads. Every layer is written with its image, its mask, its blend mode, opacity, visibility, clipping, offsets and sizes and its process or PixelMath source, as LayerBlender writes them. What LayerBlender wrote in a file is written back as it was where we did not change it, including the properties DSPX does not use, so a stack can go back and forth between the two programs without losing anything. A layer's pixels are written in the sample format the file had them in when that keeps every value exactly (an unchanged 16-bit layer comes back bit for bit), else as 32-bit floating point. DSPX adds some properties of its own (the active layer, a mask's own rectangle, a process layer's full settings); LayerBlender ignores them and drops them when it saves.
When a file uses something LayerBlender 1.0 does not show the same way, such as layers scaled by a size on the canvas or masks with a rectangle of their own, the file is written with those properties so nothing is lost, and the Log says what LayerBlender will show differently.
8.5.2Layers from a FITS File
A FITS file with several images can open as one layered image, a layer for each image (FITS images on the General page of , choice As layers of one image; FITS Files with Several Images). The layers are named after their HDUs, only the first shows, and they may have different sizes. DSPX never saves them over the FITS file; save the layers as XISF.
8.5.3Saving the Composite
- to FITS, or to the format called "XISF, flattened: the composite only", writes the composite and leaves the image layered. DSPX asks first when layers are not computed here or process layers are not up to date.
- writes the composite in any format the program writes, with the format's options (a PNG or JPEG is saved as displayed by default); see Saving Images.
- makes a plain image of the composite.
8.5.4Projects
A project keeps a layered image with its layers, masks and history; opening it puts them back and every step can be undone (Projects).