
Interactive Tools
Tools that work directly on the image, one session at a time
The interactive tools are the ways of working on an image by hand: drawing a crop rectangle, painting, selecting, copying and pasting, drawing shapes, placing the samples of a background model, measuring stars, cloning and typing text. A tool works in a session on one image, shows what it is doing over the image, and ends with Apply, which is one step of the image's history, or with Cancel, which leaves every pixel as it was. This chapter explains what the tools have in common and what each one is for; each tool has a page of its own with every setting of its panel.
7.1Tool Sessions
7.1.1The Tools Toolbar and the Tools Menu
The tools are in the toolbar called Tools and in the menu, which offer the same choices; the menu lists them in alphabetical order, the toolbar in the order below. Exactly one is active at a time:
| Tool | For | Page |
|---|---|---|
| Pan | Dragging the view; the tool in use when no other is chosen | This chapter |
| Crop | Cropping, resampling, flipping and turning | Crop |
| Paintbrush | Painting, blending, blurring and smudging | Paintbrush |
| Eraser | Making pixels transparent, on a layer or on an image | Eraser |
| Selection | Selecting regions | Selection |
| Clipboard | Copying a region and placing it | Clipboard |
| Draw | Drawing shapes into the image | Draw |
| Background Extraction | Placing the samples of a background model | Background Extraction |
| Dynamic PSF | Measuring stars | Dynamic PSF |
| Clone Stamp | Painting with pixels copied from elsewhere | Clone Stamp |
| Spot Healing | Painting over a flaw so the background around it fills it | Spot Healing |
| Text | Typing text on the image | Text |
| Celestial Grid | Showing lines of right ascension and declination over an image with a plate solution | This chapter |
| Intensity Profile | Graphing the pixel values along a line drawn on an image | This chapter |
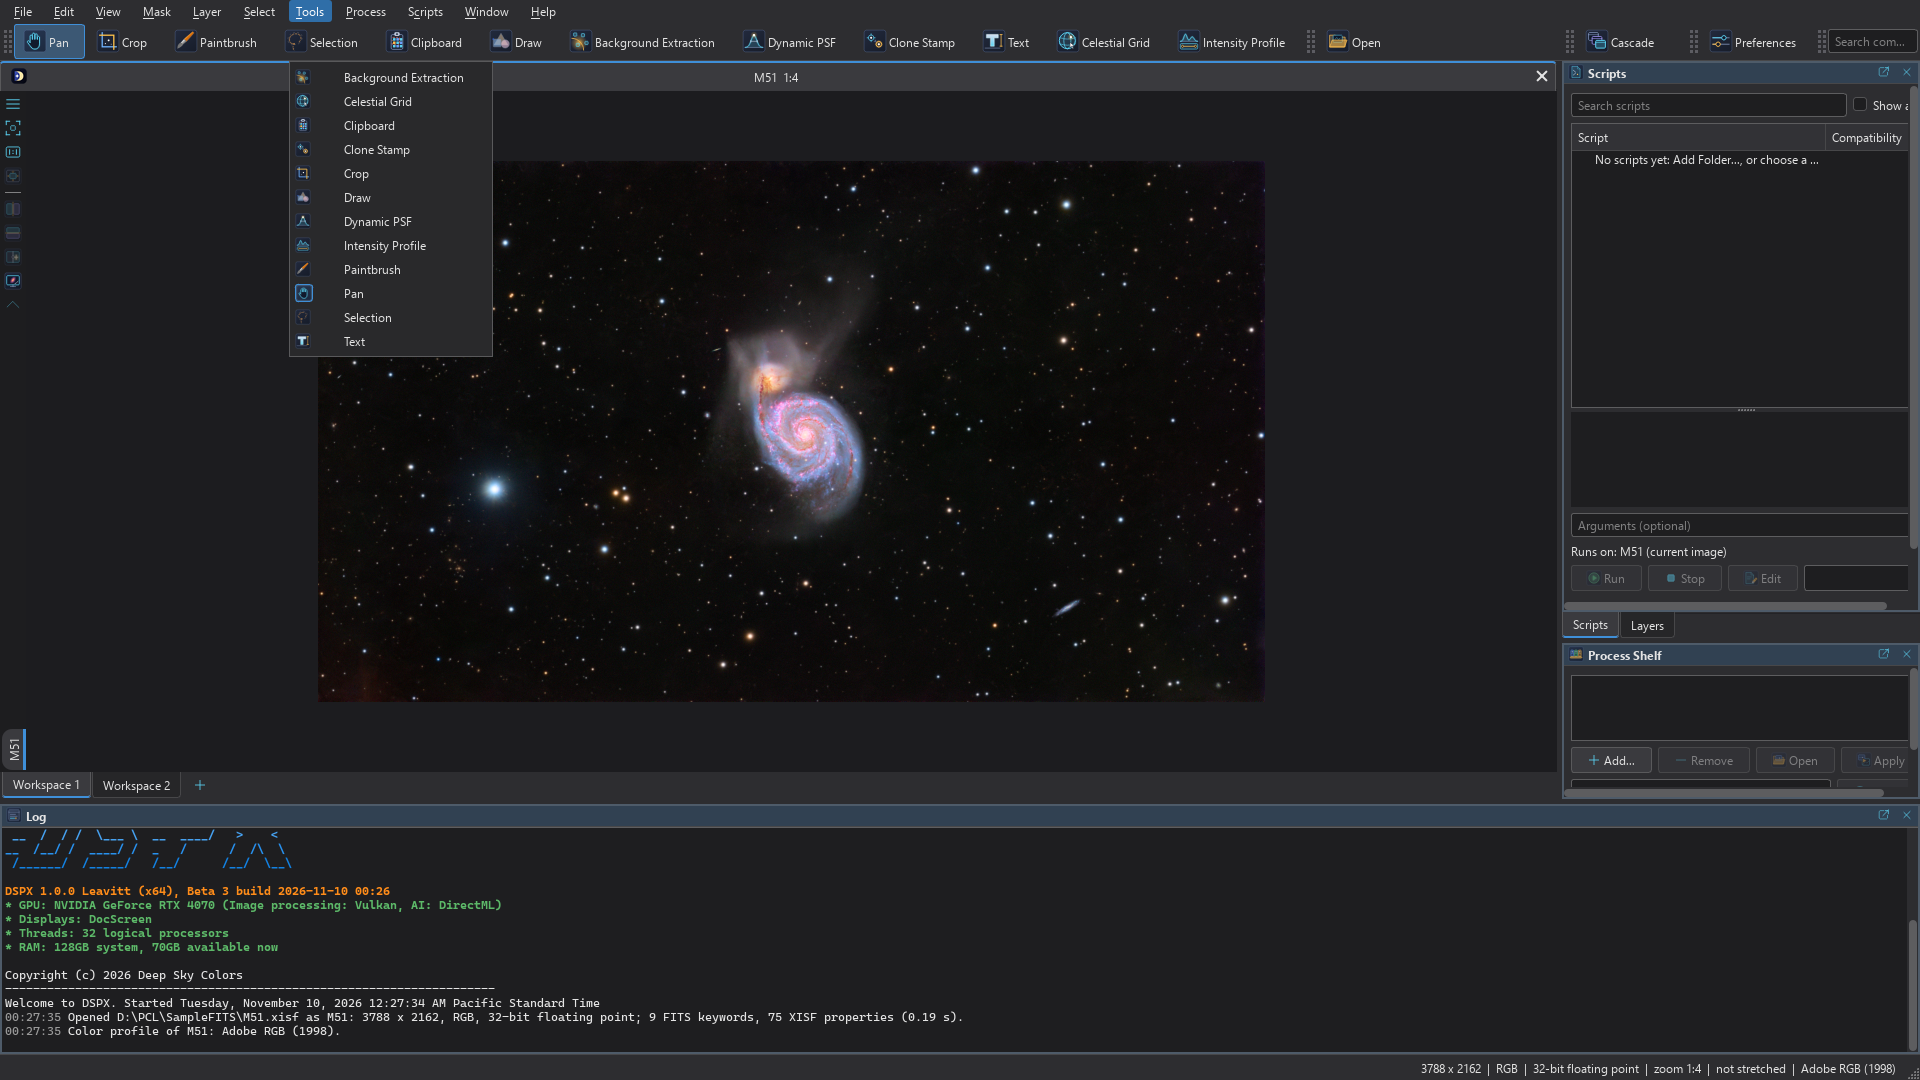
The icons and names on the toolbar can be changed in Icons and Toolbars. No tool has a keyboard shortcut at first; a shortcut can be given to any of them in Keyboard Preferences, where the tools are listed among the commands.
7.1.2Using a Tool's Button Again
The button of the tool that is already active is a way out of it. Clicking it, or choosing the tool again in the menu or with its keyboard shortcut, does what the panel's Close button does: it hides the panel. Then:
- No unfinished work. Pan becomes the active tool, as if its button had been clicked.
- Unfinished work. The tool stays active and only its panel hides, so nothing is lost and the work can go on over the image. Clicking the button again shows the panel again. Work is unfinished when a session holds something that Apply would put in the image or Cancel would throw away: a crop rectangle, strokes of the Paintbrush or Clone Stamp, a selection shape or a polygon being drawn with the Selection tool or Draw, shapes of Draw, a block of the Clipboard placed and not pasted, the sample boxes of Background Extraction, the stars Dynamic PSF has measured, or the text being typed.
If the panel was closed with its Close button, the tool's button shows it again; clicking once more then leaves the tool as described above. Pan's own button, with Pan active, changes nothing.
7.1.3The Tool Panel
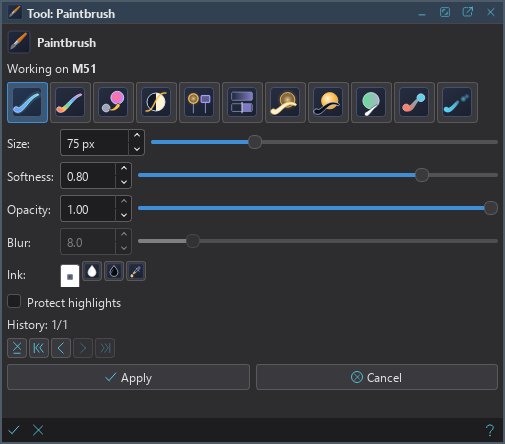
Choosing a tool shows its controls in the Tool panel, which shares its place with the Process panel: one of the two is in front. Before any tool is chosen, the panel says "Choose a tool in the toolbar." The panels have the same parts for every tool:
- the tool's icon and name;
- a line that names the image the tool is working on, "Working on" followed by the image's name and the window it is in, or "No image yet: click on one." until the first click; the name is a link that brings that image to the front;
- the tool's own controls;
- Apply and Cancel (the Background Extraction tool also has the eye of the live preview beside the image's name);
- a status line that says what the tool did last or why it could not.
The buttons are the ones of the process panels: the system bar under a panel can hide them and offer the same commands in its own row (Panels). The panel can be docked, or floated as a window of its own, like every panel.
7.1.4Tools and Processes
A process works on a whole image, or on a selection or a mask, from a panel of settings, and is applied once; it can be saved, put on the shelf, dragged onto an image, and run by a workflow or a script. A tool is driven by the pointer: it needs the image under our hands, keeps what we have done so far as drawn, and changes the pixels only when we apply it. Because of that, tools are not saved as processes, are not on the shelf, and are not run by workflows. Two of them also exist as processes, with the settings of the tool in a panel and no pointer: the Crop tool as Dynamic Astro Crop, and the Text tool as the Text process. The Background Extraction tool is the way of placing the samples of the Background Extraction process.
7.1.5Starting, Working and Ending a Session
A tool's session starts on the image we first click or drag on with the tool. From then on:
- The tool holds the image. While the session is open, nobody else can change the image: it cannot be closed, processed, saved with changes pending, or taken back in the History panel. DSPX says why, naming the tool: "The Paintbrush tool is working on it: apply or cancel it first." The image's tab, the tool's panel and the status line also say which tool is on which image, and so does a label in the image's top right corner: its cross closes the session; the rest of the label lets our clicks through to the tool.
- What the tool does is the tool's until Apply. Paintbrush and Clone Stamp strokes, Draw shapes, selection steps, a crop rectangle or a block waiting to be pasted are kept by the tool, shown over the image, and can be undone one by one inside the session.
- Apply ends the session with one history step. Only the tiles of the image that changed are recorded, and a session that changed nothing records nothing. One afterwards takes back the whole session. The Log says what the tool did.
- Cancel ends the session with the image exactly as it was when the session began, whatever the tool did in between.
7.1.6Undo and Redo Inside a Session
Ctrl+Z and Ctrl+Y go to the tool while its session is on the image in front: one stroke, one shape, one selection step at a time. The Edit menu says which it is: its first command reads "Undo in Paintbrush", for example. With any other image in front they are the image's own undo and redo. The painting tools, the Selection tool and Draw also have a row of buttons in their panels for the same: delete the last stroke, undo all, undo, redo, redo all. Two exceptions: in the Clipboard's Place mode the keys do nothing, and after a paste the image's own undo takes the paste back.
7.1.7Leaving a Session
- Choosing another tool, or quitting. A session with nothing to lose is canceled. One with changes is applied for us when Auto-apply tools is on (the default; below). With it off, DSPX asks "The Paintbrush tool has work on M31 that is neither applied nor canceled", and offers Apply, Discard and Keep Working. The Text tool is the exception: the text being typed becomes a layer without asking.
- Bringing another image to the front leaves the session where it is, on its image.
- Saving is refused while a painting session has changed pixels that are neither applied nor canceled. A session that has changed no pixels yet (a crop rectangle, selection steps, shapes not drawn in, a block not pasted) leaves the image as it is, and saving saves that.
- Running a process on another image is not affected.
7.1.8Starting Something Else with Work in a Tool
A tool that has work on an image holds the image: a process cannot change it, and another tool cannot start on it, until the session ends. What happens then is a setting of the layout in use, Auto-apply tools in the group Process and tool panels of (Layout).
- On, the default: the tool is applied for us, without a question, and then what we started goes on: another tool is chosen, a process or a script runs on the image, or DSPX quits. The work becomes one history step, and the Log says so first ("The Paintbrush tool had unapplied work on M31: applied.") and then gives the tool's own line. A tool that cannot apply yet (a Selection with no valid shape, say) is not applied, and the refusal below happens; nothing is applied while the pointer is down, or to an image that something else is working on.
- Off: DSPX asks whether to Apply, Discard or Keep Working, or refuses what we started and names the tool: "The Paintbrush tool is working on it: apply or cancel it first."
The Apply and Cancel buttons, and the system toolbar's, stay either way and still end the session. Whatever was applied can be undone with Undo. The Fix Inside (Light) look, which has no layout of its own, starts with the option off when it is chosen at the first start. With Close panels after Apply on (same group), the tool's panel closes after we apply its work ourselves, and stays when Auto-apply tools applies it.
7.1.9The Mouse and the Keys
While a tool is active the left button belongs to the tool (the Celestial Grid is the exception: it has no gestures, and the left button drags the view; the Intensity Profile uses it to draw its line). The right and the middle button pan the view, and so does the left button with the space bar held; the wheel zooms about the pointer, as always. The Tab key goes to the tool, not to the next panel. Pan is the tool in use when no other is chosen: the left button drags the view.
A tool shows its own look as soon as it is chosen and the pointer is over the image, before the first click. The tools that click to place or draw something (Crop, Selection, Draw, Clipboard, Background Extraction, Dynamic PSF, Text, the Intensity Profile) change the arrow to a small cross. The Paintbrush and the Clone Stamp show their brush as a circle on the image, as large as the brush at the current zoom, with the cross at its center. The circle follows the pointer, the zoom and the brush size in the tool's panel (for the Clone Stamp also Ctrl and the wheel), and goes when the pointer leaves the image. The first click carries on from it. With Pan, and with the Celestial Grid, the pointer is the hand.
7.1.10Tools, Masks and Selections
Tools meet the image's mask and selection in different ways, so it is worth knowing which applies:
| Tool | The image's mask | The image's selection |
|---|---|---|
| Crop | Let go when the pixels move | Moves with a crop that is not turned; cleared by the other operations |
| Paintbrush | Strokes go through it, and are painted again under it if the mask is enabled, disabled or inverted | The Selection tool starts from it; painting is not limited by it |
| Eraser | Nothing is erased where the mask is black | Only what is selected is erased |
| Selection | Not used; can make a mask image and attach it | Starts from it, and Set Selection replaces it |
| Clipboard | The paste goes through it | Starts from it; Copy takes it |
| Draw | Not used: shapes are drawn into the pixels | Does not limit the shapes |
| Background Extraction | As the process | As the process |
| Dynamic PSF | Not used | Not used |
| Clone Stamp | Nothing is cloned where the mask is black | Not limited by it |
| Text | A text layer has its own alpha | Not used |
A mask cannot be replaced or removed while a tool holds the image, but it can be enabled, disabled and inverted. Selections are explained in Selections.
7.2Pan
Pan is not a tool with a session. It is what the left button does when no other tool is chosen: drag, and the view moves with the pointer. It is checked in the toolbar and in the menu at the start, and choosing it ends a tool's session the way choosing any other tool does. Panning is always available without it: the right button, the middle button, or the left button with the space bar held, pans while another tool is active. Zooming and the other controls of the view are in Zoom, Pan and the Image Column. Pan has no page of its own.
7.3Crop
The Crop tool crops, resamples, flips and turns the image in front, and keeps its astrometric solution true to the new pixels. Drag on the image to draw the rectangle; drag inside it to move it, drag its eight handles to resize it, and drag the knob above it to turn it about its center. The panel has three pages: Crop (the rectangle's center, width, height and angle, typed or dragged), Resample gauge (the size the image will have) and Orientation (five buttons that flip or turn the image at once).
Apply applies everything the tool shows: a rectangle that is not turned crops the pixels exactly; a turned one makes an upright image of its size, with interpolated pixels and black where the rectangle reaches outside the image; the gauge resamples the image to its size. Each operation is one history step, and each recomputes the astrometric solution of a plate solved image, which the Log reports. The Orientation buttons act at once and have no session. The same operations, typed in a panel without the pointer, are the Dynamic Astro Crop process; Crop, Rotate and Resample are the processes for the same geometry by numbers.
7.4Paintbrush
The Paintbrush paints on the image, stroke by stroke. Its eleven actions are Normal, Color, Saturation, Contrast, Dodge/Burn, Sharpen, Lighten, Darken, Neutralize, Smudge and Blur; Ctrl held as a stroke starts gives the opposite of Saturation, Contrast and Dodge/Burn. Size, softness and opacity shape the brush, the ink is chosen with the color dialog, white, black or the eyedropper (Alt+click picks from any image), and protecting highlights keeps stars from being painted over.
The first click on an image starts the session and paints. Each drag is a stroke, painted into the image through its mask; the row of buttons in the panel (delete the last stroke, undo all, undo, redo, redo all) works on the strokes, and Delete over the image deletes the last one. Apply makes the session one history step. A mask image opened in its own tab can be painted by hand with the white and black inks and the Normal action, then attached with .
7.5Eraser
The Eraser makes pixels transparent. It is a tool for layers: on a layered image it erases the active layer's mask, so what is under the layer shows through; on a single image it erases the alpha channel, adding one at the first stroke. Its modes are Erase (the brush's path), Background (only the sky under the brush; brighter stars and nebulae stay) and Magic (a click erases an area of similar pixels). Strokes go through the image's selection and mask, are undone and redone like the Paintbrush's, and Apply makes them one history step. Transparent pixels show a checkerboard.
7.6Selection
The Selection tool makes selections: freehand, rectangle, ellipse, polygon and magic wand steps, added to the selection, or subtracted from it with Alt held as a shape starts. Shift makes a square or a circle. Each step can be inverted, feathered and contracted or expanded, and the last step can be moved, turned and resized with the Move/Rotate/Resize button. The magic wand has a tolerance and a metric. Backspace drops a polygon's last vertex and Esc gives the polygon up.
The session starts from the selection the image already has. Set Selection makes the steps the
image's selection, as one history step, or does nothing when they are the selection the image had. Two options go further:
Also make a mask image makes the selection into an image named after the source with _mask
added, and a second option attaches that image as the image's mask. A selection limits every process that follows, as a mask
does: the live preview and Apply change only what it selects, blended by its feather (Selections). The Select menu turns a selection into a mask image and a mask into
a selection, inverts it, clears it and hides it.
Show overlay shows or hides the Selection tool's outline and, once the selection is set, the selection's outline as well, as does; a hidden selection still limits processes. On a layered image the Selection tool works on the image, not on a layer: the selection is the image's, drawn on the canvas, and it stays drawn after Set Selection. A process that runs on the active layer, preview and Apply, changes the layer's pixels only where they lie under the selection (Layers and Selections).
7.7Clipboard
The Clipboard copies a region of one image and places it, turned, scaled and blended, on the same or another image. It has two modes. In Select mode the tool draws a region with the Selection tool's shapes (freehand, rectangle, ellipse, polygon, wand), starting from the image's selection; Copy takes the region, or the selection, or the whole image, with every channel and the selection's coverage as alpha, and changes nothing. In Place mode a click puts the block on an image; we drag it, turn it with a corner, resize it with a side, nudge it with the arrows or type its position, scale and angle, and choose an operator, a channel, an opacity, a feather, an anchor and an interpolation. Paste (or Return over the image) blends the block through the image's mask as one history step; New Image makes an image of the block.
An image that another program has put on the system clipboard, such as a screenshot, becomes the block when the panel is shown
and whenever the system clipboard changes. and are
the tool's Copy and Place: with a text field in front they are text commands as usual; otherwise Copy takes the region of the
image in front, and Paste places the clipboard's image in the middle of the view, or makes a new image named
Clipboard when no image is open. Tab over the image switches between Select and Place.
7.8Draw
The Draw tool draws shapes into the image: freehand, line, rectangle, ellipse, polygon, and a magic-wand fill, filled, outlined or both, with a fill color and an outline color, opacity, thickness, softness and contract/expand. Each shape can be changed after it is drawn, and the last one can be moved, turned and resized. The shapes are the tool's until Apply, which draws them all into the pixels as one history step. The image's mask is not used: Draw is not maskable. Shift snaps a line to 0, 45 and 90 degrees and makes squares and circles.
7.9Background Extraction's Samples
The Background Extraction tool places the boxes on which the Background Extraction process fits its model of the background. A click places a box on the sky, a drag moves a box, and Ctrl+click on a box or Delete removes it; Generate makes a regular grid. Every change measures the boxes and rejects those on stars as the process will, drawing the boxes that count in the theme's frame color and the rejected ones in a second color. The live preview, the eye beside the image's name in the panel, shows the corrected image as the boxes change; the image changes only with Apply, which runs the process with the boxes placed.
The tool's panel holds the same settings as the process; the process page explains them and the model they build. The boxes are kept with the process when it is saved.
7.10Dynamic PSF
Dynamic PSF measures stars. A click on a star finds the brightest pixel within the search radius, measures the background and the noise around it, and fits a point spread function to it: a Gaussian, a Moffat with a free or a fixed beta, a Lorentzian, a variable shape, or, with Auto, whichever fits best. The fit is circular or elliptical. A star must stand well above its noise or nothing is listed, and the panel says why. A color image has a row per channel.
The panel lists every star with its position, amplitude, background, widths, angle, beta and deviation, and draws each as an ellipse of its FWHM over the image. A click on a listed star selects it; Ctrl+click or Delete removes it; Ctrl+Z and Ctrl+Y undo and redo the list. Under the list the average of the stars of the most frequent function is shown; Make PSF Image makes a new gray image of the average, a kernel for deconvolution. Write to Log, the tool's Apply, writes the list and the average to the Log and ends the session. Dynamic PSF never changes the image: it records no history step.
7.11Clone Stamp
The Clone Stamp paints with pixels copied from another part of the image. Ctrl+click sets the source; a drag paints, each pixel under the brush taking the pixel at the same offset from the source, blended by the brush's softness, its opacity and the image's mask. With Aligned on, the offset of the first stroke is kept for the strokes that follow; off, every stroke copies from the source point again. A stroke reads the image as it was when the stroke began, so it never clones what it painted itself. The overlay shows the brush and, beside it, where it copies from.
The strokes are the tool's: Undo Stroke and Redo Stroke in the panel, or Ctrl+Z and Ctrl+Y. Apply makes them one history step, and Cancel puts every pixel back.
7.12Spot Healing
Spot Healing removes a flaw by painting over it: under the brush the image is rebuilt from a ring of sky just outside it, a smooth background with the grain put back, the stars under the brush kept and stars from around it added when asked; with Directional (trail), from the two sides of the stroke, for trails. The strokes are the tool's (Ctrl+Z and Ctrl+Y, with Shift all of them; Delete drops the last); Apply makes them one history step, and Cancel puts every pixel back.
7.13Text
The Text tool types text on the image. Click where the text should start and type; Enter starts a new line, the arrows, Home, End, Backspace and Delete move and delete. Esc, a click elsewhere, another tool or the panel's Done end the text, which becomes a new text layer above the active layer: one history step, and a plain image becomes a layered image in the same step. A text that is only spaces is dropped.
Each text stays a layer that can be edited: with the tool active, a click on the text of the active text layer puts the caret there, and a drag moves the text. The panel sets the font, Bold, Italic, Underline, Shadow, the color, the size in pixels, the opacity and the alignment, and, in Text and position, the text itself and the position of its top left corner. A text layer's blend mode and its own opacity are in the Layers panel (The Layers Panel and the Layer Menu); Merge Down or Flatten turns a text layer into pixels. The color is a value of the image as given, with no transform, so on a linear image a white text is as bright as the brightest pixel. The settings are also the Text process, which runs without a click.
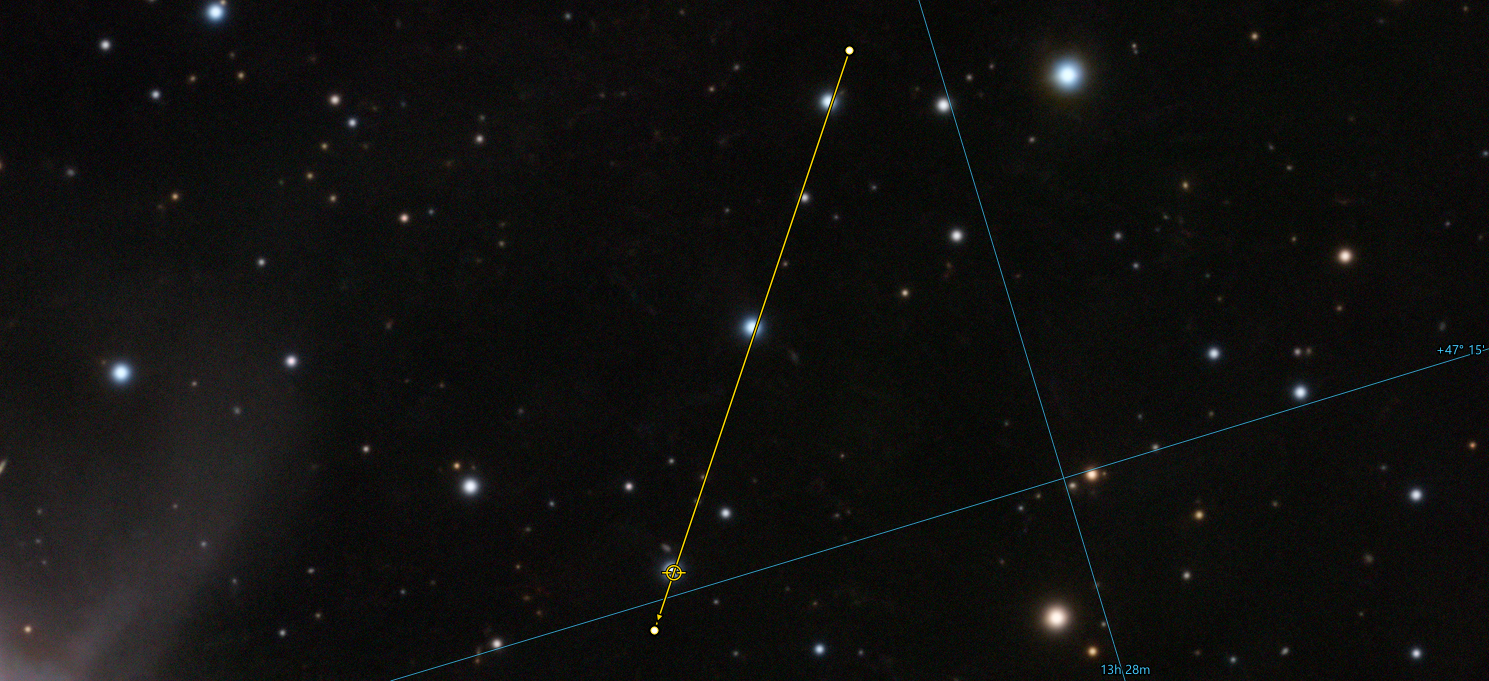
7.14Celestial Grid
The Celestial Grid tool draws lines of right ascension and declination over an image that has a plate solution (Astrometry). Its button draws the grid and opens its panel, where everything the grid shows can be changed. It is not a session: nothing is applied or canceled, no history step is made, the image is not marked as modified, and the left button still drags the view. The grid is an overlay of the view, never part of the pixels, so it is not in a saved, exported or printed image. It stays on every image that has a solution while another tool is chosen, until Show grid in the panel is cleared. The button used again puts the grid away with the panel and makes Pan the tool; choosing another tool instead keeps the grid.
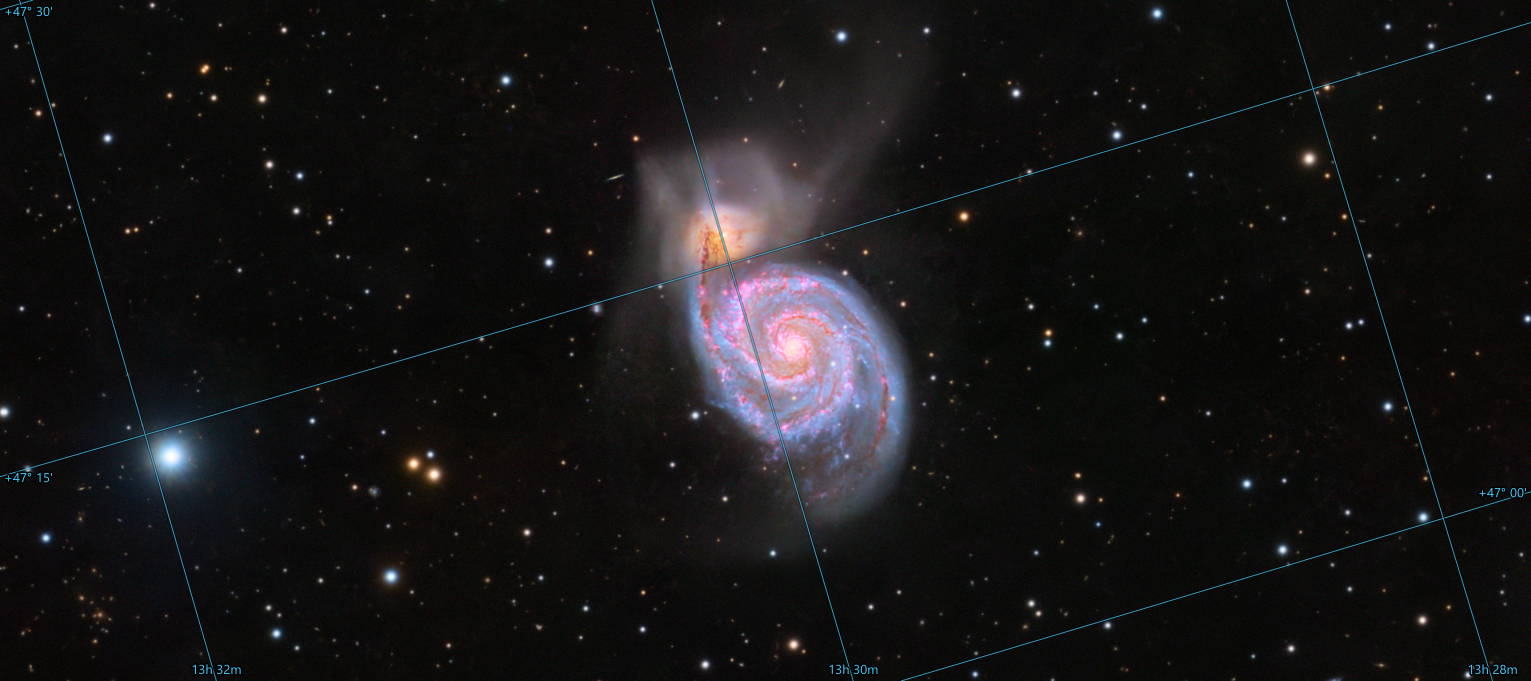
The lines follow the image's solution, including its distortion, so they curve where the sky does. The spacing follows the size of the field: steps of seconds, minutes or hours of right ascension, and of arcseconds, arcminutes or degrees of declination, so a field of a degree has a handful of lines of each. Lines cross 0h and 24h without a gap, and meet at a pole that is in the field. Each line is labeled where it meets the edge of the part of the image in view: right ascension along the bottom, declination along the left. A label has a dark outline so that it reads on any background, never covers another label, and stays inside the view as the image is zoomed and moved.
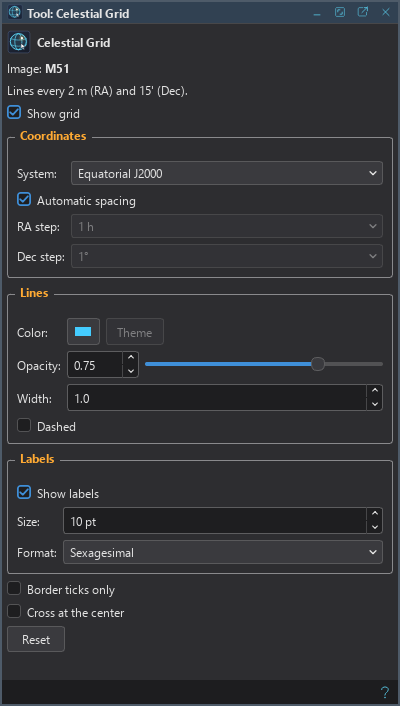
The panel's controls:
- Show grid turns the grid on and off.
- System is Equatorial J2000, Galactic or Ecliptic J2000.
- Automatic spacing chooses the steps from the size of the field; with it off, the right ascension and declination steps are chosen from lists. A step too small for the field is raised so that the lines stay readable, and the panel says so.
- Show lines turns the lines, their ticks and their labels off, to show the names alone.
- Color, Opacity, Width (in screen pixels, whatever the zoom) and Dashed set the lines. By default the color is the theme's overlay color; Theme returns to it.
- Show labels, their Size and Format: sexagesimal (5h 34m 12s and +22° 30' 15") or decimal degrees.
- Border ticks only draws short ticks where the lines meet the edge of the view instead of the lines.
- Cross at the center marks the center of the field.
- Names: the names of stars and deep-sky objects (below).
- Reset puts the settings back as they were first.
7.14.1Names
The grid also names what is in the field: the bright stars, the Messier and Caldwell objects, the NGC and IC objects, and the Sharpless (Sh2), Barnard and van den Bergh objects. A nebula is marked by its dashed outline where the sky data has one, and every other deep-sky object by a dashed circle of its catalog size, or an ellipse at its position angle when the catalog gives its axes; the marks grow and shrink with the image as it is zoomed; an object whose size is not known, or too small to see, is marked by a small reticle. A star's name sits beside the star, with no mark. The labels are in screen pixels, so they read the same at any zoom; they are placed again at every zoom and move of the view, around their marks, inside the view, and never over another label, the grid's included. A name whose label does not fit is left out. A large object whose center is out of view but whose circle reaches into it is named too, its label inside the view near the edge. The names show with or without the lines.
- Show names turns the names on and off. They are on by default.
- Stars, Messier, Caldwell, NGC and IC and Other (Sh2, Barnard, van den Bergh, and objects known by a common name only) choose the kinds. An object that is in two catalogs is shown when either is chosen, by the number of the first chosen in this order: Messier, NGC or IC, Caldwell, Sh2, Barnard, van den Bergh.
- Common names writes the common name under the number: M 31 over Andromeda Galaxy. Off, the numbers alone.
- Automatic limits leaves out the small objects and the faint stars of a wide field, from the part of the sky in view: in a field of a degree every named star and objects of 6 screen pixels or more; in a field of 30 degrees the stars to magnitude 3.5 and objects of 16 pixels or more. Zooming in shows more. Off, Smallest (in screen pixels) and Faintest star (magnitude) set the limits. Messier objects are never left out for their size, and an object whose size is not known counts as one arcminute across.
- Most names is the most names shown at once (50 by default). The brightest stars, the Messier objects and the largest objects with a common name come first.
- Size sets the size of the names, in the program's font. Color is the lines' color by default; Lines returns to it.
The objects of an image's field are looked up once for its solution and kept with it; zooming and moving the view only place the labels again. The names, sizes and outlines are those Finding Chart uses: the sky data next to the program (OpenNGC, the IAU's star names and the Sharpless, Barnard and van den Bergh catalogs; see Credits and Licenses). The stars' magnitudes are the IAU's (V). The names are not translated: they are names of the sky.
The settings are kept between sessions; whether the grid is on is not. The panel's first line says what the image in front has: that it has no plate solution (solve it with Plate Solve), or the spacing in use. A solution made, edited or removed while the tool is on changes the grid at once. The grid is worked out once for an image and kept until its window is closed or its astrometry changes (a new solution, a solution removed, a crop, a rotation or a resampling); zooming, moving the view and changing the style of the lines draw it again from what was kept. The solution of an image is read as the rest of the program reads it: distortion terms that only other programs evaluate (SIP) are not drawn.
7.15Intensity Profile
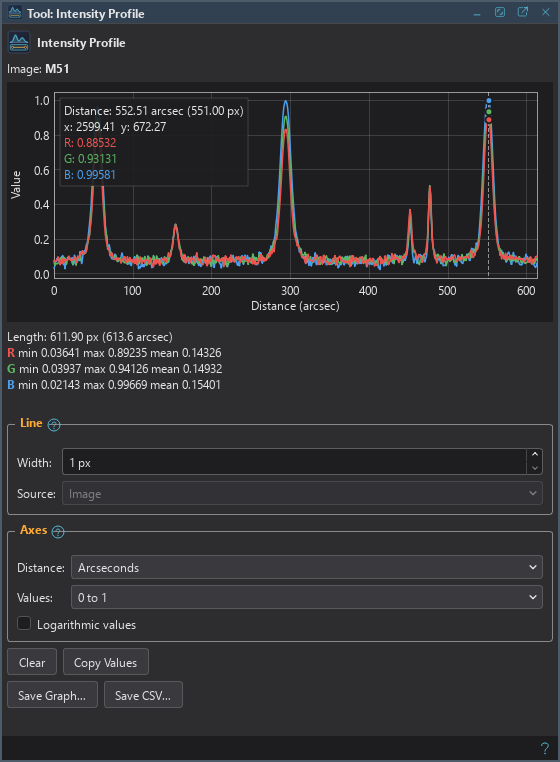
The Intensity Profile tool graphs the pixel values along a line drawn on an image: how a star falls off from its center, where a gradient crosses a frame, how a band of dust changes across a galaxy. Its button opens the panel; press on the image, drag and release to draw the line from the press to the release, and the graph shows the values along it, one curve for each channel. It is not a session: nothing is applied or canceled, no history step is made, and the image is not marked as modified. The line is an overlay of the view, never part of the pixels, so it is not in a saved, exported or printed image.
7.15.1Drawing the Line
- Press, drag, release draws the line from A (the press) to B (the release). A press that does not move draws nothing and leaves the line there was. A new line replaces the old one.
- Dragging an end adjusts the line: a press within a few pixels of a handle takes it, and the other end stays.
- Shift holds the line horizontal, vertical or at 45 degrees, with the length the pointer gave it. It works on a new line and on an end being dragged.
- Esc while dragging puts back the line there was. Delete removes the line of the image, as Clear does.
- An end dragged past the image stops at its edge.
The line stays until another replaces it or it is cleared, and it is kept for each image while the image is open: another image has its own line, and the first one's is there when it comes to the front again. It is drawn at any zoom and position of the view. Choosing the tool shows the lines. Its button used again hides the panel and the lines and makes Pan the tool; the line is kept, and the button shows it again. Choosing another tool directly leaves the lines on the images, and Pan hides them. A line drawn is not unfinished work: only a drag in progress is, and then the button hides the panel and leaves the tool active.
7.15.2The Graph
The graph shows the values along the line, one curve for each channel in the theme's red, green and blue for a color image, and one for a gray image. The horizontal axis is the distance from A along the line in pixels or, for an image with a plate solution, in arcseconds on the sky, which follows the solution's distortion. The vertical axis is the image's own values, 0 to 1, or 16-bit units, or percent, linear or logarithmic. The axes have labels and grid lines. Moving the pointer over the graph reads the nearest sample: a line at its distance, a dot on each curve and a box with the distance, the position (x, y) on the image and the values; a ring on the image marks that position, and both go when the pointer leaves the graph. Below the graph are the length of the line and the minimum, maximum and mean of each channel along it.
The values are those of the image's pixels, never the screen stretch or a preview. For a layered image, Source chooses what is read: Image, the composite the view shows (the default), or Active layer, that layer's own pixels along the same line, wherever the layer is placed and at whatever scale; the graph follows the active layer when another becomes active, and the marker stays on the canvas. The choice is off for an image that is not layered, and a layer that has no pixels (a process layer) has no graph. A change of the pixels (a process, an undo or a redo, a tool's stroke) draws the graph again; a plate solution made or removed turns the arcsecond axis on or off. A change of the image's geometry (a crop, a rotation, a resampling) removes the line, because its points are no longer the same pixels, and an undo does not bring it back.
7.15.3How the Values Are Taken
A sample is taken every pixel of length along the line from A, so a diagonal line has a sample for each pixel of its true length (not one for each column), and the last sample is at B when the length is not a whole number of pixels. Each sample is the bilinear interpolation of the four pixels around its position; a position on a pixel's center gives that pixel's value exactly. Between the edge of the image and the center of its first pixel the edge pixel's value is held. A sample whose position is outside the image is not taken: the curve covers the part of the line on the image, and the distance still counts from A.
A width of more than 1 averages across the line: for a width of 5, five samples a pixel apart on the perpendicular through each point, centered on the line, whatever its direction; those off the image are left out of the mean. A pixel that is not a number (a NaN or infinity) is left out of an interpolation and of a mean, the others standing in; a sample with nothing left is a gap in the curve and counts in no statistic. Only the pixels along the line are read, so the graph follows an end being dragged smoothly on an image of any size.
7.15.4The Panel
- Width is how many pixels across the line are averaged into each value; 1 is the line itself.
- Source is Image or Active layer, for a layered image (see The Graph).
- Distance is Pixels or Arcseconds; the second is available only for an image with a plate solution (Astrometry).
- Values is 0 to 1, 16-bit (the values times 65535) or Percent.
- Logarithmic values draws the vertical axis in decades; only values above 0 are drawn.
- Clear removes the line from the image in front.
- Copy Values puts the samples on the clipboard as CSV: the distance in pixels, in arcseconds when the image has a solution, the position x and y, and a column for each channel (R, G, B, or K for gray), in the chosen units with the unit in the column names (R_16bit, R_pct); a gap is an empty field.
- Save Graph... saves the graph as a PNG or SVG picture, and Save CSV... the samples as a CSV file.
The settings (the width, the axes) are kept between sessions.