
The Workspace
The window, its images, panels, workspaces and projects
The workspace is everything we see in DSPX's main window: the menus and toolbars, the image windows and the tabs that hold them, the panels around them, and the pages of the image area that keep one piece of work apart from another. This chapter describes how the window is made, how we arrange it, and how we keep the whole session, images and all, in a project that comes back as it was.
2.1The Main Window
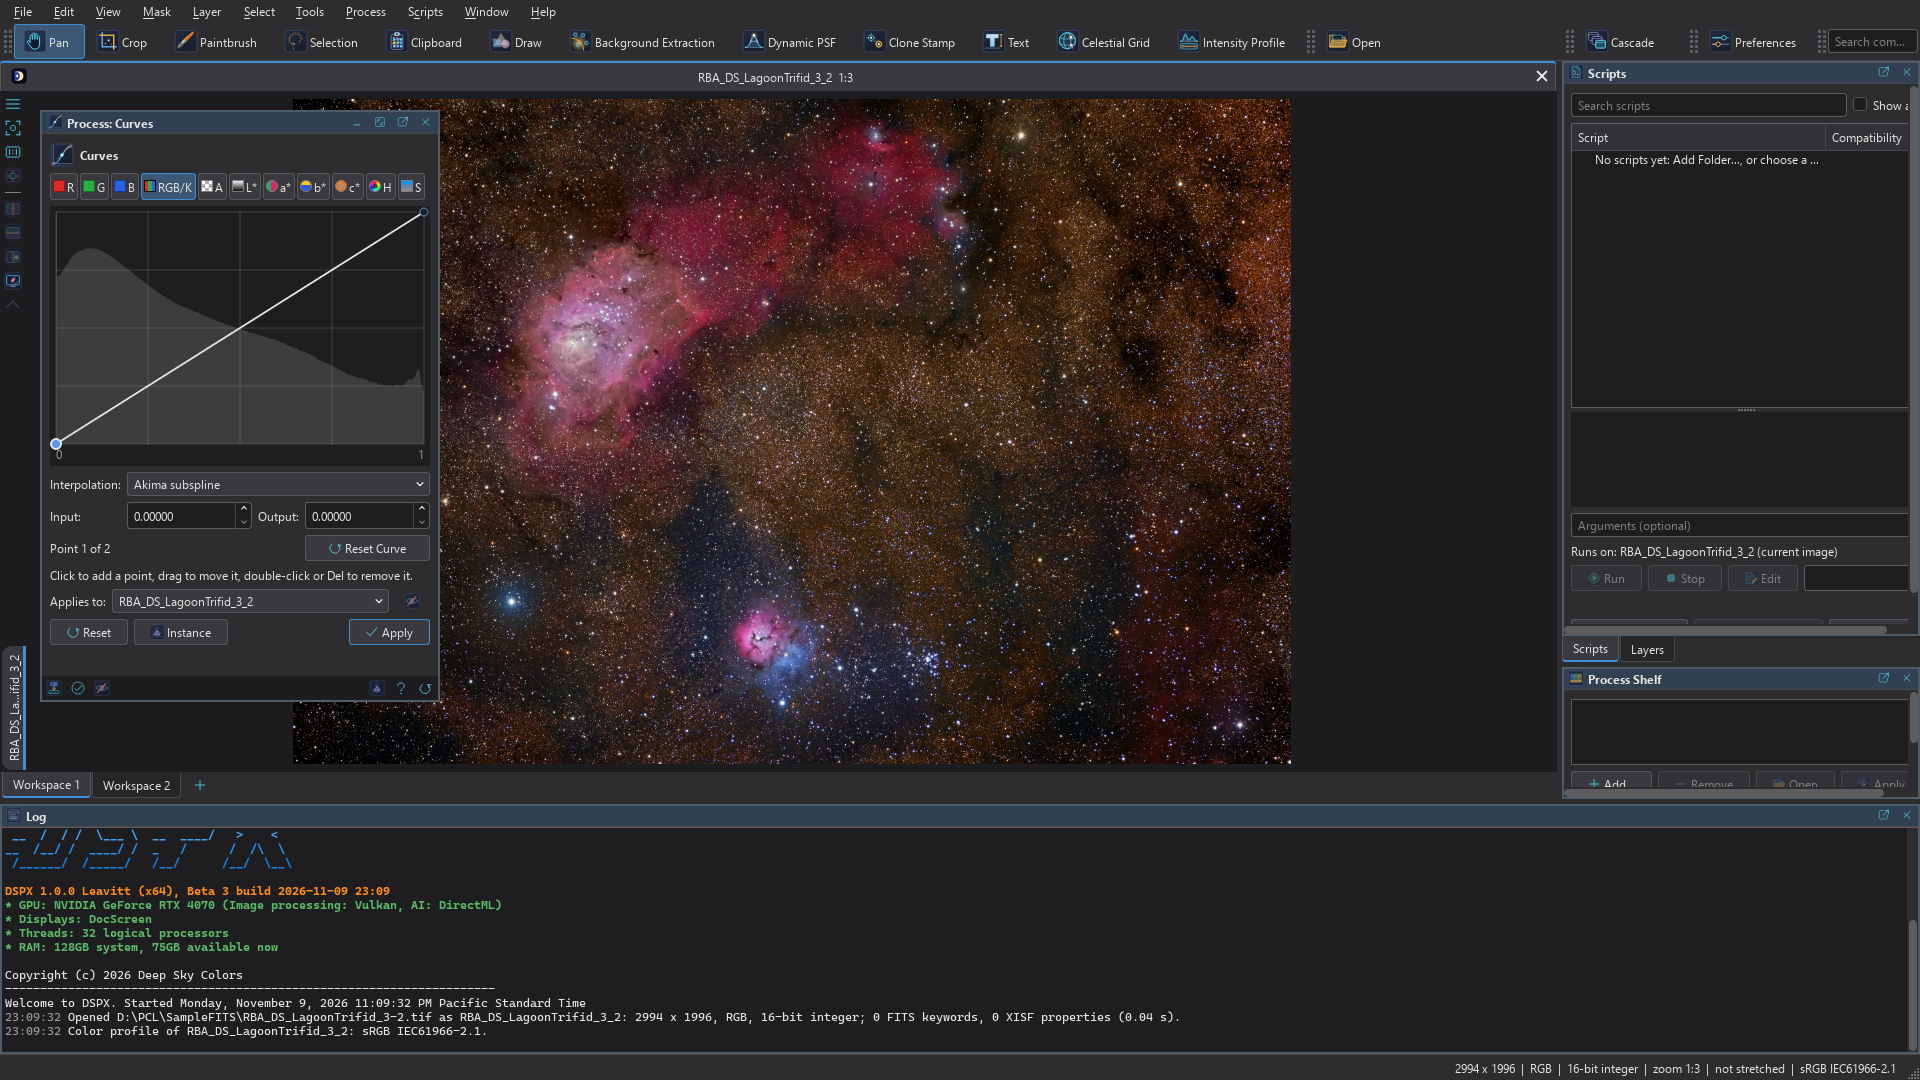
DSPX is one program and one window. The menus run along the top, with the toolbars under them. The image area is in the middle, and the panels, which hold the settings of processes and tools and the information about the image in front, are docked around it. A bar of tabs under the image area switches between workspaces, and the status line at the bottom says what is under the pointer and what we know about the image in front.
2.1.1The Menus
Every command of the program is in a menu, and every menu command can be given a shortcut (Keyboard Preferences). A menu command that does not apply to the image in front, or to the state of the program, is dimmed, and its tooltip says why when it is not obvious.
- : Open, New Pre-processing Session, Open Pre-processing Session, Open Recent, Save, Save As, the project commands (Open Project, Save Project, Save Project As, Close Project), Rename, Close and Exit. Open Recent has a list for each of images, projects, scripts, blueprints, process icons, themes, launchpads and layouts: the last ten of each, newest first, with Clear List to empty one. A file that is gone leaves its list.
- : Undo, Redo, Copy, Paste, Search Commands (the command palette, below) and Preferences. In a text field Copy and Paste handle text as always; otherwise Copy is the Clipboard tool's copy on the image in front, and Paste of an image places it in the middle of the view, or, with no image in front, makes a new image named Clipboard (Clipboard).
- : zoom, the screen stretch, the color management of the view and the image info bar. Seeing the Image covers them.
- : the commands for the mask of the image in front, and : those for its selection. Masks and Selections covers them.
- : the interactive tools, the same as the Tools toolbar (Interactive Tools).
- : Find Process, Recent Processes, All Processes, the processes in their categories, and the commands for saved processes, process icons, blueprints, workflows and guided processing (Processes).
- : the arrangement of the image windows, workspaces, layouts, toolbars and a toggle for each panel (this chapter).
- : the commands for layered images (Layers).
- : the Siril scripts (Scripts and Python).
- : Documentation opens this documentation in the default browser, from the folder next to the program (the command is dimmed when the folder is not there); Setup Assistant... opens the window of the first start again (The First Start); About DSPX shows the version, the license information, the program's web address and the copyright, and its Licenses... button lists the third-party notices.
2.1.2The Toolbars
Nine toolbars have buttons for the commands we use most, and a field to search them, drawn in the theme's colors. They show their icons with the names beside them, icons alone, or names alone (Preferences > Layout). The one exception is the Syrup Bottom Bar, described below, which always shows icons alone.
Tools, File, Window, Settings, Masks and Layers are built-in LaunchPads docked as toolbars: each is still a LaunchPad, serving as a toolbar. They look and sit as the toolbars always did, and we can change them as any LaunchPad (see LaunchPads): add, remove and reorder their buttons, give them a look of their own, float them or dock them elsewhere. Search, the Syrup Top Bar, the Syrup Bottom Bar and the Image Picker are fixed toolbars. Their controls can also be placed on any LaunchPad, floating or docked, as live controls (LaunchPads: Controls).
- Tools: Pan, which is the default, and the interactive tools. Shown at start.
- File: Open, New Pre-processing Session, Save, Save As and Close. Shown at start.
- Window: Cascade, Tile, Tabs, Arrange Icons and LaunchPads. Shown at start.
- Settings: Preferences. Shown at start.
- Search: one field, "Search commands (Ctrl+K)", that opens the command palette (below). Shown at start.
- Masks: remove, attach, enable, invert and show the mask, and turn a selection into a mask or the reverse. Hidden at start.
- Layers: new, duplicate and delete a layer, merge down, flatten and properties. Hidden at start.
- Syrup Top Bar: Open, Undo and Redo (the same commands as in the menus), then three buttons that open a menu with one click: Image Processing, Tools and Scripts. Image Processing and Tools begin with All Processes, the same list as , and then hold the usual processes by group: stretching, color calibration, filters, stars, geometry, channels and composition in Image Processing; plate solving, the finding chart, statistics, Dynamic PSF, color profiles and the FITS header in Tools. A choice opens that process or picks that tool. Scripts opens the Scripts menu itself, so it always has the same items. The Syrup Top Bar works with every theme, and it is hidden at start: shows it.
- Syrup Bottom Bar: a row of its own at the bottom of the window, for what we reach for while we look at an image: the display range, the curve the screen shows the image through, the chain that links the channels of the screen stretch, a negative and a false-color view, the Celestial Grid and Intensity Profile tools, the zoom, and the rotations and flips. It is described below. It is hidden at start: shows it.
2.1.3The Syrup Bottom Bar
The Syrup Bottom Bar sits under the images, in a row of its own, and it works with every theme. Its buttons are icons whatever the Buttons setting of the Layout page says (two stacked rows of sliders and choices and a row of buttons read better without names; each button has a tip). From the left:
- Display range: two sliders, the upper for the value shown as white and the lower for the value shown as black, with their numbers (0 to 255). Min/Max takes the lowest and the highest value of the picture on the screen; User is where the sliders are, and moving a slider selects it; the sliders start from the last Min/Max values, so the picture does not jump. A window starts with the whole scale (User, 0 to 255), which changes nothing: each value is shown as it is, as PixInsight shows an image with no screen stretch. Min/Max fills the scale with a picture that does not use it all. While the Syrup Bottom Bar is hidden, every window shows its picture as it is.
- Curve: Linear, Logarithm, Square root, Squared, Asinh, Auto-stretch and Histogram equalization. Choosing a curve shows the image through it and turns the screen stretch off; Auto-stretch computes the screen stretch (Ctrl+A) and shows it, and Linear shows the image as it is.
- The chain: links or unlinks the channels of the screen stretch, as does.
- Negative and False color: the screen shows the negative of the image, or its brightness in the colors of a rainbow from dark blue through green and yellow to red. Both can be on at once.
- The globe and the profile: start the Celestial Grid tool and the Intensity Profile tool, as their buttons in the Tools toolbar do, and put them away when pressed again.
- Zoom: zoom out, zoom in, fit in the window and 1:1.
- Rotate and flip: 90 degrees clockwise, 90 degrees counterclockwise, flip vertically, flip horizontally. They are the commands of , so each is one step in the image's history.
The range, the curve, Negative and False color change only what the screen shows: no pixel of the image changes, nothing goes in the history, and the image is not marked as modified. They are the look of that image's window, kept while it is open, and they act on the picture as the screen stretch and the color management have made it (so with a dark linear image, we turn the screen stretch on first). Tools, exports and the image's statistics see the image as it is.
Each toolbar has a grip at its left; we drag it to move the toolbar anywhere along the top of the window (the Syrup Bottom Bar, along the bottom), or let it float. A built-in LaunchPad docked on the left or the right lays its buttons out in a column, as a toolbar does. shows or hides each one shown as a toolbar (a built-in LaunchPad floating as a window is in ), and Reset Toolbar Positions puts them back along the top, docking again a built-in LaunchPad that floats. Which ones show when DSPX starts is a setting of the Layout page of the Preferences.
2.1.4The Command Palette
The command palette finds a process, a tool, a script or a menu command from a few letters of its name, and runs it. We open it with Ctrl+K (Cmd+K on macOS; ), by clicking the field of the Search toolbar, or with (Ctrl+Shift+F), which opens it already narrowed to the processes. It is a box over the top of the main window, the same on every system. The field of the toolbar and the box are two faces of one thing: the toolbar's field holds no text; clicking it, or typing a key in it, opens the box and the typing goes there. If the keyboard goes anywhere else the box closes, so nothing stays half open.
We type, and the results narrow under the field, grouped as Processes, Tools, Scripts and Commands. A group header and a short line under each name say what it is: a process's description, a command's menu (Edit), a script's group. A command with a shortcut shows it at the right. Up and Down move the highlight, Enter or a click runs it, Esc or a click outside closes the box. The field starts empty.
- What matches: three things, and nothing else. The start of a word:
curfinds Curves,stretchfinds Hyperbolic Stretch. Words typed with a space, each starting a word, in order:clone stfinds Clone Stamp. One initial per word, at least two:bnfinds Background Neutralization. Letters taken from the middle of a word, or from several words, do not match (warfinds Warp Speed, not Window Arrange Icons). Capitals and accents do not matter (extraccionfinds Extracción del fondo). The whole name ranks first, then the start of the name, then the start of a later word, then initials; a short name ranks before a long one. A process is found by its name in the language of the program, by its English name, and by its id and the other names it is known by (HistogramTransformation finds Histogram); when the other name is what matched, it is shown under the process. For Chinese and Japanese, any run of the characters of a name finds it, and so does its English name. - Recent choices: an empty field lists the last twelve things we ran, the latest first. They are kept for the next session, per user, and nothing else is listed until we type.
- What is searched: a row of check boxes under the field: Processes and tools and Scripts, on at the start, and Commands and Help, off at the start. Help searches this documentation: its chapters, sections and process pages by title and index words, each with where it is; Enter opens the page at that section in the browser. A choice made here is kept for the next time. Find Process... opens the box for the processes alone; checking the other boxes widens it.
What Enter does is what choosing the same thing in the menu does, and nothing more:
- A process: opens its panel, as a double click in the process list does. It does not apply it.
- A tool: makes it the active tool.
- A script: runs it as the Scripts menu does: the question about a script not yet trusted, the parameter window and the license check are the same. The scripts of the Scripts panel are listed, the DSPX Scripts group included.
- A menu command: runs it. A command that is dimmed in its menu, because it does not apply now, is listed dimmed; the box says "Not available right now." and Enter does nothing.
The Search toolbar can be hidden like any other (, or the Layout page of the Preferences); Ctrl+K opens the box all the same. Its key can be changed in the Keyboard page like any other. Preferences pages and open images are not searched yet.
2.1.5The Status Line
The status line has two parts. On the left, the pixel under the pointer: its coordinates and its sample values. On the right, what we know about the image in front, separated by bars: its size, its channels and sample type, the number of layers of a layered image, the zoom, whether the screen stretch is on and linked, the image's ICC profile and whether the view manages its colors, the mask (and whether it is disabled, inverted or hidden), the selection, and the tool whose session is open on the image. A long operation, such as saving a project, shows a progress bar here with a Cancel button.
2.1.6The Canvas
The area behind the image windows shows the theme's wallpaper, or nothing. A double click on the canvas where no image window is opens the Open dialog.
2.2Image Windows
Each open image has a window of its own in the image area. The title shows the image's name, with a star when it has changes that are not saved, and the zoom. Inside the window is the view: the image, the screen stretch, the mask's overlay, the selection and whatever the active tool draws, with the row of preview controls over the top (Previewing a Process). Several images can be open at once, as many as the memory allows.
2.2.1Cascade, Tile and Tabs
The menu and the Window toolbar arrange the image windows in one of three ways.
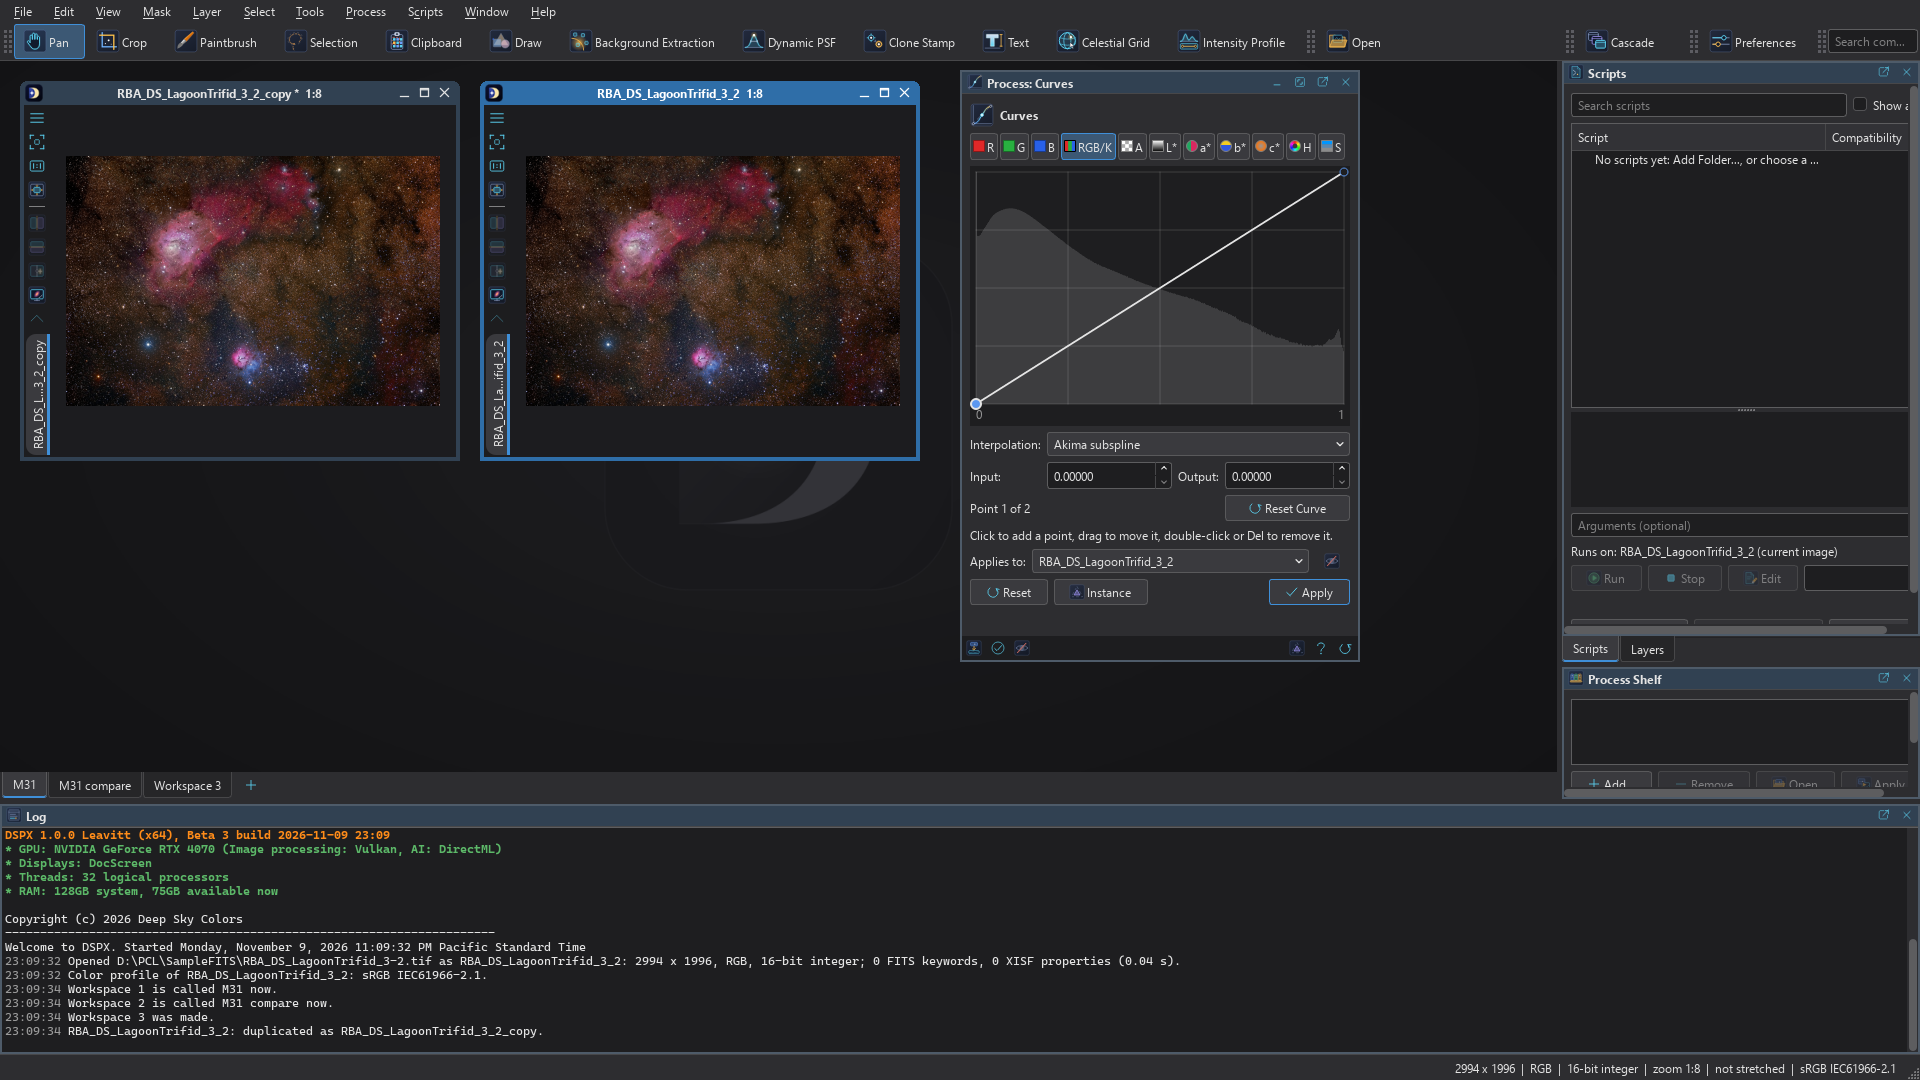
Cascade: The default. The windows float, each its own size, and the open ones are put in a cascade when we choose it, in the order they were opened: the first at the workspace's corner, behind, each next one a step down and to the right, fitted to its image, and the last opened in front. The step is large enough for every window's title bar to show. A new window opens at the largest zoom that shows the whole image (never above 1:1), the window of that size, in the cascade; it starts again at the corner when the workspace is empty.
Tile: The windows are tiled side by side over the area. Tile and Cascade are the two free modes: the windows float, process icons and the wallpaper are shown, and Tile in either mode tiles the windows on request.
Tabs: One image at a time, with a tab for each image along the top of the image area. We drag a tab to put the images in another order.
The choice is kept: DSPX starts in the mode it was left in, and each workspace remembers its own mode (Workspaces). Choosing Tabs while images are minimized brings them back first.
2.2.2Zoom and Pan
The wheel zooms about the pointer. Dragging pans, with the left button when no tool is using it, with the right or the middle button always, or with the left button while the Space bar is held, which works even while a tool is active. The View menu has Zoom In, Zoom Out, Fit in Window, 1:1 and Fit Window to Image, which sizes a floating window to its image. The zoom is shown in the window's title and in the status line.
2.2.3The Pixel Under the Pointer
As the pointer moves over the image, the left of the status line gives the pixel's coordinates and the value of each channel, in the units of the image's sample type. A color-managed view reads the pixel's data, not the color shown on screen.
2.2.4The Image's Own Menu
Right-clicking an image's tab or the title bar of its window opens the window's menu. Besides the usual commands of a window it has Move to Workspace, and the top row of the view has an image menu with shortcuts to common changes: Mode converts between RGB and grayscale and among the sample types, Rotation turns or flips the image (the astrometric solution follows), Extract makes a gray image of the luminance or of a channel, Invert inverts the image, and Duplicate makes a copy of the image, with its layers and mask, as a new image. Each one is a process of its own run on the image, and one history step.
2.2.5Minimized Images
In Cascade and Tile, minimizing an image window hides the window and puts an icon where it was: a small picture of the image as it was shown, with its name under it, in the theme's title bar colors. The icons lie on the workspace and are dragged anywhere. A double click on one, or Enter or Space with it selected, restores the window to the size and place it had, in front. Closing the image removes its icon. Choosing Tabs restores every minimized image, since tabs have no icons.
2.2.6Who Holds an Image
While a tool, a process, a script, a guided run or a workflow is working on an image, the image is held, and anything that would also change it is refused with a message that names who holds it: "The image is in use by the Curves process", "M8 is in use by the script Stars_Only", and so on, followed by what to do: apply or cancel the tool's session, or wait for the process to end. When a tool holds the image, the message has a button that closes the tool for us (a session with changes asks first).
2.3Workspaces
An image area can hold a lot of windows. A workspace is a page of it: its own images, in their own order, with their own Tabs or Tile arrangement, their minimized icons and their process icons, and its own arrangement of the panels. We use a workspace for one target, one stage of the work, or one comparison, and switch between them without closing anything. The program starts with two, and we can have up to 16.
2.3.1The Bar
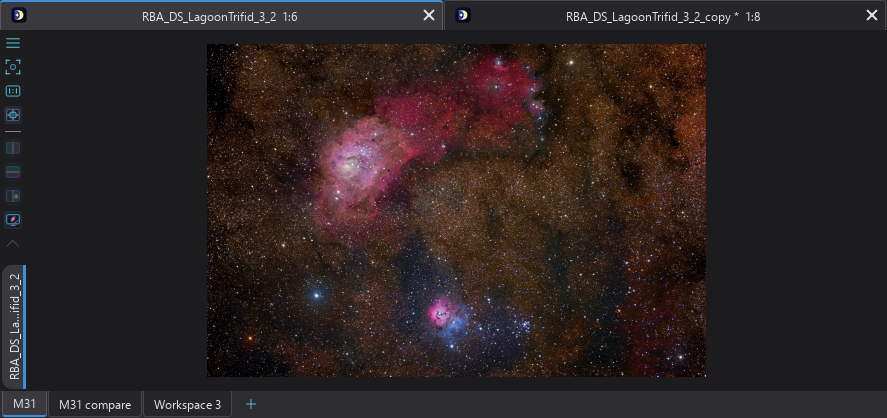
The workspace bar is always shown under the image area, even with a single workspace, so that + is there to make another. It has a tab for each workspace, at the bottom as PixInsight has them, and the image tabs stay at the top in Tabs mode. A click on a tab shows that workspace, a drag reorders the tabs, a double click renames, and the tab's tooltip says how many images it has. The right-click menu of a tab has New Workspace, Rename..., Delete, Move Left and Move Right; the menu of the bar off the tabs has New Workspace.
2.3.2The Window > Workspaces Menu
lists the workspaces, the one shown checked, then:
- Next Workspace and Previous Workspace: Ctrl+PgDn and Ctrl+PgUp. They go round from the last to the first.
- New Workspace, Rename Workspace..., Delete Workspace, Move Workspace Left and Move Workspace Right.
- Move Image To: the image in front goes to one of the workspaces, its own shown checked and dimmed, or to a new workspace.
Alt+1 to Alt+9 show the first nine workspaces (the commands are named Go to Workspace 1 to 9 in the keyboard preferences). Every one of these keys can be changed.
2.3.3Names, Limits and Deleting
A workspace is called Workspace 1, Workspace 2 and so on until we rename it. A name has at most 32 characters, an empty name puts the default back, and a name another workspace shows is refused, whatever its case, so that Move Image To is never ambiguous. At 16 workspaces, + and New Workspace are dimmed and their tooltip says why; the last workspace cannot be deleted.
Deleting a workspace that has images asks what to do with them: Move to its neighbor, named in the box, (the default; the neighbor is the workspace to its left, or to its right for the first), Close Them (each image with unsaved changes asks as closing it does, and the workspace stays if one remains open), or Cancel. Its process icons go to the neighbor as well, renamed there if a name is taken. Deleting the workspace shown shows the one to its left. Closing the last image of a workspace leaves the workspace, empty.
2.3.4What a Workspace Keeps
The documents are shared, but each window belongs to exactly one workspace, which also keeps:
- the order of its images and the one in front: switching makes that image the image in front, and everything that follows the image in front follows it (History, Layers, the targets of the process panels, the live preview, Screen Stretch, the status line);
- its arrangement, Tabs or Tile, and its minimized icons;
- its process icons;
- its arrangement of the panels: which are shown and where, docked, tabbed or floating. A new workspace starts with the panels as the workspace shown has them, so that making one changes nothing but the image area;
- the layout it was made from, checked in while it is shown.
Tile, Tabs, Ctrl+Tab and minimizing act within the workspace shown. Undo, Redo, Close and Save act on its image in front; no keyboard command acts on another workspace's images. An empty workspace has no image in front, as when nothing is open.
2.3.5Moving Images Between Workspaces
Move Image To, and Move to Workspace in the window's menu, move the window itself, not a copy: the same view with its zoom and place, and any tool's viewport. We stay in the workspace we are in, and the image is in front of its new workspace. Into a tiled workspace the windows are tiled again. A minimized image moved to a workspace in Tabs is restored first; between two tiled workspaces its icon goes with it. An image held by a tool or a process can be moved.
In Tabs, an image's tab dragged up or down out of the row of image tabs turns into a drag of the image, with a small picture of it under the pointer. Dropped on a workspace's tab in the bar, the image moves there. Along the image tabs a drag still reorders them, and hovering over a workspace tab does not switch to it.
2.3.6Where New Images Go
- Files we open or drop, and a double click on the empty canvas: the workspace shown.
- An image that a process, a script or the guide makes: the workspace of the image it was made from, so that a run started before a switch does not land in the wrong place.
- The masters of a pre-processing run, and the results of a process on files: the workspace that was shown when the run started.
- When the image it came from has been closed, or its workspace deleted: the workspace shown.
2.3.7Lists of Images and Tools in Another Workspace
Where a list offers the open images (the Applies to list of a process panel, Select Mask, New Layer from Image, Add Mask from Image), they are grouped by workspace, in the order of the bar, under headings that cannot be chosen, when more than one workspace has images. Choosing one never switches workspace: the process works on the image where it is, and a mask may be in another workspace.
A tool's session stays on its image. When that image is in a workspace that is not shown, the Tool panel says "Working on M42 in Workspace 2", and the name is a link that brings the image back. The same holds for the guided run: what it previews or shows is brought to the front together with its workspace.
2.3.8Process and Tool Windows in a Workspace
With Each process and tool in its own window on (Preferences > Layout), every process and every tool has a window of its own, and each of those windows belongs to one workspace, the workspace it was opened in or moved to. The other panels, Log, History, Layers, Scripts, Guide and Screen Stretch, belong to the program and are not tied to a workspace; the Process Shelf is shared by all of them too.
- Switching shows only that workspace's windows. The others are hidden, not closed, so their settings and state stay. Each comes back where it was, floating or docked as we left it.
- Closing a window removes it from its workspace.
- There is one window per process, so a process that is already open in another workspace is brought to the workspace shown when we open it again, not copied.
- Move to Workspace in the window's icon menu (right-click the icon in its title bar) moves it, and Move to New Workspace moves it to a workspace made for it. It is hidden at once when it leaves the workspace shown.
- A tool whose window is in another workspace stays the active tool, and its session goes on; its window is back when its workspace is shown.
- Deleting a workspace moves its windows, with its images, to the neighbor.
With the option off, nothing changes: the sets are kept and come back when it is switched on again.
2.3.9What Is Kept Between Sessions
The list of workspaces, their names, modes, panel arrangements and process windows, and the one that was shown, come back the next time DSPX starts. The arrangement of the panels is applied only when Start with is Where I left off (Layouts); when it names a layout, each workspace starts in the Default layout. No image is reopened by this: that is what a project is for. The Preferences page General, with Reset Page, puts back two workspaces with their default names; the images of the others are moved to the second, none is closed.
2.4Panels
The panels are the windows of settings and information that dock around the image area. There is one of each, whatever the number of workspaces; each workspace arranges them as it likes. Each is toggled in .
| Panel | What it holds |
|---|---|
| Process | The panel of the process we opened: its settings, Reset, Instance and Apply (The Process Panel). |
| Tool | The panel of the active tool. It shares the Process panel's place (Interactive Tools). |
| Scripts | The Siril scripts, each with its compatibility mark (Scripts and Python). |
| Process Shelf | Saved processes and PixInsight process icons, kept at hand (Saved Processes and the Process Shelf). |
| Screen Stretch | The histogram and the controls of the image's screen stretch (Screen Stretch). |
| Process Explorer | A way into the processes by what we want to do, and a list of the AI tools (The Process Explorer). It is hidden until we choose . |
| History | The steps of the image in front (Undo, Redo and History). |
| Layers | The layers of a layered image (Layers). |
| Log | What the program says (The Log). |
| Guide | The questions and steps of a guided run. It appears with a guided run and goes with it, in every workspace (Guided Processing). |
2.4.1The Process Explorer
The Process Explorer is for the moment when we know what we want to do but not which process does it. It is in , and it is a panel like the others: we dock it, float it or tab it, and a layout we save keeps it. None of the built-in layouts shows it, so nothing changes until we ask for it.
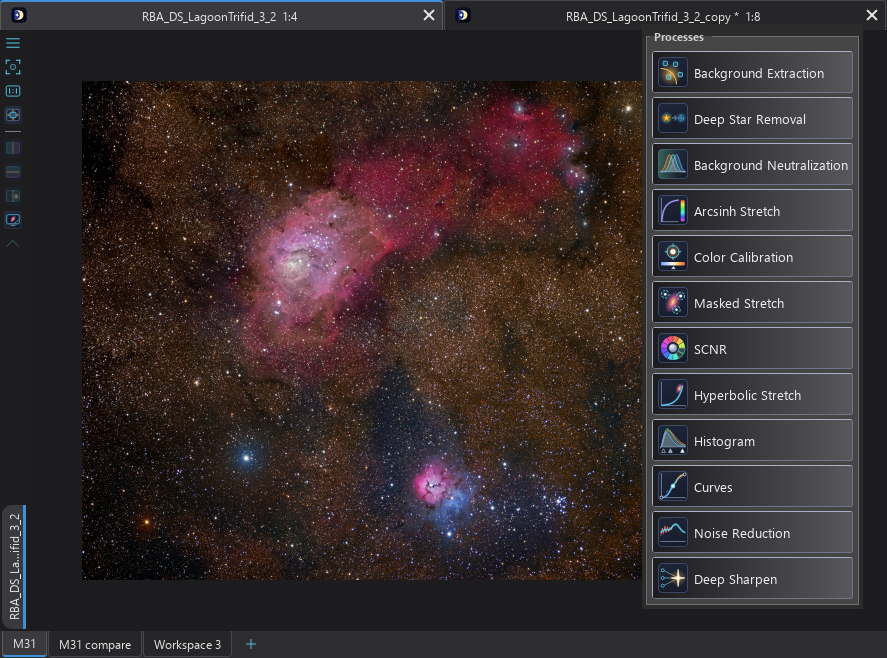
The panel has two parts. Under Processing there is a search box, and under it a list of boxes, one for each category, with its icon, its name and a line about the tools in it. Which categories it lists is a choice of the theme: the tasks (Browse by task, the default), the categories of the Process menu (Browse by category) or categories of our own (see Browsing by Category and by Our Own Categories). Under AI Tools there is a box for each process that runs an AI model or an AI program, with that process's own icon.
How it looks is the theme's too: the size and weight of the headers, and for every box the icon's size (or none), a group box or none, and the font size, weight and color of the name and of the line under it (Appearance and Preferences, The Process Explorer).
Browsing by Task
Pointing at a task box opens a popup beside it, to its right, or to its left when the window has no room at the right. The popup has the task's name as its header, the task's line under it, and a box for each process of the task: the process's icon, its name, and a line about what it does. A click on a process opens it, exactly as does: its panel appears and nothing is applied. The popup stays while the pointer is on it or on the task box, and goes when the pointer is on neither. Clicking a task box shows its popup at once. With the keyboard, Tab moves from one task box to the next and shows the popup for the box in focus; Enter, or the Right arrow, moves into the popup, the Up and Down arrows move between its boxes, Enter opens the process and Escape or the Left arrow goes back to the task box.
| Task | What is in it |
|---|---|
| Calibrate | Pre-processing and astrometry: Superbias, Calibration, Cosmetic Correction, Defect Map, Debayer, Split CFA, Merge CFA, Registration, Local Normalization, Integration, Drizzle, Autocrop, Comet Alignment, Canon Banding Reduction, RGB Combination, Plate Solve, Finding Chart, Photometric Glow Subtraction, the two Spectrophotometric calibrations, FITS Header, Background Extraction and GraXpert Background Extraction, Linear Fit. |
| Tone | Intensity, stretch and color: Histogram, Curves, Hyperbolic, Arcsinh, Masked and Adaptive Stretch, Exponential Transformation, Binarize, Invert, Background Neutralization, Color Calibration, Spectrophotometric Color Calibration, Catalog Star Color, Saturation, SCNR, Convert Color, the two color profile processes, Linear Fit, Statistics. |
| Layers | The Layers panel, PixelMath, and the processes that combine several images: Channel Combination, LRGB Combination, RGB Combination, HDR Composition, Star Trails Blending, Channel Extraction, the alpha channel processes, Text. |
| Restore | Deconvolution, GraXpert Deconvolution, Wavelets, Noise Reduction, Multiscale TGV Denoise, GraXpert Denoise, Canon Banding Reduction, Blur, Noise Generator. |
| Finish | Sharpening and the last touches: Deep Sharpen, Unsharp Mask, Multiscale, Texture, Flow and Filament Sharpen, Clarity, HDR Compression, Dark Structures, Saturation. |
| Stars and Masks | Deep Star Removal, StarNet2, Deep Star Mask, Color Mask, Range Mask, Deep Morphology, Photometric Glow Subtraction and the alpha channel processes. |
| Geometry | Crop, Dynamic Astro Crop, Rotate, Resample, Integer Resample, Autocrop, Mosaic, Surface Align. |
| All tools | Every process, in alphabetical order. A process that is in no other task is here. |
A process may be in several tasks; Linear Fit is in Calibrate and Tone. The products of RC Astro's tool, when we have allowed it (Preferences), are listed in the task their menu category belongs to and under AI Tools.
Browsing by Category and by Our Own Categories
With Browse by category the boxes are the categories of the menu, in the order the menu has them: Astrometry, Background, Channel Management, Color, and so on. A popup lists the processes that the menu lists in that category, by name; the pre-processing steps are in the order of a night, as in the menu. Every process is in exactly one box. Processes with no category are in Other processes, at the end. The menu's own list is not a box here: the search finds every process, and is still in the menu.
With Custom the boxes are categories we wrote in the theme: a name, an icon, a line and the processes, in the order we want them. The theme editor has a box for them (Panels and title bars, Process Explorer), and the format, with an example, is in Appearance and Preferences. A process that a custom category names and the program does not have is left out, and the Log says so. A custom list with no usable category shows the tasks.
Only one list is shown at a time. The panel changes when we change the theme or the choice, also while the theme editor is open.
Searching
Typing in the search box replaces the two lists with the processes and tools that match, as the same kind of boxes, best match first. The search looks at names, as the command palette does (a few letters of the start of each word are enough), and at what the processes say they do. Enter opens the first match, the Down arrow moves to the list, and clearing the box brings the tasks back.
2.4.2Docking and Floating
Every panel docks on the left or the right of the window, because the panels are tall and narrow; only the Log may also dock at the top or the bottom. Several panels in one place are tabbed. We drag a panel by its title to move it, drop it on another panel to tab it, or drop it outside the window to float it. A floating panel is a window of its own, kept inside its screen.
A layout can also make every panel a floating window: with Dock panels at the sides off (Preferences, page General) the left and right of the window are no longer places to dock. The panels docked there float where they are, at their size, and a floating panel has no Dock button. The Log alone can still dock at the top or the bottom. Turned on again, the panels stay floating until we dock them. The choice belongs to the layout: it is saved with a layout we save, and applying a layout puts back its own. The built-in layouts, and layouts saved before the option existed, have it on.
2.4.3Sections
The groups of settings in a process panel are collapsible sections. A click anywhere on a section's title bar collapses or expands it; the chevron before the title says which way it is, down for expanded and right for collapsed. Tab reaches a title and Space or Enter does the same. The state we leave a section in is remembered for each process and group, for the panels opened later and the next start. A section we never touched follows its default, and some sections of the long panels (Calibration, Integration, Registration, the wavelet tools) start collapsed. A setting the guide asks us to check opens its section.
closes the windows of the processes. The tools, the Log, History and the Process Shelf stay. A process with a live preview on an image asks first, because closing its window ends the preview.
2.4.4The Size of a Panel
The content of a panel starts at the top and follows on directly, with the buttons right after the settings. A dock taller than the panel leaves the room under it empty, and a panel with a part that takes the room, such as a list, a histogram or a curve, gives the room to that part. A dock shorter than the panel scrolls its settings with the buttons kept in view.
The first time a panel is undocked its window takes the size that shows all of it, without a scroll bar and within the screen. Afterwards the window's place and size are remembered while it floats, and used the next time it floats; the Process and Tool panels remember a size for each process and tool. The window follows its content: collapse a section, or let a label wrap onto another line, and the height follows; a window we made shorter ourselves keeps our size but grows by what the content gained. A floating Process or Tool panel is never narrower than 400 pixels, and never taller than its content needs, even when it holds a list or table that could take room: it can be made shorter, not taller, and a section that closes shrinks the window while the list keeps its height. In a panel with a splitter between its inputs, its settings and its results, a handle we move stays where we put it: a section that opens or closes changes the height of the settings, and of the window, and nothing else. forgets the remembered sizes and places of the floating panels. The Default fit button on the title bar of a floating panel, between Minimize and the float button, does the same for that panel alone: it forgets the size and place remembered for it and fits it again where it is. A process or tool panel also has Default fit in the menu of its title bar (right-click the bar).
2.4.5One Window per Process and Tool
By default there is one Process window and one Tool window, and whatever we open takes the place of the one before. With Each process and tool in its own window every process and tool opens in a window of its own, docked or floating, and the others stay as they are; opening a process that already has a window brings that window to the front. With Display process system toolbar a thin bar along the bottom of these panels offers a drag handle to apply the settings by dropping them on an image, and Apply, Instance, Help and Reset (Apply and Cancel for a tool). Both options and Hide classic buttons are described with the Layout page (Preferences); a layout holds them, so applying a layout puts them back.
2.5Layouts
A layout is a named arrangement of the panels and toolbars, with the size and place of the window.
2.5.1The Session
The arrangement is saved when DSPX closes and put back when it starts, unless Start with in the Preferences (page Layout) names a layout, in which case DSPX starts with that layout instead. Where I left off, the default, puts the session back. A window that would be off every screen after a change, a monitor unplugged or another resolution or scaling, is brought back onto one: the main window, the floating panels and the floating toolbars.
2.5.2The Built-In Layouts
Seven layouts are built in. Pre-processing and Processing are arranged by the program, so they fit any screen; every panel is docked again from scratch and the Layers panel shares the History's place. Default, Syrup, Psycho'n, Fix Inside and PhotonChop are arrangements saved as they are.
Only Psycho'n shows the Process Explorer; does in the others, and a layout of our own that we save with the Explorer shown shows it again.
- Default: the Scripts and Layers panels tabbed together on the right, with the shelf under them, and the Log at the bottom. The Process and Tool panels, the History and the Screen Stretch are hidden: each process and tool opens in its own window. The Tools, File, Window, Settings and Search toolbars show along the top, with icon and name, and the image windows are cascaded.
- Pre-processing: for looking at masters after a session's run. The Log, where the sessions report, is taller, the History is under the process panels, and the shelf is hidden.
- Processing: the Process, Tool and Scripts panels on the right, wider; the shelf and the History on the left; a short Log.
- Syrup: the Tools bar on the left; one column on the right with the Log and Layers tabbed together, the Scripts and the History under them, and the Screen Stretch at the bottom; the Process and Tool panels are hidden, without the process system toolbar. The Tools bar shows on the left, with icons only, and the Window, Settings, Search, Syrup Top and Bottom Bars show at start. It goes with the Syrup (Dark) look: a first start with that look opens in it.
- Psycho'n: the Process Explorer on the left; the Process and Tool panels tabbed together on the right, with the Layers, Log and Scripts panels; the shelf, the History and the Screen Stretch hidden. The Tools, File, Window, Settings and Search toolbars show along the top, with icons only. It goes with the Psycho'n (Dark) look: a first start with that look opens in it.
- Fix Inside: the arrangement of the Fix Inside look: panels on the left side only, image windows cascaded, icons only, and the Tools, File, Window, Settings, Search, Masks and Image Picker toolbars shown at start. It goes with the Fix Inside (Light) look: a first start with that look opens in it.
- PhotonChop: the Layers, Tool and Scripts panels tabbed together on the right, with the History under them, and the Log at the bottom; the shelf, the Screen Stretch and the Process panel hidden, without the process system toolbar. It comes with two LaunchPads of its own: PhotonPad, the tools in two columns, docked on the left, and Tool Adjustments, the Tool Options of the tool in use, in a row of its own under the toolbars. The File, Window, Layers, Search and Settings toolbars show at start, with icons only, and the image windows are tiled. It goes with the PhotonChop (Dark) look: a first start with that look opens in it.
The PhotonChop layout's two LaunchPads ship with DSPX. Applying the layout adds them to our LaunchPads when they are not there (again if we deleted them); once there, they are ours: an edit we make to them stays, and the layout docks them as they are.
2.5.3Our Own Layouts
lists the built-in layouts, then ours in alphabetical order, the one in use checked. Choosing one arranges the workspace shown.
- Save Layout As...: saves the window as it is now under a name. A name of a built-in layout, or an empty one, is refused; the name of one of ours replaces it, after asking.
- Rename Layout... and Delete Layout: act on our layout in use. A built-in layout cannot be renamed or deleted.
- Export Layout... and Import Layout...: one of our layouts as a file, and a layout from a file (Layout Files, below).
- Reset to Default: arranges the Default layout.
A layout arranges the workspace shown; the other workspaces keep their arrangements. A layout we save carries the process and tool windows of that workspace and the LaunchPads that are open and where, and applying it opens them in the workspace shown, leaving its other windows alone. It also carries the two toolbar choices of the Preferences, Buttons and Show at start (Layout); a layout we saved before they were part of it leaves them as they are. A built-in layout sets Buttons (icon and name, and icons only for Syrup, Psycho'n, Fix Inside and PhotonChop); Default, Syrup, Psycho'n, Fix Inside and PhotonChop also set Show at start, the others leave it as we set it. The image windows are Tabs in Pre-processing, Processing, Syrup and Psycho'n, cascaded in Default and Fix Inside, and tiled in PhotonChop.
A layout carries the options of the process and tool panels as well: Display process system toolbar, Hide classic buttons, Each process and tool in its own window, Auto-apply tools and Close panels after Apply. A layout we save keeps them as they are, applying a layout puts them back, and a layout saved before they were part of it leaves them as they are (except Close panels after Apply, which such a layout turns off). The built-in layouts carry their own: the system toolbar shown, the classic buttons shown, shared Process and Tool windows, Auto-apply tools on and Close panels after Apply off, except Default, which gives each process and tool its own window, Syrup, which has no system toolbar and closes panels after Apply, Psycho'n, which has no system toolbar, PhotonChop, which has no system toolbar and closes panels after Apply, and Fix Inside, which hides the classic buttons and gives each process and tool its own window. Themes do not carry these options any more.
2.5.4Layout Files
saves one of our layouts as a file, .dspxlayout: the layout in use when it
is ours, else the one we choose. Built-in layouts are not exported: every DSPX has them. The file holds what a saved layout holds: the panels and toolbars,
the process and tool windows, the LaunchPads that are open, the sides, the toolbar choices, the panel options and the arrangement of the image windows. The
file window starts in the layouts folder of the data folder (General).
adds the layout of such a file to ours, on this computer or another. When we have a layout of that name,
DSPX asks: Replace, Keep Both (the default: it is added as name 2) or Cancel. A file named as a built-in layout is added
as Default 2 and the like, without asking. Applying an imported layout fits it to this computer's screens, as every layout is: a panel or toolbar
that would be off the screens is brought back onto one.
The Layout page of the Preferences has the same list, with Save layout..., Export..., Import... and Reset to Default, and Start with, which chooses what DSPX starts with: Where I left off or any layout of the list.
2.6The Log
The Log panel is the program's record of what happened: the files opened and saved, what a process ran with and how it ended, what a file format could not keep, scripts' output, the messages of pre-processing runs, and every warning and error. Each line has the time; warnings and errors are colored in the theme's warning and error colors. The panel is read-only and keeps the last 5000 lines. When a process cannot do what was asked, the message in the status of the panel is short, and the Log has the reason: it is the first place to look (Reading the Log's Messages).
The Log is the one panel that can dock at the bottom. We select and copy its text as in any text field.
A right-click on the text opens a menu with Copy, Select All, Save Log..., which writes what the panel shows to a text file, and Clear Log, which empties the panel. A right-click on the panel's title bar has the last two.
2.7Undo, Redo and History
(Ctrl+Z) and (Ctrl+Y or Ctrl+Shift+Z) step through the history of the image in front. Every image has its own history. A process that changes the image is one step, an interactive tool's whole session is one step, and a script's run is one step. A step is undone and redone exactly, bit for bit.
2.7.1The History Panel
The History panel lists the steps of the image in front, from how it was opened (or "New image") to the latest, numbered, each with its title and, on a layered image, the layer it changed. A click on a row goes to that state, and the steps after it stay there until a new step replaces them. A summary at the bottom says, for example, "M31: step 4 of 6, 38.0 MB in memory, 2.10 GB on disk": how much of the image's undo data is in memory and how much is in the cache folder (the second part is left out while none is). A row's tooltip says how many tiles of the image the step kept, how much memory they would use, and where they are: in memory, on disk, or both (Undo Steps in the Cache Folder).
2.7.2Exporting the History
The steps applied to an image can be exported to repeat them on another image, as a script, as a blueprint or as a process container. Export... under the list, or , opens a window for the steps applied now, in order, up to the row of the current state. The steps that redo could bring back are not included. To export only some steps, Ctrl+click or Shift+click them first (a plain click still goes to that state); with none selected, all the applied steps are exported.
The window offers the three formats, a table with every step and a check or a dash for each format, the steps the chosen format leaves out with the reason, and the file to write. The file is named from the image and the format. An existing file is handled as the output files of pre-processing are (When an output file already exists in the Preferences: keep both, ask or replace; keep both is the default).
- Script: a Python script that calls
dspx.runfor each step, in order, with the settings the step ran with, and a comment before each step with its number and title. By default it goes to our first script folder, so it is in the Scripts panel at once. See A Script From the History. - Blueprint: a blueprint that runs the steps one after the other without asking anything, one Process step each. By default it goes to our blueprints folder and is ours, so it runs without the approval sheet. See A Blueprint From the History.
- Process container: a PixInsight process container (
.xpsm) with the steps whose process PixInsight has, in order. The steps of a process PixInsight does not have are left out and listed.
Only a step that a process run made can be exported, because only a process run keeps a process and its settings. Everything else cannot be repeated from the History, and is listed as not exported with the reason; in the script it is a comment at its place.
| Step | Script | Blueprint | Container |
|---|---|---|---|
| A process run from its panel, a process icon, a container, a blueprint or the guide | Yes | Yes | Yes, when PixInsight has the process |
| A tool's work: brush strokes, clone stamp, selection, clipboard | No | No | No |
| A layer operation | No | No | No |
| A selection or mask change | No | No | No |
| A script's run (one step, whatever the script did) | No | No | No |
| A step of a project opened again | No | No | No |
A step keeps its settings in memory, while the image is open. A project does not save them: after opening a project, its earlier steps are listed as recorded before settings were kept, and the steps applied afterwards can be exported. A script's dspx.run calls are part of the script's one step, and not steps of their own.
A selection, a mask or a layer that a step ran with changed what it did. They are not reproduced: the script notes each in a comment before the step, the blueprint in the note of the step, and the container ignores them. The same is said for a step that ran with PixInsight compatibility off, which a script or a blueprint runs with it on.
2.7.3Undo Steps in the Cache Folder
Undo steps keep the parts of the image that changed. The newest steps stay in memory, so that undoing the last thing is instant. The older ones move to the cache folder in the background, compressed, and are read back when we undo or redo them, which takes a fraction of a second even for a large image (about a tenth of a second for a 24-megapixel color image on a fast drive). While we look at the result, the step before it is read back in advance, when it fits in the memory kept for the newest steps and no process is running, so that pressing undo again finds it ready. Nothing needs setting, and the heavy work never has to compete with the undo steps for memory.
- In memory: the newest steps, up to the smaller of 1 GB and 5 percent of the computer's memory, and always at least the newest three steps of all the images. A step is written only after a newer step follows it, or after a short while.
- On disk: the
undofolder of the cache folder (, Cache folder), in a folder for each running DSPX. The files hold the pixels of the steps, so they are as private as the pre-processing caches: they stay in our own cache folder on this computer, and DSPX does not send them anywhere. Clear cache... leaves them alone. - How much: the smaller of 25 GB and a quarter of the free space of the drive of the cache folder, looked at again every few seconds. Beyond it, the oldest steps of all the images are dropped, as they were when the memory was short; the newest step of an image always stays.
- When the disk cannot be used (the folder cannot be made or written to, or the drive is full) the steps stay in memory, the Log says so once, and DSPX tries again after a minute. The steps of all the images may then use a quarter of the computer's memory together; beyond it the oldest steps are dropped.
- A file that is gone or damaged: the undo or redo says so in a message and in the Log, and nothing changes: the image and the history stay as they were.
- Cleaning up: the files of an image are deleted when it is closed, and all of them when DSPX ends. If DSPX stopped without ending, the next start removes what it left, and only that: the files of another DSPX that is running at the same time are never touched.
A step that deletes or flattens layers keeps those layers whole, in memory, as the layered image's own pixels are.
2.8LaunchPads
A LaunchPad is a small floating window of buttons, each of which launches something: a process with its settings, a tool, a script, a workflow, a file, a panel or a menu command. We make as many as we like, place them next to the image or dock them as toolbars, and keep them open at start. The LaunchPads page describes the pads, their look, the Manager, the editor and the import of PixInsight launchpads in full: LaunchPads. This section says how they fit in the window.
- lists the pads, the built-in ones too, toggles each one, and opens the LaunchPad Manager; the Window toolbar has a LaunchPads button with the same menu.
- A pad is a window of the main window. Pressing anywhere on it and dragging moves it; a press that does not move is a click. Its right-click menu has Edit, Manager, Show Title, Open at Startup, the four Dock commands and Close.
- A pad marked Open at Startup opens when DSPX starts; nothing else opens by itself.
- A layout saved in Window > Layouts records which pads are open and where, floating or docked as a toolbar, and applying it puts them there. A layout saved before pads could dock floats them.
- Process icons dragged from a workspace or a row of the Process Shelf and dropped on a pad, floating or docked, become Process buttons with the icon's settings and name. Dropped on a button, they go before it (after it, past its middle); anywhere else, at the end.
- The brush handle of the Paintbrush's panel, dragged onto a pad, floating or docked, makes a Paintbrush button with the brush as it is: its type, size, softness, opacity, blur and ink. A click on that button selects the Paintbrush with that brush; with the Paintbrush already active, it only switches brushes. The button shows the brush type's icon and name, and its tooltip lists what it sets.
- The Selection panel's preset handle does the same for the Selection tool: the button sets the way of drawing, Feather, Contract/Expand, Tolerance, Metric and Subtract, and shows the way's icon and name.
- Command and Tool buttons show state, floating or docked, as the toolbars' buttons do. A Command button is dimmed when its command does not apply now (a click does nothing) and checked when the command is on, such as Show Mask; its tooltip names the shortcut. A Tool button, a Paintbrush or Selection button too, is checked while its tool is the active one. Other buttons show no state.
- The pads' colors are the theme's by default, so a theme switch changes them.
- A new installation opens with a ready-made pad in the top-right corner of the work area, light or dark to match the look we start with (the Psycho'n (Dark) and PhotonChop (Dark) looks have pads of their own; PhotonChop's, PhotonPad, is docked on the left by the PhotonChop layout), so there is no need to go looking for the processes. It is made once, at the first start; we can move it, close it or delete it like any other pad, and it does not come back by itself. To get it back, open the LaunchPad Manager and press Add default pad.
2.8.1A LaunchPad Docked as a Toolbar
A LaunchPad can be docked as a toolbar. It is still a LaunchPad, serving as a toolbar: the same buttons, the same editor, the same file. Docked, it sits in one of the main window's toolbar areas, at the top, the bottom or a side, like the program's own toolbars.
- Docking: drag the pad's title bar to an edge of the main window. While it is over a toolbar area, a mark shows where it will go: in a row of toolbars, between two of them, or in a row of its own. Let go and it docks there. A pad without a title bar docks from its right-click menu: Dock at the Top, Dock at the Bottom, Dock on the Left or Dock on the Right.
- As it is: a docked pad looks exactly as it does floating, in any area: its columns and rows, its groups with their frames and titles, at the same size, with no title bar. Ctrl+click on a group's title collapses or opens the group, as on the floating pad. A docked pad has a toolbar's handle and can share a row with other toolbars. It always shows all its buttons: the toolbar area makes room for the whole pad.
- Size limits: a pad more than 300 pixels wide does not dock on the left or the right, and one more than 200 pixels tall does not dock at the top or the bottom. Dragged over such an area, it shows no mark and does not dock there; in its right-click menu the Dock command for that area is grayed, and its tooltip says why. A docked pad that grows past the limit (edited, or a larger icon size) floats again where it is, and the Log says so.
- Its look: the floating pad's, button for button: the same size, spacing, 3D shading, gradients, borders, corners, button image, fonts, name position, colors (its own or the theme's) and hover effect.
- What the buttons do: the same as on the floating pad. A click launches the button, a button dragged to another place moves it in the pad, and process icons dropped on the pad become buttons there. Command and Tool buttons show dimmed or checked as on the floating pad.
- Floating again: drag it out of the area by its handle, or choose Float from its right-click menu. While it is dragged it keeps its shape; let go away from the toolbar areas and it is a pad window there, or over an area that takes it and it docks there again.
- The right-click menu: Edit LaunchPad..., Float, Icon Size, Name (none, right of the icon, below it, or the name only), Hide, then the toolbars and panels to show or hide. Icon Size and Name change the pad's look, so the floating pad shows the change too.
- Shown and hidden: a docked pad is listed in and in . Hidden and shown again, it comes back docked; at the next start it docks again where it was.
2.8.2Built-in LaunchPads
The program's toolbars of buttons, Tools, File, Window, Settings, Masks and Layers, are built-in LaunchPads, docked as toolbars by default. Until we change one, it is the toolbar it always was: the same buttons in the same order, in the same place, in the theme's colors.
- Their buttons: Command buttons for the menu commands and Tool buttons for the tools. They show state as the toolbar's buttons did: Save dimmed with no image, the active tool checked, a mask toggle checked while it is on, the shortcut in the tooltip. The Window toolbar's Arrange Icons and LaunchPads buttons open their menus.
- Changing one: Edit LaunchPad... in its right-click menu, or in the LaunchPad Manager, opens the editor: add, remove and reorder buttons, change the look. The change is kept as the pad's own file. Reset to Default (in the editor, the Manager and the pad's menu) puts the program's own back.
- Their look: until a built-in LaunchPad has a look of its own, Buttons and Name on the Layout page of the Preferences say how it shows its buttons, and it follows the theme.
- Never deleted: a built-in LaunchPad can be hidden, floated and docked again, never deleted. Close All LaunchPads leaves them alone. Whether each shows at start is the Layout page's Show at start.
- New buttons: when a later version of DSPX adds a button to a built-in LaunchPad, a pad we changed gets it too, at its end, unless we had removed that button ourselves.
- Layouts: layouts saved before, the built-in ones included, place each built-in LaunchPad where its toolbar was.
2.9Process Icons on the Workspace
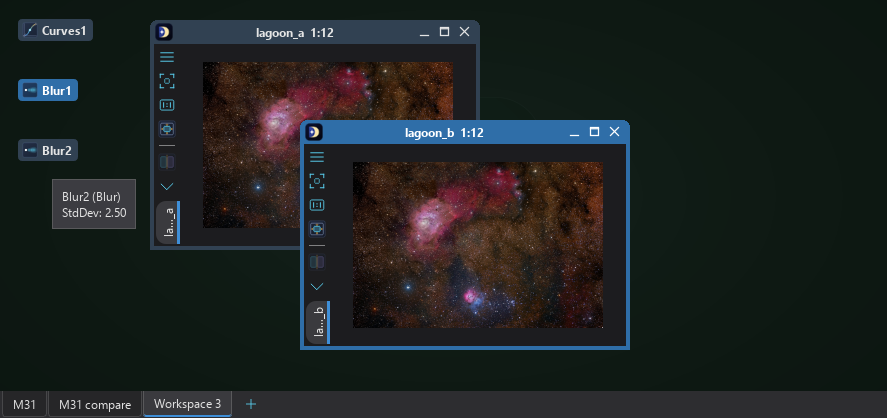
A process icon, PixInsight's term, is a process with its settings kept on the workspace itself: a small bar with the
process's icon and a name made of its id and a number, such as Curves1. It is the quickest way to keep a few
processes at hand for the session, next to the images they will be applied to. The Process Shelf is the other: a shared list of
processes that is not tied to a workspace.
2.9.1Making Process Icons
Dropping any of these on the background of a workspace, or on the strip in Tabs, makes an icon there:
- a process panel's instance, dragged from the handle on the panel's system bar;
- a row of the Process Shelf, which makes an icon named after the row;
- a
.dsprocor.xpsmfile: one icon per process. An.xpsmwith many icons makes many, at the places the file gives or in a row from the drop; the processes of a ProcessContainer each become an icon. The question about the PixInsight compatibility mode is asked as when the file is opened.
does the same for files chosen in a dialog, on the workspace shown. The pointer shows a + when a drop will be taken: a process is taken over an image (applied), over the background or the strip (made an icon), and refused anywhere else.
2.9.2Where They Are
In Tile and Cascade, the icons lie on the workspace's background where they were dropped, always behind the image windows. In Tabs they are in a row in a thin strip under the image tabs, in the order of the row. The strip is shown while the workspace has icons, and while a process is dragged over the window, so that the first icon can be dropped. hides it, as does the strip's right-click menu; it is available in Tabs only. A long row scrolls with the wheel.
2.9.3Names
A new icon is its process id and the lowest number no icon of the workspace has with it, so Blur1, Blur2, and Blur1 again once Blur1 has been renamed. An icon from a file or a shelf row keeps its name, made unique by adding a number. To rename one, press F2, choose Rename in its menu, or click the name of an icon that is already selected, and type in place: Enter renames, Esc leaves it. A name up to 40 characters, with any text, is accepted; one another icon of the workspace has (case ignored) or an empty one is refused, and the Log says why.
2.9.4Using Process Icons
- A double click (or Enter) opens the process's panel with the icon's settings. The panel is not linked to the icon afterwards.
- Dragging the icon onto an image applies it, exactly as the panel's instance dropped there does; a process on files runs on its files. Only the icon dragged is applied, even with several selected. An image held by something else refuses it and says so.
- Dragging a panel's instance onto the icon updates it: DSPX asks "Replace the settings of the process icon Curves1 with the Curves panel's?" with Replace and Cancel, and the icon keeps its name and place. An instance of another process dropped on an icon makes an icon of its own beside it.
- Dragging an icon onto the Process Shelf keeps it there as a row, and onto another workspace's tab moves it there; Ctrl copies instead of moving.
2.9.5Selecting and Moving
A click selects an icon, Ctrl adds or takes away, Shift selects a run in the order of the row, a click on the background clears the selection, and a rubber band on the background selects the icons it touches. Dragging on the background moves the selected icons by the same amount; with Ctrl it copies them, with new names and the same settings. Along the strip a drag moves them in the row. Delete deletes the selection, after asking ("Delete the process icon Curves1?", "Delete 3 process icons?").
2.9.6The Icon's Menu
The right-click menu of an icon has:
- Open: as a double click.
- Apply to Active Image: applies the icon to the image in front (Run on Its Files for a process on files). Dimmed with no image.
- Rename (F2) and Duplicate: a copy after it, with the next number.
- Show Instance...: a window with the icon's settings, titled "Instance: Curves1", with Save... to save them.
- Save As...: saves the icon's process as a
.dsprocor a PixInsight.xpsmfile named after the icon, as does. - Delete: deletes the selection when the icon is in it; asks first.
lines the workspace's icons up in columns from a corner chosen in its submenu: Top Left, Top Right, Bottom Left or Bottom Right. The tooltip of an icon gives its name, its process and the settings that are not at their defaults, as the History panel gives them.
2.9.7Keeping Them
The icons of every workspace are saved for the next start when Keep process icons between sessions is on (Preferences, page General; on by default). With it off they are gone at the next start, and quitting with process icons asks whether to save them. A project keeps the icons of its workspaces.
2.10Projects
A project is the whole session on disk: the images, their histories, masks and selections, layers, metadata, windows,
workspaces, the process panels' settings, and the Process Shelf. It is how we leave a piece of work and come back to it, with
every step still undoable. A project is two things on disk: a manifest file, Orion.dspx, and a data folder beside
it, Orion.dspx.data, with the images and the histories. Moving them together, to another computer, moves the
project.
2.10.1The Commands
The project commands are in the menu.
- Open Project...: opens a
.dspx. A project can also be opened by dropping the file on the window or by giving it on the command line. - Save Project (Ctrl+Shift+Alt+S): saves the project, with the choices it was saved with.
- Save Project As...: saves under another name, and asks for the choices.
- Close Project: closes every image (each unsaved one asks); the workspaces, the panels and the shelf stay as they are. Dimmed when no project is open.
While a project is open the window's title names the project and DSPX, as in Orion - DSPX.
2.10.2What a Project Keeps
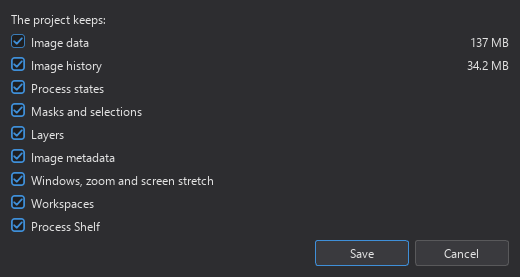
The save dialog, shown the first time a project is saved and for Save Project As, has nine choices, all ticked at first. Each has a tooltip, and the first two show their sizes.
- Image data: the pixels. Unticked, the project names each image's own file instead, and only the images that have no file, have unsaved changes, or whose file is gone are included, as they are needed to restore them. A line under the choice says how many these are and how big.
- Image history: the undo steps of every image.
- Process settings: the settings of every open process panel.
- Masks and selections.
- Layers: unticked, a layered image is saved flattened, as a plain image without its history.
- Image metadata: the FITS keywords and XISF properties of the plain images. Unticked, opening takes them from the image's own file when it has one.
- Windows: each view's place, zoom, color management and a minimized image's icon, and the geometry of a window in Tile.
- Workspaces: the workspaces, their names, modes, panel arrangements, process icons and process windows.
- Process Shelf: the rows of the shelf.
2.10.3Saving
Saving is careful. The new files are written under new names first, then the manifest is replaced, and only then are the old files removed, so a save that fails or is canceled leaves the old project whole. An image unchanged since the last save of the project keeps its files; a save after a few steps writes only what changed. The images are read on a thread of their own, so the window stays responsive, with "Saving the project: image 3 of 7", a bar and Cancel in the status line.
A save is refused, with the reason in the Log and in a box, while a process, a script, a workflow, a process on files or a container is running, and while a guided step runs or an image is held; a tool's session ends first, and one with changes asks whether to apply it, discard it or keep working. While the guide is waiting, the save goes ahead, but the run itself is not saved: the project keeps the images as they are now.
DSPX never silently overwrites a project. Save Project As onto another project asks (Replace or Cancel); Save Project asks before replacing a project that changed on disk since it was opened or saved here.
2.10.4Opening
Opening a project reads the manifest first. Each image comes from its data file or from its own file, looked for next to the project first, so a project moved with its images finds them, then by its full path. Files that are missing are listed in one dialog, where Locate... chooses the file (and finds the other missing files of the same folder in it) and Skip leaves the image out; Cancel leaves the session as it was, since nothing has closed yet. Then the session is replaced: every open image closes (those with unsaved changes ask), and the project's images open, each in its workspace and place, read on a thread of their own while the window keeps drawing.
An image that is skipped, or whose file cannot be read, stays in the project: Save Project keeps it and its files, and it opens again once its file is back. Save Project As to another place leaves it out, and the Log says so.
An image read from its own file, or from a file chosen with Locate..., is checked against the project's record of its pixels. If the file was saved over since, or is another image, the image opens as it is now, without its history and its window's state, and the Log says so. Histories are read last and held to the limits of the undo steps; if a limit drops the oldest steps, the Log says how many. Then masks, layers, screen stretches, process panels, the shelf (its rows are added, never twice), the windows, and the workspace that was shown come back.
Closing, quitting, or opening another project does not ask about an image that is unchanged since the open project was last saved; the others ask as usual.
A project made by a newer DSPX than the one opening it is refused with a message that names the version needed. Names the program does not know are listed in the Log and skipped. A history file that cannot be read (damaged, or made by a newer DSPX) loses only that image's history, and the project keeps the file.