
Seeing the Image
The screen stretch, the view and the preview of a process
A linear astronomical image looks black on a screen, and a process has to be judged before it is applied. This chapter explains how DSPX shows an image: the screen stretch, which changes what we see and never the pixels; zooming and panning; the row of buttons over the image; the live preview and the snapshots that show a process on the image before we apply it; and the numbers the status line and the Statistics process give.
4.1Screen Stretch
The screen stretch is a curve applied to the image on its way to the screen. It makes the faint signal of a linear image visible without touching the pixels: saving, processing and measuring all see the image as it is. It is PixInsight's screen transfer function, and a file saved by one program opens with the stretch of the other.
The stretch belongs to us. Nothing in DSPX computes it on its own account: not opening a file, not an edit or its undo, not a process's run or the new images it makes, not a script. It changes when we press Auto or (Ctrl+A), or move its handles in the Screen Stretch panel. An image shown for the first time has the stretch its XISF file was saved with, or none. A new image that a process makes has none, not even its target's, unless the process gives one on purpose; an example is Survey Overlay, which can ask for an automatic screen stretch. The one exception is a guided run: on a linear image it keeps the automatic stretch in step with each step (Workflows and Blueprints).
While an image is shown through a screen stretch, automatic or set by hand, a Screen stretch badge sits on its top left corner and its window's title ends with "(screen stretch)", so it is never mistaken for stretched pixels. The badge is not part of the image: it is not saved, copied or measured, and a tool draws under it as anywhere else.
4.1.1The curve
The curve is defined by three values. Shadows is the level below which the image is shown black. Highlights is the level above which it is shown white. Midtones is the balance in between: a value below 0.5 brightens the midtones, above 0.5 darkens them. The result is clipped at the shadows and highlights, passed through the midtones transfer function, and, when the file asks for it, expanded over a dynamic range. A color image has a curve for each channel; with Linked on, the three are the same.
4.1.2Auto Stretch
computes a stretch from the image's statistics, with two parameters: where the median of the image goes on the screen (Target background, 0.25 by default) and where the shadows are clipped in deviations from the median (Shadows clipping, minus 2.80 by default). Both are kept from one session to the next, and sets them back. The menu of the Auto button in the panel shows them.
How Auto computes depends on PixInsight compatibility mode. With the mode on, Auto is PixInsight's own: each channel's median and deviation over its samples other than 0 and 1, the shadows and medians averaged over the channels when they are linked, one curve per channel when they are not. It has been proven to give the same curves as PixInsight on the same images. With the mode off, DSPX uses one median and deviation of all channels pooled when they are linked, so the median lands exactly on the target; a large image is sampled.
4.1.3The commands
The commands are in and its submenu :
| Command | What it does |
|---|---|
| Computes the stretch from the image (Ctrl+A). | |
| Shows the image through its stretch, or as it is; the values are kept either way (Ctrl+L). | |
| The three channels go together: Auto computes one curve for them, and an edit moves all three. Changing it computes nothing. | |
| Clears the stretch: every channel the identity, and the stretch off (Ctrl+F12). | |
| Target background 0.25 and shadows clipping minus 2.80. | |
| Gives the stretch to every open image. | |
| For a layered image: gives its stretch to each of its layers. | |
| A check item, on by default: saving as XISF writes the stretch with the image. | |
| Keeps the stretch under a name. | |
| Applies the stretch to the pixels with Histogram, through the mask, as one history step, then turns the screen stretch off, since the image now is what it showed. | |
| Shows or hides the Screen Stretch panel. |
4.1.4The Screen Stretch panel
The panel () follows the image in front. The histogram is the control: we drag the handles S (shadows), M (midtones) and H (highlights) on it, and the curve drawn over it is the transfer function itself, dashed while the stretch is off, with the clipped sides shaded.
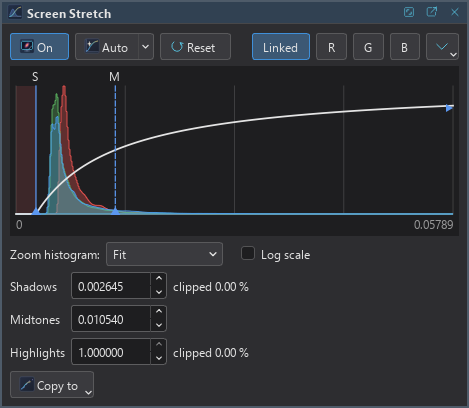
On: Shows the image stretched or as it is, keeping the values.
Auto: Computes the stretch. Its menu has the two parameters, Target background: and Shadows clipping:.
Reset: Clears the stretch.
Linked: Moves the three channels together. R, G and B unlink them and edit that channel alone, drawing its histogram and leaving the others faint.
Zoom histogram: Fit frames the data, from 0 to twice the level under which 99 percent of the samples lie, so a linear image's stars are left out and its histogram fills the panel; Whole range shows 0 to 1; 2x to 256x show from 0 to 1/2, 1/4, down to 1/256. Log scale draws the counts logarithmically. The view does not move under a drag; it frames again when the stretch comes from elsewhere (Auto, Reset, a preset, a copy).
Shadows, Midtones, Highlights: The values, typed with six decimals; an edit turns the stretch on. A double click on a handle goes to its field. Moving the shadows or highlights keeps the midtones balance. Next to Shadows and Highlights the panel shows the share of the samples that are clipped.
Copy to: Gives this stretch to another open image, to all open images, or to this image's layers.
The three dots at the right open a menu with Save Stretch with Image, Save Stretch Preset, Apply Preset and Delete Preset. Presets are named stretches kept for later use.
4.1.5Stretches in files
An XISF file saved with a stretch opens with it. DSPX reads PixInsight's display function and writes it back as PixInsight writes it, so a file that PixInsight saved and DSPX saves again has the same display function. The stretch is written only when it is on and not the identity, and only when Save Stretch with Image is on. FITS has no place for a stretch. A layered image saves each layer with its own stretch (Layered Images).
The preview of a process that moves the levels of the image, such as the subtraction of Background Extraction, is shown through the image's stretch moved with the levels, and the banner says so. The stretch itself is ours: neither the preview nor Apply changes it, so after Apply the image may need Auto Stretch again.
4.2Zoom, Pan and the Image Column
4.2.1Zoom
The wheel zooms about the pointer, in steps from 1:32 up to 32:1. The zoom is shown in the status line and in the title of the image window. The commands are in :
Zoom In and Zoom Out: Ctrl++ and Ctrl+-.
Fit in Window: The whole image in the window (Ctrl+0).
1:1: One image pixel for each screen pixel (Ctrl+1).
Fit Window to Image: Makes the image window the size of the image at its zoom, as far as the workspace allows.
In Cascade or Tile, a window that opens takes the largest zoom that shows the whole image, never above 1:1 (Image Windows). While a tool is active, Ctrl and the wheel go to the tool first (the radius of Clone Stamp, for example).
4.2.2Pan
Drag with the left button to move the image when no tool is active, or with the right or the middle button, or with the left button while the space bar is held, which also works in the middle of a tool. The Pan entry of the Tools toolbar is the state with no tool (Pan).
4.2.3The image column
Every image window has a narrow column at its left with the window's buttons, one under another. At its top are the image menu, Zoom to Fit, 1:1 and Fit Window, which do what the View commands do. Below them, after a wider gap, are the buttons of the preview:
- Vertical split: compares with a vertical line, the image as it is on the left and the preview on the right. The line is dragged with the mouse.
- Horizontal split: the same with a horizontal line, the image above and the preview below.
- Before: shows the image as it is, without the process, while it is held; the backslash key does the same.
- Exact: only when the preview offers it: computes the part in view at full resolution (the next section).
- STF: shows the image through its screen stretch, or as it is. With a split, each side is shown through its own stretch.
- Hide info row: hides the info row (below). With a live preview, it also turns the preview off.
The splits and Before work while a preview shows. When the window is too short for all the buttons, the last one is More, and its menu has the rest. At the bottom of the column are vertical tabs for the image, its mask and its layers (Masks).
4.2.4The info row
The row along the top edge of an image says what the image is showing. It has no buttons. It is shown by itself while the image has a process preview, a banner (for example a script's), or a layer or a mask shown alone. keeps it always in view, and Hide info row in the column hides it again. The theme can put the row along the bottom edge instead.
4.3Previewing a Process
A process can show its result on the image before we apply it. The image itself never changes before Apply: it is not marked busy, and nothing enters its history. A process has one of three kinds of preview, and its panel says which.
4.3.1The live preview
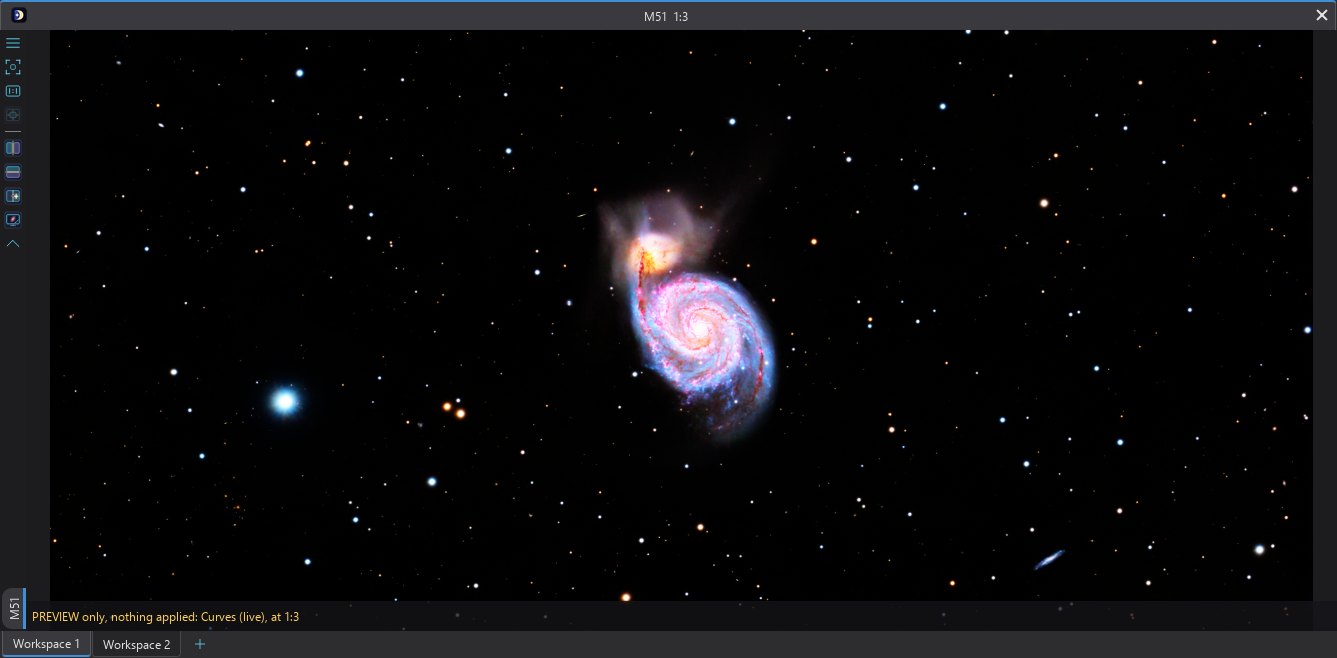
Most processes that change tones and colors are previewed live: Histogram, Curves, Hyperbolic Stretch, Saturation, SCNR, Invert, Convert Color, Sample Format, Assign Profile, Convert to Profile, Channel Combination, LRGB Combination, Pixel Math, Background Extraction, Background Neutralization, Color Calibration, Arcsinh Stretch and Masked Stretch. The eye at the end of the Applies to row of the panel, or Preview in the system bar, turns it on and off for the process. It is on by default.
While it is on, the image shows the process applied to the part in view, with a banner such as "PREVIEW only, nothing applied: Curves (live)". The banner adds what else is true of the preview: "at 1:3", "through the mask", "through the selection", "screen stretch off, as Apply will leave it", "approximate: computed on the part in view", "updates when you release the mouse". The preview follows the settings, the pan and the zoom. A preview that takes more than a fraction of a second makes the next ones wait for the mouse button to be released; the banner says so. The panel says why a process is not previewed live when its settings cannot be, and the Log has one line when previews settle, such as "Live preview: Curves at 1:3, 132 ms, 2,000 x 1,334 pixels".
At a zoom of 1:1 or more, a live preview is exactly what Apply gives there. At a reduced zoom (Fit, 1:2, and so on) the process runs on block means of the image, so the preview is close but not exact; Before shows the same blocks of the image as it is, so the comparison is fair. Histogram and Hyperbolic Stretch, previewed on an image shown through a screen stretch, are shown without it, and Apply turns the stretch off. The preview ends when we Apply, when a run or a tool holds the image, or when the process panel is hidden, and starts again when a setting changes.
The panel says where the process stands in a strip above its buttons, so a preview cannot be taken for a result. While a preview is on the image the strip reads "PREVIEW only. Nothing applied yet.". After Apply it reads "Applied to" and the image's name, and Apply changes to Apply again: the same settings were just applied to this image. Nothing is blocked; a second Apply runs. The strip and the line the last run left under the buttons go away when a setting changes, the image changes or another image comes to the front.
4.3.2Processes with sizes in pixels: scaled sizes and Exact
Blur, Range Mask, Deep Morphology, Clarity, Flow Sharpen and the chrominance noise reduction of LRGB Combination have settings in pixels, which depend on the zoom. They are live like the others, and at a reduced zoom their sizes are scaled to the view; the banner says "approximate at 1:3: sizes scaled" and the row shows Exact. Exact computes the part in view at full resolution, with progress and Stop in the panel, and shows it in place of the approximate preview: "exact: the part in view at full resolution". A pan, a zoom or a change of a setting returns to the live preview. At 1:1 and above nothing is scaled and Exact is not offered. Range Mask previews the mask it will make, shown as a mask is, without the screen stretch.
4.3.3Snapshots
The slow processes, such as the AI processes, the other sharpening methods and the astrometric processes that make pixels, are previewed by a snapshot, which we ask for. A snapshot never starts by itself, and nothing that uses the network is ever automatic. The panel of such a process has a Preview box in the place of the eye:
On: What to compute: The visible area (the default), a region we draw with Draw Region, or The whole image (Apply then reuses it).
Draw Region: Draws the region on the image with the gesture of the Crop tool, without rotation: press and drag outside the region draws a new one, inside it moves it, its corners and edges resize it. The region is kept for the image while the process panel is open, and forgotten when the panel is hidden.
Preview: Computes the snapshot at full resolution. Its progress is shown in the panel, with Stop. While it computes, the image says so over it and stays usable.
Hide: Takes the snapshot off the image. So does Hide preview in the system bar, the banner's close button, and Esc on the image. In the system bar, the Preview button of a process that only has a snapshot is off until the snapshot is on the image, and off again when it is taken off.
The result shows in place, in a dashed frame when it is a part of the image, with a banner such as "PREVIEW only, nothing applied: DeepStarRemoval, region 700 x 540 (0.9 s), approximate: the network's tiles fall differently". A part of an image is approximate for the snapshot processes, because what a process measures over the whole image is measured on the part: the banner says what. If we change a setting after the snapshot, the banner and the panel say "Settings changed since the preview: Preview again", and nothing is computed until we ask. Only one snapshot is held at a time; a new one, another image in front, a change of the image or another process frees it. The Log says what it took and the memory it holds.
Apply reuses a snapshot of the whole image while the settings, the image, its mask and the images the process reads are unchanged since it began: the result is the same one history step,
and the Log says "from the preview". Applying during a snapshot stops it first. DeepStarMask with hand edits, and Pixel Math with pixel() or a rescale, can only preview the whole image.
4.3.4The mask, the selection and layers
A preview is blended through the image's mask and selection, as Apply will blend it (Masks and Selections), and the banner says "through the mask" or "through the selection". On a layered image, a process works on the active layer or its mask, and the image shows the composite with that layer as the process would leave it: "on the layer Stars, the composite, at 1:3, the layers blended at the view's resolution". Before shows the image's own composite. The panel says why nothing is previewed when no layer is chosen, when the layer is hidden or not in view, or when the process makes a new image.
4.3.5Before and Split
Before shows the part of the image as it is; hold the backslash key or press the button. Split compares both on either side of a line that we drag anywhere in the view; the split menu turns the line across, putting the image as it is above the preview. Each side is rendered the same way at the same zoom.
- Open the process, and choose the image in Applies to.
- Move the settings. For a live process the image follows; for a snapshot process, click Preview.
- Press and hold the backslash key to see the image as it is, or click the split button to compare side by side.
- Click Apply when it looks right.
4.4Statistics and Pixel Values
4.4.1The pixel under the pointer
While the pointer is over an image, the left of the status line gives the pixel it is on: its coordinates, then the value of each channel (R, G and B for a color image, K for gray), and the value of the image's mask there, if it has one. Values are shown from 0 to 1 with five decimals; for an integer image the integer value is added in parentheses.
4.4.2The status line
The right of the status line describes the image in front. It lists, separated by bars: the size in pixels, the channels and the sample type; for a layered image the number of layers; the zoom; whether the image is stretched, and linked or unlinked; the image's color profile and whether its colors are managed (Color Management); the image's mask and how it is (disabled, inverted, hidden); the selection and its number of steps, hidden or not; and, while a tool works on the image, the tool's session.
4.4.3Statistics
For the numbers of the whole image or of its selection, the Statistics process measures the image channel by channel: mean, median, deviation, extremes with their places, and the noise. Its page describes the table and its settings.