HDR Composition for astronomical images
Published on September 12, 2011
NOTE: It has been many years since I wrote this article. Obviously, there are now plenty of tools, much more sophisticated – including the ones being mentioned here – that produce amazing results with nearly no effort.
A few days ago I wrote an article about my thoughts on HDR compositions for astro images, and why I felt that astrophotographers should take advantage of HDR composition tools when confronting certain dynamic range problems, rather than relying on hand-drawn selective overlays, so I figured a good complement to that article would be a few examples of using these techniques in action.
We can find dynamic range problems in all kinds of images, but we tend to associate dynamic range problems to situations with images that contain areas that “burn” easily. For that reason, for this article I will use the most emblematic object in the sky that comes to mind when one has to solve this particular problem: M42.
The data
To keep things as simple as possible, I will use only two images: one whose exposure time was 5 minutes, and another one with just 10 seconds of exposure. Of course, each image has been constructed from a number of subframes (6 each to be exact) and has previously been calibrated and gradient-corrected. This is not high quality data – to be honest I quickly acquired it during one session just for the purpose of writing this article – but it should be good enough to illustrate these examples. For better results, I would recommend using at least three different subsets – the exposure time would vary depending on your camera, optics and sky conditions, but a good base would be a subset of 10-15 minutes exposures, another subset of 3-5 minutes, and a third set of just 10 to 30 seconds.
Back to our set of two images, by doing a basic non-linear stretch to each image, we can reveal what’s in each of the images:
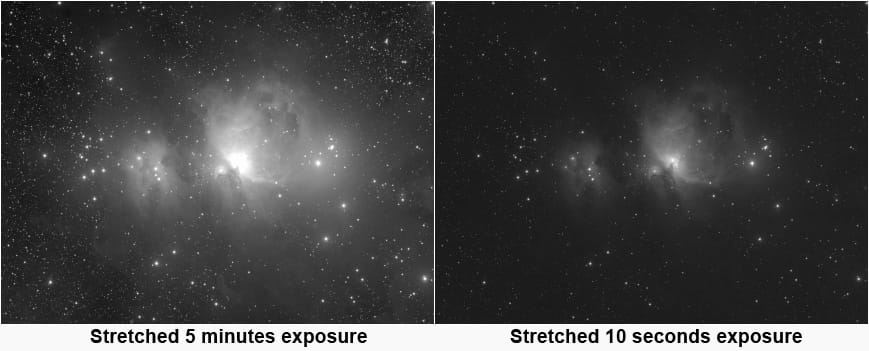
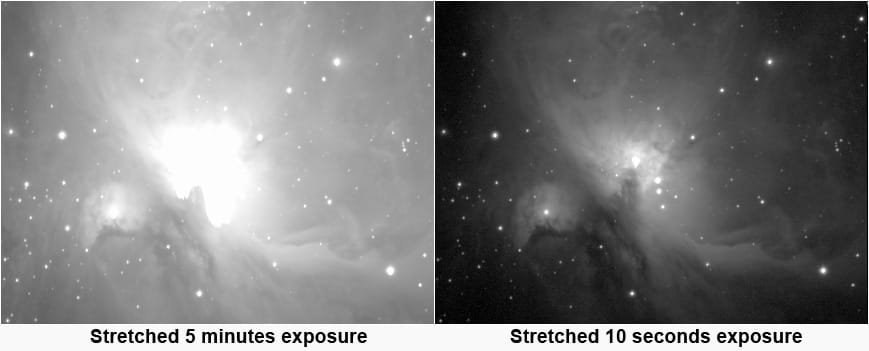
As you can see, the 5 minutes image contains a lot more information in the outer areas of the nebula, while the 10 seconds image barely has any information in the same area. Likewise, the core of the M42 nebula appears completely saturated in the 5 minutes exposure due to a limitation in the available dynamic range, while the 5 seconds exposure does show most information in the same area.
Since I have shrank the images in order to make them fit in this page, here’s a closeup of the core of M42:
Now I will use these two images and perform an HDR composition using three different packages:
1) Photoshop, if anything because today it is still the most widely used image processing software for astroimages.
2) Photomatix, mainly to see how an application especially designed to perform HDR compositions can be used for HDR compositions of astronomical images.
3) PixInsight, for being possibly the best software today entirely developed towards astroimage processing.
Note that the purpose of this article is not to see which of these packages does a better job, but I will talk about that later.
Photoshop
The latest versions of Photoshop come with a “Merge to HDR” tool. Although I admit that this tool is not my favorite to do an HDR composition for a number of reasons, it is rather easy to use.
One of the most important limitations of Photoshop’s HDR tool is that it only accepts 16 bit images, so the first step is to reduce the bit depth of our images from 32 bit float to 16 bits. Of course this is not ideal, but he have no choice.
Now I execute the “Merge to HDR” tool, which in CS5 is accesible by selecting the File menu option, and Automate submenu. Usually you will be asked to set the EV (exposure value) manually. You can either accept the default calculated values, or enter your own. Usually an EV spacing of 1 to 6 should suffice.
Once you OK the “Manually Set EV” dialog box, you’ll be presented with the “Merge to HDR” tool. Here’s where you do most of the work of making sure your image looks the way you want. Make sure the Mode is set to Local Adaptation and adjust the parameters. For a composition where the problem is mainly in the highlights, you will want to compress the highlights (set a small value for the Highlight option), leave the Gamma and Exposure values alone (or make very minor adjustments), and depending on your preferences, compress or leave alone the Shadows value. All remaining values (Details and Edge Glow parameters) can be adjusted to your own liking.
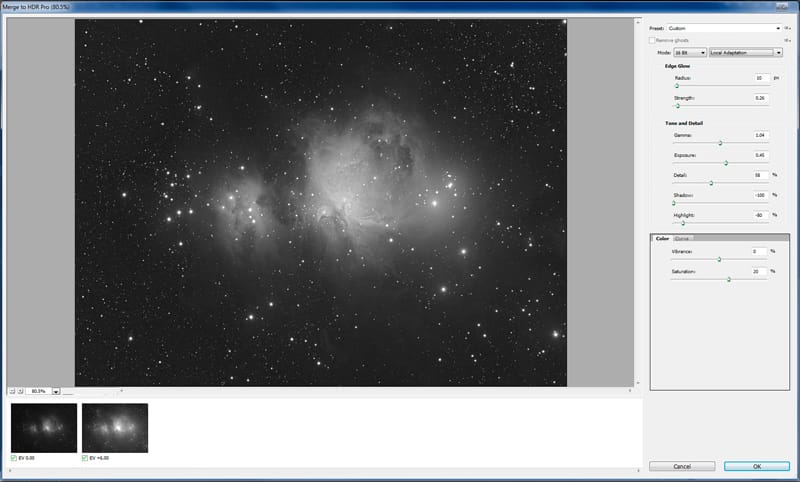
If you’re still not quite satisfied with the results, you can adjust the histogram curves (notice the Curve tab). If the merged image just doesn’t look right no matter what you do, you may want to go back and use different EV values for each image.
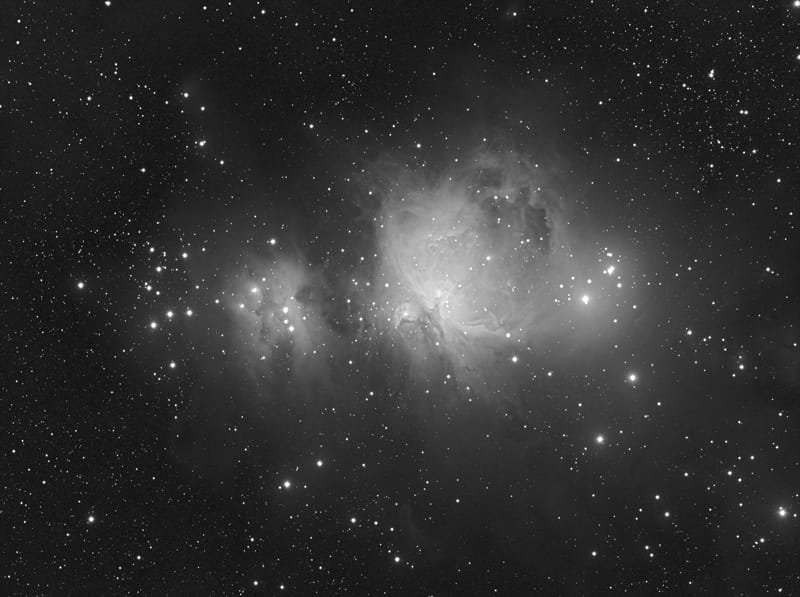
When you’re happy with what you see in the preview, hit OK. Here’s the resulting image I obtained, without any further processing. As you can see in the resulting image, I did not work the background at all, but that was a personal choice. Notice that the “structural” detail that you see in the image is not caused by the HDR composition per-se, but by the edge enhancement and sharpening tools conveniently included in the Merge to HDR dialog box. Of course, at this point, you could (should) continue processing the image…
Photomatix
Photomatix is a more versatile tool than Photoshop for HDR compositions – it is after all a software designed for this task. It is also a software I’m not particularly familiar with, and I’m certainly not an expert in using it. One thing is clear: it’s not a software with astroimage processing in mind, not even astroimage HDR composition. I’m including it here because it’s probably one of the most popular HDR composition applications out there, and I do think it’s beneficial to see how such programs fair when it comes to use them with astroimages.
Photomatix seems to accept 32 bit images, although it takes a really unusual amount of time to load them, and in the tests I’ve run it could never interpret them well, so generally speaking you’d probably be feeding Photomatix 16-bit images only, just like in Photoshop, which is what I had to do in this case, again not being an ideal situation. Photomatix does actually create intermediate 32 bit images, which is cool, except for the fat that once you’re done, you can only save them as 16 bit images (!!).
Just like with Photoshop, once you select the images you’d like to combine, Photomatix will ask you for the EV value, and again, you just have to make an educated guess. A value of 1 to 3 would work in a case like the one at hand. Do not ask Photomatix to show you the intermediary 32-bit HDR image.
After entering the EV value, Photomatix will offer you a few “processing options”. I wouldn’t use any of them, except for perhaps the noise reduction. Then, you’re ready to adjust the HDR combination parameters…
Photomatix offers a number of presets, each of them with their own set of distinct parameters. My recommendation is to try the Exposure Fusion method first, and only if you don’t get results that you like, try the Tone Mapping method. Since it’s very easy to preview the different presets, just click away and adjust the parameters each method offers.
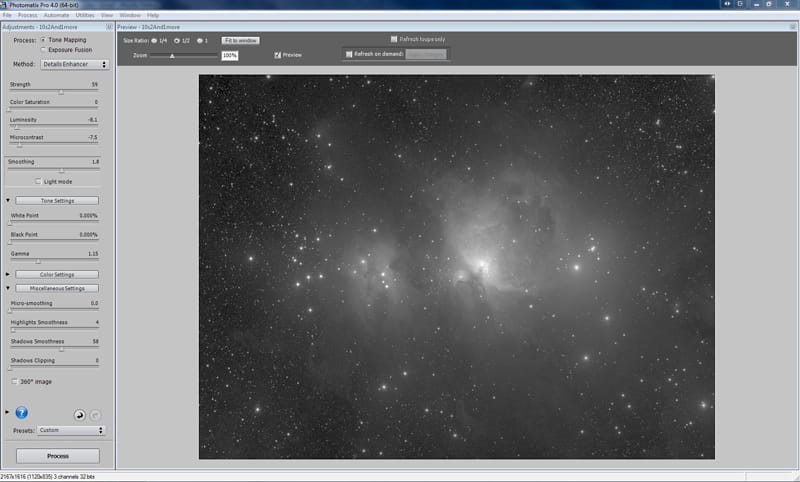
A word of caution: Photomatix can do really fancy stuff to your images. Although it does a good job creating a HDR composition, I suggest using it very gently. Keep your eye on the ball – you’re not using Photomatix to process your image, but just to combine the different exposures. Get that done, and go fancy later with your usual image processing software. Here’s just one of the many possible results that can be obtained with Photomatix with just a few clicks and a few slider adjustments:
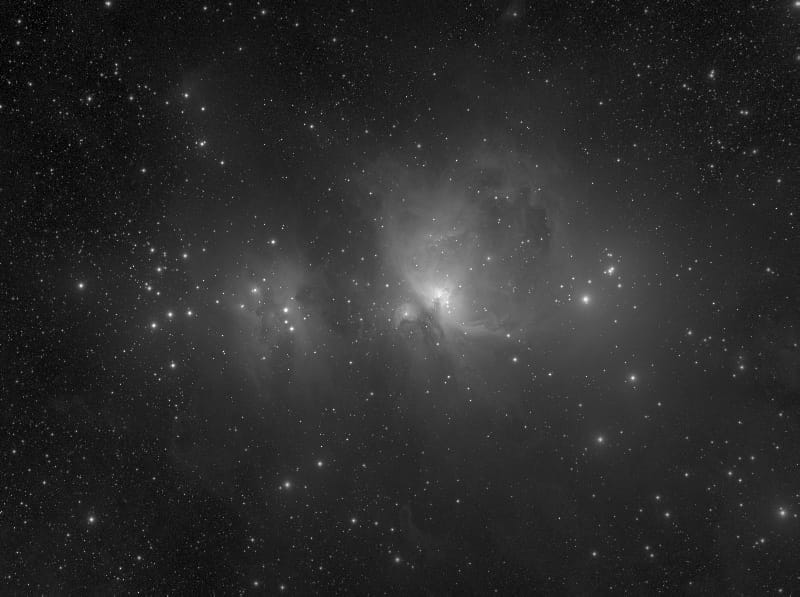
The above image appears – to me at least – rather soft, so during post-processing I would probably apply some edge enhancement and other features to push the contrast of the image a bit further.
PixInsight
PixInsight is an astroimage processing application, so it usually lets us work the way we want with out images. To begin with , it allows us to work not only with 32 bit (int or float) images, but even with 64 bit float images. The HDRComposition tool in PixInsight can also work on linear images, and when doing so, it too will return a linear image, which is ideal to continue processing the image linearly after the HDR composition. It is, in fact, recommended to use it with linear images. However, for this article I will use the same set of two already stretched images, mainly to use the very same data on the three applications I’m using in this article, and later I’ll write another article showing how to do the integration of these same images linearly with PixInsight’s HDRComposition tool.
The HDRComposition tool in PixInsight is under Process > ImageRegistration. Please note that there’s also an old script using the same name under Script > Utilities, but I strongly recommend using the module under ImageRegistration. Besides implementing a better scaling algorithm, the new module is much more robust, accurate, fast, and it does a lot of the thinking for you.
Just as with the previous examples, I will not go on detail about what each of the parameters and options do. Instead, I will simply comment on the adjustments I made for this particular case.
The HDRComposition tool in PixInsight doesn’t ask us for exposure values. The tool itself does all the calculations to determine the weights
Leaving the highlight/lowlight limit parameters with their default values, I may adjust the binarizing threshold to an amount that seems to cover the overexposed areas well (I used the 0.80 default value this time), and increase the mask smoothness (15) and maybe the mask growth (not this time), to generate smoother transitions in the final composition. Leaving the “Generate a 64-bit HDR image” option activated is nice, although you’d probably also obtain good results by producing a 32-bit image. In the end, as you see, the only parameter I’ve adjusted is the mask smoothness, and even the default value would probably yield good results. Bottom line: once you’ve added the images that will be combined, doing a HDR composition in PixInsight can often be a one-click operation.
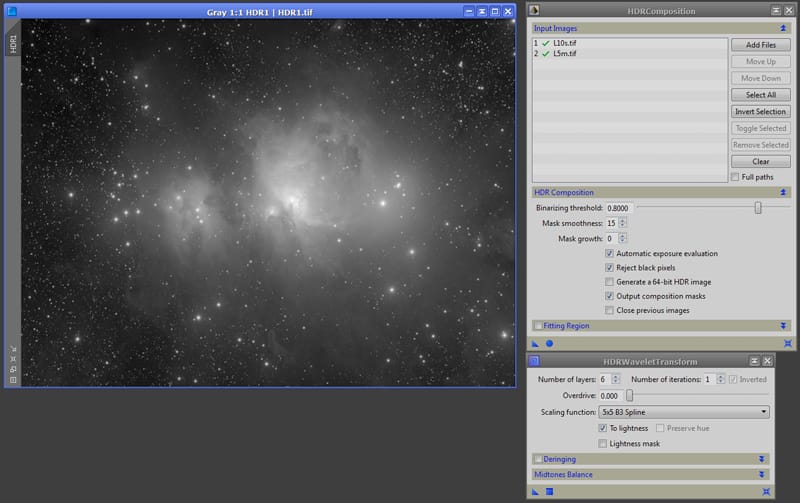
Right after the HDR combination, which produced the image in the picture above, I would usually run one HDRWT pass (HDR Wavelets Transform) to enhance the local contrast of structures in a multiscale fashion. The old script I mentioned at the beginning included this option in the HDRComposition dialog box, but this option was dropped in the newer module, and needs to be run separately. Needless to say, if you combined linear images, you should do first a non-linear histogram adjustment. Here I also used the default values – ok, now it’s a two clicks operation 🙂 This is the “final” result I obtained from running HDRComposite and HDRWT:
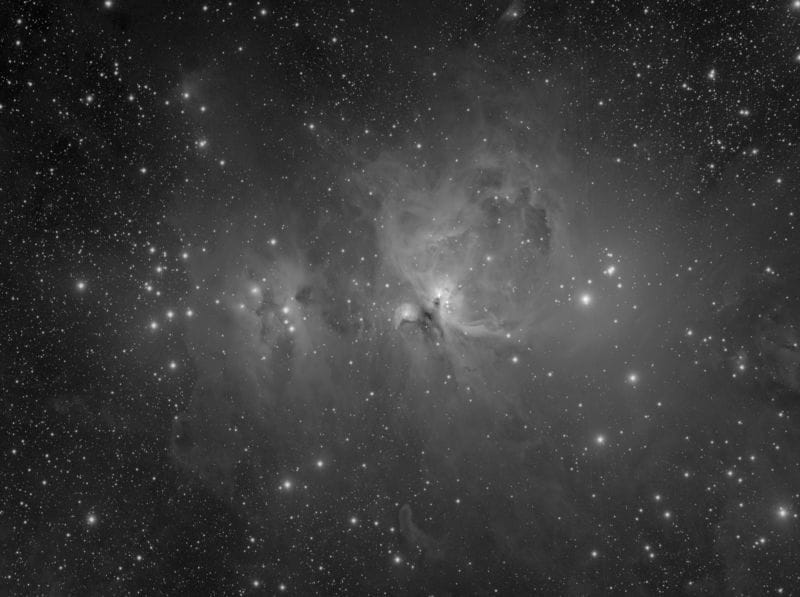
As in the other two examples, you should probably continue processing the data to craft the final rendition of the image.
Conclusion
First of all, as I said earlier, I would like to make clear that this article is NOT a comparison between the HDR tools of these three applications. The results that can be achieved with either tool can be very different by simply adjusting one or two parameters. Your experience with each package, and even your personal preferences will play a role that will determine the effectiveness and quality of the results. Also remember, the “final” images I present here are not really final. All you see here is what comes out of the HDR composition without any further processing, and as I said at the end of each example, usually you would perform further processing to the image before it becomes really final.
Now… Those who know me know I don’t have a Pixel Police attitude when it comes to personal processing preferences, and in a way, I understand why some imagers continue to choose relying on the hand-drawn lasso tool or mask-painted selective overlays despite they know about these and other HDR combination tools. For that reason, the object of this article is simply to show that doing a HDR combination using tools designed for this task produce excellent results and needs not to be intimidating – quite the opposite, these tools are very easy to use, and as hopefully I have shown, in some cases with just a few clicks you can produce even better results than the old manual approaches.
I personally don’t see anything wrong if you choose to continue using “old tricks” techniques, but having said that, I believe that getting to know your favorite HDR composition tool – and using it – is going to help you in the long run to deal with these situations in a methodical, productive and more efficient manner.
You have seen above how, in barely a couple of clicks, I was able to produce a perfectly acceptable HDR composition with PixInsight, which goes a long way from layering two images, selecting an area or painting a mask, blurring it, feathering it, blending it, readjusting the histograms, perhaps doing a touch-up here and there, etc.
Now… If you decide to use HDR composition tools to build HDR compositions (sounds logical, doesn’t it?) then great! If not, that’s fine, but should you ever find yourself giving advice to a novice, my recommendation would be to do your part in not limiting yourself to just perpetuating the “old tricks” knowing there are sophisticated tools for the job, and at the very least, also let newcomers to this discipline know that nowadays there are tools designed for this task that not only unleash the imager’s creativity in more efficient and productive ways, but often times also do so by producing better results.
Of course, if you do that by pointing them to this article, even better 🙂
