
Hasta La Vista, Green!
About HLVG
Hasta La Vista, Green (HLVG from now on) was my first attempt at writing a Photoshop plug-in, back a while ago. Although I wasn’t using Photoshop much for processing my images at the time, I had always been curious about the procedure of writing a Photoshop plug-in. The HLVG filter seemed a good way to start since it’s a very simple plug-in.
HLVG is a chromatic noise reduction tool that attempts to remove green noise and the green casts such noise may cause in some images. It is based on PixInsight‘s SCNR Average Neutral algorithm.
The idea is not new. We all know that with a very few exceptions (some planetary nebulae, comets, etc.), there are no green objects in the sky. Therefore, if we’ve already correctly calibrated and color-balanced an image and it’s free of gradients (to the best of our ability at least), we have to assume that if something else looks green in our images it’s got to be noise. Don’t mistake gradients with noise. Removing gradients are best dealt by subtracting a good background model. Chromatic noise on the other hand is tricky, since it “overwrites” the real data we want.
There are several techniques widely used to deal with this problem, however most of them rely on selections and adjustments that sometimes are not easy to execute. SCNR (the base algorithm used by this plug-in) is in my opinion one of the most reliable methods to deal with “green noise” and it works the same every time, without having to worry about anything, just click OK and you’re done.
Some examples
The only process applied between the BEFORE and AFTER images below is the HLVG plugin with the Strong option selected, over a “color blended” layer.
The following three examples are somewhat “extreme”, and in fact a couple of them do include uncorrected gradients, that HLVG obviously does NOT correct (see section above), but hopefully they serve the purpose of showing the effect of applying HLVG over a “green polluted” image.
Before HLVG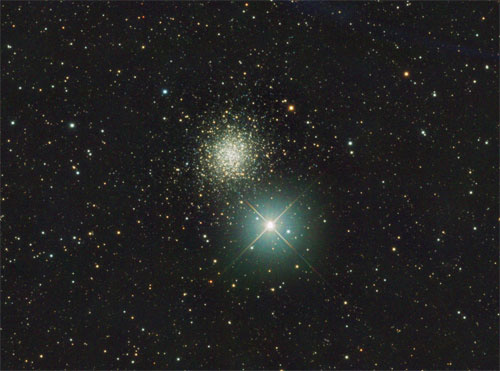 |
After HLVG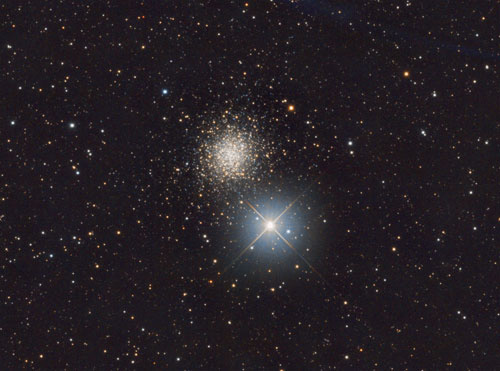 |
Before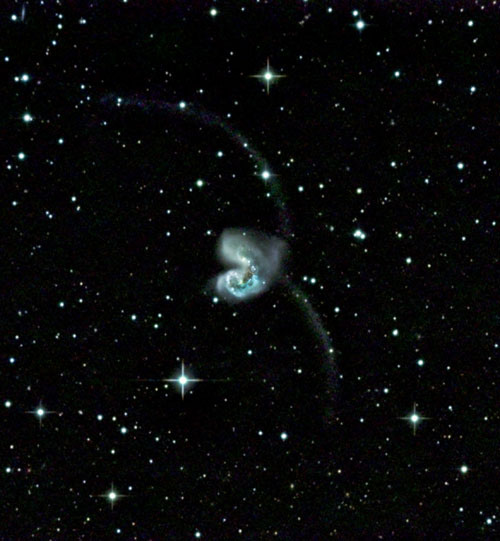 |
After |
Before |
After |
Requirements
To use HLVG you need a computer running Windows (tested on XP, Vista, Windows 7, 8, 10 and 11, both 32 and 64 bits versions) and Photoshop (tested on Photoshop 7, CS2 to CS6, and CC up to 2023). HLVG will likely work under previous versions of Windows and Photoshop, and likely newer ones. If you successfully run HLVG in any of the not-tested versions of Windows and/or Photoshop, let me know.
Why not macOS? … Short answer: because I don’t have one, therefore I cannot compile and test the plug-in for macOS.
Download it!
Download it
Downloading HLVG is easy, simply click one the links below:
For any non-64 bits version of Photoshop : DOWNLOAD HLVG
For Photoshop 64 bits ONLY: DOWNLOAD HLVG 64bits
By the way, HLVG is free (as in “free beer”) and I want it to stay that way, so permission is NOT given to include this plug-in in any commercial package. If you downloaded HLVG, whether standalone or as a part of a package, and paid for it, please let me know. Having said that, if you find HLVG useful and would like to make a small donation, please use the “Donate” button below. The Donate button will take you to PayPal – don’t worry when you see the donation goes to AR Networks. Yes, that’s me.
Documentation
HLVG is pretty easy and intuitive. Here’s how to install it and use it.
Installing HLVG
Once downloaded, you’ll need to unzip the HLVG.zip file. This will extract the HLVG.8bf file.
Once extracted, copy the HLVG.8bf file to the Plug-Ins directory in your Photoshop installation. This usually is something like C:\Program Files\Adobe\Adobe Photoshop XXX\Plug-ins for Windows or Applications/Adobe Photoshop CCC/Plug-ins for macOS, where XXX could be a number of things usually starting with CS or CC followed by the version number, year, etc. depending on the operating system and the Photoshop version you’re running.
After you’ve copied the file to the Plug-Ins directory, start (or restart) Photoshop.
Using HLVG
When you’re ready to use HLVG (you’ll need at least one image loaded in Photoshop, preferably an image already color balanced, and with any gradients already corrected), go to the Filters menu, find the DeepSkyColors menu option, select it, then click on the HLVG sub-menu option. If you don’t see it there, chances are you did something wrong when you copied the HLVG.8bf file, so double-check you indeed copied it to the right directory. Again don’t forget to restart Photoshop anytime you copy a plug-in filter to the Plug-Ins directory so Photoshop knows there.
Select Strong, Medium or Weak, depending on whether you want HLVG to get rid of all green noise, about half of it, or just slightly. The recommended setting is Strong.
A note about lightness
HLVG may affect the lightness of the image a bit (the L component of the image if converted to CIELab). This is because the current version of HLVG does not save the lightness prior to applying its “de-greening” algorithm (it might in a future version).
In order to preserve the exact lightness as the original image, it is recommended to follow this process:
- Duplicate the layer where you’d like to apply HLVG.
- Make the blending mode of that new copy to “Color”.
- Apply HLVG over that new layer.
- Merge that new layer back with the original
The above process will get rid of unwanted green noise and hues without affecting the lightness at all. HLVG doesn’t degrade the lightness considerably, so using it directly doesn’t do a bad job, although I do recommend following the method I just described.
Bit depth
HLVG should work on images of either 8, 16 or 32 bit depth. If you find that HLVG didn’t work with your image, again, let me know.
Color Mode
HLVG only works well when the image is in RGB mode. You can still use HLVG when you’re in Lab or CMYK modes for example – HLVG won’t complain – but the results will not be what you were expecting. Although this is something HLVG should take care of internally – say converting the image to RGB mode internally, then back to whichever mode it was before – at this point HLVG does not check the current color mode being used, and it simply assumes the image is in RGB mode, so you must make sure your image is in RGB mode prior to using HLVG.
"Could not complete..." error
HLVG will not work on monochrome layers, or on individual channels. If you try to execute HLVG on a monochrome layer or an individual channel, you will get the following error:
“Could not complete the HLVG command because of a problem with the filter module interface”
Simply OK the error message and make sure you select a color (RGB) layer before applying HLVG. After all, it doesn’t make much sense running HLVG on monochrome data, right?
HLVG and selections
If you preselect an area in your image – either with the lasso tool, select range, etc. – and then run HLVG, you may be in for a disappointment when you notice that HLVG completely ignored your selection and applied the effect to the entire image. Although I believe that HLVG works best when we leave it up to the plug-in to decide what areas require “HLVG’ing” and which don’t, I can understand this behavior of ignoring a selection may feel odd to some people. While there’s a chance I may “fix” this in a future version, if you must apply HLVG to just a specific area of your image, you can still do it by creating a mask, just not a selection. I don’t recommend it, but if you must, that should do the job.